在 GKE 上部署 DeepSeek-R1 671B 或 Llama 3.1 405B 等 LLM

概览

本指南介绍了如何跨多个节点使用图形处理器 (GPU),在 Google Kubernetes Engine (GKE) 上提供先进的大语言模型 (LLM),例如 DeepSeek-R1 671BLlama 3.1 405B

本指南演示了如何使用可移植的开源技术(Kubernetes、vLLMLeaderWorkerSet (LWS) API)在 GKE 上部署和提供 AI/机器学习工作负载,并利用 GKE 的精细控制、可伸缩性、弹性、可移植性和成本效益。

在阅读本页面之前,请确保您熟悉以下内容:

背景

本部分介绍本指南中使用的关键技术,包括本指南中用作示例的两个 LLM:DeepSeek-R1 和 Llama 3.1 405B。

DeepSeek-R1

DeepSeek-R1 是由 DeepSeek 提供的 671B 参数大型语言模型,专为在各种基于文本的任务中实现逻辑推理、数学推理和实时问题解决而设计。GKE 可处理 DeepSeek-R1 的计算需求,并通过可伸缩资源、分布式计算和高效网络支持其功能。

如需了解详情,请参阅 DeepSeek 文档

Llama 3.1 405B

Llama 3.1 405B 是由 Meta 提供的大语言模型,专为各种自然语言处理任务(包括文本生成、翻译和问答)而设计。GKE 提供所需的强大基础设施,以支持这种规模的模型的分布式训练和服务需求。

如需了解详情,请参阅 Llama 文档

GKE 托管式 Kubernetes 服务

Google Cloud 提供各种各样的服务,包括 GKE,该服务非常适合用于部署和管理 AI/机器学习工作负载。GKE 是一项托管式 Kubernetes 服务,可简化容器化应用的部署、扩缩和管理。GKE 提供必要的基础设施(包括可伸缩资源、分布式计算和高效网络),以满足 LLM 的计算需求。

如需详细了解关键 Kubernetes 概念,请参阅开始了解 Kubernetes。如需详细了解 GKE 以及它如何帮助您扩缩、自动执行和管理 Kubernetes,请参阅 GKE 概览

GPU

利用图形处理器 (GPU),您可以加速特定工作负载,例如机器学习和数据处理。GKE 提供配备这些强大 GPU 的节点,让您能够配置集群,以在机器学习和数据处理任务中实现最佳性能。GKE 提供了一系列机器类型选项以用于节点配置,包括配备 NVIDIA H100、L4 和 A100 GPU 的机器类型。

如需了解详情,请参阅 GKE 中的 GPU 简介

LeaderWorkerSet (LWS)

LeaderWorkerSet (LWS) 是一种 Kubernetes 部署 API,可解决 AI/机器学习多节点推理工作负载的常见部署模式。多节点服务利用多个 Pod(每个 Pod 可能在不同的节点上运行)来处理分布式推理工作负载。LWS 可将多个 Pod 视为一个群组,从而简化分布式模型部署的管理。

vLLM 和多主机服务

在提供计算密集型 LLM 时,我们建议使用 vLLM 并在多个 GPU 上运行工作负载。

vLLM 是一个经过高度优化的开源 LLM 服务框架,可提高 GPU 上的服务吞吐量,具有如下功能:

  • 具有 PagedAttention 且经过优化的 Transformer 实现
  • 连续批处理,可提高整体服务吞吐量
  • 多个 GPU 上的分布式服务

您可以使用多个 GPU 节点来提供模型,特别是对于无法放入单个 GPU 节点的计算密集型 LLM。vLLM 通过两种策略支持在多个 GPU 上运行工作负载

  • 张量并行处理会将转换器层中的矩阵乘法拆分到多个 GPU 上。不过,由于 GPU 之间需要通信,因此该策略需要快速网络,因此不太适合在多个节点上运行工作负载。

  • 管道并行性会按层或垂直方向拆分模型。该策略不需要 GPU 之间进行持续通信,因此在跨节点运行模型时是一个更好的选择。

您可以在多节点服务中使用这两种策略。例如,如果使用两个节点,每个节点有八个 H100 GPU,您可以同时使用这两种策略:

  • 双向流水线并行化,用于跨两个节点对模型进行分片
  • 八向张量并行化,用于跨每个节点的八个 GPU 对模型进行分片

如需了解详情,请参阅 vLLM 文档

目标

  1. 使用处于 Autopilot 或 Standard 模式的 GKE 集群准备环境。
  2. 在集群中的多个节点上部署 vLLM。
  3. 使用 vLLM 通过 curl 提供模型。

准备工作

  • Sign in to your Google Cloud account. If you're new to Google Cloud, create an account to evaluate how our products perform in real-world scenarios. New customers also get $300 in free credits to run, test, and deploy workloads.
  • In the Google Cloud console, on the project selector page, select or create a Google Cloud project.

    Roles required to select or create a project

    • Select a project: Selecting a project doesn't require a specific IAM role—you can select any project that you've been granted a role on.
    • Create a project: To create a project, you need the Project Creator (roles/resourcemanager.projectCreator), which contains the resourcemanager.projects.create permission. Learn how to grant roles.

    Go to project selector

  • Verify that billing is enabled for your Google Cloud project.

  • Enable the required API.

    Roles required to enable APIs

    To enable APIs, you need the Service Usage Admin IAM role (roles/serviceusage.serviceUsageAdmin), which contains the serviceusage.services.enable permission. Learn how to grant roles.

    Enable the API

  • Make sure that you have the following role or roles on the project: roles/container.admin, roles/iam.serviceAccountAdmin, roles/iam.securityAdmin

    Check for the roles

    1. In the Google Cloud console, go to the IAM page.

      Go to IAM
    2. Select the project.
    3. In the Principal column, find all rows that identify you or a group that you're included in. To learn which groups you're included in, contact your administrator.

    4. For all rows that specify or include you, check the Role column to see whether the list of roles includes the required roles.

    Grant the roles

    1. In the Google Cloud console, go to the IAM page.

      前往 IAM
    2. 选择项目。
    3. 点击 授予访问权限
    4. 新的主账号字段中,输入您的用户标识符。 这通常是 Google 账号的电子邮件地址。

    5. 选择角色列表中,选择一个角色。
    6. 如需授予其他角色,请点击 添加其他角色,然后添加其他各个角色。
    7. 点击 Save(保存)。
      • 如果您还没有 Hugging Face 账号,请创建一个。
      • 查看可用的 GPU 型号和机器类型,确定哪种机器类型和区域满足您的需求。
      • 检查您的项目是否有足够的 NVIDIA_H100_MEGA 配额。本教程使用配备了 8 个 NVIDIA H100 80GB GPUsa3-highgpu-8g 机器类型。如需详细了解 GPU 以及如何管理配额,请参阅 GPU 简介分配配额

      获取对模型的访问权限

      您可以使用 Llama 3.1 405B 或 DeepSeek-R1 模型。

      DeepSeek-R1

      生成一个访问令牌

      如果您还没有 Hugging Face 令牌,请生成一个新令牌:

      1. 点击您的个人资料 > 设置 > 访问令牌
      2. 选择新建令牌 (New Token)。
      3. 指定您选择的名称和一个至少为 Read 的角色。
      4. 选择生成令牌

      Llama 3.1 405B

      生成一个访问令牌

      如果您还没有 Hugging Face 令牌,请生成一个新令牌:

      1. 点击您的个人资料 > 设置 > 访问令牌
      2. 选择新建令牌 (New Token)。
      3. 指定您选择的名称和一个至少为 Read 的角色。
      4. 选择生成令牌

      准备环境

      在本教程中,您将使用 Cloud Shell 来管理Google Cloud上托管的资源。Cloud Shell 预安装有本教程所需的软件,包括 kubectlgcloud CLI

      如需使用 Cloud Shell 设置您的环境,请按照以下步骤操作:

      1. 在 Google Cloud 控制台中,点击 Google Cloud 控制台中的 Cloud Shell 激活图标 激活 Cloud Shell 以启动 Cloud Shell 会话。此操作会在 Google Cloud 控制台的底部窗格中启动会话。

      2. 设置默认环境变量:

        gcloud config set project PROJECT_ID
        gcloud config set billing/quota_project PROJECT_ID
        export PROJECT_ID=$(gcloud config get project)
        export CLUSTER_NAME=CLUSTER_NAME
        export REGION=REGION
        export ZONE=ZONE
        export HF_TOKEN=HUGGING_FACE_TOKEN
        export CLUSTER_VERSION=CLUSTER_VERSION
        

        替换以下值:

        • PROJECT_ID:您的 Google Cloud 项目 ID
        • CLUSTER_NAME:GKE 集群的名称。
        • CLUSTER_VERSION:GKE 版本。 如需获得 Autopilot 支持,请使用 1.33 或更高版本。
        • REGION:GKE 集群所在的区域。
        • ZONE:支持 NVIDIA H100 Tensor Core GPU 的可用区。

      创建 GKE 集群

      您可以使用 vLLM 在 GKE Autopilot 或 Standard 集群中的多个 GPU 节点上提供模型。我们建议您使用 Autopilot 集群获得全托管式 Kubernetes 体验。如需选择最适合您的工作负载的 GKE 操作模式,请参阅选择 GKE 操作模式

      Autopilot

      在 Cloud Shell 中,运行以下命令:

        gcloud container clusters create-auto ${CLUSTER_NAME} \
          --project=${PROJECT_ID} \
          --location=${REGION} \
          --cluster-version=${CLUSTER_VERSION}
      

      Standard

      1. 创建具有两个 CPU 节点的 GKE Standard 集群:

        gcloud container clusters create CLUSTER_NAME \
            --project=PROJECT_ID \
            --num-nodes=2 \
            --location=REGION \
            --machine-type=e2-standard-16
        
      2. 创建一个包含两个节点的 A3 节点池,每个节点包含 8 个 H100s:

        gcloud container node-pools create gpu-nodepool \
            --node-locations=ZONE \
            --num-nodes=2 \
            --machine-type=a3-highgpu-8g \
            --accelerator=type=nvidia-h100-80gb,count=8,gpu-driver-version=LATEST \
            --placement-type=COMPACT \
            --cluster=CLUSTER_NAME
            --location=${REGION}
        

      配置 kubectl 以与您的集群通信

      使用以下命令配置 kubectl 以与您的集群通信:

      gcloud container clusters get-credentials CLUSTER_NAME --location=REGION
      

      为 Hugging Face 凭据创建 Kubernetes Secret

      使用以下命令创建包含 Hugging Face 令牌的 Kubernetes Secret:

      kubectl create secret generic hf-secret \
        --from-literal=hf_api_token=${HF_TOKEN} \
        --dry-run=client -o yaml | kubectl apply -f -
      

      安装 LeaderWorkerSet

      如需安装 LWS,请运行以下命令:

      kubectl apply --server-side -f https://github.com/kubernetes-sigs/lws/releases/latest/download/manifests.yaml
      

      使用以下命令验证 LeaderWorkerSet 控制器是否在 lws-system 命名空间中运行:

      kubectl get pod -n lws-system
      

      输出类似于以下内容:

      NAME                                     READY   STATUS    RESTARTS   AGE
      lws-controller-manager-546585777-crkpt   1/1     Running   0          4d21h
      lws-controller-manager-546585777-zbt2l   1/1     Running   0          4d21h
      

      部署 vLLM 模型服务器

      如需部署 vLLM 模型服务器,请按以下步骤操作:

      1. 应用清单(具体取决于您要部署的 LLM)。

        DeepSeek-R1

        1. 检查 vllm-deepseek-r1-A3.yaml 清单。

          
          apiVersion: leaderworkerset.x-k8s.io/v1
          kind: LeaderWorkerSet
          metadata:
            name: vllm
          spec:
            replicas: 1
            leaderWorkerTemplate:
              size: 2
              restartPolicy: RecreateGroupOnPodRestart
              leaderTemplate:
                metadata:
                  labels:
                    role: leader
                spec:
                  nodeSelector:
                    cloud.google.com/gke-accelerator: nvidia-h100-80gb
                  containers:
                    - name: vllm-leader
                      image: vllm/vllm-openai:v0.8.5
                      env:
                        - name: HUGGING_FACE_HUB_TOKEN
                          valueFrom:
                            secretKeyRef:
                              name: hf-secret
                              key: hf_api_token
                      command:
                        - sh
                        - -c
                        - "bash /vllm-workspace/examples/online_serving/multi-node-serving.sh leader --ray_cluster_size=$(LWS_GROUP_SIZE);
                          python3 -m vllm.entrypoints.openai.api_server --port 8080 --model deepseek-ai/DeepSeek-R1 --tensor-parallel-size 8 --pipeline-parallel-size 2 --trust-remote-code --max-model-len 4096"
                      resources:
                        limits:
                          nvidia.com/gpu: "8"
                      ports:
                        - containerPort: 8080
                      readinessProbe:
                        tcpSocket:
                          port: 8080
                        initialDelaySeconds: 15
                        periodSeconds: 10
                      volumeMounts:
                        - mountPath: /dev/shm
                          name: dshm
                  volumes:
                  - name: dshm
                    emptyDir:
                      medium: Memory
                      sizeLimit: 15Gi
              workerTemplate:
                spec:
                  nodeSelector:
                    cloud.google.com/gke-accelerator: nvidia-h100-80gb
                  containers:
                    - name: vllm-worker
                      image: vllm/vllm-openai:v0.8.5
                      command:
                        - sh
                        - -c
                        - "bash /vllm-workspace/examples/online_serving/multi-node-serving.sh worker --ray_address=$(LWS_LEADER_ADDRESS)"
                      resources:
                        limits:
                          nvidia.com/gpu: "8"
                      env:
                        - name: HUGGING_FACE_HUB_TOKEN
                          valueFrom:
                            secretKeyRef:
                              name: hf-secret
                              key: hf_api_token
                      volumeMounts:
                        - mountPath: /dev/shm
                          name: dshm   
                  volumes:
                  - name: dshm
                    emptyDir:
                      medium: Memory
                      sizeLimit: 15Gi
          ---
          apiVersion: v1
          kind: Service
          metadata:
            name: vllm-leader
          spec:
            ports:
              - name: http
                port: 8080
                protocol: TCP
                targetPort: 8080
            selector:
              leaderworkerset.sigs.k8s.io/name: vllm
              role: leader
            type: ClusterIP
          
        2. 通过运行以下命令来应用清单:

          kubectl apply -f vllm-deepseek-r1-A3.yaml
          

        Llama 3.1 405B

        1. 检查 vllm-llama3-405b-A3.yaml 清单。

          
          apiVersion: leaderworkerset.x-k8s.io/v1
          kind: LeaderWorkerSet
          metadata:
            name: vllm
          spec:
            replicas: 1
            leaderWorkerTemplate:
              size: 2
              restartPolicy: RecreateGroupOnPodRestart
              leaderTemplate:
                metadata:
                  labels:
                    role: leader
                spec:
                  nodeSelector:
                    cloud.google.com/gke-accelerator: nvidia-h100-80gb
                  containers:
                    - name: vllm-leader
                      image: vllm/vllm-openai:v0.8.5
                      env:
                        - name: HUGGING_FACE_HUB_TOKEN
                          valueFrom:
                            secretKeyRef:
                              name: hf-secret
                              key: hf_api_token
                      command:
                        - sh
                        - -c
                        - "bash /vllm-workspace/examples/online_serving/multi-node-serving.sh leader --ray_cluster_size=$(LWS_GROUP_SIZE);
                          python3 -m vllm.entrypoints.openai.api_server --port 8080 --model meta-llama/Meta-Llama-3.1-405B-Instruct --tensor-parallel-size 8 --pipeline-parallel-size 2"
                      resources:
                        limits:
                          nvidia.com/gpu: "8"
                      ports:
                        - containerPort: 8080
                      readinessProbe:
                        tcpSocket:
                          port: 8080
                        initialDelaySeconds: 15
                        periodSeconds: 10
                      volumeMounts:
                        - mountPath: /dev/shm
                          name: dshm
                  volumes:
                  - name: dshm
                    emptyDir:
                      medium: Memory
                      sizeLimit: 15Gi
              workerTemplate:
                spec:
                  nodeSelector:
                    cloud.google.com/gke-accelerator: nvidia-h100-80gb
                  containers:
                    - name: vllm-worker
                      image: vllm/vllm-openai:v0.8.5
                      command:
                        - sh
                        - -c
                        - "bash /vllm-workspace/examples/online_serving/multi-node-serving.sh worker --ray_address=$(LWS_LEADER_ADDRESS)"
                      resources:
                        limits:
                          nvidia.com/gpu: "8"
                      env:
                        - name: HUGGING_FACE_HUB_TOKEN
                          valueFrom:
                            secretKeyRef:
                              name: hf-secret
                              key: hf_api_token
                      volumeMounts:
                        - mountPath: /dev/shm
                          name: dshm   
                  volumes:
                  - name: dshm
                    emptyDir:
                      medium: Memory
                      sizeLimit: 15Gi
          ---
          apiVersion: v1
          kind: Service
          metadata:
            name: vllm-leader
          spec:
            ports:
              - name: http
                port: 8080
                protocol: TCP
                targetPort: 8080
            selector:
              leaderworkerset.sigs.k8s.io/name: vllm
              role: leader
            type: ClusterIP
          
        2. 通过运行以下命令来应用清单:

          kubectl apply -f vllm-llama3-405b-A3.yaml
          
      2. 等待模型检查点下载完成。此操作可能需要几分钟才能完成。

      3. 使用以下命令查看正在运行的模型服务器的日志:

        kubectl logs vllm-0 -c vllm-leader
        

        输出应类似如下所示:

        INFO 08-09 21:01:34 api_server.py:297] Route: /detokenize, Methods: POST
        INFO 08-09 21:01:34 api_server.py:297] Route: /v1/models, Methods: GET
        INFO 08-09 21:01:34 api_server.py:297] Route: /version, Methods: GET
        INFO 08-09 21:01:34 api_server.py:297] Route: /v1/chat/completions, Methods: POST
        INFO 08-09 21:01:34 api_server.py:297] Route: /v1/completions, Methods: POST
        INFO 08-09 21:01:34 api_server.py:297] Route: /v1/embeddings, Methods: POST
        INFO:     Started server process [7428]
        INFO:     Waiting for application startup.
        INFO:     Application startup complete.
        INFO:     Uvicorn running on http://0.0.0.0:8080 (Press CTRL+C to quit)
        

      应用模型

      运行以下命令,设置到模型的端口转发:

      kubectl port-forward svc/vllm-leader 8080:8080
      

      使用 curl 与模型互动

      如需使用 curl 与模型互动,请按以下说明操作:

      DeepSeek-R1

      在新的终端中,向服务器发送请求:

      curl http://localhost:8080/v1/completions \
      -H "Content-Type: application/json" \
      -d '{
          "model": "deepseek-ai/DeepSeek-R1",
          "prompt": "I have four boxes. I put the red box on the bottom and put the blue box on top. Then I put the yellow box on top the blue. Then I take the blue box out and put it on top. And finally I put the green box on the top. Give me the final order of the boxes from bottom to top. Show your reasoning but be brief",
          "max_tokens": 1024,
          "temperature": 0
      }'
      

      输出应类似如下所示:

      {
      "id": "cmpl-f2222b5589d947419f59f6e9fe24c5bd",
      "object": "text_completion",
      "created": 1738269669,
      "model": "deepseek-ai/DeepSeek-R1",
      "choices": [
        {
          "index": 0,
          "text": ".\n\nOkay, let's see. The user has four boxes and is moving them around. Let me try to visualize each step. \n\nFirst, the red box is placed on the bottom. So the stack starts with red. Then the blue box is put on top of red. Now the order is red (bottom), blue. Next, the yellow box is added on top of blue. So now it's red, blue, yellow. \n\nThen the user takes the blue box out. Wait, blue is in the middle. If they remove blue, the stack would be red and yellow. But where do they put the blue box? The instruction says to put it on top. So after removing blue, the stack is red, yellow. Then blue is placed on top, making it red, yellow, blue. \n\nFinally, the green box is added on the top. So the final order should be red (bottom), yellow, blue, green. Let me double-check each step to make sure I didn't mix up any steps. Starting with red, then blue, then yellow. Remove blue from the middle, so yellow is now on top of red. Then place blue on top of that, so red, yellow, blue. Then green on top. Yes, that seems right. The key step is removing the blue box from the middle, which leaves yellow on red, then blue goes back on top, followed by green. So the final order from bottom to top is red, yellow, blue, green.\n\n**Final Answer**\nThe final order from bottom to top is \\boxed{red}, \\boxed{yellow}, \\boxed{blue}, \\boxed{green}.\n</think>\n\n1. Start with the red box at the bottom.\n2. Place the blue box on top of the red box. Order: red (bottom), blue.\n3. Place the yellow box on top of the blue box. Order: red, blue, yellow.\n4. Remove the blue box (from the middle) and place it on top. Order: red, yellow, blue.\n5. Place the green box on top. Final order: red, yellow, blue, green.\n\n\\boxed{red}, \\boxed{yellow}, \\boxed{blue}, \\boxed{green}",
          "logprobs": null,
          "finish_reason": "stop",
          "stop_reason": null,
          "prompt_logprobs": null
        }
      ],
      "usage": {
        "prompt_tokens": 76,
        "total_tokens": 544,
        "completion_tokens": 468,
        "prompt_tokens_details": null
      }
      }
      

      Llama 3.1 405B

      在新的终端中,向服务器发送请求:

      curl http://localhost:8080/v1/completions \
      -H "Content-Type: application/json" \
      -d '{
          "model": "meta-llama/Meta-Llama-3.1-405B-Instruct",
          "prompt": "San Francisco is a",
          "max_tokens": 7,
          "temperature": 0
      }'
      

      输出应类似如下所示:

      {"id":"cmpl-0a2310f30ac3454aa7f2c5bb6a292e6c",
      "object":"text_completion","created":1723238375,"model":"meta-llama/Llama-3.1-405B-Instruct","choices":[{"index":0,"text":" top destination for foodies, with","logprobs":null,"finish_reason":"length","stop_reason":null}],"usage":{"prompt_tokens":5,"total_tokens":12,"completion_tokens":7}}
      

      设置自定义自动扩缩器

      在本部分中,您将设置 Pod 横向自动扩缩以使用自定义 Prometheus 指标。您可以使用来自 vLLM 服务器的 Google Cloud Managed Service for Prometheus 指标。

      如需了解详情,请参阅 Google Cloud Managed Service for Prometheus。这应在 GKE 集群上默认启用。

      1. 对集群设置自定义指标 Stackdriver 适配器:

        kubectl apply -f https://raw.githubusercontent.com/GoogleCloudPlatform/k8s-stackdriver/master/custom-metrics-stackdriver-adapter/deploy/production/adapter_new_resource_model.yaml
        
      2. 将 Monitoring Viewer 角色添加到自定义指标 Stackdriver 适配器使用的服务账号:

        gcloud projects add-iam-policy-binding projects/PROJECT_ID \
            --role roles/monitoring.viewer \
            --member=principal://iam.googleapis.com/projects/PROJECT_NUMBER/locations/global/workloadIdentityPools/PROJECT_ID.svc.id.goog/subject/ns/custom-metrics/sa/custom-metrics-stackdriver-adapter
        
      3. 将以下清单保存为 vllm_pod_monitor.yaml

        
        apiVersion: monitoring.googleapis.com/v1
        kind: PodMonitoring
        metadata:
         name: vllm-pod-monitoring
        spec:
         selector:
           matchLabels:
            leaderworkerset.sigs.k8s.io/name: vllm
            role: leader
         endpoints:
         - path: /metrics
           port: 8080
           interval: 15s
        
      4. 将清单应用于集群:

        kubectl apply -f vllm_pod_monitor.yaml
        

      在 vLLM 端点上创建负载

      在 vLLM 服务器上创建负载,以测试 GKE 如何使用自定义 vLLM 指标进行自动扩缩。

      1. 设置到模型的端口转发:

        kubectl port-forward svc/vllm-leader 8080:8080
        
      2. 运行 bash 脚本 (load.sh) 以向 vLLM 端点发送 N 个并发请求:

        #!/bin/bash
        # Set the number of parallel processes to run.
        N=PARALLEL_PROCESSES
        # Get the external IP address of the vLLM load balancer service.
        export vllm_service=$(kubectl get service vllm-service -o jsonpath='{.status.loadBalancer.ingress[0].ip}')
        # Loop from 1 to N to start the parallel processes.
        for i in $(seq 1 $N); do
          # Start an infinite loop to continuously send requests.
          while true; do
            # Use curl to send a completion request to the vLLM service.
            curl http://$vllm_service:8000/v1/completions -H "Content-Type: application/json" -d '{"model": "meta-llama/Llama-3.1-70B", "prompt": "Write a story about san francisco", "max_tokens": 100, "temperature": 0}'
          done &  # Run in the background
        done
        # Keep the script running until it is manually stopped.
        wait
        

        PARALLEL_PROCESSES 替换为您要运行的并行进程数。

      3. 运行 bash 脚本:

        nohup ./load.sh &
        

      验证 Google Cloud Managed Service for Prometheus 是否注入指标

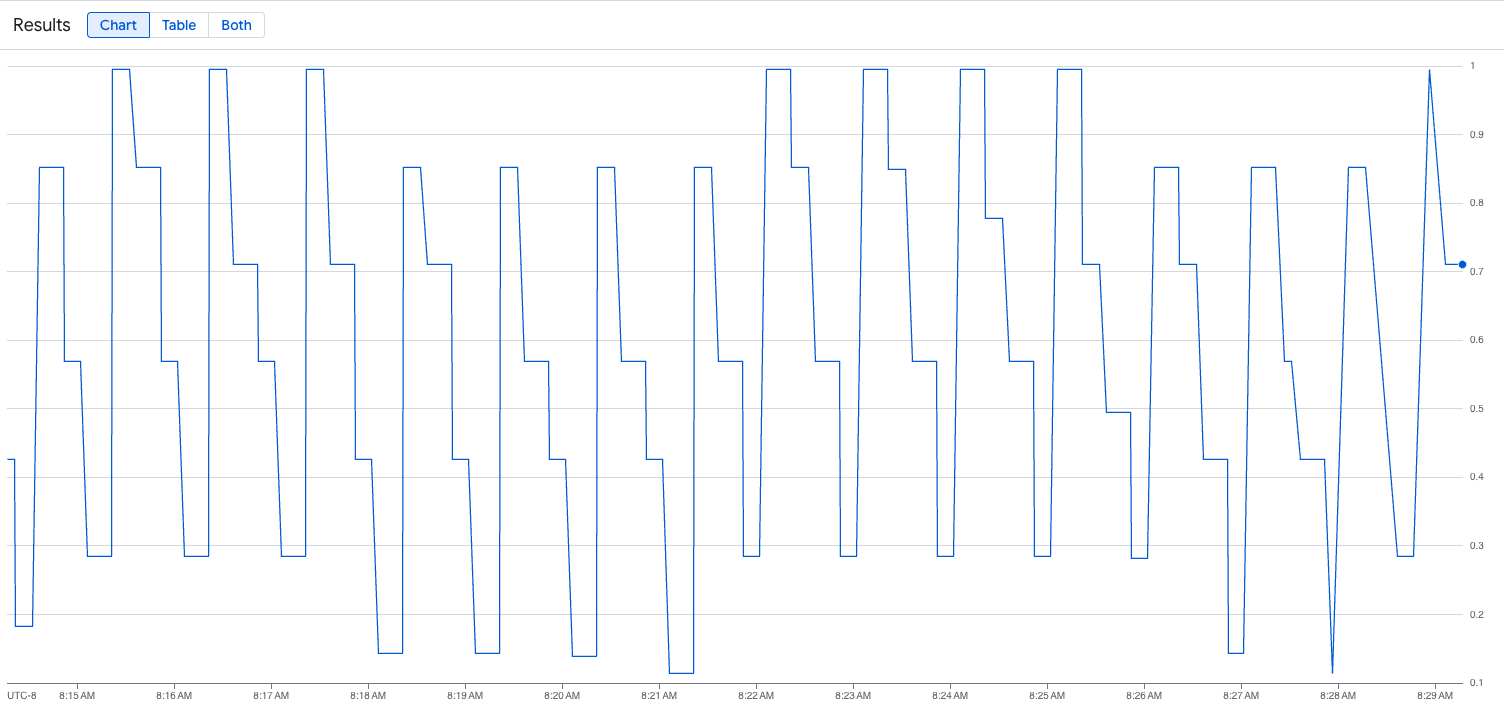
      在 Google Cloud Managed Service for Prometheus 爬取指标并且您向 vLLM 端点添加负载后,您可以在 Cloud Monitoring 上查看指标。

      1. 在 Google Cloud 控制台中,前往 Metrics Explorer 页面。

        转到 Metrics Explorer

      2. 点击 < > PromQL

      3. 输入以下查询,以观察流量指标:

        vllm:gpu_cache_usage_perc{cluster='CLUSTER_NAME'}
        

      下图显示了加载脚本执行后的图表示例。此图表显示,Google Cloud Managed Service for Prometheus 正在注入流量指标以响应添加到 vLLM 端点的负载:

      为 vLLM 服务器捕获的流量指标

      部署 Pod 横向自动扩缩器配置

      在决定根据哪个指标进行自动扩缩时,我们建议您为 vLLM 使用以下指标:

      • num_requests_waiting:此指标与模型服务器队列中等待的请求数相关。当 kv 缓存已满时,此数量会开始显著增长。

      • gpu_cache_usage_perc:此指标与 KV 缓存利用率相关,这与模型服务器上给定推理周期内处理的请求数直接相关。

      在优化吞吐量和费用时,以及在使用模型服务器的最大吞吐量可以实现延迟时间目标时,我们建议您使用 num_requests_waiting

      如果您的工作负载对延迟时间敏感,并且基于队列的扩缩不够快,无法满足您的要求,我们建议您使用 gpu_cache_usage_perc

      如需了解详情,请参阅使用 GPU 自动扩缩大语言模型 (LLM) 推理工作负载的最佳实践

      为 HPA 配置选择 averageValue 目标时,您需要通过实验确定要根据哪个指标进行自动扩缩。如需了解有关如何优化实验的更多思路,请参阅节省 GPU 费用:为 GKE 推理工作负载提供更智能的自动扩缩博文。这篇博文中使用的 profile-generator 也适用于 vLLM。

      如需使用 num_requests_waiting 部署 Pod 横向自动扩缩器配置,请按以下步骤操作:

      1. 将以下清单保存为 vllm-hpa.yaml

        
        apiVersion: autoscaling/v2
        kind: HorizontalPodAutoscaler
        metadata:
          name: lws-hpa
        spec:
          minReplicas: 1
          maxReplicas: 2
          metrics:
          - type: Pods
            pods:
              metric:
                name: prometheus.googleapis.com|vllm:num_requests_waiting|gauge
              target:
                type: AverageValue
                averageValue: 5
          scaleTargetRef:
            apiVersion: leaderworkerset.x-k8s.io/v1
            kind: LeaderWorkerSet
            name: vllm
        

        Google Cloud Managed Service for Prometheus 中的 vLLM 指标遵循 vllm:metric_name 格式。

        最佳实践

        使用 num_requests_waiting 来扩缩吞吐量。对于对延迟时间敏感的 GPU 应用场景,请使用 gpu_cache_usage_perc

      2. 部署 Pod 横向自动扩缩器配置:

        kubectl apply -f vllm-hpa.yaml
        

        GKE 会调度另一个 Pod 进行部署,这会触发节点池自动扩缩器在部署第二个 vLLM 副本之前添加第二个节点。

      3. 观察 Pod 自动扩缩的进度:

        kubectl get hpa --watch
        

        输出类似于以下内容:

        NAME      REFERENCE              TARGETS   MINPODS   MAXPODS   REPLICAS   AGE
        lws-hpa   LeaderWorkerSet/vllm   0/1       1         2         1          6d1h
        lws-hpa   LeaderWorkerSet/vllm   1/1       1         2         1          6d1h
        lws-hpa   LeaderWorkerSet/vllm   0/1       1         2         1          6d1h
        lws-hpa   LeaderWorkerSet/vllm   4/1       1         2         1          6d1h
        lws-hpa   LeaderWorkerSet/vllm   0/1       1         2         2          6d1h
        

      利用 Google Cloud Hyperdisk ML 缩短模型加载时间

      对于这类 LLM,vLLM 可能需要花费大量时间来下载、加载和预热每个新副本。例如,使用 Llama 3.1 405B 时,该过程可能需要大约 90 分钟。您可以通过将模型直接下载到 Hyperdisk ML 卷并将该卷装载到每个 Pod 来缩短此时间(使用 Llama 3.1 405B 时缩短至 20 分钟)。为了完成此操作,本教程使用 Hyperdisk ML 卷和 Kubernetes 作业。Kubernetes 中的 Job 控制器会创建一个或多个 Pod,并确保它们成功执行特定任务。

      如需缩短模型加载时间,请执行以下步骤:

      1. 将以下示例清单保存为 producer-pvc.yaml

        kind: PersistentVolumeClaim
        apiVersion: v1
        metadata:
          name: producer-pvc
        spec:
          # Specifies the StorageClass to use. Hyperdisk ML is optimized for ML workloads.
          storageClassName: hyperdisk-ml
          accessModes:
          - ReadWriteOnce
          resources:
            requests:
              storage: 800Gi
        
      2. 将以下示例清单保存为 producer-job.yaml

        DeepSeek-R1

        
        apiVersion: batch/v1
        kind: Job
        metadata:
          name: producer-job
        spec:
          template:  # Template for the Pods the Job will create
            spec:
              affinity:
                nodeAffinity:
                  requiredDuringSchedulingIgnoredDuringExecution:
                    nodeSelectorTerms:
                    - matchExpressions:
                      - key: cloud.google.com/machine-family
                        operator: In
                        values:
                        - "c3"
                    - matchExpressions:
                      - key: topology.kubernetes.io/zone
                        operator: In
                        values:
                        - "ZONE"
              containers:
              - name: copy
                resources:
                  requests:
                    cpu: "32"
                  limits:
                    cpu: "32"
                image: python:3.11-alpine
                command:
                - sh
                - -c
                - "pip install 'huggingface_hub==0.24.6' && \
                  huggingface-cli download deepseek-ai/DeepSeek-R1 --local-dir-use-symlinks=False --local-dir=/data/DeepSeek-R1 --include *.safetensors *.json *.py"
                env:
                - name: HUGGING_FACE_HUB_TOKEN
                  valueFrom:
                    secretKeyRef:
                      name: hf-secret
                      key: hf_api_token
                volumeMounts:
                  - mountPath: "/data"
                    name: volume
              restartPolicy: Never
              volumes:
                - name: volume
                  persistentVolumeClaim:
                    claimName: producer-pvc
          parallelism: 1         # Run 1 Pods concurrently
          completions: 1         # Once 1 Pods complete successfully, the Job is done
          backoffLimit: 4        # Max retries on failure


        Llama 3.1 405B

        
        apiVersion: batch/v1
        kind: Job
        metadata:
          name: producer-job
        spec:
          template:  # Template for the Pods the Job will create
            spec:
              affinity:
                nodeAffinity:
                  requiredDuringSchedulingIgnoredDuringExecution:
                    nodeSelectorTerms:
                    - matchExpressions:
                      - key: cloud.google.com/machine-family
                        operator: In
                        values:
                        - "c3"
                    - matchExpressions:
                      - key: topology.kubernetes.io/zone
                        operator: In
                        values:
                        - "ZONE"
              containers:
              - name: copy
                resources:
                  requests:
                    cpu: "32"
                  limits:
                    cpu: "32"
                image: python:3.11-alpine
                command:
                - sh
                - -c
                - "pip install 'huggingface_hub==0.24.6' && \
                  huggingface-cli download meta-llama/Meta-Llama-3.1-405B-Instruct --local-dir-use-symlinks=False --local-dir=/data/Meta-Llama-3.1-405B-Instruct --include *.safetensors *.json"
                env:
                - name: HUGGING_FACE_HUB_TOKEN
                  valueFrom:
                    secretKeyRef:
                      name: hf-secret
                      key: hf_api_token
                volumeMounts:
                  - mountPath: "/data"
                    name: volume
              restartPolicy: Never
              volumes:
                - name: volume
                  persistentVolumeClaim:
                    claimName: producer-pvc
          parallelism: 1         # Run 1 Pods concurrently
          completions: 1         # Once 1 Pods complete successfully, the Job is done
          backoffLimit: 4        # Max retries on failure
        
        
      3. 按照利用 Hyperdisk ML 加快 AI/机器学习数据加载速度中的说明操作(使用您在前面步骤中创建的两个文件)。

        完成此步骤后,您便创建了 Hyperdisk ML 卷并使用模型数据进行了填充。

      4. 部署 vLLM 多节点 GPU 服务器部署,该部署会将新创建的 Hyperdisk ML 卷用于模型数据。

        DeepSeek-R1


        apiVersion: leaderworkerset.x-k8s.io/v1
        kind: LeaderWorkerSet
        metadata:
          name: vllm
        spec:
          replicas: 1
          leaderWorkerTemplate:
            size: 2
            restartPolicy: RecreateGroupOnPodRestart
            leaderTemplate:
              metadata:
                labels:
                  role: leader
              spec:
                containers:
                  - name: vllm-leader
                    image: vllm/vllm-openai:v0.8.5
                    env:
                      - name: HUGGING_FACE_HUB_TOKEN
                        valueFrom:
                          secretKeyRef:
                            name: hf-secret
                            key: hf_api_token
                    command:
                      - sh
                      - -c
                      - "bash /vllm-workspace/examples/online_serving/multi-node-serving.sh leader --ray_cluster_size=$(LWS_GROUP_SIZE);
                        python3 -m vllm.entrypoints.openai.api_server --port 8080 --model /models/DeepSeek-R1 --tensor-parallel-size 8 --pipeline-parallel-size 2 --trust-remote-code --max-model-len 4096"
                    resources:
                      limits:
                        nvidia.com/gpu: "8"
                    ports:
                      - containerPort: 8080
                    readinessProbe:
                      tcpSocket:
                        port: 8080
                      initialDelaySeconds: 15
                      periodSeconds: 10
                    volumeMounts:
                      - mountPath: /dev/shm
                        name: dshm
                      - mountPath: /models
                        name: deepseek-r1
                volumes:
                - name: dshm
                  emptyDir:
                    medium: Memory
                - name: deepseek-r1
                  persistentVolumeClaim:
                    claimName: hdml-static-pvc
            workerTemplate:
              spec:
                containers:
                  - name: vllm-worker
                    image: vllm/vllm-openai:v0.8.5
                    command:
                      - sh
                      - -c
                      - "bash /vllm-workspace/examples/online_serving/multi-node-serving.sh worker --ray_address=$(LWS_LEADER_ADDRESS)"
                    resources:
                      limits:
                        nvidia.com/gpu: "8"
                    env:
                      - name: HUGGING_FACE_HUB_TOKEN
                        valueFrom:
                          secretKeyRef:
                            name: hf-secret
                            key: hf_api_token
                    volumeMounts:
                      - mountPath: /dev/shm
                        name: dshm
                      - mountPath: /models
                        name: deepseek-r1
                volumes:
                - name: dshm
                  emptyDir:
                    medium: Memory
                - name: deepseek-r1
                  persistentVolumeClaim:
                    claimName: hdml-static-pvc
        ---
        apiVersion: v1
        kind: Service
        metadata:
          name: vllm-leader
        spec:
          ports:
            - name: http
              port: 8080
              protocol: TCP
              targetPort: 8080
          selector:
            leaderworkerset.sigs.k8s.io/name: vllm
            role: leader
          type: ClusterIP
        

        Llama 3.1 405B


        apiVersion: leaderworkerset.x-k8s.io/v1
        kind: LeaderWorkerSet
        metadata:
          name: vllm
        spec:
          replicas: 1
          leaderWorkerTemplate:
            size: 2
            restartPolicy: RecreateGroupOnPodRestart
            leaderTemplate:
              metadata:
                labels:
                  role: leader
              spec:
                containers:
                  - name: vllm-leader
                    image: vllm/vllm-openai:v0.8.5
                    env:
                      - name: HUGGING_FACE_HUB_TOKEN
                        valueFrom:
                          secretKeyRef:
                            name: hf-secret
                            key: hf_api_token
                    command:
                      - sh
                      - -c
                      - "bash /vllm-workspace/examples/online_serving/multi-node-serving.sh leader --ray_cluster_size=$(LWS_GROUP_SIZE);
                        python3 -m vllm.entrypoints.openai.api_server --port 8080 --model /models/Meta-Llama-3.1-405B-Instruct --tensor-parallel-size 8 --pipeline-parallel-size 2"
                    resources:
                      limits:
                        nvidia.com/gpu: "8"
                    ports:
                      - containerPort: 8080
                    readinessProbe:
                      tcpSocket:
                        port: 8080
                      initialDelaySeconds: 15
                      periodSeconds: 10
                    volumeMounts:
                      - mountPath: /dev/shm
                        name: dshm
                      - mountPath: /models
                        name: llama3-405b
                volumes:
                - name: dshm
                  emptyDir:
                    medium: Memory
                - name: llama3-405b
                  persistentVolumeClaim:
                    claimName: hdml-static-pvc
            workerTemplate:
              spec:
                containers:
                  - name: vllm-worker
                    image: vllm/vllm-openai:v0.8.5
                    command:
                      - sh
                      - -c
                      - "bash /vllm-workspace/examples/online_serving/multi-node-serving.sh worker --ray_address=$(LWS_LEADER_ADDRESS)"
                    resources:
                      limits:
                        nvidia.com/gpu: "8"
                    env:
                      - name: HUGGING_FACE_HUB_TOKEN
                        valueFrom:
                          secretKeyRef:
                            name: hf-secret
                            key: hf_api_token
                    volumeMounts:
                      - mountPath: /dev/shm
                        name: dshm
                      - mountPath: /models
                        name: llama3-405b
                volumes:
                - name: dshm
                  emptyDir:
                    medium: Memory
                - name: llama3-405b
                  persistentVolumeClaim:
                    claimName: hdml-static-pvc
        ---
        apiVersion: v1
        kind: Service
        metadata:
          name: vllm-leader
        spec:
          ports:
            - name: http
              port: 8080
              protocol: TCP
              targetPort: 8080
          selector:
            leaderworkerset.sigs.k8s.io/name: vllm
            role: leader
          type: ClusterIP
        

      清理

      为避免因本教程中使用的资源导致您的 Google Cloud 账号产生费用,请删除包含这些资源的项目,或者保留项目但删除各个资源。

      删除已部署的资源

      为避免因您在本指南中创建的资源导致您的 Google Cloud 账号产生费用,请运行以下命令:

      ps -ef | grep load.sh | awk '{print $2}' | xargs -n1 kill -9
      
      gcloud container clusters delete CLUSTER_NAME \
        --location=ZONE
      

      后续步骤