Private network connectivity
This page describes how you can configure Integration Connectors to privately connect to your backend applications, and assumes that you are familiar with the following concepts:Integration Connectors supports connectivity to your backends that are hosted on a private network. To enable private connectivity, you must use Private service connect (PSC). PSC enables connecting to services across different networks privately.
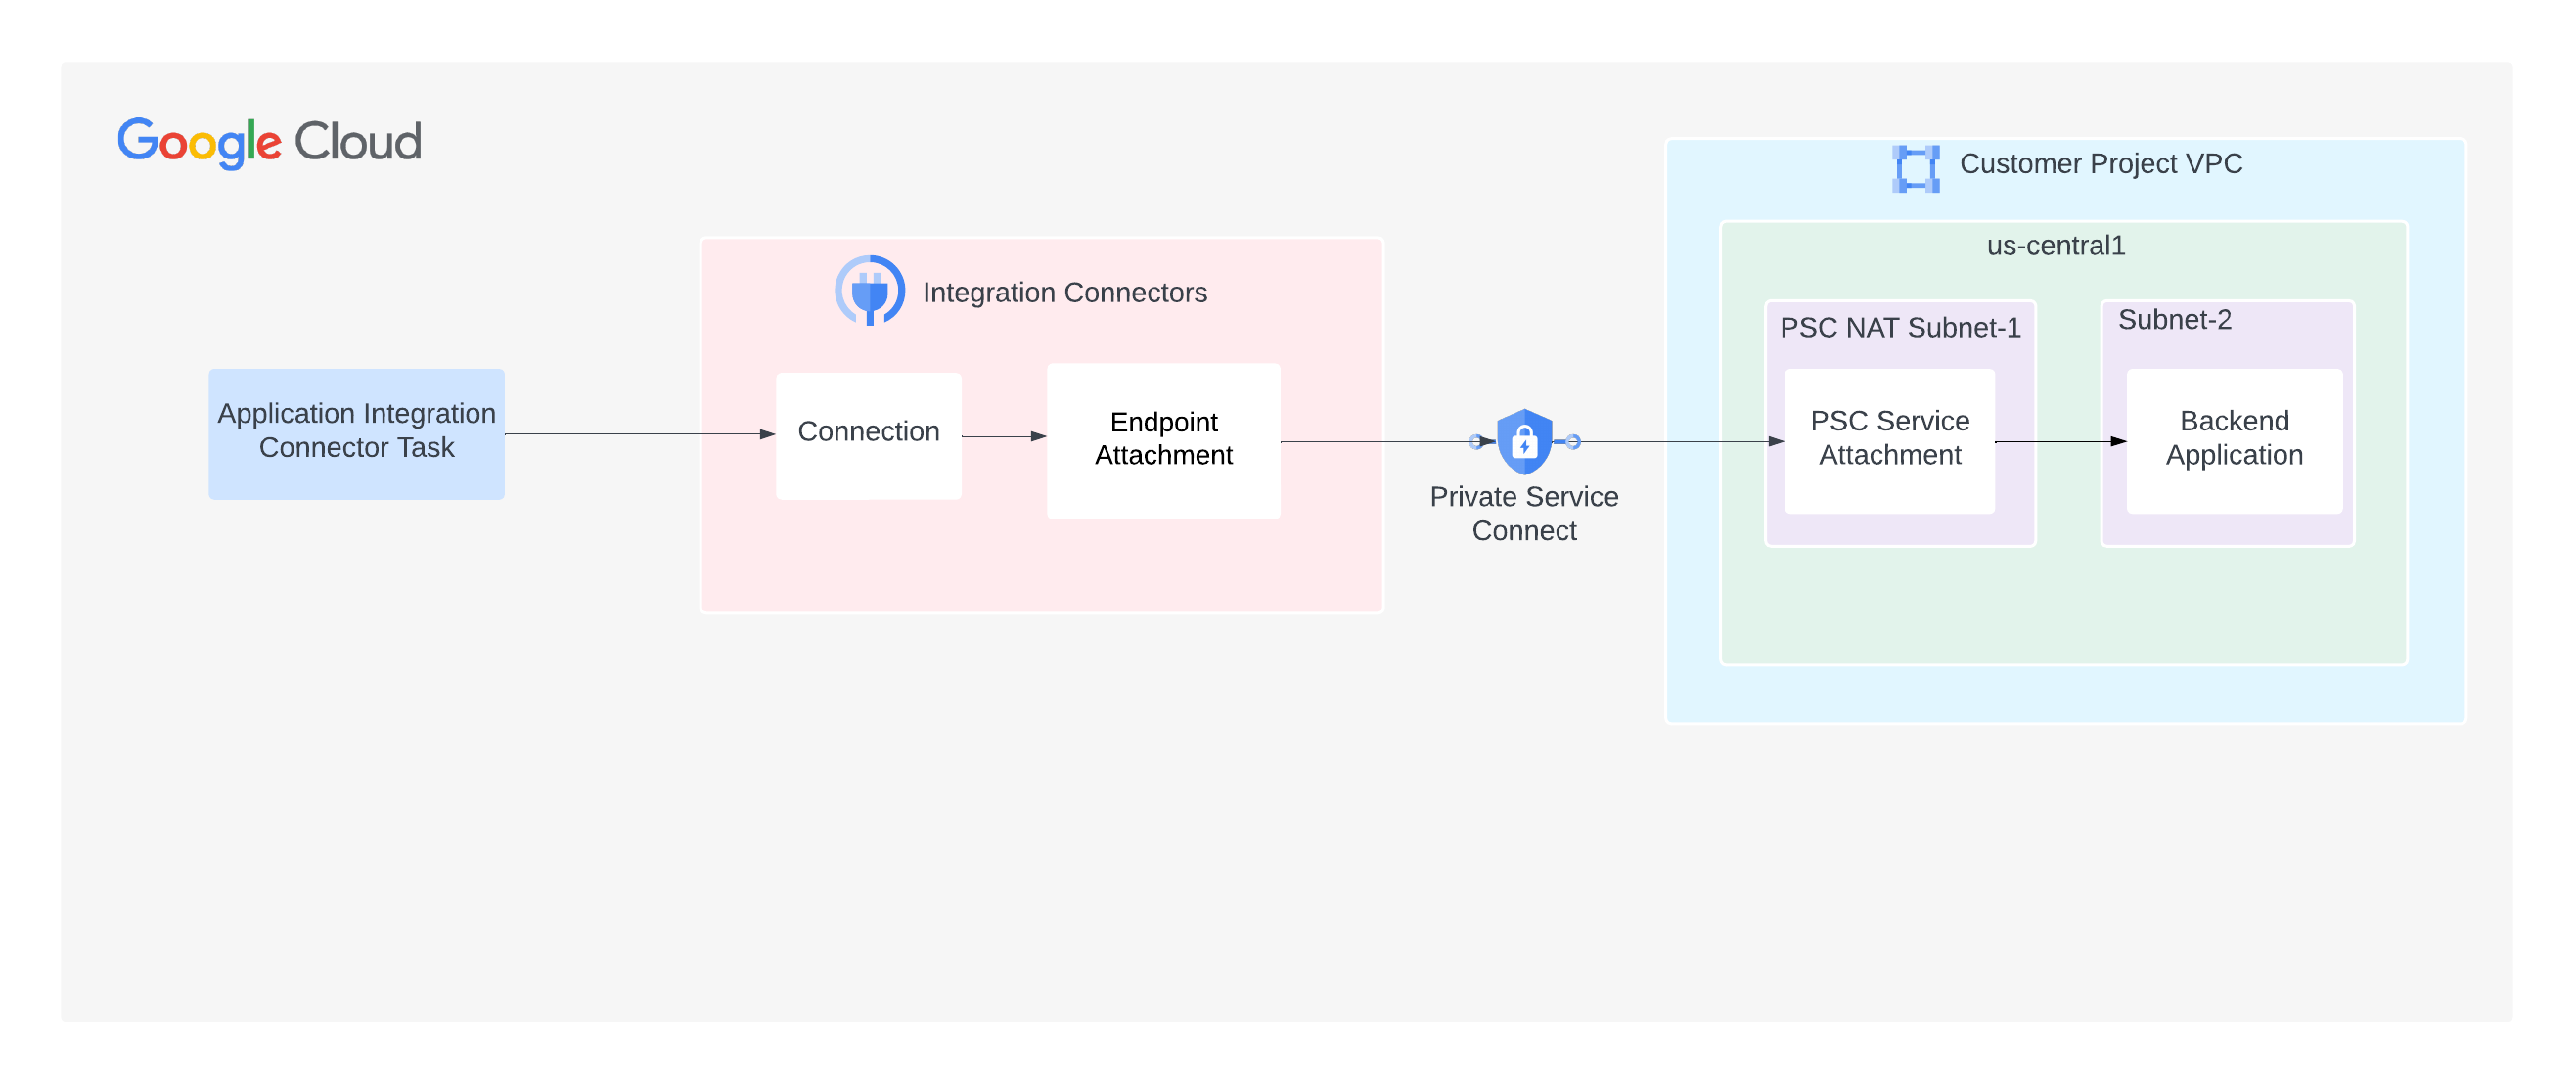
In the case of Integration Connectors, from a networking point of view, you are the service producer and Integration Connectors is the service consumer. As a service producer, you must configure a PSC service attachment that Integration Connectors can use to consume the service. After the service attachment is ready, you can configure the connection to consume the service attachment using an endpoint attachment.
Endpoint attachments
Endpoint attachments are Integration Connectors resources that enable connections to establish connectivity with your backend applications through the PSC service attachments.
The following image shows an endpoint attachment that enables a connection to establish connectivity with a backend application through a PSC service attachment:
You can create the endpoint attachment either as an IP address or as a hostname.
Create an endpoint attachment as an IP address
To create an endpoint attachment as an IP address, you can use either the Cloud console or the command line (gcloud).Console
To create an endpoint attachment from the Cloud console, do the following:
- Open the Endpoint attachments page for Integration Connectors.
- Click + Create. The Create Endpoint Attachment page opens.
- Enter values for the following fields:
- Name: A name for the endpoint attachment. The name must be unique. There can be no other endpoint attachments with the same name, and you cannot change the name later. The name must start with a lowercase letter followed by up to 63 lowercase letters, numbers, or hyphens, but it cannot end with a hyphen. The minimum length is 2.
- Service Attachment ID: Name of the PSC service attachment that you have already created.
- (Optional) Description: Enter a description for the endpoint attachment.
- (Optional) Labels: Enter resource labels as key-value pairs. For more information about labels, see What are labels?
- (Optional) Enable endpoint global access: Select this option, if you want to
send traffic to your backend from a connection present in any region.
By default, the endpoint attachment requires that both the connection and the backend should be in the same region. Therefore, if you enable global access for the endpoint, a connection present in any region can send traffic to your backend.
- Click Create.
The IP Address column specifies the IP address of the endpoint attachment. You must use this IP address when configuring a connector for private connectivity.
gcloud
To create an endpoint attachment from the command line, do the following:
- Get the PSC service attachment resource:
gcloud compute service-attachments list
The command returns the list of service attachments. For example:
  NAME       REGION   TARGET_SERVICE                                       CONNECTION_PREFERENCE
  demo-sa us-west1 k8s2-tcp-tgysilgj-apps-ingressgateway-fzdhwstg ACCEPT_AUTOMATIC
You will need this service attachment information in the subsequent steps.
- Get an authentication token before you run the CreateEndpointAttachment API:
TOKEN="$(gcloud auth print-access-token)"
- Create the endpoint attachment by using the CreateEndpointAttachment API. For example:
curl -X POST -H "Authorization: Bearer $TOKEN" \
       -H "Content-Type: application/json" \
       -d '{
      "name": "projects/PROJECT_ID/locations/LOCATION/endpointAttachments/ENDPOINT_ATTACHMENT_NAME",
      "serviceAttachment": "projects/demo/serviceAttachments/?SERVICE_ATTACHMENT_NAME"
    }' \
       https://connectors.googleapis.com/v1/projects/PROJECT_ID/locations/LOCATION/endpointAttachments?endpointAttachmentId=ENDPOINT_ATTACHMENT_NAME
Where:
- LOCATION is the region of the service attachment. For example,
us-west1. - PROJECT_ID is the Google Cloud project where you have created the PSC service attachment.
- ENDPOINT_ATTACHMENT_NAME is the name of the endpoint attachment. The name must be unique. There can't be other endpoint attachments with the same name, and you cannot change the name later. The name must start with a lowercase letter followed by up to 31 lowercase letters, numbers, or hyphens, but it cannot end with a hyphen. The minimum length is 2.
- SERVICE_ATTACHMENT_NAME is the name of the service attachment. Use the PSC
service attachment name returned by the previously
run
gcloud compute service-attachments listcommand.
After you call the API, Integration Connectors starts a long-running operation, and it may take some time to complete the operation. The endpoint attachment will be created after the operation completes successfully.
- LOCATION is the region of the service attachment. For example,
- Get the project ID of the service directory associated with your Google Cloud project, and then allowlist that project ID in your service attachment.
- Verify if the endpoint attachment is created by using the GetEndpointAttachment API.
For example:
curl -X GET -H "Authorization: Bearer $TOKEN" \
    https://connectors.googleapis.com/v1/projects/PROJECT_ID/locations/us-central1/endpointAttachments/ENDPOINT_ATTACHMENT_NAME
The API returns a response similar to the following:
{
    "name": "projects/demo-project/locations/us-central1/endpointAttachments/demo-ea",
    "createTime": "2023-04-17T04:34:59.569527046Z",
    "updateTime": "2023-04-17T04:37:25.189074195Z",
    "description": "demo endpoint attachment",
    "serviceAttachment": "projects/demo-project/regions/us-central1/serviceAttachments/demo-sa",
    "endpointIp": "10.0.0.0",
    "labels": {"team":"sre"},
  }
The IP address of the endpoint attachment is available in the
endpointIpfield. In this sample response, the IP address is10.0.0.0. Use this IP address when configuring a connector for private connectivity.
If the endpoint attachment creation is successful, the newly created attachment is listed in the Endpoint Attachments page, similar to the following image:

The steps, described till now, show how to create an endpoint attachment as an IP address. However, you can also create an endpoint attachment as a hostname and use the hostname to configure a connector for private connectivity. To understand how to create an endpoint attachment with a hostname, see Create an endpoint attachment as a hostname.
Create an endpoint attachment as a hostname
To create an endpoint attachment as a hostname, perform the following tasks:
- Create an endpoint attachment as an IP address. For more information, see Create an endpoint attachment as an IP address.
- Create a Cloud DNS private managed zone in any of your Google Cloud projects.
In this DNS zone, you must add a hostname that you want to use for connector configuration and map the hostname to the endpoint attachment IP address that you got from step 1. For information on how to create a Cloud DNS private managed zone, see Create a private zone and Add a record.
- Create an Integration Connectors managed zone in your Google Cloud project that you use for the Integration Connectors. The Integration Connectors
managed zone (peering zone) communicates with the Cloud DNS private managed zone (created in step 2)
for name resolution.
Before creating the managed zone, you must grant the following roles and permissions:
- Grant the
connectors.managedZones.createpermission to the user creating the Integration Connectors managed zone.The
connectors.managedZones.createpermission is available either in theroles/connectors.adminIAM role or theroles/connectors.managedZonesAdminIAM role. For information on the various IAM roles and their corresponding permissions available for Integration Connectors, see IAM roles and permissions for Integration Connectors. - Grant the
role/dns.peerrole to the Integration Connectorsservice-PROJECT_NUMBER@gcp-sa-connectorsiam.gserviceaccount.comservice account.If the Cloud DNS Google Cloud project is different from the Integration Connectors Google Cloud project, then grant the
roles/dns.peerrole to the Integration Connectors service account in the Cloud DNS Google Cloud project. For example, consider you want to create the Integration Connectors managed zone in Google Cloud project 12345 and the Cloud DNS is in the Google Cloud project 67890. In this case, you must grant theroles/dns.peerrole to theservice-12345@gcp-sa-connectors.iam.gserviceaccount.comservice account in the Google Cloud project 67890.
To create an Integration Connectors managed zone, you can use either the Cloud console or the command line (gcloud).
Console
To create an Integration Connectors managed zone from Cloud console, do the following:
- Go to the Managed zones page for Integration Connectors.
- Enter values for the following fields:
- Name: A name for the managed zone.
- Target DNS name: Full Cloud DNS name for which you are creating the managed (peering) zone. For example,
server8.stage.user.private. - Target project: Name of the Google Cloud project which has the private Cloud DNS zone.
- Target network: Name of the VPC network in which the private Cloud DNS zone is maintained.
- (Optional) Description: Enter a description for the endpoint attachment.
- (Optional) Labels: Enter resource labels as key-value pairs. For more information about labels, see What are labels?
- Click Create.
gcloud
To create an Integration Connectors managed zone from the command line, do the following:
- Get an authentication token before you run the CreateManagedZone API:
TOKEN="$(gcloud auth print-access-token)"
- Create the managed zone by using the CreateManagedZone API. For example:
curl -X POST -H "Authorization: Bearer $TOKEN" \
  -H "Content-Type: application/json" \
  -d '{
    "description": "DESCRIPTION",
    "dns": "DNS_NAME",
    "target_project": "TARGET_PROJECT",
    "target_vpc": "TARGET_VPC"
  }' \
  https://connectors.googleapis.com/v1/projects/PROJECT_ID/locations/global/managedZones?managedZoneId=MANAGED_ZONE_NAME
Where:
- DESCRIPTION is an optional description for the managed zone.
- DNS_NAME: Full Cloud DNS name for which you are creating the managed (peering) zone. For example,
server8.stage.user.private. - TARGET_PROJECT is the name of the Google Cloud project which has the private Cloud DNS zone.
- TARGET_NETWORK is the name of the VPC network in which the private Cloud DNS zone is maintained.
- PROJECT_ID is your Google Cloud project which you are using for Integration Connectors.
- MANAGED_ZONE_NAME is the name of the managed zone. The name must be unique. There can't be other managed zones with the same name, and you cannot change the name later. The name must start with a lowercase letter followed by up to 63 lowercase letters, numbers, or hyphens, but it cannot end with a hyphen. The minimum length is 2.
After you call the API, Integration Connectors starts a long-running operation and it may take some time to complete the operation. The managed zone will be created after the operation completes successfully.
- Verify if the managed zone is created by using the GetManagedZone API.
For example:
curl -X GET -H "Authorization: Bearer $TOKEN" \
    https://connectors.googleapis.com/v1/projects/PROJECT_ID/locations/global/managedZones/MANAGED_ZONE_NAME
The API returns a response similar to the following:
{
    "name": "projects/demo-project/locations/global/managedZones/demo-mz",
    "createTime": "2023-04-17T04:34:59.569527046Z",
    "updateTime": "2023-04-17T04:37:25.189074195Z",
    "description": "demo managed zone",
    "dns": "api.private.service.com.",
    "targetVpc": "target-project-vpc",
    "targetProject": "target-project"
  }
- Grant the
If the managed zone creation is successful, the newly created managed zone is listed in the Managed zones page similar to the following image:

Allowlist the Integration Connectors project in a service attachment
You can create the PSC service attachment such that it accepts requests only from the specified Google Cloud projects. However, to do this, you need the project ID of the service directory associated with your Google Cloud project. To get the project ID of the service directory, you can use the List Connections API as shown in the following example.
Syntax
curl -X GET \
    -H "authorization: Bearer $(gcloud auth print-access-token)" \
    -H "Content-Type: application/json" \
    "https://connectors.googleapis.com/v1/projects/CONNECTORS_PROJECT_ID/locations/-/connections"
Replace the following:
- CONNECTORS_PROJECT_ID: The ID of your Google Cloud project where you created your connection.
Example
This example gets the project ID of the service directory for the connectors-test Google Cloud project.
curl -X GET \
    -H "authorization: Bearer $(gcloud auth print-access-token)" \
    -H "Content-Type: application/json" \
    "https://connectors.googleapis.com/v1/projects/connectors-test/locations/-/connections"
Running this command on the terminal displays an output similar to the following:
.....
{
  "connections": [
    {
      "name": "projects/connectors-test/locations/asia-northeast1/connections/big-query-iam-invalid-sa",
      "createTime": "2022-10-07T09:02:31.905048520Z",
      "updateTime": "2022-10-07T09:22:39.993778690Z",
      "connectorVersion": "projects/connectors-test/locations/global/providers/gcp/connectors/bigquery/versions/1",
      "status": {
        "state": "ACTIVE"
      },
      "configVariables": [
        {
          "key": "project_id",
          "stringValue": "connectors-test"
        },
        {
          "key": "dataset_id",
          "stringValue": "testDataset"
        }
      ],
      "authConfig": {},
      "serviceAccount": "564332356444-compute@developer.gserviceaccount.com",
      "serviceDirectory": "projects/abcdefghijk-tp/locations/asia-northeast1/namespaces/connectors/services/runtime",
      "nodeConfig": {
        "minNodeCount": 2,
        "maxNodeCount": 50
      }
    },
....
In the sample output, for the connectors-test Google Cloud project, the project ID
of the service directory is abcdefghijk-tp.
Verify the endpoint attachment connection
To verify the endpoint attachment connection, do the following:
- In the Endpoint Attachments page, click on the name of the endpoint attachment that you created.
- In the Endpoint Attachment Details page that appears, view the Connection state field. If the state is
Accepted, then the endpoint attachment is set up correctly and the Private Service Connect connection is established.For information about other statuses, see Connection statuses.
Configure a connection to use the endpoint attachment
In Integration Connectors, when you create a new connection or update an existing connection, in the Destinations section, select Endpoint attachment as the Destination Type and select the endpoint attachment that you created from the Endpoint Attachment list.
If you created a managed zone, select Host Address as the Destination Type and use the A-record that you created while creating the managed zone.
Connectivity to various types of private networks
Even though private connectivity in Integration Connectors will always be through a PSC service attachment, the steps for establishing private connectivity slightly vary based on the environment. The following sections describe how to establish private connectivity in the various environments:
- Backend is hosted on-premise
- Backend is hosted in Google VPC
- Backend is hosted in Google Cloud serverless environment
- Backend is available as a managed Google Cloud service