Get started with media recommendations
You can quickly build a state-of-the-art media recommendations app. Media recommendations enable your audiences to discover more personalized content, like what to watch or read next, with Google-quality results that are customized by optimization objectives.
For general information about Vertex AI Search for media, see Introduction to media search and recommendations.In this getting-started tutorial, you will use the Movielens dataset to demonstrate how to upload your media content catalog and user events into Vertex AI Search and train a personalized movie recommendation model. The Movielens dataset contains a catalog of movies (documents) and user movie ratings (user events).
In this tutorial, you train a recommendation model of type Others You May Like optimized for click-through-rate (CTR). After training, the model can recommend movies based on a user ID and on a seed movie.
To meet the minimum data requirements for the model, each positive movie rating (4 or higher) is treated as a view-item event.
Estimated time to complete this tutorial:
- Initial steps to start training the model: ~1.5 hours.
- Waiting for the model to train: ~24 hours. (Train the model)
- Evaluating the model predictions and cleaning up: ~30 minutes. (Preview recommendations)
If you completed the Get started with media search tutorial and you still have the data store (suggested name quickstart-media-data-store), then you can use that data store instead of
creating another. In this case, you should begin the tutorial at
Create an app for media recommendations.
Objectives
- Learn how to import media documents and user events data from BigQuery into Vertex AI Search.
- Train and evaluate recommendation models.
Before following this tutorial, make sure you have done the steps in Before you begin.
To follow step-by-step guidance for this task directly in the Google Cloud console, click Guide me:
Before you begin
- Sign in to your Google Cloud account. If you're new to Google Cloud, create an account to evaluate how our products perform in real-world scenarios. New customers also get $300 in free credits to run, test, and deploy workloads.
-
In the Google Cloud console, on the project selector page, select or create a Google Cloud project.
Roles required to select or create a project
- Select a project: Selecting a project doesn't require a specific IAM role—you can select any project that you've been granted a role on.
-
Create a project: To create a project, you need the Project Creator
(
roles/resourcemanager.projectCreator), which contains theresourcemanager.projects.createpermission. Learn how to grant roles.
-
Verify that billing is enabled for your Google Cloud project.
-
Enable the Vertex AI Search (Discovery Engine), Cloud Storage, BigQuery APIs.
Roles required to enable APIs
To enable APIs, you need the Service Usage Admin IAM role (
roles/serviceusage.serviceUsageAdmin), which contains theserviceusage.services.enablepermission. Learn how to grant roles. -
Make sure that you have the following role or roles on the project: Discovery Engine Admin
Check for the roles
-
In the Google Cloud console, go to the IAM page.
Go to IAM - Select the project.
-
In the Principal column, find all rows that identify you or a group that you're included in. To learn which groups you're included in, contact your administrator.
- For all rows that specify or include you, check the Role column to see whether the list of roles includes the required roles.
Grant the roles
-
In the Google Cloud console, go to the IAM page.
Go to IAM - Select the project.
- Click Grant access.
-
In the New principals field, enter your user identifier. This is typically the email address for a Google Account.
- In the Select a role list, select a role.
- To grant additional roles, click Add another role and add each additional role.
- Click Save.
-
-
In the Google Cloud console, on the project selector page, select or create a Google Cloud project.
Roles required to select or create a project
- Select a project: Selecting a project doesn't require a specific IAM role—you can select any project that you've been granted a role on.
-
Create a project: To create a project, you need the Project Creator
(
roles/resourcemanager.projectCreator), which contains theresourcemanager.projects.createpermission. Learn how to grant roles.
-
Verify that billing is enabled for your Google Cloud project.
-
Enable the Vertex AI Search (Discovery Engine), Cloud Storage, BigQuery APIs.
Roles required to enable APIs
To enable APIs, you need the Service Usage Admin IAM role (
roles/serviceusage.serviceUsageAdmin), which contains theserviceusage.services.enablepermission. Learn how to grant roles. -
Make sure that you have the following role or roles on the project: Discovery Engine Admin
Check for the roles
-
In the Google Cloud console, go to the IAM page.
Go to IAM - Select the project.
-
In the Principal column, find all rows that identify you or a group that you're included in. To learn which groups you're included in, contact your administrator.
- For all rows that specify or include you, check the Role column to see whether the list of roles includes the required roles.
Grant the roles
-
In the Google Cloud console, go to the IAM page.
Go to IAM - Select the project.
- Click Grant access.
-
In the New principals field, enter your user identifier. This is typically the email address for a Google Account.
- In the Select a role list, select a role.
- To grant additional roles, click Add another role and add each additional role.
- Click Save.
-
Prepare the dataset
You use the Cloud Shell to import the Movielens dataset and restructure the dataset for Vertex AI Search for media.
Open the Cloud Shell
- Open Google Cloud console.
- Select your Google Cloud project.
- Take note of the project ID in the Project info card on the dashboard page. You will need the project ID for the following procedures.
Click the Activate Cloud Shell button at the top of the console. A Cloud Shell session opens inside a new frame at the bottom of the Google Cloud console and displays a command-line prompt. For other ways to launch the Cloud Shell, see Launch Cloud Shell.

Import the dataset
The Movielens dataset is available in a public Cloud Storage bucket to make it easier to import.
Run the following using your project ID to set the default project for the command-line.
gcloud config set project PROJECT_IDCreate a BigQuery dataset:
bq mk movielensLoad
movies.csvinto a newmoviesBigQuery table:bq load --skip_leading_rows=1 movielens.movies \ gs://cloud-samples-data/gen-app-builder/media-recommendations/movies.csv \ movieId:integer,title,genresLoad
ratings.csvinto a newratingsBigQuery table:bq load --skip_leading_rows=1 movielens.ratings \ gs://cloud-samples-data/gen-app-builder/media-recommendations/ratings.csv \ userId:integer,movieId:integer,rating:float,time:timestamp
Create BigQuery views
In this step, you restructure the Movielens dataset so it follows the expected format for media recommendations.
Media recommendations require user events data in order to create a model.
For this guide, you create fake view-item events during the past 90 days
from positive ratings (>= 4).
Create a view that converts the movies table into the Google-defined
Documentschema:bq mk --project_id=PROJECT_ID \ --use_legacy_sql=false \ --view ' WITH t AS ( SELECT CAST(movieId AS string) AS id, SUBSTR(title, 0, 128) AS title, SPLIT(genres, "|") AS categories FROM `PROJECT_ID.movielens.movies`) SELECT id, "default_schema" as schemaId, null as parentDocumentId, TO_JSON_STRING(STRUCT(title as title, categories as categories, CONCAT("http://mytestdomain.movie/content/", id) as uri, "2023-01-01T00:00:00Z" as available_time, "2033-01-01T00:00:00Z" as expire_time, "movie" as media_type)) as jsonData FROM t;' \ movielens.movies_viewNow, the new view has the schema that the Discovery Engine API expects.
Go to the BigQuery page in Google Cloud console.
In the Explorer pane, expand your project name, expand the
movielensdataset and clickmovies_viewto open the query page for this view.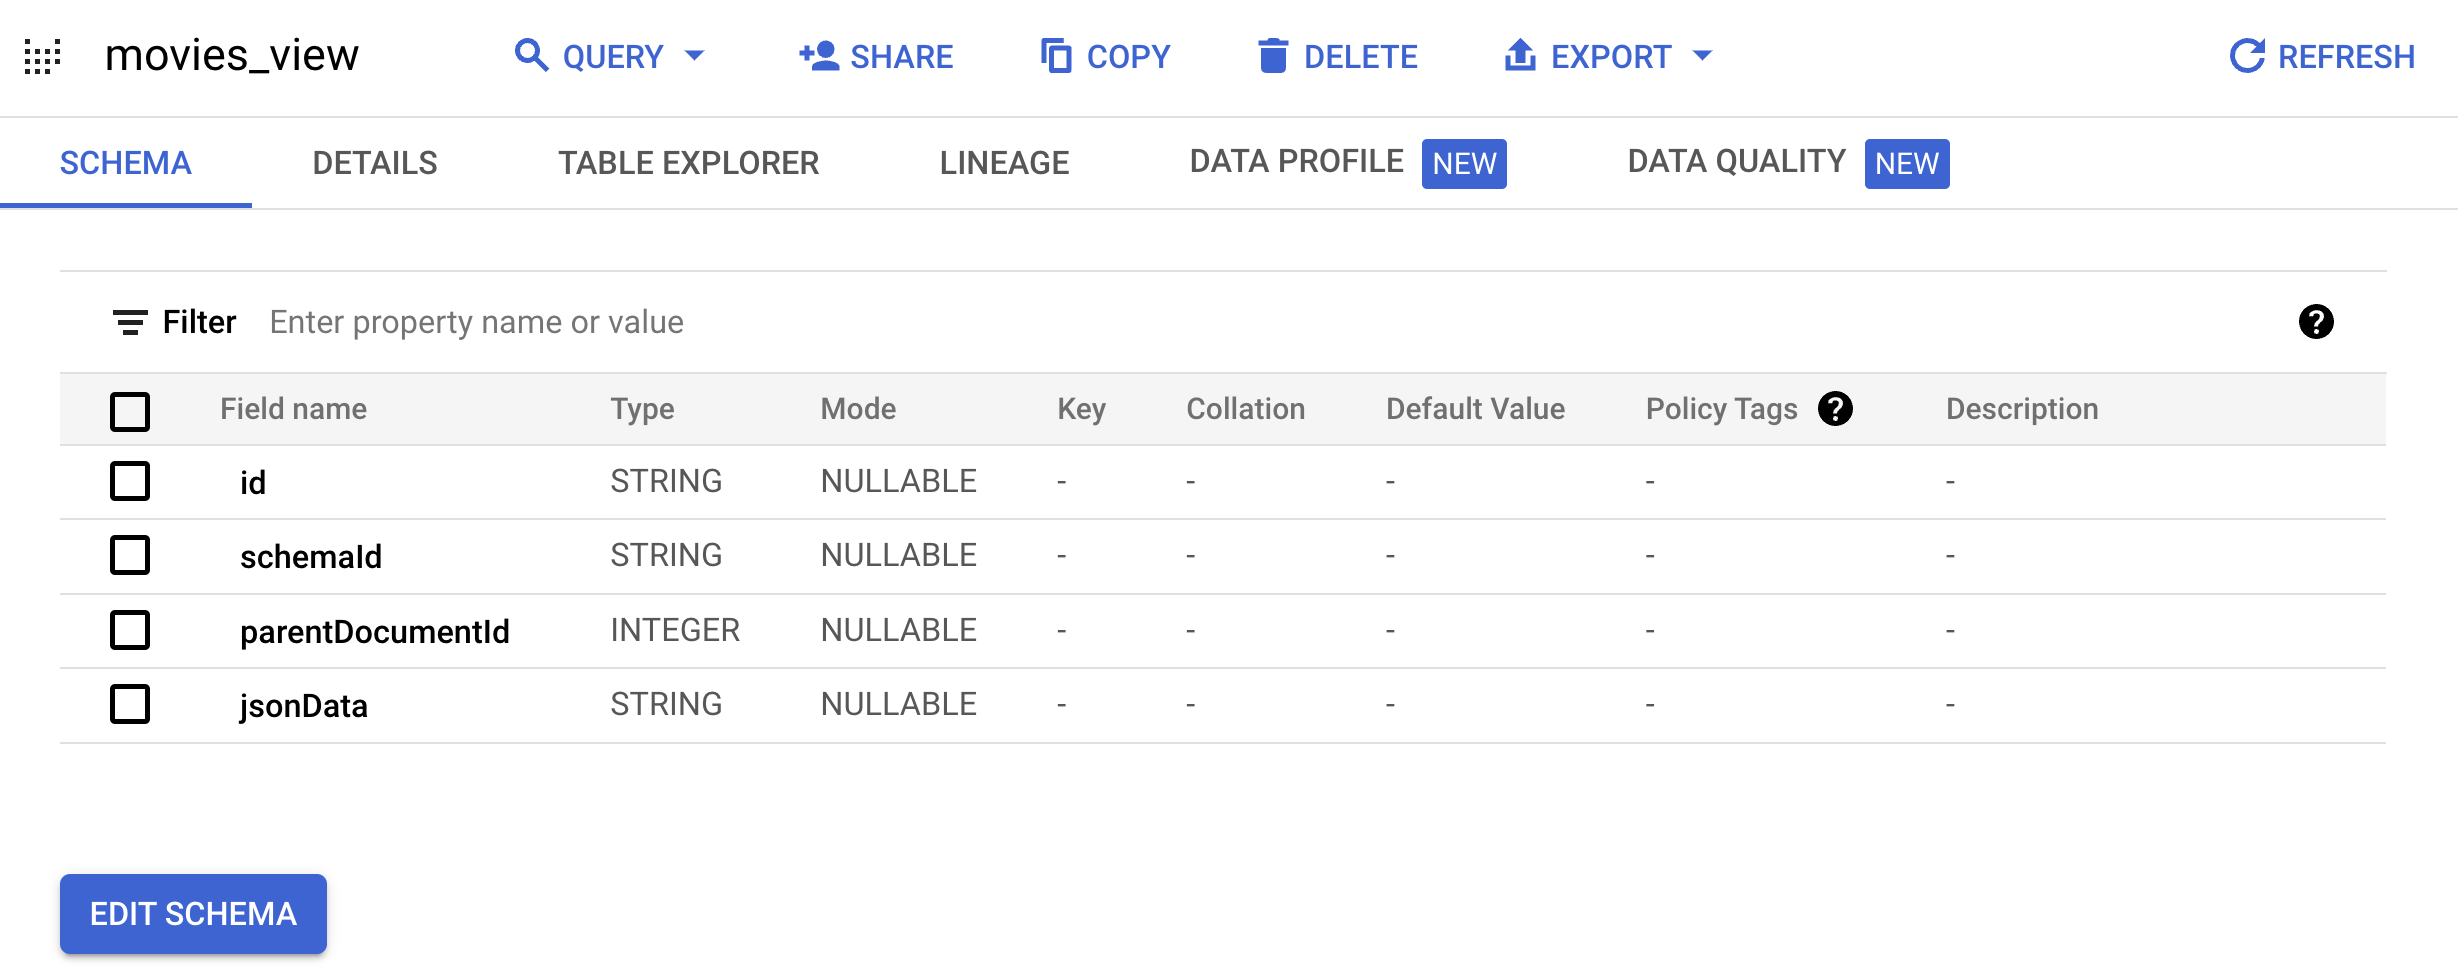
Go to the Table explorer tab.
In the Generated query pane, click the Copy to query button. The query editor opens.
Click Run to see movie data in the view that you created.
Create fictitious user events from movie ratings by running the following Cloud Shell command:
bq mk --project_id=PROJECT_ID \
 --use_legacy_sql=false \
 --view '
 WITH t AS (
  SELECT
    MIN(UNIX_SECONDS(time)) AS old_start,
    MAX(UNIX_SECONDS(time)) AS old_end,
    UNIX_SECONDS(TIMESTAMP_SUB(
    CURRENT_TIMESTAMP(), INTERVAL 90 DAY)) AS new_start,
    UNIX_SECONDS(CURRENT_TIMESTAMP()) AS new_end
  FROM `PROJECT_ID.movielens.ratings`)
  SELECT
    CAST(userId AS STRING) AS userPseudoId,
    "view-item" AS eventType,
    FORMAT_TIMESTAMP("%Y-%m-%dT%X%Ez",
    TIMESTAMP_SECONDS(CAST(
      (t.new_start + (UNIX_SECONDS(time) - t.old_start) *
      (t.new_end - t.new_start) / (t.old_end - t.old_start))
    AS int64))) AS eventTime,
    [STRUCT(movieId AS id, null AS name)] AS documents,
  FROM `PROJECT_ID.movielens.ratings`, t
  WHERE rating >= 4;' \
  movielens.user_events
Activate Vertex AI Search
In the Google Cloud console, go to the AI Applications page.
Optional: Click Allow Google to selectively sample model input and responses.
Click Continue and activate the API.
Create an app for media recommendations
The procedures in this section guide you through creating and deploying a media recommendations app.
In the Google Cloud console, go to the AI Applications page.
Click
Create app .On the Create app page, under Media recommendations, click Create.
In the App name field, enter a name for your app, such as
quickstart-media-recommendations. Your app ID appears under the app name.Under Recommendations type, make sure Others you may like is selected.
Under Business Objective, make sure Click-through rate (CTR) is selected.
Click Continue.
Create a data store.
On the Data Stores page, click Create data store.
Enter a display name for your data store, such as
quickstart-media-data-store, and then click Create.
Select the data store you just created, and then click Create to create your app.
Import data
Next, import the movies and user events data that were formatted earlier.
Import documents
Import the movies_view document created in the
Create BigQuery views section to your
quickstart-media-data-store data store.
Under Native sources on the Import documents page, select BigQuery.
Enter the name of the
moviesBigQuery view that you created and click Import.PROJECT_ID.movielens.movies_viewWait until all documents have been imported, which should take about 15 minutes. There should be 86537 documents when complete.
You can check the Activity tab for the import operation status. When the import is complete, the import operation status changes to Completed.
Import user events
Import the user_events records created in the
Create BigQuery views section to your data store.
On the Events tab, click Import Events.
Under Native sources on the Import documents page, select BigQuery.
Enter the name of the
user_eventsBigQuery view that you created and click Import.PROJECT_ID.movielens.user_eventsWait until at least a million events have been imported before proceeding to the next step, in order to meet the data requirements for training a new model.
You can check the Activity tab for the operation status. The process takes about an hour to complete because you are importing millions of rows.
To see if the requirements have been met, go to the Data quality > Requirements tab. Even after the user events have been imported, it can take some time for the Requirements tab to update its status to Data requirements met.
Train the recommendation model
Go to the Configurations page.
Click the Serving tab. A serving config has already been created.
If you want to adjust the Recommendation demotion or Result diversification settings, you can do so on this page.
Click the Training tab.
After the data requirements have been met, the model begins training automatically. You can view the training and tuning status on this page.
It might take a couple of days for the model to train and become ready to query. The Ready to query field indicates Yes when the process is complete. You need to refresh the page to see the change No to Yes.
Preview recommendations
After the model is ready to query:
In the navigation menu, click
Preview .Click the Document ID field. A list of document IDs appears.
Enter a seed document (movie) ID, such as
4993for "The Lord of the Rings: The Fellowship of the Ring (2001)".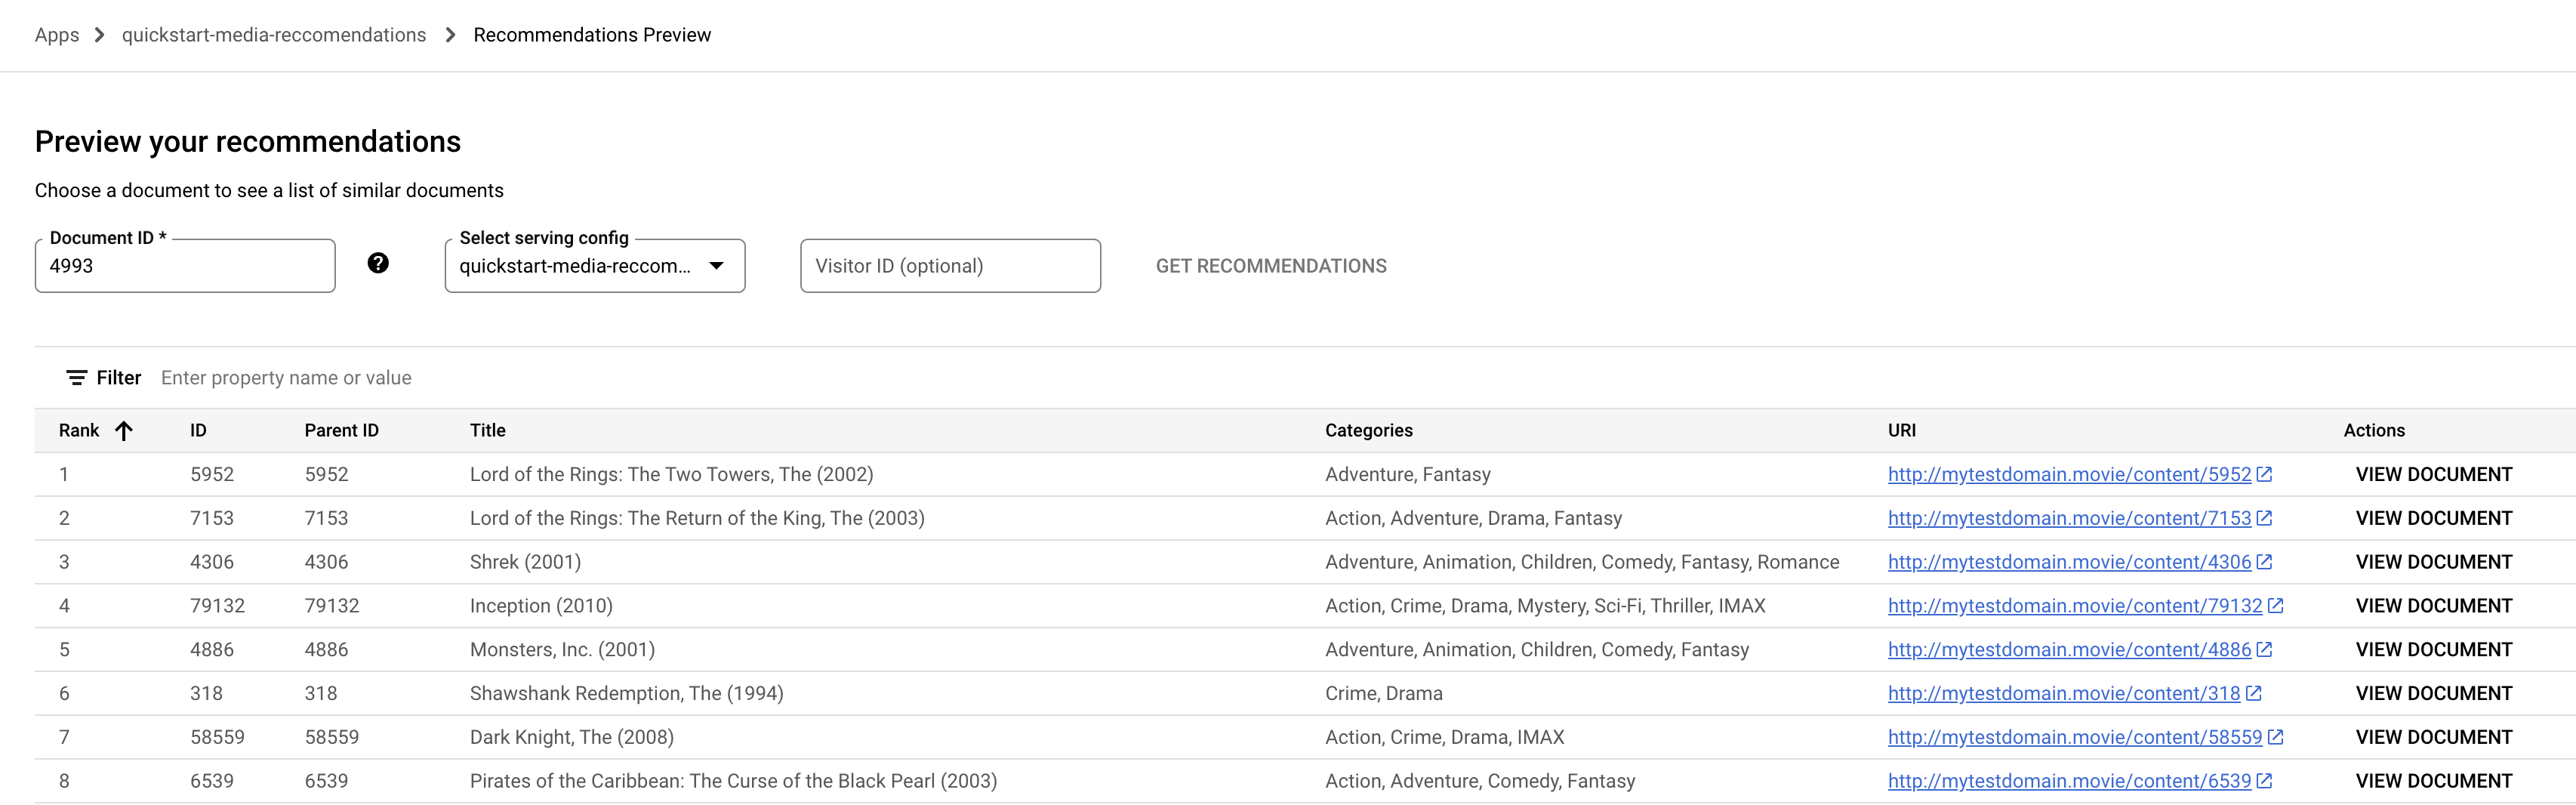
Select the Serving config name from the drop-down menu.
Click Get recommendations. A list of recommended documents appears.
Deploy your app for structured data
There is no recommendations widget for deploying your app. To test your app before deployment:
Go to the Data page, Documents tab, and copy a document ID.
Go to the Integration page. This page includes a sample command for the
servingConfigs.recommendmethod in the REST API.Paste the document ID you copied earlier into the Document ID field.
Leave the User Pseudo ID field as is.
Copy the example request and run it in Cloud Shell.
For help integrating the recommendations app into your web app, see the code samples at Get media recommendations.
Clean up
To avoid incurring charges to your Google Cloud account for the resources used on this page, follow these steps.
You can reuse the data store you created for media search in the Get started with media search tutorial. Try that tutorial before doing this clean up procedure.
- To avoid unnecessary Google Cloud charges, use the Google Cloud console to delete your project if you don't need it.
- If you created a new project to learn about Vertex AI Search and you no longer need the project, delete the project.
- If you used an existing Google Cloud project, delete the resources you created to avoid incurring charges to your account. For more information, see Delete an app.
- Follow the steps in Turn off Vertex AI Search.
If you created a BigQuery dataset, delete it in Cloud Shell:
bq rm --recursive --dataset movielens