This document describes how to configure and use canary deployments to deploy your applications to GKE or GKE Enterprise using Cloud Deploy with service-based networking.
A canary deployment is a progressive rollout of a new version of your application, where you gradually increase the percentage of traffic sent to the new version, while monitoring the application's performance. This helps you to catch potential problems early and minimize the impact on your users.
How canary deployments work for GKE and GKE Enterprise with service-based networking
You provide the name of the Deployment resource and the Service resource.
Cloud Deploy creates an additional Deployment resource, with the name of your current Deployment plus
-canary.
Secrets and ConfigMaps are also copied and renamed with -canary.
Cloud Deploy modifies the Service to adjust the selector to select the pods in the current Deployment and the canary pods.
Cloud Deploy calculates the number of pods to use for the canary based on the calculation described in the pod provisioning section. That calculation differs depending on whether you enable or disable pod overprovisioning.
If we're skipping to the
stablephase Cloud Deploy adds the labels to be used to match pods, so they're available for subsequent canary runs.Cloud Deploy creates a Deployment that includes the phase-specific percentage of pods, updating it for each phase. This is done by calculating the number of pods as a percentage of the original number of pods. This can result in an inexact traffic split. If you need an exact traffic split, you can achieve that using Gateway API.
During the
stablephase, the-canaryDeployment is scaled down to zero, and the original Deployment is replaced with the new Deployment.Cloud Deploy doesn't modify the original Deployment until the
stablephase, unless you disable overprovisioning.
Cloud Deploy provisions pods to achieve the requested canary percentage as closely as possible. This is based on the number of pods, not traffic to the pods. If you want your canary to be based on traffic, you need to use Gateway API.
For GKE network-based canary, you can enable or disable pod overprovisioning. The following sections describe how Cloud Deploy calculates the number of pods to provision for the canary deployment for each canary phase.
Pod provisioning with overprovisioning enabled
Enabling overprovisioning (disablePodOverprovisioning: false)
allows Cloud Deploy to create enough additional pods to run the
canary percentage you want, based on the number of pods running your
existing deployment. The following formula shows how
Cloud Deploy calculates the number of pods to provision for the
canary deployment for each canary phase, when pod overprovisioning is
enabled:
math.Ceil( percentage * ReplicaCountOfDeploymentOnCluster / (100-percentage))
With this formula, the current replica count (the number of pods you already have, before this canary) is multiplied by the canary percentage for the phase, and the result of that is divided by (100 minus the percentage).
For example, if you have 4 pods already, and your canary phase is 50%, then
the number of canary pods is 4. (The result of 100-percentage is used as a
percentage: 100-50=50, treated as .50.)
Pod overprovisioning is the default behavior.
Pod provisioning with overprovisioning disabled
You can disable overprovisioning (disablePodOverprovisioning: true),
to ensure that Cloud Deploy doesn't increase your replica count.
The following formula shows how Cloud Deploy calculates pod provisioning for the canary deployment for each canary phase, when pod overprovisioning is disabled:
math.Ceil( (ReplicaCountOfDeploymentOnCluster + ReplicaCountOfCanaryDeploymentOnCluster) * percentage)
In this formula, ReplicaCountOfCanaryDeploymentOnCluster only exists if
there was already a canary phase. If this is the first canary phase, there
is no ReplicaCountOfCanaryDeploymentOnCluster.
If you begin with 4 pods, that number is multiplied by the canary percentage
(for example, 50%, or .5) to get 2. So the original deployment is now
scaled down to 2, and 2 new pods are created for the canary deployment. If
you then have a 75% canary stage, you have 2 (original deployment) +2
(first canary stage), *.75, to get 3 canary pods and 1 pod running the
original deployment.
Using Cloud Deploy, you can configure canary deployments to GKE and GKE Enterprise in a single stage or in multiple stages.
The instructions here include only what is specific to canary configuration. The document Deploy to a Google Kubernetes Engine cluster has the general instructions for configuring and executing your deployment pipeline.
Make sure you have the required permissions
In addition to other Identity and Access Management permissions you need for using Cloud Deploy, you need the following permissions in order to perform additional actions that might be needed for a canary deployment:
clouddeploy.rollouts.advanceclouddeploy.rollouts.ignoreJobclouddeploy.rollouts.cancelclouddeploy.rollouts.retryJobclouddeploy.jobRuns.getclouddeploy.jobRuns.listclouddeploy.jobRuns.terminate
See IAM roles and permissions for more information about what available roles include these permissions.
Prepare your skaffold.yaml
Your skaffold.yaml file defines how your Kubernetes manifests are rendered and deployed. For a canary deployment to GKE/GKE Enterprise, ensure it correctly points to your manifests and defines any necessary build artifacts. No special canary-specific configuration is required within skaffold.yaml itself beyond what's needed for a standard deployment. You might use Skaffold profiles to manage different manifest variations for custom canary phases.
Prepare your Kubernetes manifests
Your Kubernetes manifests must include both a Deployment resource and a Service resource.
The Service must define a selector that matches the labels of the pods managed by the Deployment.
The default label Cloud Deploy looks for is app, but this can be configured in the pipeline.
Configure an automated canary
Configure an automated canary directly within your delivery pipeline definition for a specific GKE or GKE Enterprise stage using standard Kubernetes Service networking.
In the pipeline stage, include a strategy property, as follows:
serialPipeline:
  stages:
  - targetId: prod
    profiles: []
    strategy:
      canary:
        runtimeConfig:
          kubernetes:
            serviceNetworking:
              service: "SERVICE_NAME"
              deployment: "DEPLOYMENT_NAME"
              podSelectorLabel: "LABEL"
        canaryDeployment:
          percentages: [PERCENTAGES]
          verify: true|false
          predeploy:
            actions: "PREDEPLOY_ACTION"
          postdeploy:
            actions: "POSTDEPLOY_ACTION"
In this configuration...
SERVICE_NAME is the name of the Kubernetes Service, defined in your manifest.
DEPLOYMENT_NAME is the name of your Kubernetes Deployment, defined in your manifest.
LABEL is a pod selector label. This must match the label selector in the Kubernetes Service defined in your manifest. This is optional. The default is
app.PERCENTAGES is a comma-separated list of percentage values representing your canary increments, for example
[5, 25, 50].Also, this doesn't include
100, because 100% percent deployment is assumed in the canary, and is handled by thestablephaseYou can enable deployment verification (
verify: true). If you do so, averifyjob is enabled on each phase.PREDEPLOY_ACTION
Is the same as the ACTION_NAME that you used in your
skaffold.yamlto define the custom action you want to run before deploying.POSTDEPLOY_ACTION
Is the same as the ACTION_NAME that you used in your
skaffold.yamlto define the custom action you want to run after deploying.
Configure a custom-automated canary
This combines custom phase definition (names, percentages, profiles, verify, hooks) with Cloud Deploy's automatic traffic management for GKE or GKE Enterprise. You define the phases, but Cloud Deploy handles the underlying resource manipulation based on the percentages and the chosen runtimeConfig.
To configure this, include both a runtimeConfig section with serviceNetworking and the customCanaryDeployment section (defining phaseConfigs) within the strategy.canary block. Cloud Deploy will use the specified Skaffold profiles for rendering but will automatically adjust traffic according to the runtimeConfig and phase percentages.
serialPipeline:
  stages:
  - targetId: gke-prod
    profiles: []
    strategy:
      canary:
        # Include runtimeConfig for automatic traffic management
        runtimeConfig:
          kubernetes:
            serviceNetworking:
              service: "my-app"
              deployment: "my-deployment"
        # Include customCanaryDeployment for phase customization
        customCanaryDeployment:
          phaseConfigs:
          - phaseId: "warmup"
            percentage: 10
            profiles: ["profile-a"] # Profile used for rendering this phase
            verify: true
          - phaseId: "scaling"
            percentage: 50
            profiles: ["profile-b"] # Different profile for this phase
            verify: true
          - phaseId: "stable"
            percentage: 100
            profiles: ["profile-b"] # Can reuse profiles
            verify: true
Execute the GKE or GKE Enterprise canary
Register Pipeline and Targets: Apply your delivery pipeline and GKE or GKE Enterprise target configuration files.
gcloud deploy apply --file=delivery-pipeline.yaml --region=REGION
gcloud deploy apply --file=gke-targets.yaml --region=REGION
The delivery pipeline includes the automated or custom canary configuration, for your chosen runtime.
Create a Release: Start the deployment, providing the image name.
gcloud deploy releases create RELEASE_NAME \
                                --delivery-pipeline=PIPELINE_NAME \
                                --region=REGION
  # e.g., --images=my-cloudrun-service=gcr.io/my-project/my-app:v1.1
  # Add --skaffold-file or --source if not using default Skaffold config discovery
The delivery pipeline identified by
PIPELINE_NAMEcontains the automated or custom canary configuration described in this document.Advance the canary:
gcloud CLI
gcloud deploy rollouts advance ROLLOUT_NAME \
                            --release=RELEASE_NAME \
                            --delivery-pipeline=PIPELINE_NAME \
                            --region=REGION
Where:
ROLLOUT_NAMEis the name of the current rollout which you're advancing to the next phase.RELEASE_NAMEis the name of the release that this rollout is part of.PIPELINE_NAMEis the name of the delivery pipeline you're using to manage deployment of this release.REGIONis the name of the region in which the release was created, for exampleus-central1. This is required.See the Google Cloud SDK reference for more information about the
gcloud deploy rollouts advancecommand.Google Cloud console
Click your pipeline shown in the list of delivery pipelines.
The Delivery pipeline details page shows a graphical representation of your delivery pipeline's progress.
On the Rollouts tab, under Delivery pipeline details, click the name of your rollout.
The rollout details page is shown, for that rollout.
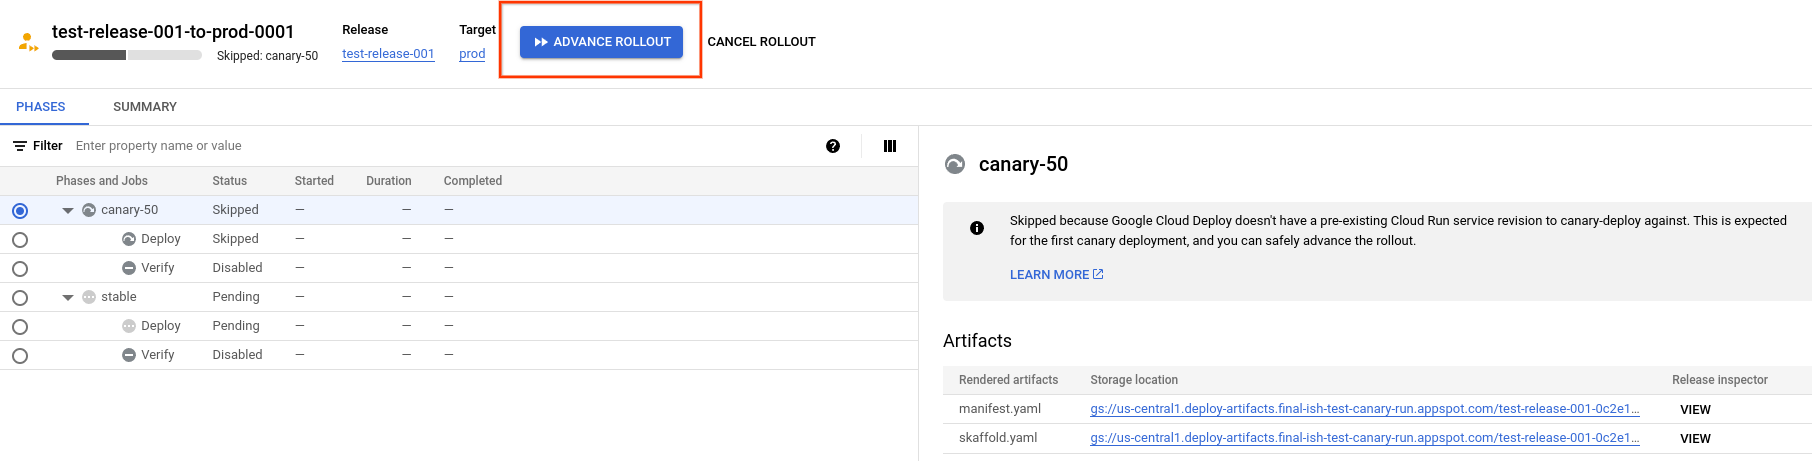
Notice that in this example, the rollout has a
canary-50phase and astablephase. Your rollout might have more phases or different phases.Click Advance rollout.
The rollout is advanced to the next phase.
Skipped phases
If you deploy a canary and your application has not been deployed to that runtime yet, Cloud Deploy skips the canary phase and runs the stable phase. See Skipping phases the first time to find out why this happens.
What's next
Try the canary deployment quickstart.
Find out how to manage the lifecycle of your canary's rollouts.
Learn more about parallel deployment.
Learn more about Cloud Deploy deployment strategies.