Sebelum memulai
Jika Anda belum melakukannya, siapkan Google Cloud project dan dua (2) bucket Cloud Storage.
Menyiapkan project
- Sign in to your Google Cloud account. If you're new to Google Cloud, create an account to evaluate how our products perform in real-world scenarios. New customers also get $300 in free credits to run, test, and deploy workloads.
-
In the Google Cloud console, on the project selector page, select or create a Google Cloud project.
Roles required to select or create a project
- Select a project: Selecting a project doesn't require a specific IAM role—you can select any project that you've been granted a role on.
-
Create a project: To create a project, you need the Project Creator
(
roles/resourcemanager.projectCreator), which contains theresourcemanager.projects.createpermission. Learn how to grant roles.
-
Verify that billing is enabled for your Google Cloud project.
-
Enable the Dataproc, Compute Engine, Cloud Storage, and Cloud Run functions APIs.
Roles required to enable APIs
To enable APIs, you need the Service Usage Admin IAM role (
roles/serviceusage.serviceUsageAdmin), which contains theserviceusage.services.enablepermission. Learn how to grant roles. -
Install the Google Cloud CLI.
-
Jika Anda menggunakan penyedia identitas (IdP) eksternal, Anda harus login ke gcloud CLI dengan identitas gabungan Anda terlebih dahulu.
-
Untuk melakukan inisialisasi gcloud CLI, jalankan perintah berikut:
gcloud init -
In the Google Cloud console, on the project selector page, select or create a Google Cloud project.
Roles required to select or create a project
- Select a project: Selecting a project doesn't require a specific IAM role—you can select any project that you've been granted a role on.
-
Create a project: To create a project, you need the Project Creator
(
roles/resourcemanager.projectCreator), which contains theresourcemanager.projects.createpermission. Learn how to grant roles.
-
Verify that billing is enabled for your Google Cloud project.
-
Enable the Dataproc, Compute Engine, Cloud Storage, and Cloud Run functions APIs.
Roles required to enable APIs
To enable APIs, you need the Service Usage Admin IAM role (
roles/serviceusage.serviceUsageAdmin), which contains theserviceusage.services.enablepermission. Learn how to grant roles. -
Install the Google Cloud CLI.
-
Jika Anda menggunakan penyedia identitas (IdP) eksternal, Anda harus login ke gcloud CLI dengan identitas gabungan Anda terlebih dahulu.
-
Untuk melakukan inisialisasi gcloud CLI, jalankan perintah berikut:
gcloud init - In the Google Cloud console, go to the Cloud Storage Buckets page.
- Click Create.
- On the Create a bucket page, enter your bucket information. To go to the next
step, click Continue.
-
In the Get started section, do the following:
- Enter a globally unique name that meets the bucket naming requirements.
- To add a
bucket label,
expand the Labels section (),
click add_box
Add label, and specify a
keyand avaluefor your label.
-
In the Choose where to store your data section, do the following:
- Select a Location type.
- Choose a location where your bucket's data is permanently stored from the Location type drop-down menu.
- If you select the dual-region location type, you can also choose to enable turbo replication by using the relevant checkbox.
- To set up cross-bucket replication, select
Add cross-bucket replication via Storage Transfer Service and
follow these steps:
Set up cross-bucket replication
- In the Bucket menu, select a bucket.
In the Replication settings section, click Configure to configure settings for the replication job.
The Configure cross-bucket replication pane appears.
- To filter objects to replicate by object name prefix, enter a prefix that you want to include or exclude objects from, then click Add a prefix.
- To set a storage class for the replicated objects, select a storage class from the Storage class menu. If you skip this step, the replicated objects will use the destination bucket's storage class by default.
- Click Done.
-
In the Choose how to store your data section, do the following:
- Select a default storage class for the bucket or Autoclass for automatic storage class management of your bucket's data.
- To enable hierarchical namespace, in the Optimize storage for data-intensive workloads section, select Enable hierarchical namespace on this bucket.
- In the Choose how to control access to objects section, select whether or not your bucket enforces public access prevention, and select an access control method for your bucket's objects.
-
In the Choose how to protect object data section, do the
following:
- Select any of the options under Data protection that you
want to set for your bucket.
- To enable soft delete, click the Soft delete policy (For data recovery) checkbox, and specify the number of days you want to retain objects after deletion.
- To set Object Versioning, click the Object versioning (For version control) checkbox, and specify the maximum number of versions per object and the number of days after which the noncurrent versions expire.
- To enable the retention policy on objects and buckets, click the Retention (For compliance) checkbox, and then do the following:
- To enable Object Retention Lock, click the Enable object retention checkbox.
- To enable Bucket Lock, click the Set bucket retention policy checkbox, and choose a unit of time and a length of time for your retention period.
- To choose how your object data will be encrypted, expand the Data encryption section (), and select a Data encryption method.
- Select any of the options under Data protection that you
want to set for your bucket.
-
In the Get started section, do the following:
- Click Create.
- Buat template alur kerja.
  gcloud dataproc workflow-templates create wordcount-template \
      --region=us-central1
- Tambahkan tugas penghitungan jumlah kata ke template alur kerja.
-
Tentukan output-bucket-name Anda sebelum menjalankan
perintah (fungsi Anda akan menyediakan bucket input).
Setelah Anda memasukkan output-bucket-name, argumen
bucket output akan terbaca sebagai berikut:
gs://your-output-bucket/wordcount-output". -
ID langkah "count"
diperlukan, dan mengidentifikasi tugas Hadoop yang ditambahkan.
          gcloud dataproc workflow-templates add-job hadoop \
              --workflow-template=wordcount-template \
              --step-id=count \
              --jar=file:///usr/lib/hadoop-mapreduce/hadoop-mapreduce-examples.jar \
              --region=us-central1 \
              -- wordcount gs://input-bucket gs://output-bucket-name/wordcount-output
-
Tentukan output-bucket-name Anda sebelum menjalankan
perintah (fungsi Anda akan menyediakan bucket input).
Setelah Anda memasukkan output-bucket-name, argumen
bucket output akan terbaca sebagai berikut:
- Gunakan cluster
terkelola,
node tunggal
untuk menjalankan alur kerja. Dataproc akan membuat
cluster, menjalankan alur kerja di cluster tersebut, lalu menghapus cluster saat alur kerja selesai.
gcloud dataproc workflow-templates set-managed-cluster wordcount-template \ --cluster-name=wordcount \ --single-node \ --region=us-central1 - Klik nama
wordcount-templatedi halaman Workflows Dataproc di konsol Google Cloud untuk membuka halaman Workflow template details. Konfirmasi atribut wordcount-template.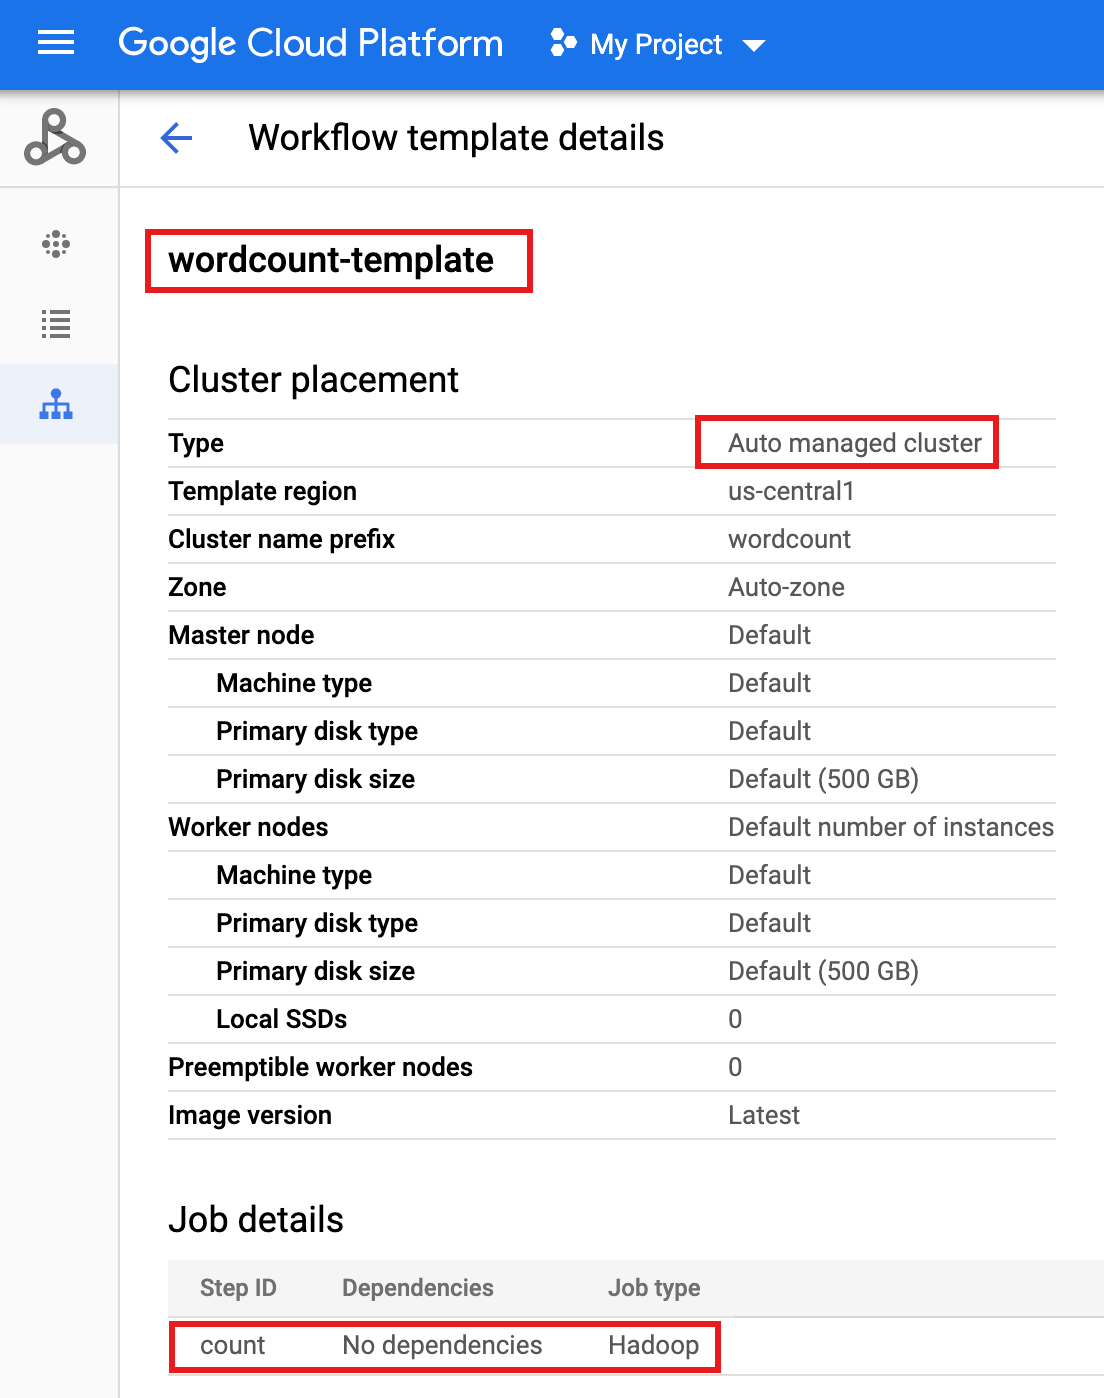
- Ekspor template alur kerja ke file teks
wordcount.yamluntuk parameterisasi.gcloud dataproc workflow-templates export wordcount-template \ --destination=wordcount.yaml \ --region=us-central1
- Dengan menggunakan editor teks, buka
wordcount.yaml, lalu tambahkan blokparameterske akhir file YAML sehingga INPUT_BUCKET_URI Cloud Storage dapat diteruskan sebagaiargs[1]ke biner wordcount saat alur kerja dipicu.Contoh file YAML yang diekspor ditampilkan di bawah. Anda dapat menggunakan salah satu dari dua pendekatan berikut untuk memperbarui template:
- Salin lalu tempel seluruh file untuk menggantikan
wordcount.yamlyang diekspor setelah mengganti your-output_bucket dengan nama bucket output Anda, ATAU - Salin, lalu tempel hanya bagian
parameterske bagian akhir filewordcount.yamlyang diekspor.
jobs: - hadoopJob: args: - wordcount - gs://input-bucket - gs://your-output-bucket/wordcount-output mainJarFileUri: file:///usr/lib/hadoop-mapreduce/hadoop-mapreduce-examples.jar stepId: count placement: managedCluster: clusterName: wordcount config: softwareConfig: properties: dataproc:dataproc.allow.zero.workers: 'true' parameters: - name: INPUT_BUCKET_URI description: wordcount input bucket URI fields: - jobs['count'].hadoopJob.args[1] - Salin lalu tempel seluruh file untuk menggantikan
- Impor file teks
wordcount.yamlyang diparameterkan. Ketik 'Y'a saat diminta untuk menimpa template.gcloud dataproc workflow-templates import wordcount-template \ --source=wordcount.yaml \ --region=us-central1
Buka halaman Cloud Run functions di Google Cloud konsol, lalu klik CREATE FUNCTION.
Di halaman Create function, masukkan atau pilih informasi berikut:
- Nama: jumlah kata
- Memori yang dialokasikan: Pertahankan pilihan default.
- Pemicu:
- Cloud Storage
- Jenis Peristiwa: Selesaikan/Buat
- Bucket: Pilih bucket input Anda (lihat Membuat bucket Cloud Storage di project Anda). Saat file ditambahkan ke bucket ini, fungsi akan memicu alur kerja. Alur kerja akan menjalankan aplikasi wordcount, yang akan memproses semua file teks dalam bucket.
Kode sumber:
- Editor inline
- Runtime: Node.js 8
- Tab
INDEX.JS: Ganti cuplikan kode default dengan kode berikut, lalu edit barisconst projectIduntuk memberikan -your-project-id- (tanpa "-" di awal atau akhir).
const dataproc = require('@google-cloud/dataproc').v1; exports.startWorkflow = (data) => { const projectId = '-your-project-id-' const region = 'us-central1' const workflowTemplate = 'wordcount-template' const client = new dataproc.WorkflowTemplateServiceClient({ apiEndpoint: `${region}-dataproc.googleapis.com`, }); const file = data; console.log("Event: ", file); const inputBucketUri = `gs://${file.bucket}/${file.name}`; const request = { name: client.projectRegionWorkflowTemplatePath(projectId, region, workflowTemplate), parameters: {"INPUT_BUCKET_URI": inputBucketUri} }; client.instantiateWorkflowTemplate(request) .then(responses => { console.log("Launched Dataproc Workflow:", responses[1]); }) .catch(err => { console.error(err); }); };- Tab
PACKAGE.JSON: Ganti cuplikan kode default dengan kode berikut.
{ "name": "dataproc-workflow", "version": "1.0.0", "dependencies":{ "@google-cloud/dataproc": ">=1.0.0"} }- Fungsi yang akan dieksekusi: Masukkan: "startWorkflow".
Klik BUAT.
Salin file publik
rose.txtke bucket Anda untuk memicu fungsi. Masukkan your-input-bucket-name (bucket yang digunakan untuk memicu fungsi Anda) dalam perintah.gcloud storage cp gs://pub/shakespeare/rose.txt gs://your-input-bucket-name
Tunggu 30 detik, lalu jalankan perintah berikut untuk memverifikasi bahwa fungsi berhasil diselesaikan.
gcloud functions logs read wordcount
...
Function execution took 1348 ms, finished with status: 'ok'
Untuk melihat log fungsi dari halaman daftar Functions di konsol Google Cloud , klik nama fungsi
wordcount, lalu klik LIHAT LOG di halaman Function details.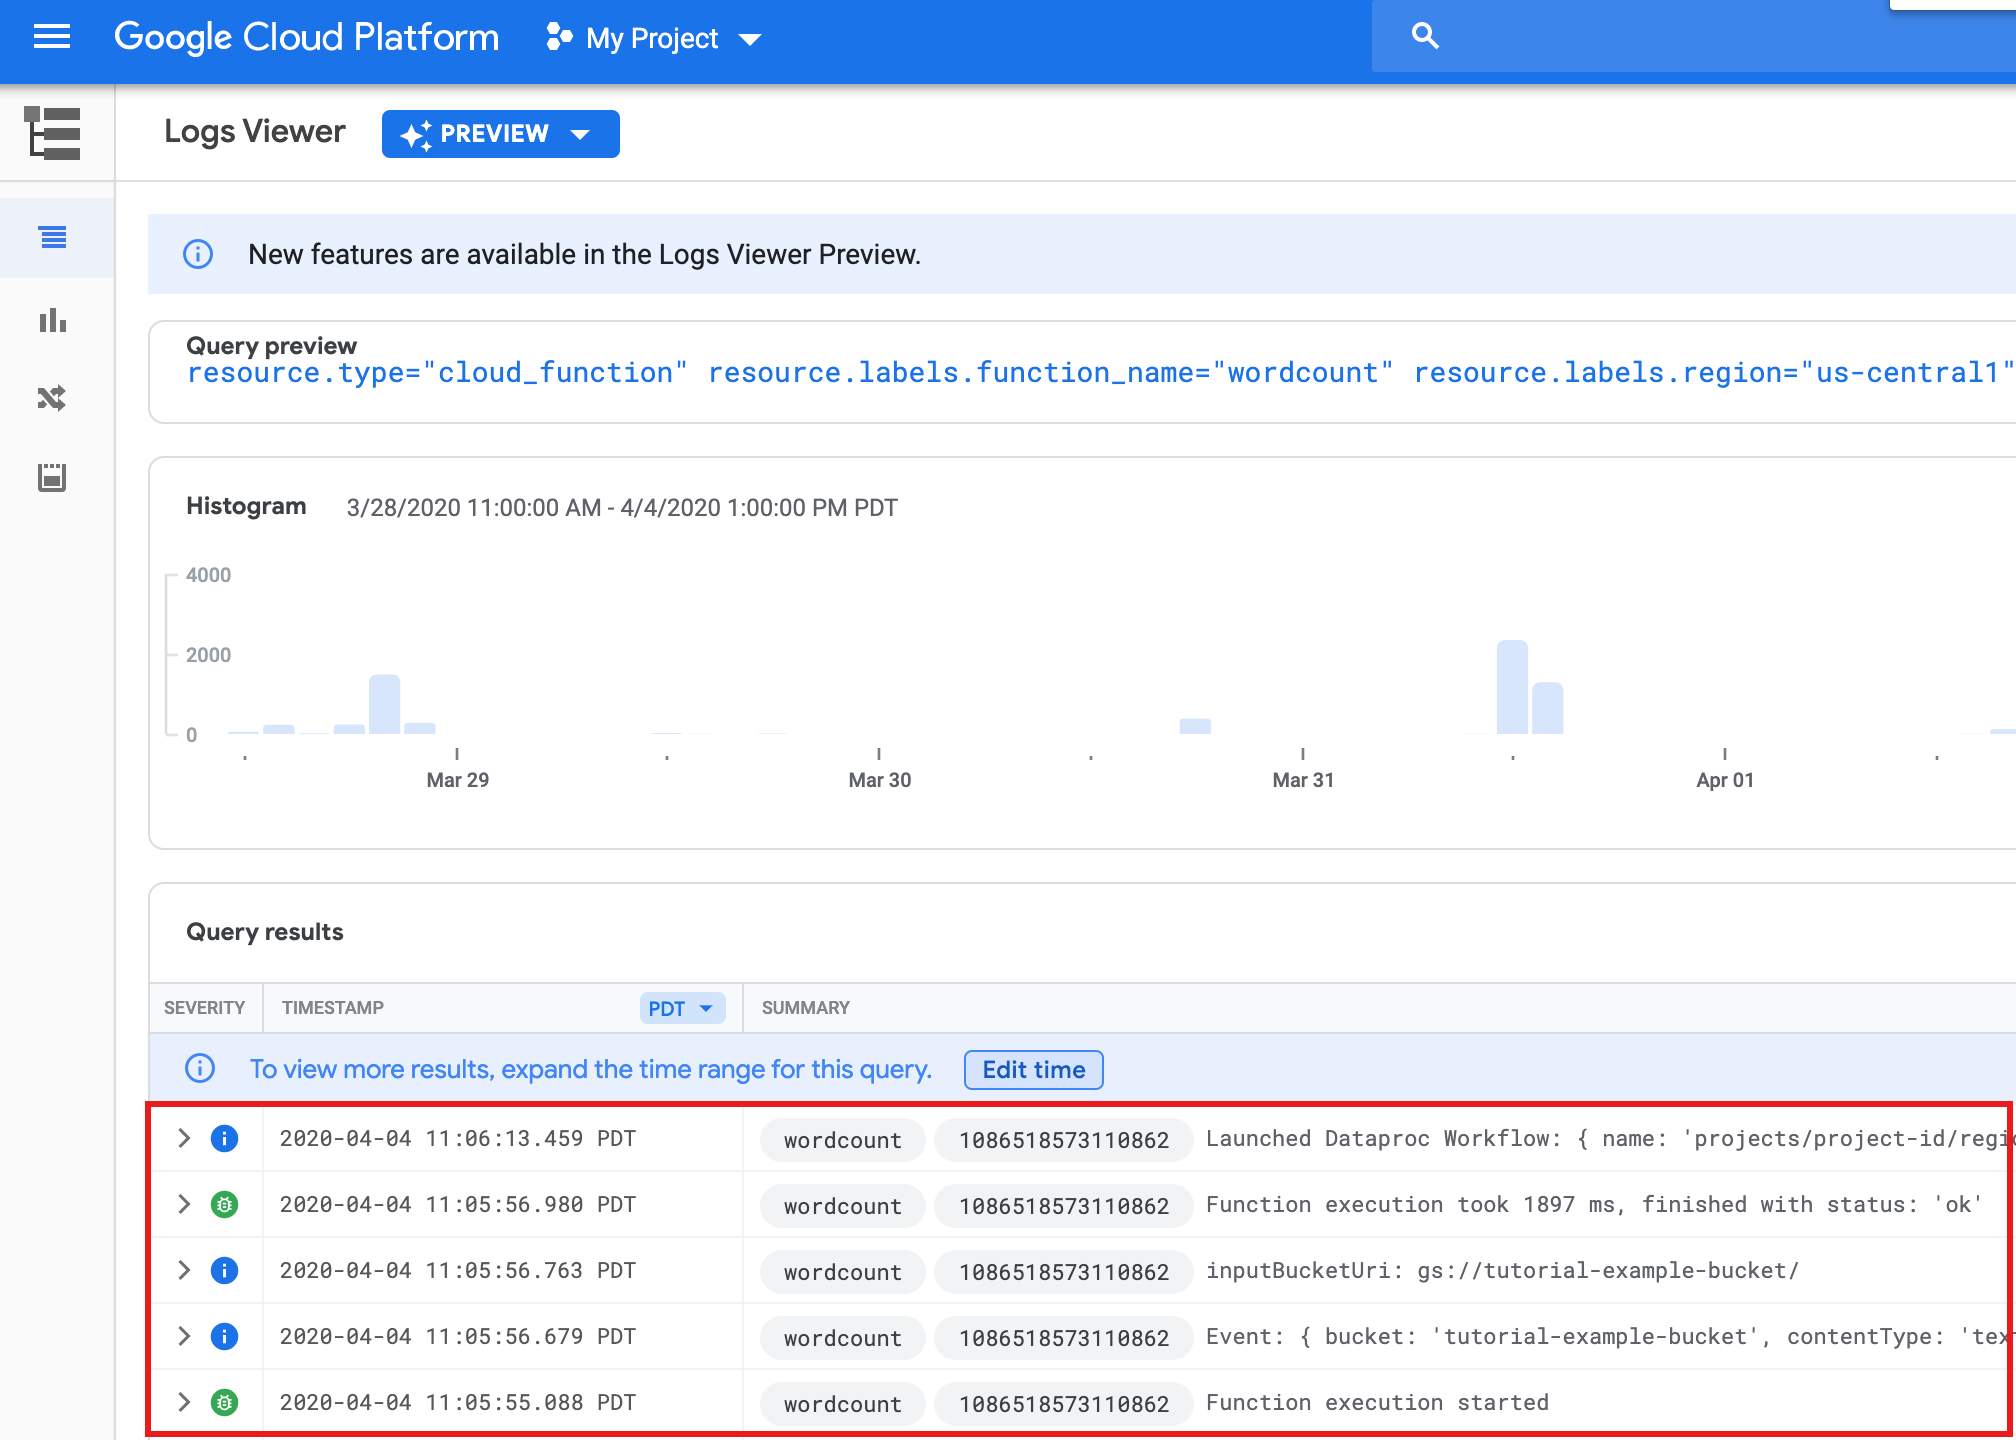
Anda dapat melihat folder
wordcount-outputdi bucket output dari halaman Storage browser di konsolGoogle Cloud .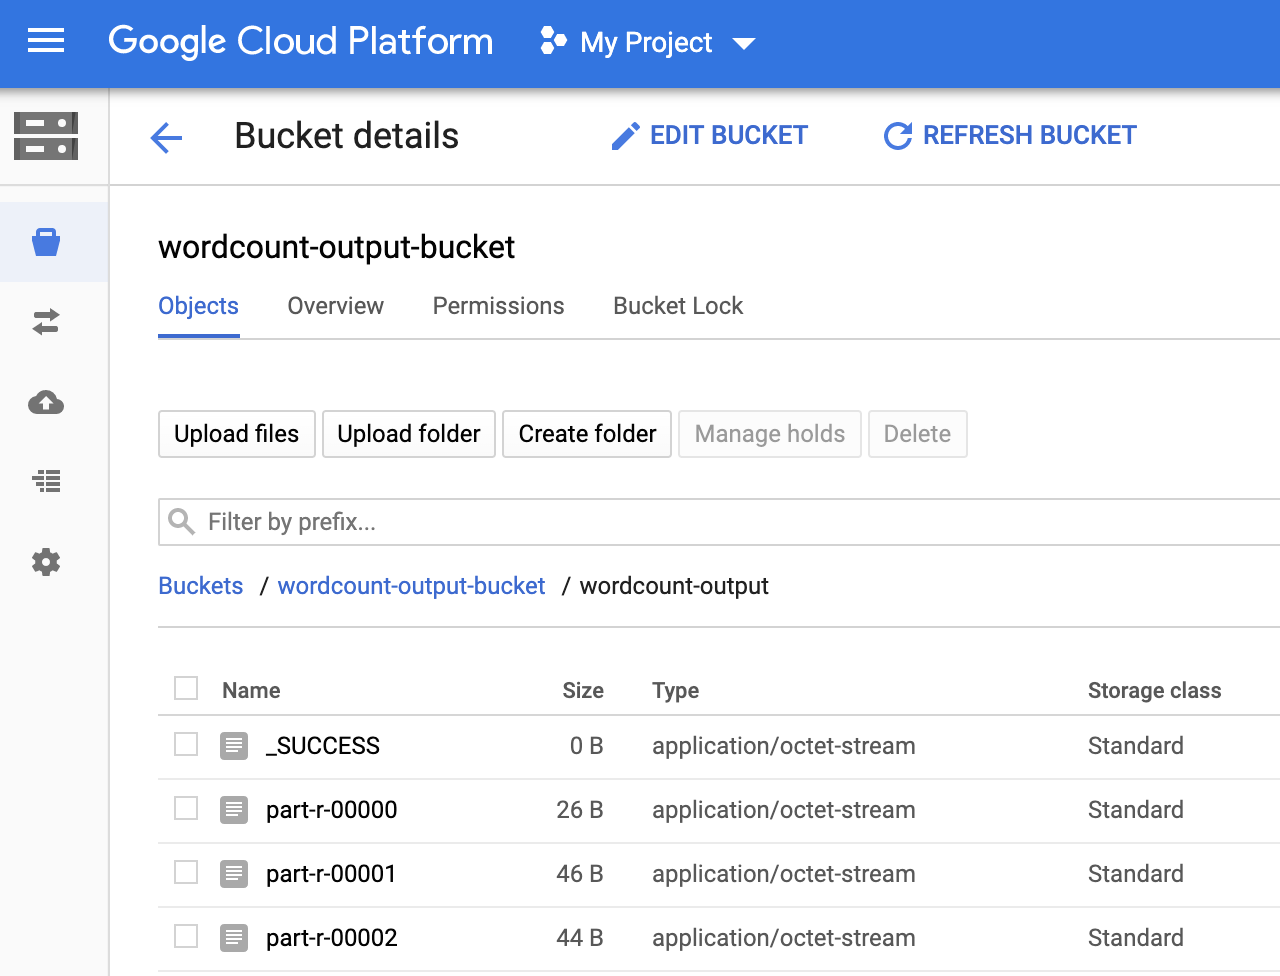
Setelah alur kerja selesai, detail tugas akan tetap ada di konsolGoogle Cloud . Klik tugas
count...yang tercantum di halaman Jobs Dataproc untuk melihat detail tugas alur kerja.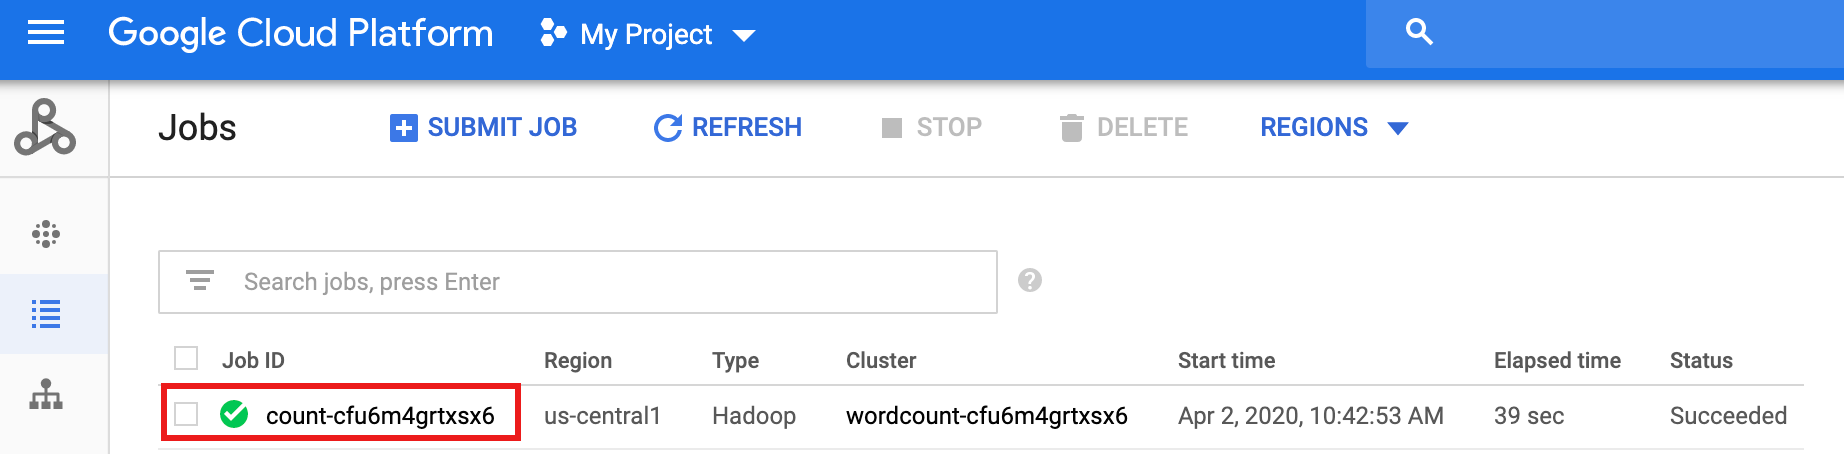
- In the Google Cloud console, go to the Manage resources page.
- In the project list, select the project that you want to delete, and then click Delete.
- In the dialog, type the project ID, and then click Shut down to delete the project.
- In the Google Cloud console, go to the Cloud Storage Buckets page.
- Click the checkbox for the bucket that you want to delete.
- To delete the bucket, click Delete, and then follow the instructions.
Buat atau gunakan dua bucket Cloud Storage di project Anda
Anda memerlukan dua bucket Cloud Storage di project Anda: satu untuk file input dan satu lagi untuk output.
Buat template workflow
Untuk membuat dan menentukan template alur kerja, salin dan jalankan perintah berikut di jendela terminal lokal atau di Cloud Shell.
Membuat parameter template alur kerja
Parameterkan variabel bucket input untuk diteruskan ke template alur kerja.
Membuat Cloud Function
Menguji fungsi
Pembersihan
Alur kerja dalam tutorial ini menghapus cluster terkelolanya saat alur kerja selesai. Untuk menghindari biaya berulang, Anda dapat menghapus resource lain yang terkait dengan tutorial ini.
Menghapus project
Menghapus bucket Cloud Storage
Menghapus template alur kerja Anda
gcloud dataproc workflow-templates delete wordcount-template \
    --region=us-central1
Menghapus Cloud Function
Buka halaman Cloud Run functions di
konsol Google Cloud , centang kotak di sebelah kiri fungsi wordcount,
lalu klik Delete.