Stay organized with collections
Save and categorize content based on your preferences.
This page describes how to connect GitHub to Agentspace.
After the initial setup and data import, the data store automatically synchronizes data from your configured source at the specified frequency.
Supported versions
GitHub connector only supports GitHub Enterprise Cloud.
Before you begin
Before you set up your connection, you must obtain a classic personal access token from the GitHub instance to integrate with Agentspace. For more information about creating a classic personal access token, see Creating a personal access token (classic).
Minimum permissions
To create a GitHub connector, a personal access token requires the minimum permissions listed in the following table. To know more about creating a classic personal access token, see Creating a personal access token (classic).
Permission
Usage reason
Description
repository
Enforce Access Control Lists (ACLs)
Allows connector to read and write to all public and private repositories, including code, commit statuses, invitations, and webhooks.
read:org
Enforce ACLs
Allows the connector to read organization projects, memberships, and team affiliations.
read:audit_log
Enforce ACLs
Allows the connector to read audit log data.
read:user
Enforce ACLs
Allows the connector to read a user's profile information.
user:email
Enforce ACLs
Allows the connector to read a user's email address.
Create a GitHub data store
Console
To use the Google Cloud console to sync data from GitHub to
, follow these steps:
In the Google Cloud console, go to the Agentspace page.
On the Select a data source page, scroll or search for GitHub and select it.
In the Authentication settings section, enter the personal access token of your GitHub instance.
Click Continue.
Optional. To allow a specific set of static IP addresses in your system, select Enable static IP addresses in the Advanced options section.
Click Continue.
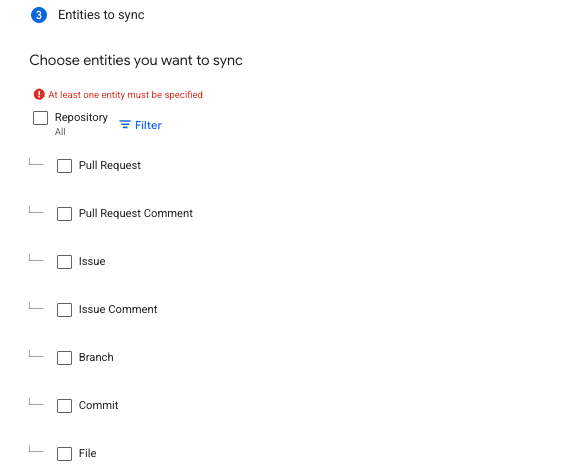
In the Entities to sync section, do the following:
Select which entities to sync:
Pull request
Pull request comment
Issue
Issue comment
Branch
Commit
File
Entities to sync
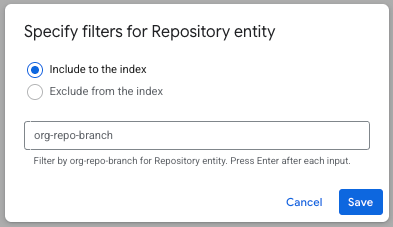
Optionally, to sync specific repositories, do the following:
Click Filter.
To filter entities out of the index select Exclude from the index or to ensure that they are included in the index select Include to the index.
Enter the filter criteria in the following format: ORG_ID/REPO_NAME/BRANCH_ID
ORG_ID: The unique identifier of the GitHub organization.
REPO_NAME: The name of the specific repository within the organization.
BRANCH_ID: The identifier of the branch within the repository. To include all branches, enter *.
Entities to sync
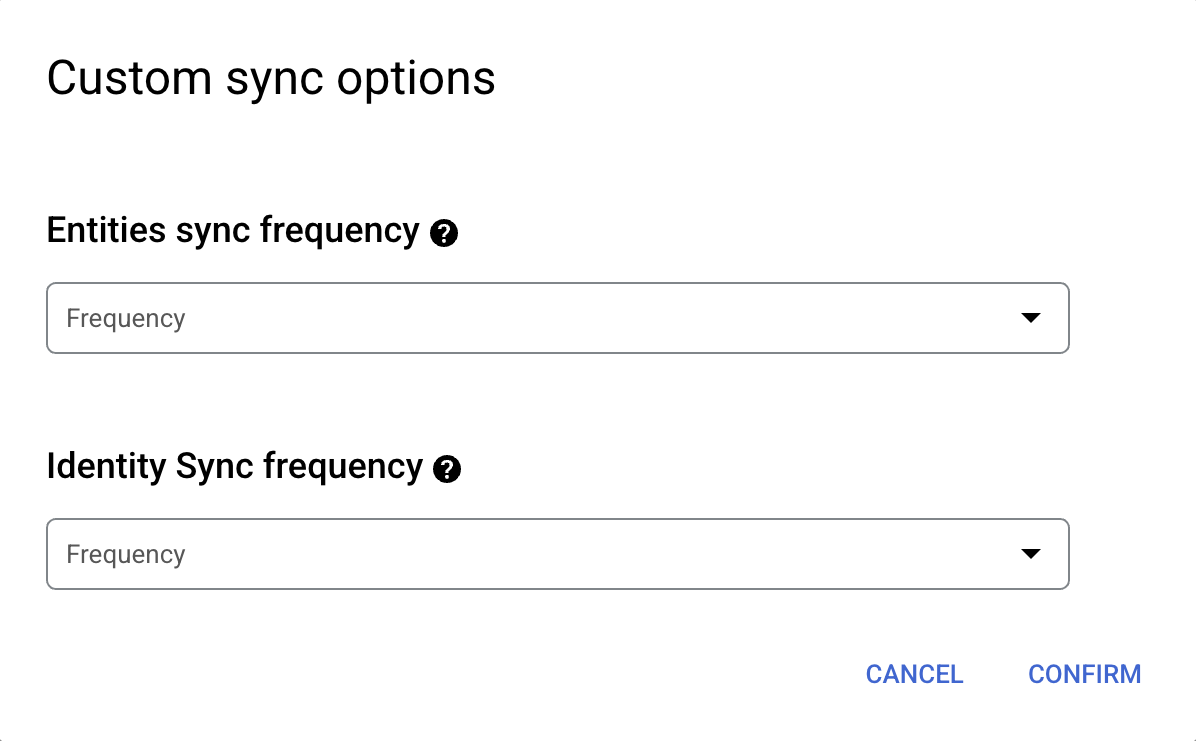
Select the Sync frequency for Full sync
and the Incremental sync frequency for Incremental data sync.
For more information, see
Sync schedules.
If you want to schedule separate full syncs of entity and identity data,
expand the menu under Full sync and then select Custom options.
Setting separate schedules for full entity sync and full identity sync.
In the Configure your data connector section:
Select a region for your data store.
You cannot change the region later. For more information on multi-regions, see Agentspace locations.
Enter a name for your data connector. You can change the name later.
Optional. To change the data connector ID after entering the name, click Edit and change the value. You cannot change the data connector ID after creating the data store.
Click Create. Agentspace creates your
data store and displays it on the Data Stores page.
To check the status of your ingestion, go to the Data stores page and
click your data store name to see details about it on its Data page. The
Connector state changes from Creating to Running when it starts
synchronizing data. When ingestion is complete, the state changes to
Active to indicate that the connection to your data source is set up and
awaiting the next scheduled synchronization. Depending on the size of your data,
ingestion can take several minutes or several hours.
Known limitations
Only classic personal access tokens are supported by the GitHub connector.
Rate limits
GitHub limits API requests to 5000 per hour for the connector.
[[["Easy to understand","easyToUnderstand","thumb-up"],["Solved my problem","solvedMyProblem","thumb-up"],["Other","otherUp","thumb-up"]],[["Hard to understand","hardToUnderstand","thumb-down"],["Incorrect information or sample code","incorrectInformationOrSampleCode","thumb-down"],["Missing the information/samples I need","missingTheInformationSamplesINeed","thumb-down"],["Other","otherDown","thumb-down"]],["Last updated 2025-09-03 UTC."],[],[],null,["# Connect GitHub\n\n\u003cbr /\u003e\n\n| **Preview:** You must be on the allowlist to use this connector.\n\n\u003cbr /\u003e\n\nThis page describes how to connect GitHub to Agentspace.\n\nAfter the initial setup and data import, the data store automatically synchronizes data from your configured source at the specified frequency.\n\nSupported versions\n------------------\n\nGitHub connector only supports GitHub Enterprise Cloud.\n\nBefore you begin\n----------------\n\nBefore you set up your connection, you must obtain a classic personal access token from the GitHub instance to integrate with Agentspace. For more information about creating a classic personal access token, see [Creating a personal access token (classic)](https://docs.github.com/en/authentication/keeping-your-account-and-data-secure/managing-your-personal-access-tokens#creating-a-personal-access-token-classic).\n\nMinimum permissions\n-------------------\n\nTo create a GitHub connector, a personal access token requires the minimum permissions listed in the following table. To know more about creating a classic personal access token, see [Creating a personal access token (classic)](https://docs.github.com/en/authentication/keeping-your-account-and-data-secure/managing-your-personal-access-tokens#creating-a-personal-access-token-classic).\n\nCreate a GitHub data store\n--------------------------\n\n### Console\n\nTo use the Google Cloud console to sync data from GitHub to\n, follow these steps:\n\n1. In the Google Cloud console, go to the **Agentspace** page.\n\n [Agentspace](https://console.cloud.google.com/gen-app-builder/)\n2. In the navigation menu, click **Data stores**.\n\n3. Click add **Create data store**.\n\n4. On the **Select a data source** page, scroll or search for **GitHub** and select it.\n\n5. In the **Authentication settings** section, enter the personal access token of your GitHub instance.\n\n6. Click **Continue**.\n\n7. Optional. To allow a specific set of static IP addresses in your system, select **Enable static IP addresses** in the **Advanced options** section.\n\n8. Click **Continue**.\n\n9. In the **Entities to sync** section, do the following:\n\n 1. Select which entities to sync:\n\n - Pull request\n - Pull request comment\n - Issue\n - Issue comment\n - Branch\n - Commit\n - File Entities to sync\n 2. Optionally, to sync specific repositories, do the following:\n\n 1. Click **Filter**.\n 2. To filter entities out of the index select **Exclude from the index** or to ensure that they are included in the index select **Include to the index**.\n 3. Enter the filter criteria in the following format: \u003cvar translate=\"no\"\u003eORG_ID\u003c/var\u003e/\u003cvar translate=\"no\"\u003eREPO_NAME\u003c/var\u003e/\u003cvar translate=\"no\"\u003eBRANCH_ID\u003c/var\u003e\n - \u003cvar translate=\"no\"\u003eORG_ID\u003c/var\u003e: The unique identifier of the GitHub organization.\n - \u003cvar translate=\"no\"\u003eREPO_NAME\u003c/var\u003e: The name of the specific repository within the organization.\n - \u003cvar translate=\"no\"\u003eBRANCH_ID\u003c/var\u003e: The identifier of the branch within the repository. To include all branches, enter `*`. Entities to sync\n10. Select the **Sync frequency** for **Full sync**\n and the **Incremental sync frequency** for **Incremental data sync** .\n For more information, see\n [Sync schedules](/agentspace/docs/introduction-to-connectors-and-data-stores#sync-schedules).\n\n If you want to schedule separate full syncs of entity and identity data,\n expand the menu under **Full sync** and then select **Custom options**.\n Setting separate schedules for full entity sync and full identity sync.\n11. In the **Configure your data connector** section:\n\n 1. Select a region for your data store.\n You cannot change the region later. For more information on multi-regions, see [Agentspace locations](/agentspace/docs/locations).\n\n 2. Enter a name for your data connector. You can change the name later.\n\n 3. Optional. To change the data connector ID after entering the name, click **Edit** and change the value. You cannot change the data connector ID after creating the data store.\n\n 4. Click **Create** . Agentspace creates your\n data store and displays it on the **Data Stores** page.\n\nTo check the status of your ingestion, go to the **Data stores** page and\nclick your data store name to see details about it on its **Data** page. The\n**Connector state** changes from **Creating** to **Running** when it starts\nsynchronizing data. When ingestion is complete, the state changes to\n**Active** to indicate that the connection to your data source is set up and\nawaiting the next scheduled synchronization. Depending on the size of your data,\ningestion can take several minutes or several hours.\n\n\u003cbr /\u003e\n\nKnown limitations\n-----------------\n\n- Only classic personal access tokens are supported by the GitHub connector.\n\nRate limits\n-----------\n\n- GitHub limits API requests to 5000 per hour for the connector.\n\nNext steps\n----------"]]