Instead of syncing people data from Google Workspace, you can import people data from Cloud Storage or BigQuery. This page describes how to create a people search connector and import custom data about people from a Cloud Storage bucket or a BigQuery table.
Before you begin
- You must have your people data in a BigQuery table or a Cloud Storage bucket.
- You must have your data in a Google-specified schema. For details about the schema, see Google-specified schema for people data.
Ingest people data from a custom source
To use the Google Cloud console to ingest people data, follow these steps:
Console
In the Google Cloud console, go to the Agentspace page.
Go to the Data Stores page.
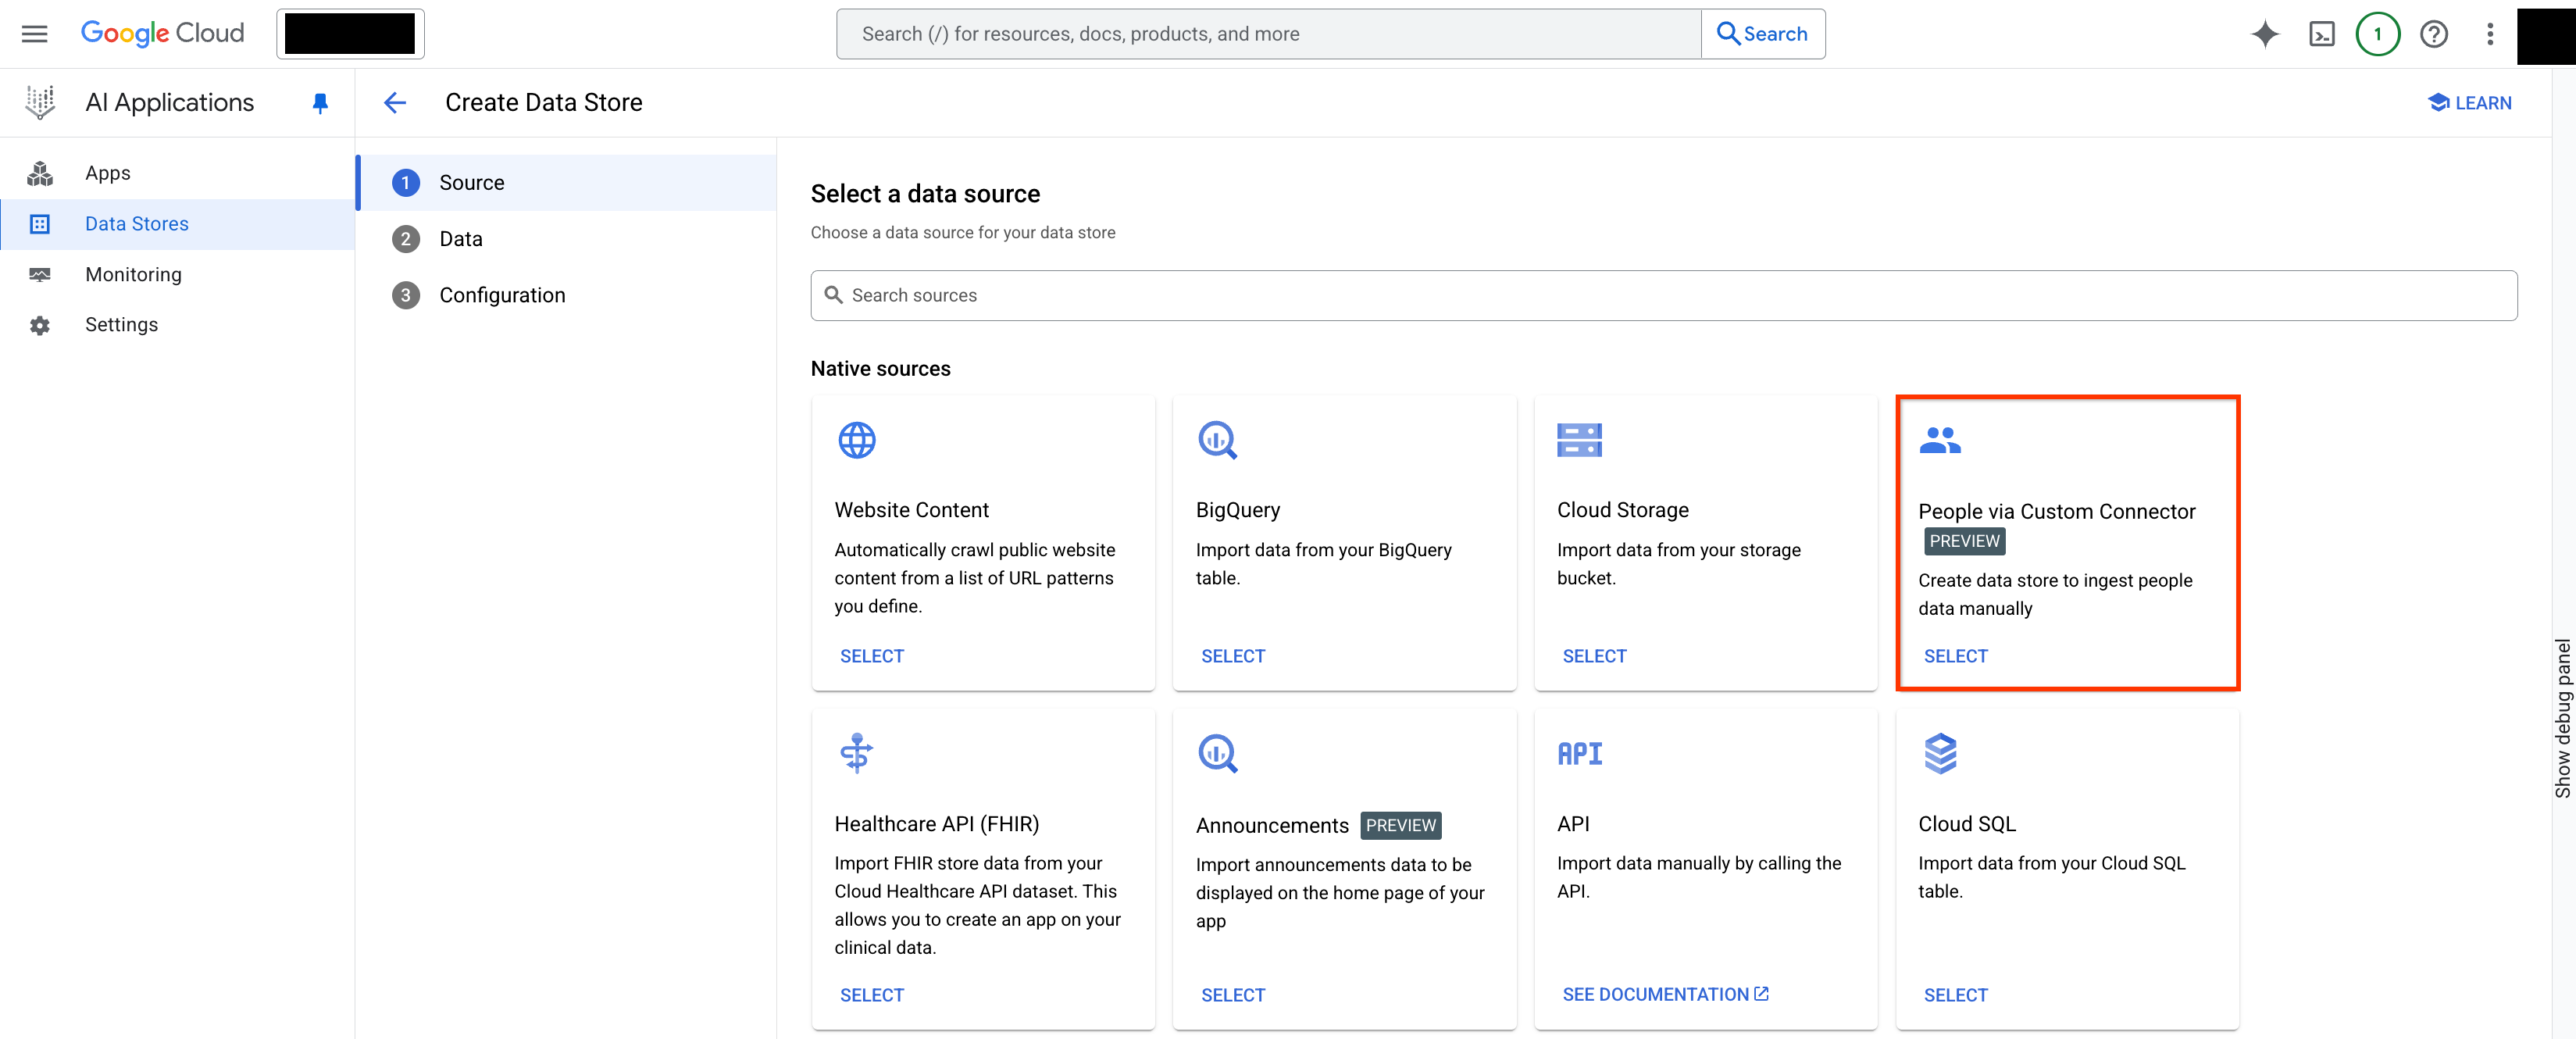
Click Create Data Store.

Create a new data store. On the Select a data source page, in the Cloud sources section, select People via Custom Connector.
Select a data source. Import the people data:
Import later: If you haven't imported your people data to Cloud SQL or BigQuery yet, select Import later.
BigQuery: Import the data from a BigQuery table.
Cloud Storage: Import the data from a Cloud Storage table.
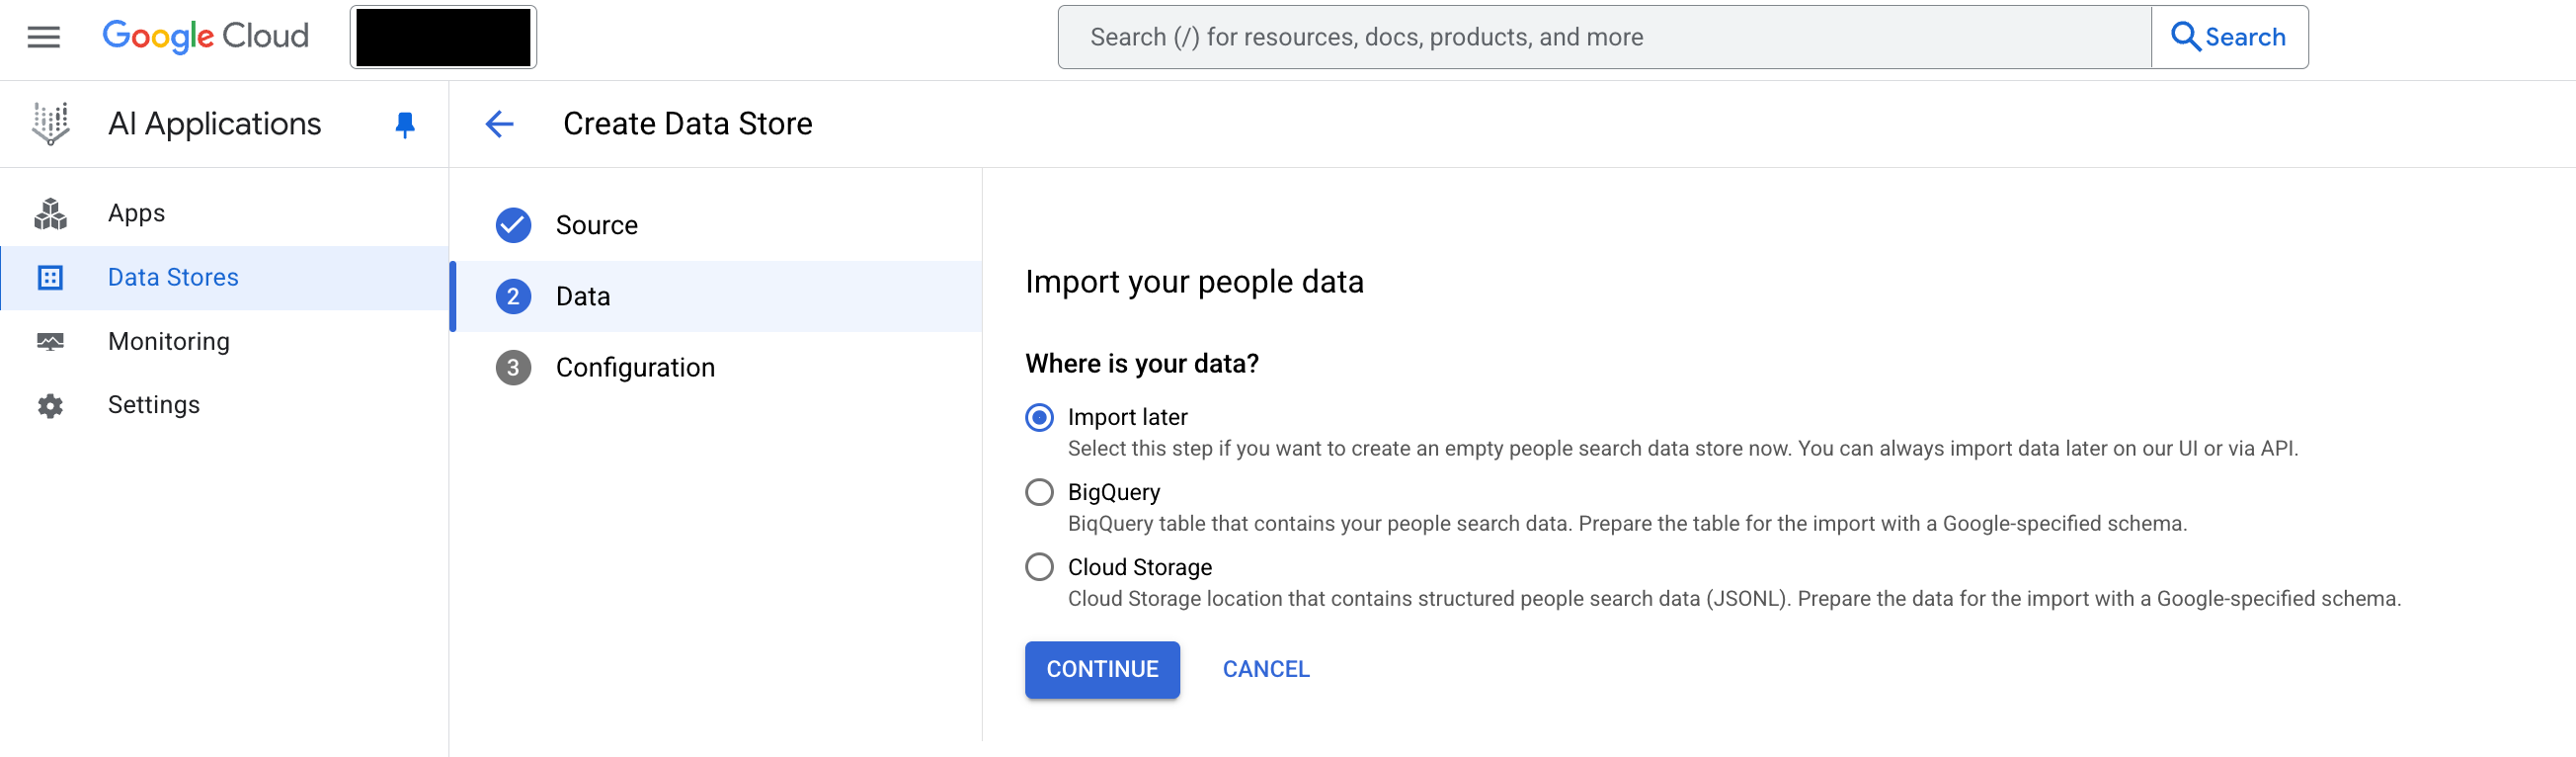
Import people data. Click Continue.
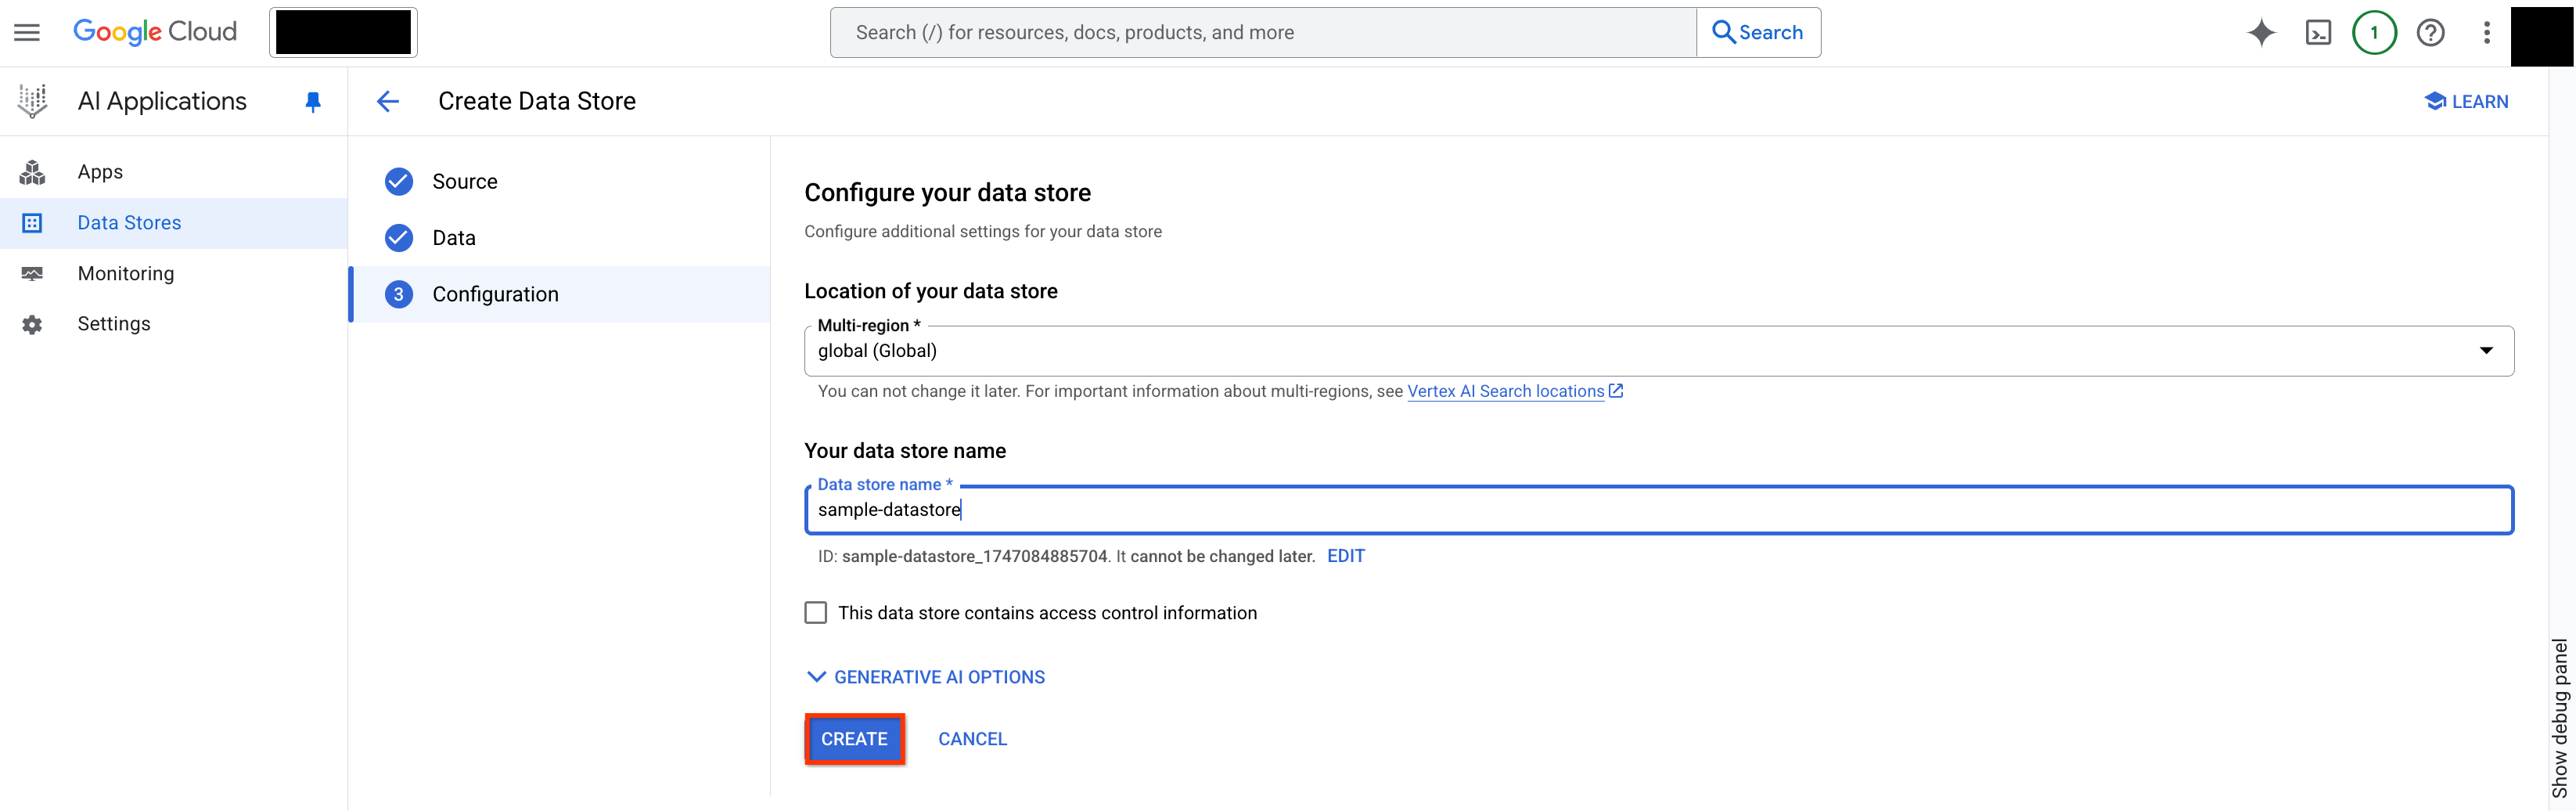
Choose a region for your data store.
Enter a name for your data store.
Optional: If the data needs to be access controlled, select This data store contains access control information. For more information, see Data source access control.
Click Create.
Configure the data connector. To check the status of your ingestion, go to the Data Stores page and click your data store name to see details about it on its Data page. When the status column on the Activity tab changes from In progress to Import completed, the ingestion is complete.
Depending on the size of your data, ingestion can take several minutes or several hours.
Customize search results
To include or exclude personal information from the search results, follow these steps:
In your data store, click the Entity tab, and click Users.
In the Users page, click the Schema tab.
Click Edit.
Select or clear the attributes, such as country, to specify whether they're retrievable, searchable, and indexable. To be searchable, the attribute must be marked Retrievable, Indexable, and Searchable.
Click Save.
Preview people search results
If you have already connected the data store to an app, click Apps, and click the name of your app.
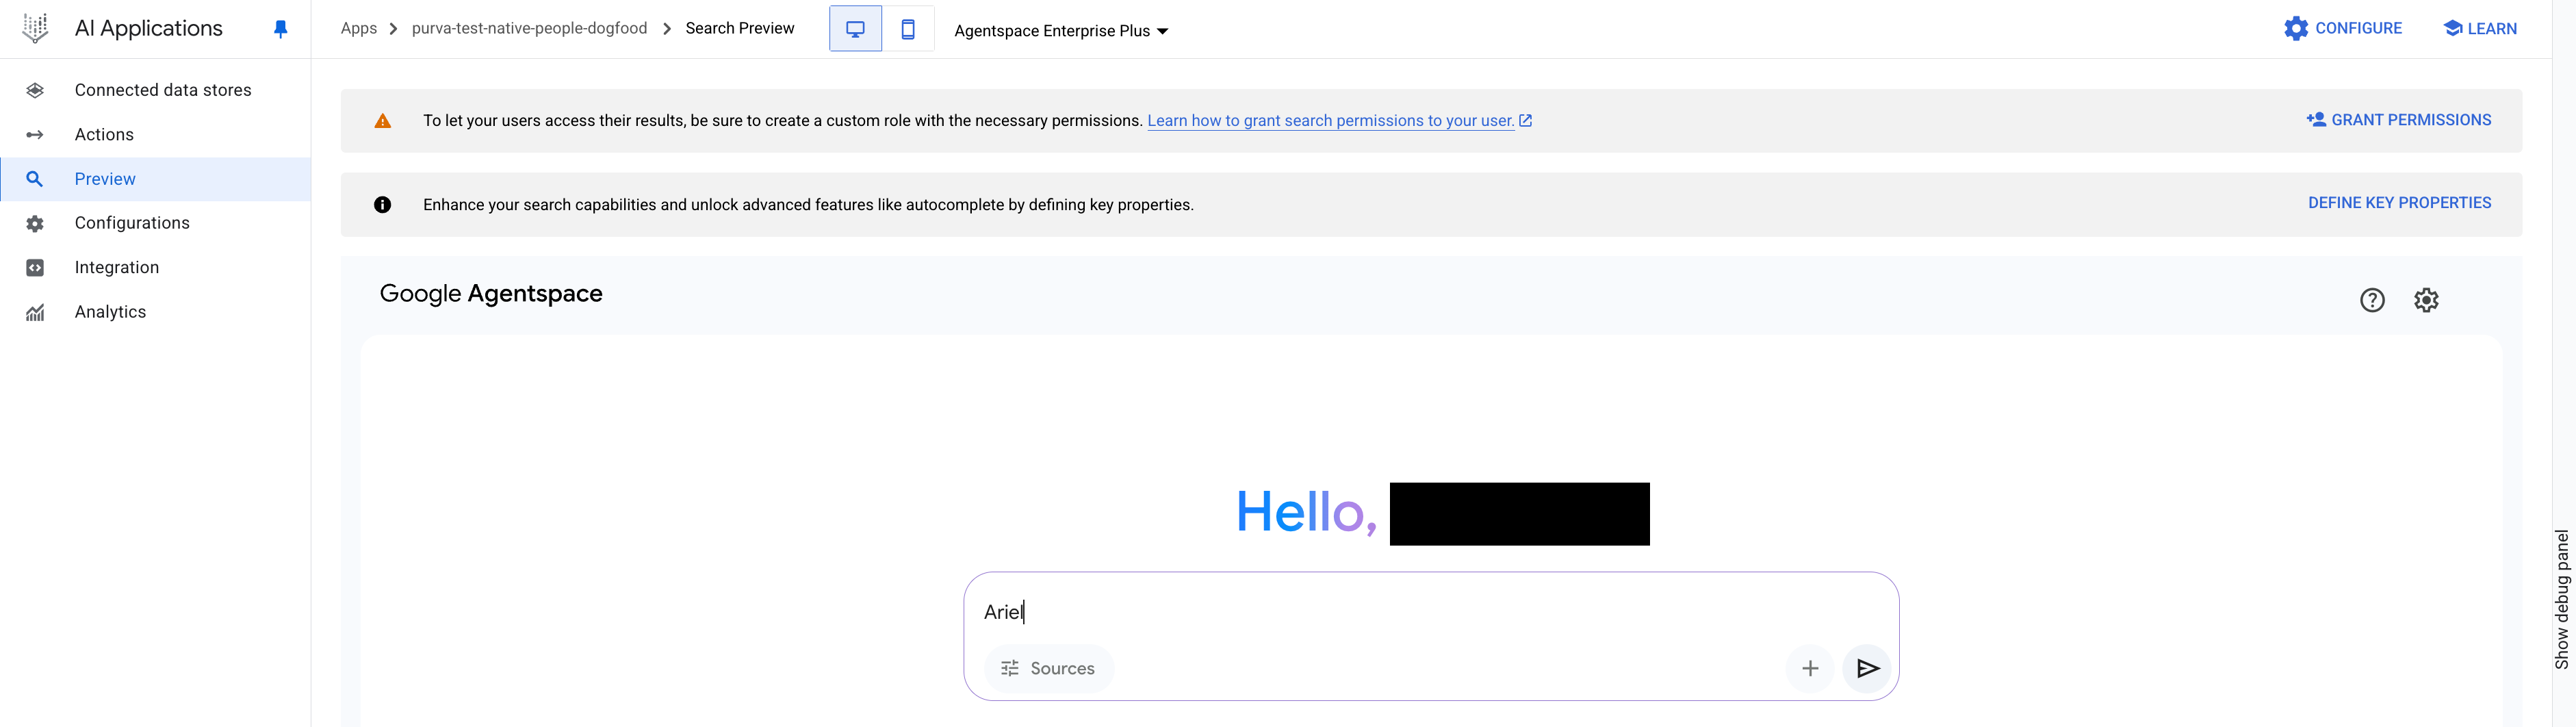
Click Preview.
Search for people in your organization using the search bar. The search results show details such as name, job title, email, and profile picture.
To open your Agentspace Enterprise web app in a browser, see View the search web app.
Preview the search results. If you have made custom attributes searchable, then you can use the attributes in searches, but the attributes themselves aren't returned in profiles. For example, if
team-positionis a custom attribute and marked retrievable, indexable, and searchable in the schema, then you can search for people with a specific team position, such as "tech lead". You get a list of people who have that position, but the output won't include the words "tech lead".
View the search web app
To view your Agentspace web app, do the following:
In the navigation menu, click Integration.
Make sure that Enable the Web App is enabled.
In the The link to your web app section, click Copy and open the link in your browser.
Example Organization-defined schema fields for people data
The data set for each person must be formatted according to the following schema. In the example of a file imported from Cloud Storage, each line of the JSONL file represents a person. A valid but minimal file might look as follows:
{"id":"01","structData":{"personId":"01","name":{"familyName":"Doe","givenName":"Jane"},"email":{"type":"work","value":"jdoe@example.com"}}}
{"id":"02","structData":{"personId":"02","name":{"familyName":"Kumar","givenName":"Ashok"},"email":{"type":"home","value":"akumar@example.net"}}}
Field Name |
Type |
Repeatable |
Indexable |
Retrievable |
Searchable |
Description |
|---|---|---|---|---|---|---|
personId |
string |
N |
Y |
Y |
Y |
The person’s unique ID. Required field. The value
of the |
name.familyName |
string |
N |
Y |
Y |
Y |
The person’s family name/last name. |
name.givenName |
string |
N |
Y |
Y |
Y |
The person’s given name/first name. |
name.displayName |
string |
N |
Y |
Y |
Y |
The person’s display name. |
name.username |
string |
N |
Y |
Y |
Y |
The person’s username. |
emails.type |
string |
Y |
N |
N |
N |
The type of the email account, such as "work", "home", "other", or "custom". |
emails.value |
string |
Y |
Y |
Y |
Y |
The person's email address, such as "acruz@example.net". |
phoneNumbers.type |
string |
Y |
Y |
Y |
Y |
The type of the phone number, such as "office", "mobile", or "other". |
phoneNumbers.value |
string |
Y |
Y |
Y |
Y |
The person's phone number, such as "+1 800-555-1212". |
suspended |
boolean |
N |
N |
N |
N |
Whether the person is suspended with the organization. |
employeeId |
string |
N |
Y |
Y |
Y |
The person’s employee ID. |
employeeType |
string |
N |
Y |
Y |
Y |
The person’s employee type, such as "FTE", "Intern", or "Temp". |
employmentStatus |
string |
N |
N |
N |
N |
The person’s employment status. |
availabilityStatus |
string |
N |
N |
N |
N |
The person’s availability status, such as "OOO", "WFH", or "In Meeting". |
creationDate |
datetime |
N |
N |
N |
N |
The person’s creation date in the source system. |
modifiedDate |
datetime |
N |
N |
N |
N |
The person’s last modified date in the source system. |
deletionDate |
datetime |
N |
N |
N |
N |
The person’s deletion date in the source system. |
hireDate |
datetime |
N |
Y |
Y |
N |
The date when the person was hired. |
gender.addressMeAs |
string |
N |
Y |
Y |
Y |
The person’s preferred pronoun choice, such as "he/him", "she/her", or "they/them". |
gender.type |
string |
N |
Y |
Y |
Y |
The person’s gender, such as "male", "female", or "other". |
displayPhoto.url |
string |
N |
Y |
Y |
Y |
The URL of the photo. |
displayPhoto.imageBinary |
string |
N |
Y |
Y |
Y |
The Base64 encoded string of the image binary of the photo. |
displayPhoto.format |
string |
N |
Y |
Y |
Y |
The format of the image binary, such as “png”. |
addresses.country |
string |
Y |
Y |
Y |
Y |
The country of the associated address, such as "United States". |
addresses.countryCode |
string |
Y |
N |
N |
N |
The country code of the associated address, such as "US". |
addresses.locality |
string |
Y |
Y |
Y |
Y |
The locality of the associated address, such as "Mountain View". |
addresses.poBox |
string |
Y |
N |
N |
N |
The PO Box of the associated address, such as "PO Box 123". |
addresses.postalCode |
string |
Y |
N |
N |
N |
The postal code of the associated address, such as "94045". |
addresses.region |
string |
Y |
N |
N |
N |
The region of the associated address, such as "CA". |
addresses.streetAddress |
string |
Y |
Y |
Y |
Y |
The associated street address, such as "1800 Amphibious Blvd.”. |
addresses.type |
string |
Y |
N |
N |
N |
The type of the associated address, such as "home", "work", or "other". |
location.value |
string |
N |
Y |
Y |
Y |
The person's office location, such as "London". |
location.buildingId |
string |
N |
Y |
Y |
Y |
The building ID of the person's office location, such as "London". |
location.deskCode |
string |
N |
Y |
Y |
Y |
The desk code of the person's office location, such as "5C1C". |
location.floorName |
string |
N |
Y |
Y |
Y |
The floor name of the person's office location, such as "Floor 5". |
location.floorSection |
string |
N |
Y |
Y |
Y |
The floor section of the location, such as "Section C". |
location.type |
string |
N |
N |
N |
N |
The type of the location, such as "desk", or "building". |
organizations.department |
string |
Y |
Y |
Y |
Y |
The department of the organization, such as "Engineering". |
organizations.description |
string |
Y |
N |
N |
N |
The description of the organization. |
organizations.jobTitle |
string |
Y |
Y |
Y |
Y |
The person’s job title, such as "Software Engineer". |
organizations.location |
string |
Y |
Y |
Y |
Y |
The location of the organization, such as "London". |
organizations.name |
string |
Y |
Y |
Y |
Y |
The name of the organization. |
organizations.symbol |
string |
Y |
N |
N |
N |
The ticker symbol of the organization. |
organizations.costCenter |
string |
Y |
Y |
Y |
Y |
The cost center of the organization, such as "75B". |
organizations.type |
string |
Y |
N |
N |
N |
The type of the organization, such as "work" or "other". |
organizations.projects.name |
string |
Y |
Y |
Y |
Y |
The name of the person's assigned project, such as "ML Ops". |
organizations.projects.description |
string |
Y |
N |
N |
N |
The description of the person's assigned project, such as "Build world's best ML infra". |
organizations.projects.role |
string |
Y |
N |
N |
N |
The role of the person in the project, such as "Lead". |
managers.personId |
string |
Y |
Y |
Y |
Y |
The personId of the person’s current management chain, starting from immediate manager to the highest manager. |
managers.email |
string |
Y |
Y |
Y |
Y |
The email address of each manager in the person’s current management chain, starting at immediate manager and ending at the highest manager. |
dottedLineReports.personId |
string |
Y |
N |
N |
N |
The person's dotted line report(s) ( |
dottedLineReports.email |
string |
Y |
N |
N |
N |
The person's dotted line reports ( |
topCoworkers.personId |
string |
Y |
N |
N |
N |
The person’s coworker(s) ( |
topCoworkers.affinityScore |
number |
Y |
N |
N |
N |
The person’s affinity score relative to coworkers (used in ranking). |
admins.personId |
string |
Y |
N |
N |
N |
Person's assigned admin(s) ( |
admins.email |
string |
Y |
N |
N |
N |
Person's assigned admins ( |
websites.type |
string |
Y |
N |
N |
N |
Person's website type, such as "work", "blog", or "other". |
websites.value |
string |
Y |
N |
N |
N |
The type of the website, such as "https://example-pet-store.com". |
directManager.personId |
string |
N |
Y |
Y |
Y |
The personId of the person’s direct/immediate manager. |
Example payload for BigQuery
INSERT INTO `playground-koyel.ibank_ccai_uat.people_connector_3` (id, structData)
WITH records_to_insert AS (
  SELECT [
    -- Record 1: jdoe
    STRUCT('jdoe' as id, STRUCT(
        "jdoe" AS personId,
        STRUCT("Doe","Jane","Jane Doe","jdoe") AS name,
        [STRUCT("work","jdoe@example.net")] AS emails,
        [STRUCT("personal","9131568042")] AS phoneNumbers,
        false AS suspended,
        "13" AS employeeId,
        CAST(NULL AS STRING) as employeeType,
        CAST(NULL AS STRING) as employmentStatus,
        "focus" AS availabilityStatus,
        CAST(NULL AS DATETIME) AS creationDate,
        CAST(NULL AS DATETIME) AS modifiedDate,
        CAST(NULL AS DATETIME) AS deletionDate,
        CAST(NULL AS DATETIME) AS hireDate,
        STRUCT("Male","Male") AS gender,
        STRUCT(CAST(NULL AS STRING) AS url, CAST(NULL AS STRING) AS imageBinary, "png" as format) AS displayPhoto,
        [STRUCT("India","IN","Bangalore",CAST(NULL AS STRING),CAST(NULL AS STRING),CAST(NULL AS STRING),CAST(NULL AS STRING),CAST(NULL AS STRING))] AS addresses,
        STRUCT("Bangalore","IN-LOCATION-01",CAST(NULL AS STRING),"7",CAST(NULL AS STRING),CAST(NULL AS STRING)) AS location,
        [STRUCT("Engineering","Our mission is to help organizations be more productive by making contextually relevant information and collaborators accessible at the right time","Software Engineer","Bangalore","Intranet search",CAST(NULL AS STRING),"80997GX000",CAST(NULL AS STRING),[STRUCT("People Search",CAST(NULL AS STRING),"Individual Contributor")])] AS organizations,
        [STRUCT("dwilson",CAST(NULL AS STRING)),STRUCT("smiller",CAST(NULL AS STRING)),STRUCT("jmartinez",CAST(NULL AS STRING))] AS managers,
        CAST(NULL AS ARRAY<STRUCT<personId STRING, email STRING>>) AS dottedLineReports,
        CAST(NULL AS ARRAY<STRUCT<personId STRING, affinityScore NUMERIC>>) AS topCoworkers,
        CAST(NULL AS ARRAY<STRUCT<personId STRING, email STRING>>) AS admins,
        [STRUCT("personal","https://jdoe.myownpersonaldomain.com")] AS websites,
        STRUCT("dwilson") AS directManager
    ) AS structData),

    -- Record 2: psmith
    STRUCT('psmith' as id, STRUCT(
        "psmith",
        STRUCT("Smith","Peter","Peter Smith","psmith"),
        [STRUCT("work","psmith@example.net")],
        [STRUCT("personal","abc")],
        false, "1249989", CAST(NULL AS STRING), CAST(NULL AS STRING), "focus", CAST(NULL AS DATETIME), CAST(NULL AS DATETIME), CAST(NULL AS DATETIME), CAST(NULL AS DATETIME),
        STRUCT("Male","Male"),
        CAST(NULL AS STRUCT<url STRING, imageBinary STRING, format STRING>),
        [STRUCT("India","IN","Bangalore",CAST(NULL AS STRING),CAST(NULL AS STRING),CAST(NULL AS STRING),CAST(NULL AS STRING),CAST(NULL AS STRING))],
        STRUCT("Bangalore","IN-LOCATION-01",CAST(NULL AS STRING),"7",CAST(NULL AS STRING),CAST(NULL AS STRING)),
        [STRUCT("Engineering","Our mission is to help organizations be more productive by making contextually relevant information and collaborators accessible at the right time","Software Engineer","Bangalore","Intranet search",CAST(NULL AS STRING),"80997GX000",CAST(NULL AS STRING),[STRUCT("ACL",CAST(NULL AS STRING),"Individual Contributor")])],
        [STRUCT("dwilson",CAST(NULL AS STRING)),STRUCT("smiller",CAST(NULL AS STRING)),STRUCT("jmartinez",CAST(NULL AS STRING))],
        CAST(NULL AS ARRAY<STRUCT<personId STRING, email STRING>>), CAST(NULL AS ARRAY<STRUCT<personId STRING, affinityScore NUMERIC>>), CAST(NULL AS ARRAY<STRUCT<personId STRING, email STRING>>),
        CAST(NULL AS ARRAY<STRUCT<type STRING, value STRING>>),
        STRUCT("dwilson")
    ) AS structData),

    -- Record 3: mgarcia
    STRUCT('mgarcia' as id, STRUCT(
        "mgarcia",
        STRUCT("Garcia","Maria","Maria Garcia","mgarcia"),
        [STRUCT("work","mgarcia@example.net")],
        [STRUCT("personal","abc")],
        false, "1204052", CAST(NULL AS STRING), CAST(NULL AS STRING), "focus", CAST(NULL AS DATETIME), CAST(NULL AS DATETIME), CAST(NULL AS DATETIME), CAST(NULL AS DATETIME),
        STRUCT("Female","Female"),
        CAST(NULL AS STRUCT<url STRING, imageBinary STRING, format STRING>),
        [STRUCT("India","IN","Bangalore",CAST(NULL AS STRING),CAST(NULL AS STRING),CAST(NULL AS STRING),CAST(NULL AS STRING),CAST(NULL AS STRING))],
        STRUCT("Bangalore","IN-LOCATION-01",CAST(NULL AS STRING),"7",CAST(NULL AS STRING),CAST(NULL AS STRING)),
        [STRUCT("Engineering","Our mission is to help organizations be more productive by making contextually relevant information and collaborators accessible at the right time","Software Engineer","Bangalore","Intranet search",CAST(NULL AS STRING),"80997GX000",CAST(NULL AS STRING),[STRUCT("People Search",CAST(NULL AS STRING),"Individual Contributor")]), STRUCT("gBadminton","To organize our team's badminton community and make the sport accessible to all.","Organizer","Bangalore","OneBlr",CAST(NULL AS STRING),CAST(NULL AS STRING),CAST(NULL AS STRING),CAST(NULL AS ARRAY<STRUCT<name STRING, description STRING, role STRING>>))],
        [STRUCT("dwilson",CAST(NULL AS STRING)),STRUCT("smiller",CAST(NULL AS STRING)),STRUCT("jmartinez",CAST(NULL AS STRING))],
        CAST(NULL AS ARRAY<STRUCT<personId STRING, email STRING>>), CAST(NULL AS ARRAY<STRUCT<personId STRING, affinityScore NUMERIC>>), CAST(NULL AS ARRAY<STRUCT<personId STRING, email STRING>>),
        [STRUCT("personal","https://mgarcia.myownpersonaldomain.com")],
        STRUCT("dwilson")
    ) AS structData),

    -- Other records follow the same pattern...
    STRUCT('dwilson' as id, STRUCT("dwilson", STRUCT("Wilson","David","David Wilson","dwilson"),[STRUCT("work","dwilson@example.net")],[STRUCT("personal","abc")],false,"14",CAST(NULL AS STRING),CAST(NULL AS STRING),"focus",CAST(NULL AS DATETIME),CAST(NULL AS DATETIME),CAST(NULL AS DATETIME),CAST(NULL AS DATETIME),STRUCT("Male","Male"),CAST(NULL AS STRUCT<url STRING, imageBinary STRING, format STRING>), [STRUCT("India","IN","Bangalore",CAST(NULL AS STRING),CAST(NULL AS STRING),CAST(NULL AS STRING),CAST(NULL AS STRING),CAST(NULL AS STRING))], STRUCT("Bangalore","IN-LOCATION-01",CAST(NULL AS STRING),"7",CAST(NULL AS STRING),CAST(NULL AS STRING)),[STRUCT("Engineering","Our mission is to help organizations be more productive by making contextually relevant information and collaborators accessible at the right time","Engineering Manager","Bangalore","Intranet search",CAST(NULL AS STRING),"80997GX000",CAST(NULL AS STRING),[STRUCT("Connectors",CAST(NULL AS STRING),"Engineering Manager")])],[STRUCT("smiller",CAST(NULL AS STRING)),STRUCT("jmartinez",CAST(NULL AS STRING))],CAST(NULL AS ARRAY<STRUCT<personId STRING, email STRING>>),CAST(NULL AS ARRAY<STRUCT<personId STRING, affinityScore NUMERIC>>),CAST(NULL AS ARRAY<STRUCT<personId STRING, email STRING>>),CAST(NULL AS ARRAY<STRUCT<type STRING, value STRING>>),STRUCT("smiller")) AS structData),
    STRUCT('ejohnson' as id, STRUCT("ejohnson", STRUCT("Johnson","Emily","Emily Johnson","ejohnson"),[STRUCT("work","ejohnson@example.net")],[STRUCT("personal","abc")],false,"652365",CAST(NULL AS STRING),CAST(NULL AS STRING),"focus",CAST(NULL AS DATETIME),CAST(NULL AS DATETIME),CAST(NULL AS DATETIME),CAST(NULL AS DATETIME),STRUCT("Male","Male"),CAST(NULL AS STRUCT<url STRING, imageBinary STRING, format STRING>), [STRUCT("India","IN","Bangalore",CAST(NULL AS STRING),CAST(NULL AS STRING),CAST(NULL AS STRING),CAST(NULL AS STRING),CAST(NULL AS STRING))], STRUCT("Bangalore","IN-LOCATION-01",CAST(NULL AS STRING),"7",CAST(NULL AS STRING),CAST(NULL AS STRING)),[STRUCT("Engineering","Our mission is to help organizations be more productive by making contextually relevant information and collaborators accessible at the right time","Senior Software Engineer","Bangalore","Intranet search",CAST(NULL AS STRING),"80997GX000",CAST(NULL AS STRING),[STRUCT("BAP Connector Integration",CAST(NULL AS STRING),"Team Lead")])],[STRUCT("smiller",CAST(NULL AS STRING)),STRUCT("jmartinez",CAST(NULL AS STRING))],CAST(NULL AS ARRAY<STRUCT<personId STRING, email STRING>>),CAST(NULL AS ARRAY<STRUCT<personId STRING, affinityScore NUMERIC>>),CAST(NULL AS ARRAY<STRUCT<personId STRING, email STRING>>),CAST(NULL AS ARRAY<STRUCT<type STRING, value STRING>>),STRUCT("smiller")) AS structData),
    STRUCT('mbrown' as id, STRUCT("mbrown", STRUCT("Brown","Michael","Michael Brown","mbrown"),[STRUCT("work","mbrown@example.net")],[STRUCT("personal","abc")],false,"1007126",CAST(NULL AS STRING),CAST(NULL AS STRING),"focus",CAST(NULL AS DATETIME),CAST(NULL AS DATETIME),CAST(NULL AS DATETIME),CAST(NULL AS DATETIME),STRUCT("Female","Female"),CAST(NULL AS STRUCT<url STRING, imageBinary STRING, format STRING>), [STRUCT("India","IN","Bangalore",CAST(NULL AS STRING),CAST(NULL AS STRING),CAST(NULL AS STRING),CAST(NULL AS STRING),CAST(NULL AS STRING))], STRUCT("Bangalore","IN-LOCATION-01",CAST(NULL AS STRING),"7",CAST(NULL AS STRING),CAST(NULL AS STRING)),[STRUCT("Engineering","Our mission is to help organizations be more productive by making contextually relevant information and collaborators accessible at the right time","Software Engineer","Bangalore","Intranet search",CAST(NULL AS STRING),"80997GX000",CAST(NULL AS STRING),[STRUCT("BAP Connector Integration",CAST(NULL AS STRING),"Individual Contributor")])],[STRUCT("smiller",CAST(NULL AS STRING)),STRUCT("jmartinez",CAST(NULL AS STRING))],CAST(NULL AS ARRAY<STRUCT<personId STRING, email STRING>>),CAST(NULL AS ARRAY<STRUCT<personId STRING, affinityScore NUMERIC>>),CAST(NULL AS ARRAY<STRUCT<personId STRING, email STRING>>),CAST(NULL AS ARRAY<STRUCT<type STRING, value STRING>>),STRUCT("smiller")) AS structData),
    STRUCT('smiller' as id, STRUCT("smiller", STRUCT("Miller","Sarah","Sarah Miller","smiller"),[STRUCT("work","smiller@example.net")],[STRUCT("personal","abc")],false,"15",CAST(NULL AS STRING),CAST(NULL AS STRING),"focus",CAST(NULL AS DATETIME),CAST(NULL AS DATETIME),CAST(NULL AS DATETIME),CAST(NULL AS DATETIME),STRUCT("Male","Male"),CAST(NULL AS STRUCT<url STRING, imageBinary STRING, format STRING>), [STRUCT("India","IN","Bangalore",CAST(NULL AS STRING),CAST(NULL AS STRING),CAST(NULL AS STRING),CAST(NULL AS STRING),CAST(NULL AS STRING))], STRUCT("Bangalore","IN-LOCATION-01",CAST(NULL AS STRING),"7",CAST(NULL AS STRING),CAST(NULL AS STRING)),[STRUCT("Engineering","Our mission is to help organizations be more productive by making contextually relevant information and collaborators accessible at the right time","Senior Engineering Manager","Bangalore","Intranet search",CAST(NULL AS STRING),"80997GX000",CAST(NULL AS STRING),[STRUCT("Intranet Search",CAST(NULL AS STRING),"Senior Engineering Manager")])],[STRUCT("jmartinez",CAST(NULL AS STRING))],CAST(NULL AS ARRAY<STRUCT<personId STRING, email STRING>>),CAST(NULL AS ARRAY<STRUCT<personId STRING, affinityScore NUMERIC>>),CAST(NULL AS ARRAY<STRUCT<personId STRING, email STRING>>),CAST(NULL AS ARRAY<STRUCT<type STRING, value STRING>>),STRUCT("jmartinez")) AS structData),
    STRUCT('clee' as id, STRUCT("clee", STRUCT("Lee","Chris","Chris Lee","clee"),[STRUCT("work","clee@example.net")],[STRUCT("personal","abc")],false,"717389",CAST(NULL AS STRING),CAST(NULL AS STRING),"focus",CAST(NULL AS DATETIME),CAST(NULL AS DATETIME),CAST(NULL AS DATETIME),CAST(NULL AS DATETIME),STRUCT("Female","Female"),CAST(NULL AS STRUCT<url STRING, imageBinary STRING, format STRING>), [STRUCT("US","US","Kirkland",CAST(NULL AS STRING),CAST(NULL AS STRING),CAST(NULL AS STRING),CAST(NULL AS STRING),CAST(NULL AS STRING))], STRUCT("Kirkland","US-KIR-6THC",CAST(NULL AS STRING),CAST(NULL AS STRING),CAST(NULL AS STRING),CAST(NULL AS STRING)),[STRUCT("Engineering","Empower every GCP customer to transform themselves through intelligence from their data.","Software Engineer","Kirkland","Vertex AI Search",CAST(NULL AS STRING),CAST(NULL AS STRING),CAST(NULL AS STRING),CAST(NULL AS ARRAY<STRUCT<name STRING, description STRING, role STRING>>))],[STRUCT("jmartinez",CAST(NULL AS STRING))],CAST(NULL AS ARRAY<STRUCT<personId STRING, email STRING>>),CAST(NULL AS ARRAY<STRUCT<personId STRING, affinityScore NUMERIC>>),CAST(NULL AS ARRAY<STRUCT<personId STRING, email STRING>>),CAST(NULL AS ARRAY<STRUCT<type STRING, value STRING>>),STRUCT("jmartinez")) AS structData),
    STRUCT('jmartinez' as id, STRUCT("jmartinez", STRUCT("Martinez","Jessica","Jessica Martinez","jmartinez"),[STRUCT("work","jmartinez@example.net")],[STRUCT("personal","abc")],false,"153035",CAST(NULL AS STRING),CAST(NULL AS STRING),"focus",CAST(NULL AS DATETIME),CAST(NULL AS DATETIME),CAST(NULL AS DATETIME),CAST(NULL AS DATETIME),STRUCT("Male","Male"),CAST(NULL AS STRUCT<url STRING, imageBinary STRING, format STRING>), [STRUCT("United States of America","US","Sunnyvale",CAST(NULL AS STRING),CAST(NULL AS STRING),CAST(NULL AS STRING),CAST(NULL AS STRING),CAST(NULL AS STRING))], STRUCT("Sunnyvale","US-SVL-MP2",CAST(NULL AS STRING),CAST(NULL AS STRING),CAST(NULL AS STRING),CAST(NULL AS STRING)),[STRUCT("Engineering","Empower every GCP customer to transform themselves through intelligence from their data.","Engineering Director","Sunnyvale","Vertex AI Search",CAST(NULL AS STRING),CAST(NULL AS STRING),CAST(NULL AS STRING),CAST(NULL AS ARRAY<STRUCT<name STRING, description STRING, role STRING>>))],CAST(NULL AS ARRAY<STRUCT<personId STRING, email STRING>>),CAST(NULL AS ARRAY<STRUCT<personId STRING, email STRING>>),CAST(NULL AS ARRAY<STRUCT<personId STRING, affinityScore NUMERIC>>),CAST(NULL AS ARRAY<STRUCT<personId STRING, email STRING>>),CAST(NULL AS ARRAY<STRUCT<type STRING, value STRING>>),CAST(NULL AS STRUCT<personId STRING>)) AS structData),
    STRUCT('dtaylor' as id, STRUCT("dtaylor", STRUCT("Taylor","Daniel","Daniel Taylor","dtaylor"),[STRUCT("work","dtaylor@example.net")],[STRUCT("personal","abc")],false,"950380",CAST(NULL AS STRING),CAST(NULL AS STRING),"focus",CAST(NULL AS DATETIME),CAST(NULL AS DATETIME),CAST(NULL AS DATETIME),CAST(NULL AS DATETIME),STRUCT("Female","Female"),CAST(NULL AS STRUCT<url STRING, imageBinary STRING, format STRING>), [STRUCT("United States of America","US","Sunnyvale",CAST(NULL AS STRING),CAST(NULL AS STRING),CAST(NULL AS STRING),CAST(NULL AS STRING),CAST(NULL AS STRING))], STRUCT("Sunnyvale","US-SVL-MP5",CAST(NULL AS STRING),CAST(NULL AS STRING),CAST(NULL AS STRING),CAST(NULL AS STRING)),[STRUCT("Engineering","Empower every GCP customer to transform themselves through intelligence from their data.","Product Manager","Sunnyvale","Vertex AI Search",CAST(NULL AS STRING),CAST(NULL AS STRING),CAST(NULL AS STRING),CAST(NULL AS ARRAY<STRUCT<name STRING, description STRING, role STRING>>))],CAST(NULL AS ARRAY<STRUCT<personId STRING, email STRING>>),CAST(NULL AS ARRAY<STRUCT<personId STRING, email STRING>>),CAST(NULL AS ARRAY<STRUCT<personId STRING, affinityScore NUMERIC>>),CAST(NULL AS ARRAY<STRUCT<personId STRING, email STRING>>),CAST(NULL AS ARRAY<STRUCT<type STRING, value STRING>>),CAST(NULL AS STRUCT<personId STRING>)) AS structData),
    STRUCT('oanderson' as id, STRUCT("oanderson", STRUCT("Anderson","Olivia","Olivia Anderson","oanderson"),[STRUCT("work","oanderson@example.net")],[STRUCT("personal","abc")],false,"103388",CAST(NULL AS STRING),CAST(NULL AS STRING),"focus",CAST(NULL AS DATETIME),CAST(NULL AS DATETIME),CAST(NULL AS DATETIME),CAST(NULL AS DATETIME),STRUCT("Male","Male"),CAST(NULL AS STRUCT<url STRING, imageBinary STRING, format STRING>), [STRUCT("United States of America","US","Remote",CAST(NULL AS STRING),CAST(NULL AS STRING),CAST(NULL AS STRING),CAST(NULL AS STRING),CAST(NULL AS STRING))], STRUCT("Remote","US-REMOTE-MTV",CAST(NULL AS STRING),CAST(NULL AS STRING),CAST(NULL AS STRING),CAST(NULL AS STRING)),[STRUCT("Engineering","Keep developers happy with their source code tools and services.","Git Maintainer",CAST(NULL AS STRING),"Developer Services",CAST(NULL AS STRING),CAST(NULL AS STRING),CAST(NULL AS STRING),CAST(NULL AS ARRAY<STRUCT<name STRING, description STRING, role STRING>>))],CAST(NULL AS ARRAY<STRUCT<personId STRING, email STRING>>),CAST(NULL AS ARRAY<STRUCT<personId STRING, email STRING>>),CAST(NULL AS ARRAY<STRUCT<personId STRING, affinityScore NUMERIC>>),CAST(NULL AS ARRAY<STRUCT<personId STRING, email STRING>>),CAST(NULL AS ARRAY<STRUCT<type STRING, value STRING>>),CAST(NULL AS STRUCT<personId STRING>)) AS structData),
    STRUCT('mthomas' as id, STRUCT("mthomas", STRUCT("Thomas","Matthew","Matthew Thomas","mthomas"),[STRUCT("work","mthomas@example.net")],[STRUCT("personal","abc")],false,"363045",CAST(NULL AS STRING),CAST(NULL AS STRING),"focus",CAST(NULL AS DATETIME),CAST(NULL AS DATETIME),CAST(NULL AS DATETIME),CAST(NULL AS DATETIME),STRUCT("Female","Female"),CAST(NULL AS STRUCT<url STRING, imageBinary STRING, format STRING>), [STRUCT("United States of America","US","Mountain View",CAST(NULL AS STRING),CAST(NULL AS STRING),CAST(NULL AS STRING),CAST(NULL AS STRING),CAST(NULL AS STRING))], STRUCT("Remote","US-MTV-40",CAST(NULL AS STRING),CAST(NULL AS STRING),CAST(NULL AS STRING),CAST(NULL AS STRING)),[STRUCT("Finance","Getting more ambitious things done","CIO",CAST(NULL AS STRING),"Alphabet",CAST(NULL AS STRING),CAST(NULL AS STRING),CAST(NULL AS STRING),CAST(NULL AS ARRAY<STRUCT<name STRING, description STRING, role STRING>>))],CAST(NULL AS ARRAY<STRUCT<personId STRING, email STRING>>),CAST(NULL AS ARRAY<STRUCT<personId STRING, email STRING>>),CAST(NULL AS ARRAY<STRUCT<personId STRING, affinityScore NUMERIC>>),CAST(NULL AS ARRAY<STRUCT<personId STRING, email STRING>>),CAST(NULL AS ARRAY<STRUCT<type STRING, value STRING>>),CAST(NULL AS STRUCT<personId STRING>)) AS structData),
    STRUCT('swhite' as id, STRUCT("swhite", STRUCT("White","Sophia","Sophia White","swhite"),[STRUCT("work","swhite@example.net")],[STRUCT("personal","abc")],false,"938578",CAST(NULL AS STRING),CAST(NULL AS STRING),"focus",CAST(NULL AS DATETIME),CAST(NULL AS DATETIME),CAST(NULL AS DATETIME),CAST(NULL AS DATETIME),STRUCT("Male","Male"),CAST(NULL AS STRUCT<url STRING, imageBinary STRING, format STRING>), [STRUCT("India","IN","Bangalore",CAST(NULL AS STRING),CAST(NULL AS STRING),CAST(NULL AS STRING),CAST(NULL AS STRING),CAST(NULL AS STRING))], STRUCT("Bangalore","IN-LOCATION-01",CAST(NULL AS STRING),CAST(NULL AS STRING),CAST(NULL AS STRING),CAST(NULL AS STRING)),[STRUCT("Customer","Successful Strategic Customer in the Cloud!","Strategic Cloud Engineer",CAST(NULL AS STRING),"Cloud Professional Services Organization (PSO)",CAST(NULL AS STRING),CAST(NULL AS STRING),CAST(NULL AS STRING),CAST(NULL AS ARRAY<STRUCT<name STRING, description STRING, role STRING>>))],CAST(NULL AS ARRAY<STRUCT<personId STRING, email STRING>>),CAST(NULL AS ARRAY<STRUCT<personId STRING, email STRING>>),CAST(NULL AS ARRAY<STRUCT<personId STRING, affinityScore NUMERIC>>),CAST(NULL AS ARRAY<STRUCT<personId STRING, email STRING>>),CAST(NULL AS ARRAY<STRUCT<type STRING, value STRING>>),CAST(NULL AS STRUCT<personId STRING>)) AS structData),
    STRUCT('jharris' as id, STRUCT("jharris", STRUCT("Harris","James","James Harris","jharris"),[STRUCT("work","jharris@example.net")],[STRUCT("personal","abc")],false,"723457",CAST(NULL AS STRING),CAST(NULL AS STRING),"focus",CAST(NULL AS DATETIME),CAST(NULL AS DATETIME),CAST(NULL AS DATETIME),CAST(NULL AS DATETIME),STRUCT("Male","Male"),CAST(NULL AS STRUCT<url STRING, imageBinary STRING, format STRING>), [STRUCT("India","IN","Bangalore",CAST(NULL AS STRING),CAST(NULL AS STRING),CAST(NULL AS STRING),CAST(NULL AS STRING),CAST(NULL AS STRING))], STRUCT("Bangalore","IN-LOCATION-01",CAST(NULL AS STRING),CAST(NULL AS STRING),CAST(NULL AS STRING),CAST(NULL AS STRING)),[STRUCT("Recruiting",CAST(NULL AS STRING),"Sr Recruiter",CAST(NULL AS STRING),"Hiring Committee",CAST(NULL AS STRING),CAST(NULL AS STRING),CAST(NULL AS STRING),CAST(NULL AS ARRAY<STRUCT<name STRING, description STRING, role STRING>>))],CAST(NULL AS ARRAY<STRUCT<personId STRING, email STRING>>),CAST(NULL AS ARRAY<STRUCT<personId STRING, email STRING>>),CAST(NULL AS ARRAY<STRUCT<personId STRING, affinityScore NUMERIC>>),CAST(NULL AS ARRAY<STRUCT<personId STRING, email STRING>>),CAST(NULL AS ARRAY<STRUCT<type STRING, value STRING>>),CAST(NULL AS STRUCT<personId STRING>)) AS structData)
  ] AS all_records
)
SELECT
  record.id,
  record.structData
FROM records_to_insert, UNNEST(all_records) as record;
Example payload for Cloud Storage
{"id":"person1","structData":{"working_from_home": "false", "personId":"person1","name":{"familyName":"Kumar","givenName":"person1","displayName":"person1 Kumar","username":"person1"},"emails":[{"type":"work","value":"person1@example.net"}],"phoneNumbers":[{"type":"personal","value":"1234"}],"suspended":false,"employeeId":"13","availabilityStatus":"focus","gender":{"addressMeAs":"Male","type":"Male"},"addresses":[{"country":"India","countryCode":"IN","locality":"Bangalore"}],"location":{"value":"Bangalore","buildingId":"IN-LOCATION-01","floorName":"7"},"organizations":[{"department":"Engineering","description":"Our mission is to help organizations be more productive by making contextually relevant information and collaborators accessible at the right time","jobTitle":"Software Engineer","location":"Bangalore","name":"Intranet search","projects":[{"name":"People Search","role":"Individual Contributor"}],"costCenter":"123"}],"directManager":{"personId":"manager1"},"managers":[{"personId":"manager1"},{"personId":"manager2"},{"personId":"manager3"}],"websites":[{"type":"personal","value":"https://person1.myownpersonaldomain.com"}],"displayPhoto":{"imageBinary":{"format":"image/png","data":"binary_content"}}}}