Mantenha tudo organizado com as coleções
Salve e categorize o conteúdo com base nas suas preferências.
Visão geral
Antes de começar a usar o Cloud Talent Solution (CTS), ative a API no Console do Google Cloud Platform (GCP). As etapas abaixo mostram como executar as ações a seguir:
Habilitar o CTS em um projeto do GCP.
Verificar se o faturamento está ativado para o CTS.
Aceitar os Termos e Condições de Geração de registros de dados.
Criar e/ou atribuir uma ou mais contas de serviço ao Cloud Talent Solution.
Fazer o download de uma chave de credencial da conta de serviço.
Definir sua variável de ambiente de autenticação.
Configuração do Console do GCP
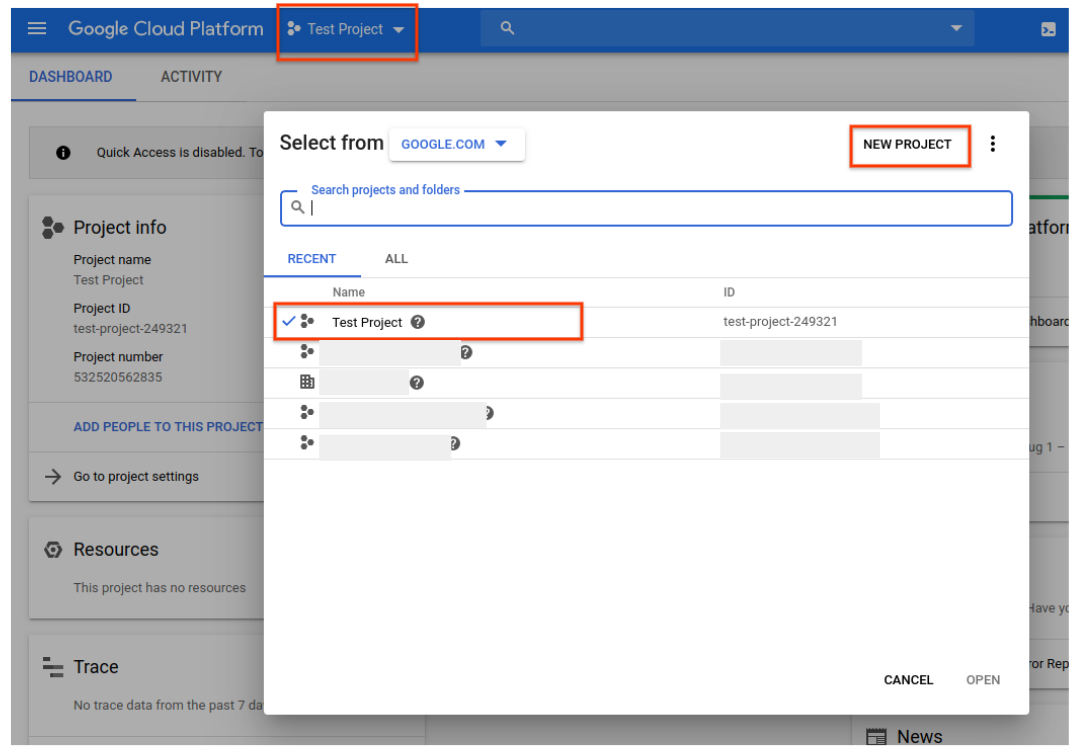
Acesse o Console do GCP.
Navegue até o menu suspenso na parte superior da página e escolha o projeto do GCP que você quer associar ao Cloud Talent Solution. Se você já criou um ou mais projetos, eles aparecerão em uma lista no menu pop-up. Escolha um projeto preexistente (uma marca de seleção aparecerá ao lado do projeto selecionado) ou criar um novo projeto clicando em NOVO PROJETO. Para mais detalhes sobre a criação de um projeto do GCP, consulte a documentação.
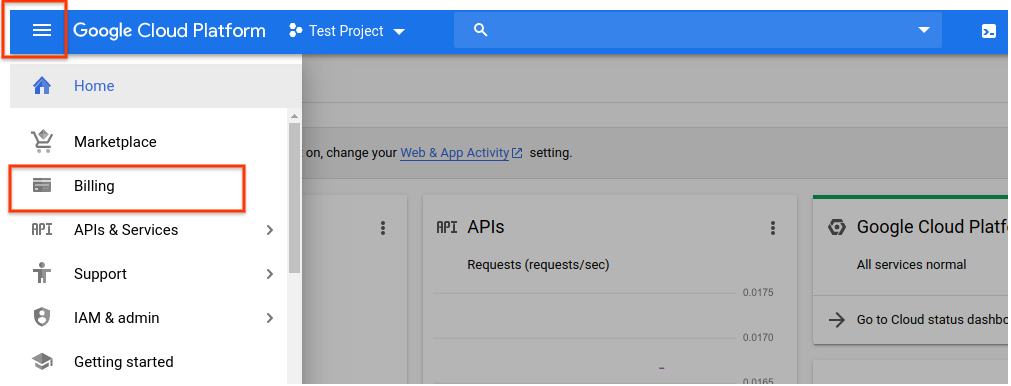
Se você criar um novo projeto, será solicitado que vincule uma conta de faturamento a esse projeto. Se você estiver usando um projeto atual, verifique se o faturamento está ativado. Para acessar as informações de faturamento do projeto a qualquer momento, use o menu de navegação principal (o ícone do hambúrguer no canto superior esquerdo) e clique na opção Faturamento:
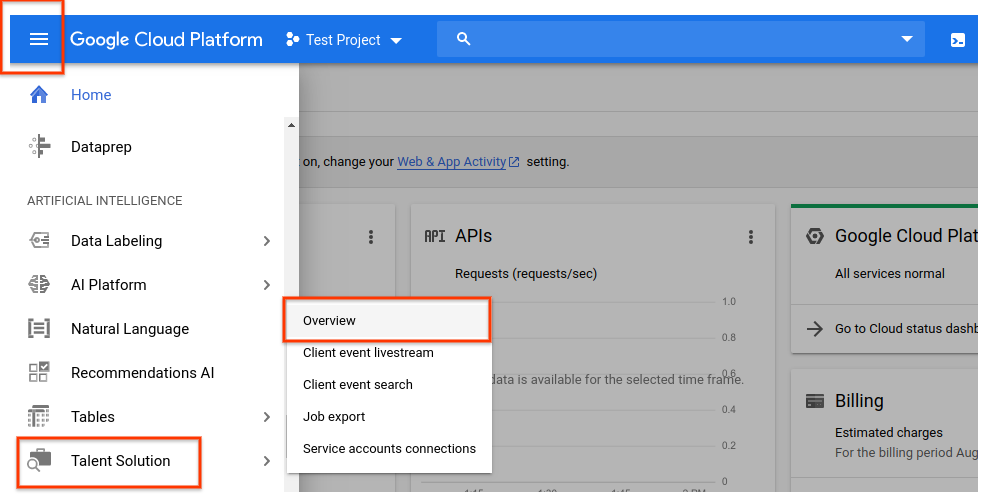
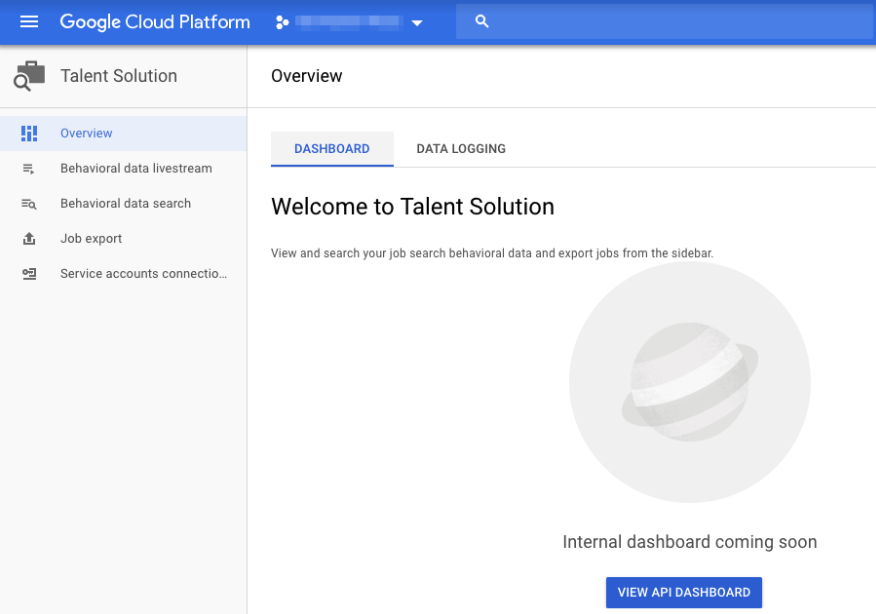
Depois de selecionar um projeto do GCP e vinculá-lo a uma conta de cobrança, ative a API Cloud Talent Solution. Acesse o menu principal de navegação e role para baixo até a seção Inteligência Artificial. Clique em Talent Solution e escolha Visão geral no menu que aparece:
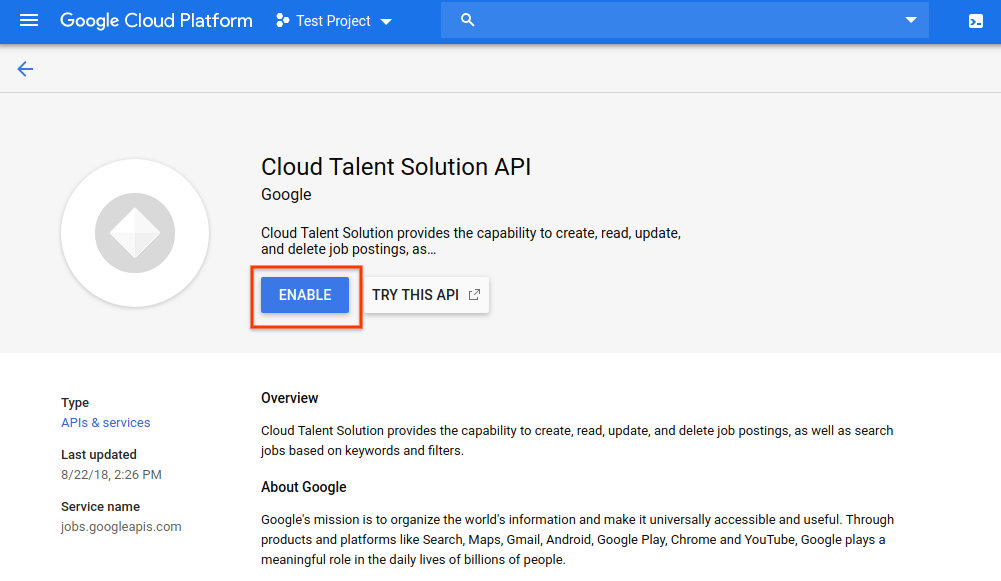
Se você quiser experimentar a API primeiro sem vinculá-la ao seu projeto, escolha a opção TESTAR ESTA API. Consulte a documentação da API Job Search no Explorer para mais informações sobre o uso desse recurso.
Para ativar a API Cloud Talent Solution para usá-la com seu projeto GCP, clique em ATIVAR:
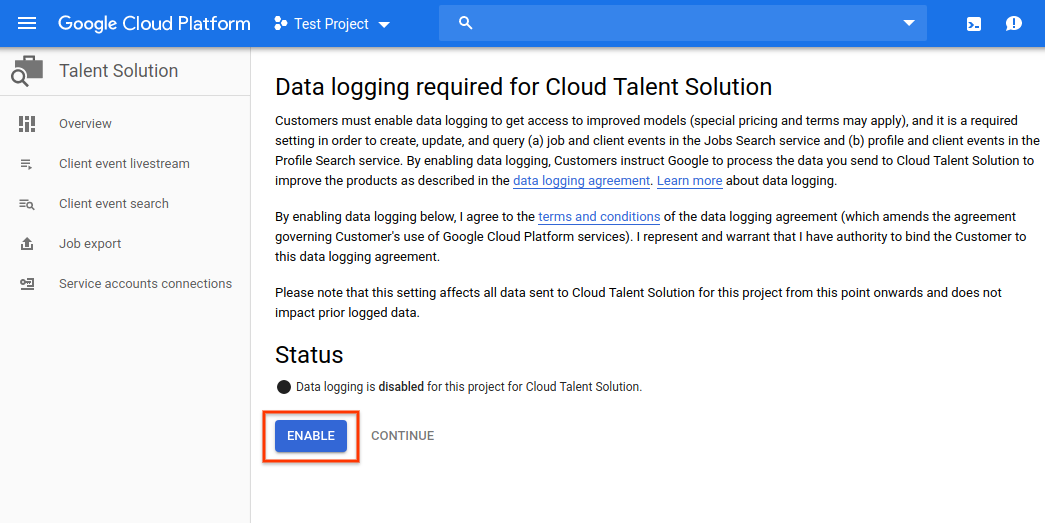
A página de registro de dados é exibida. Você precisa aceitar os termos e condições para ter acesso total aos recursos do CTS. Se você optar por não aceitar esses termos, usará apenas solicitações de exclusão da API. Clique em ATIVAR:
Agora você é solicitado a vincular uma ou mais contas de serviço à API CTS.
Se você estiver usando um projeto que já tem contas de serviço associadas, elas aparecerão em uma lista nesta página. Clique em CONECTAR ao lado das contas que você quer vincular à API CTS. Depois de fazer isso, pule para a etapa 8 para garantir que você fez o download de uma credencial JSON ou P12 para essa conta.
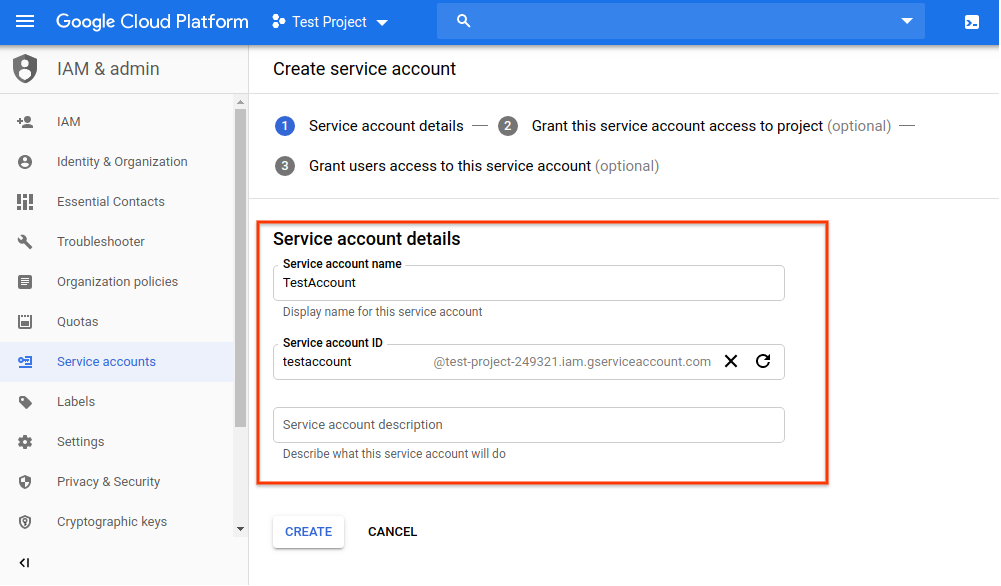
Caso o projeto ainda não tenha conta de serviço, você será solicitado a criar uma. Digite um nome de sua escolha na caixa Nome da conta de serviço. Sua entrada é preenchida automaticamente na caixa ID da conta de serviço. A caixa Descrição da conta de serviço é opcional, mas recomendada se você planeja associar várias contas de serviço ao seu projeto. Digite uma breve descrição da conta de serviço nesta caixa e clique em CRIAR.
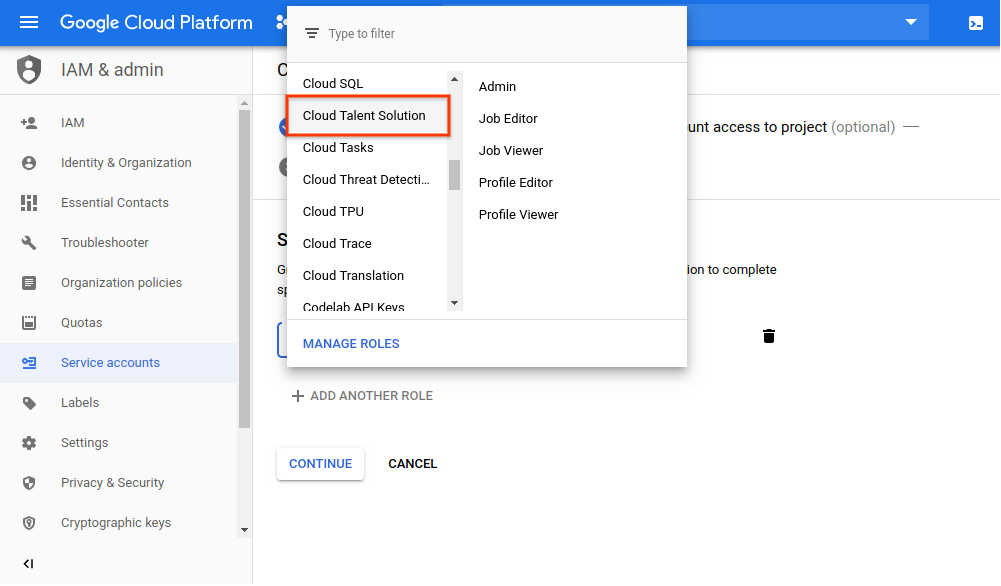
Na próxima página, é permitido atribuir um papel à nova conta de serviço. Consulte a página Permissões do IAM do CTS para ter detalhes completos sobre os papéis disponíveis e as permissões permitidas para cada um. Clique no menu suspenso Selecionar um papel e role para baixo até Cloud Talent Solution. Escolha um papel para esta conta de serviço entre as opções na coluna da direita:
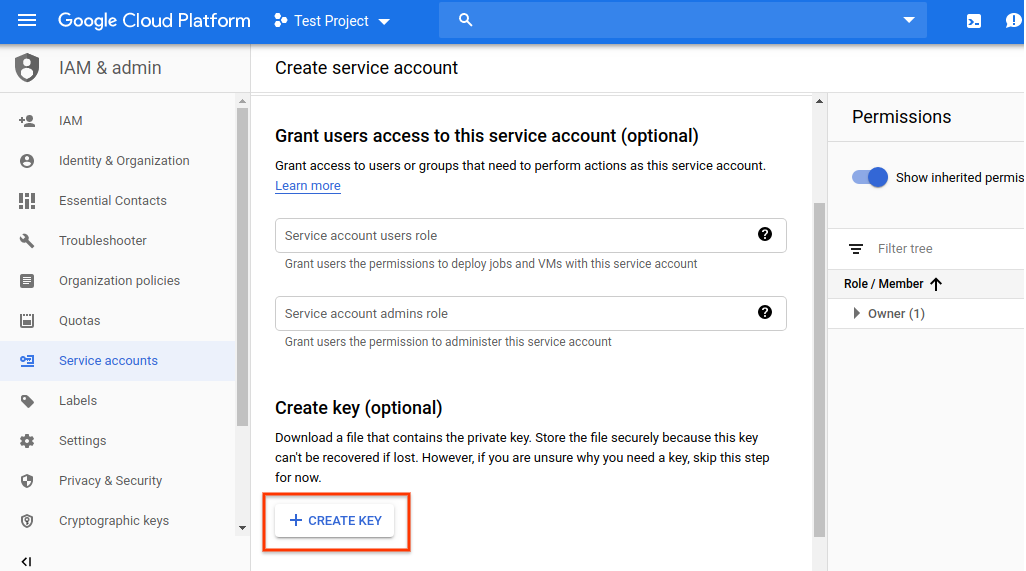
Na próxima página, é possível concluir várias tarefas. Elas não são necessárias, mas altamente recomendadas. É possível conceder a usuários individuais acesso à conta de serviço que você acabou de criar inserindo os endereços de e-mail deles.
Você também pode criar uma chave privada para a conta de serviço. Você precisa usar uma chave privada durante o processo de autenticação ao usar a API. Se você escolher não executar essas ações agora, poderá gerar uma chave e adicionar/alterar informações individuais do usuário a qualquer momento. Basta acessar a conta de serviço pela opção IAM no menu de navegação principal.
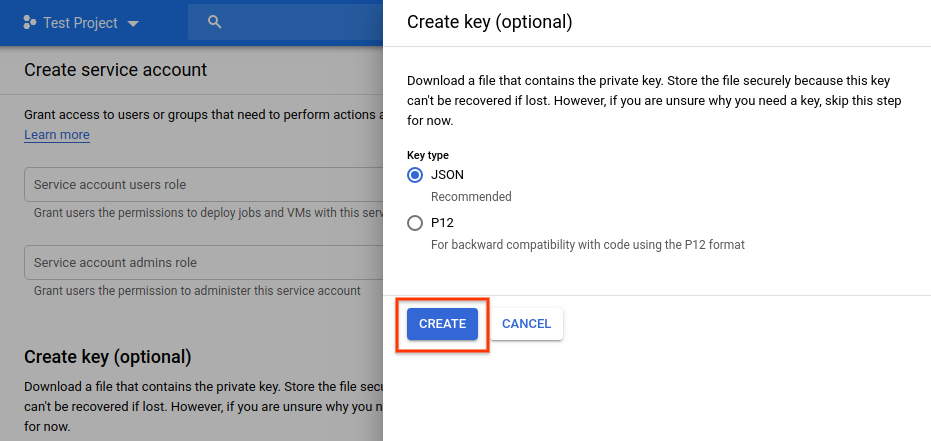
Clique em CRIAR CHAVE.
Escolha seu formato preferido no menu pop-up e clique em CRIAR:
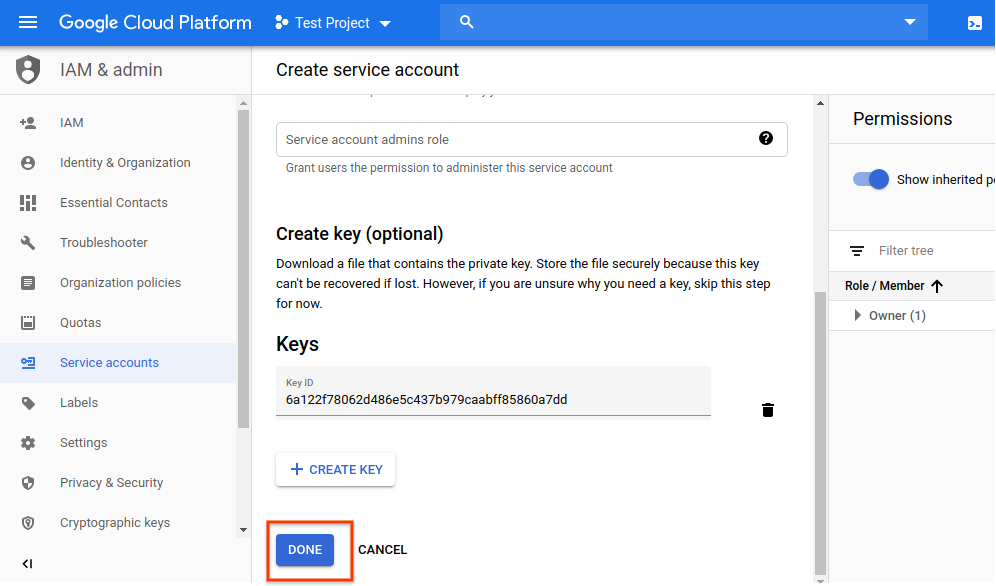
Será feito o download automático de um novo arquivo de credencial JSON ou P12.
Armazene esse arquivo em um local específico e anote o caminho do arquivo.
Você precisará apontar a variável de ambiente GOOGLE_APPLICATION_CREDENTIALS para esse arquivo ao passar pelo processo de autenticação.
Essa é uma etapa essencial para autenticar solicitações para o Cloud Talent Solution.
Após o download do arquivo de credenciais, clique em CONCLUÍDO:
A conta de serviço aparecerá na página Conectar contas de serviço.
Clique em CONECTAR para vinculá-la à API CTS:
A conta agora está conectada e você já pode começar a integrar o Cloud Talent Solution ao seu sistema:
Definir sua variável de ambiente de autenticação
Provide authentication credentials to your application code by setting the
environment variable GOOGLE_APPLICATION_CREDENTIALS. This
variable applies only to your current shell session. If you want the variable
to apply to future shell sessions, set the variable in your shell startup file,
for example in the ~/.bashrc or ~/.profile file.
Linux ou macOS
exportGOOGLE_APPLICATION_CREDENTIALS="KEY_PATH"
Replace KEY_PATH with the path of the JSON file that contains your credentials.
[[["Fácil de entender","easyToUnderstand","thumb-up"],["Meu problema foi resolvido","solvedMyProblem","thumb-up"],["Outro","otherUp","thumb-up"]],[["Difícil de entender","hardToUnderstand","thumb-down"],["Informações incorretas ou exemplo de código","incorrectInformationOrSampleCode","thumb-down"],["Não contém as informações/amostras de que eu preciso","missingTheInformationSamplesINeed","thumb-down"],["Problema na tradução","translationIssue","thumb-down"],["Outro","otherDown","thumb-down"]],["Última atualização 2025-09-02 UTC."],[],[],null,["# Before You Begin\n\nOverview\n--------\n\nBefore you can begin using Cloud Talent Solution (CTS), you must\nenable the API in the Google Cloud Platform (GCP) Console. The steps below walk\nyou through the following actions:\n\n- Enable CTS on a GCP project.\n 1. Make sure billing is enabled for CTS.\n 2. Accept the Data Logging Terms \\& Conditions.\n 3. Create and/or assign one or more service accounts to Cloud Talent Solution.\n 4. Download a service account credential key.\n- Set your authentication environment variable.\n\nGCP Console set-up\n------------------\n\n1. Go to the [GCP Console](http://console.cloud.google.com).\n Navigate to the drop-down menu at the top of the page and choose the GCP\n project that you'd like to associate with Cloud Talent Solution. If you\n have previously created one or more projects, they will appear in a list\n in the pop-up menu. You can either choose a pre-existing project (a check\n mark will appear next to the project you select) or create\n a new project by clicking **NEW PROJECT** . For more details on creating a\n GCP project, please see the [documentation](/resource-manager/docs/creating-managing-projects).\n\n2. If you create a new project, you will be prompted to link a billing account\n to this project. If you are using a pre-existing project, make sure that you\n have billing enabled. You can access the project's billing information at\n any time by going to the main navigation menu (the hamburger icon in the\n upper left corner) and clicking the **Billing** option:\n\n | **Note:** You must enable billing to use Cloud Talent Solution, however you will not be charged unless you exceed the free quota of 1-10,000 API calls per month. See the [pricing](/talent-solution/pricing) page for more details.\n3. Once you have selected a GCP project and linked it to a billing account, you\n can enable the Cloud Talent Solution API. Go to the main navigation menu and\n scroll down to the **Artificial Intelligence** section. Click on\n **Talent Solution** and choose **Overview** from the menu that pops up:\n\n4. If you would first like to try the API without linking it to your project,\n you can choose the **TRY THIS API** option. See the\n [Job Search API Explorer](/talent-solution/job-search/docs/quickstart-api-explorer)\n documentation for more information on using this feature.\n To enable the Cloud Talent Solution API for use with your GCP project, click\n **ENABLE**:\n\n5. The data logging page appears. You must accept the terms \\& conditions\n to have full access to CTS features. If you choose not to accept these\n terms, you'll only be able to use deletion API requests. Click **ENABLE**:\n\n6. You are now prompted to link one or more service accounts to the CTS API.\n If you are using a project that already has service accounts associated with\n it, they will appear in a list on this page. Click **CONNECT** next to the\n account(s) that you want to link to the CTS API. Once you have done this,\n you can skip ahead to step 8 to make sure that you've downloaded a JSON or\n P12 credential for that account.\n\n If your project does not yet have any service accounts, you are prompted to\n create one. Type a name of your choosing into the **Service account name**\n box. Your input is automatically populated in the **Service account ID**\n box. The **Service account description** box is optional but recommended if\n you plan on associating multiple service accounts with your project. Enter\n a brief description of the service account into this box, then click\n **CREATE**.\n\n7. The next page allows you to assign a role to your new service account. See\n the CTS [IAM permissions](/talent-solution/docs/iam) page for full details\n on the available roles and the permissions allowed to each. Click on the\n drop-down **Select a role** menu and scroll down to\n **Cloud Talent Solution**. You can choose a role for this service account\n from the options in the right-hand column:\n\n8. The next page gives you the option to complete several tasks. These are\n not required but highly recommended. You can grant individual users access\n to the service account you just created by entering their email addresses.\n You can also create a private key for the service account. You must use a\n private key during the [authentication process](/talent-solution/job-search/docs/before-you-begin#set_up_your_environment_variables)\n when you use the API. If you choose not take these actions now, you can\n generate a key and add/change individual user information at any time by\n accessing the service account through the **IAM** option in the main\n navigation menu.\n\n Click **CREATE KEY**:\n\n Choose your preferred format from the pop-up menu and click **CREATE**:\n\n A new JSON or P12 credential file is automatically downloaded.\n Store this file in a specific location and make a note of the file path.\n You will need to point the \u003cvar translate=\"no\"\u003eGOOGLE_APPLICATION_CREDENTIALS\u003c/var\u003e\n environment variable to this file when you go through the\n [authentication process](/talent-solution/job-search/docs/before-you-begin#set_up_your_environment_variables).\n This is an essential step for authenticating requests to Cloud Talent Solution.\n\n Once your credential file has downloaded, click **DONE**:\n\n9. Your service account now appears on the **Connect service accounts** page.\n Click **CONNECT** to link it to the CTS API:\n\n10. The account is now connected, and you're now ready to begin integrating Cloud\n Talent Solution into your system:\n\nSet your authentication environment variable\n--------------------------------------------\n\n\nProvide authentication credentials to your application code by setting the\nenvironment variable `GOOGLE_APPLICATION_CREDENTIALS`. This\nvariable applies only to your current shell session. If you want the variable\nto apply to future shell sessions, set the variable in your shell startup file,\nfor example in the `~/.bashrc` or `~/.profile` file. \n\n### Linux or macOS\n\n```bash\nexport GOOGLE_APPLICATION_CREDENTIALS=\"\u003cvar translate=\"no\"\u003eKEY_PATH\u003c/var\u003e\"\n```\n\nReplace \u003cvar translate=\"no\"\u003eKEY_PATH\u003c/var\u003e with the path of the JSON file that contains your credentials.\n\nFor example: \n\n```bash\nexport GOOGLE_APPLICATION_CREDENTIALS=\"/home/user/Downloads/service-account-file.json\"\n```\n\n### Windows\n\nFor PowerShell: \n\n```bash\n$env:GOOGLE_APPLICATION_CREDENTIALS=\"\u003cvar translate=\"no\"\u003eKEY_PATH\u003c/var\u003e\"\n```\n\nReplace \u003cvar translate=\"no\"\u003eKEY_PATH\u003c/var\u003e with the path of the JSON file that contains your credentials.\n\nFor example: \n\n```bash\n$env:GOOGLE_APPLICATION_CREDENTIALS=\"C:\\Users\\username\\Downloads\\service-account-file.json\"\n```\n\nFor command prompt: \n\n set GOOGLE_APPLICATION_CREDENTIALS=\u003cvar translate=\"no\"\u003eKEY_PATH\u003c/var\u003e\n\nReplace \u003cvar translate=\"no\"\u003eKEY_PATH\u003c/var\u003e with the path of the JSON file that contains your credentials.\n\nFor more information, see\nthe [GCP authentication documentation](/docs/authentication/production).\n\nWhat's next\n-----------\n\nInstall a [client library](/talent-solution/job-search/docs/libraries) or see\nthe [create jobs and companies quickstart](/talent-solution/job-search/docs/quickstart-jobs-and-companies)\nto begin making API calls."]]