Mit Sammlungen den Überblick behalten
Sie können Inhalte basierend auf Ihren Einstellungen speichern und kategorisieren.
Übersicht
Bevor Sie Cloud Talent Solution (CTS) verwenden können, müssen Sie die API in der Google Cloud Platform (GCP) Console aktivieren. Die folgenden Schritte führen Sie durch die folgenden Aktionen:
Aktivieren Sie CTS in einem GCP-Projekt.
Stellen Sie sicher, dass die Abrechnung für CTS aktiviert ist.
Akzeptieren Sie die Allgemeinen Geschäftsbedingungen für die Datenerfassung.
Erstellen und/oder weisen Sie Cloud Talent Solution ein oder mehrere Dienstkonten zu.
Laden Sie einen Anmeldeinformationsschlüssel für das Dienstkonto herunter.
Legen Sie Ihre Authentifizierungsumgebungsvariable fest.
Einrichtung der GCP Console
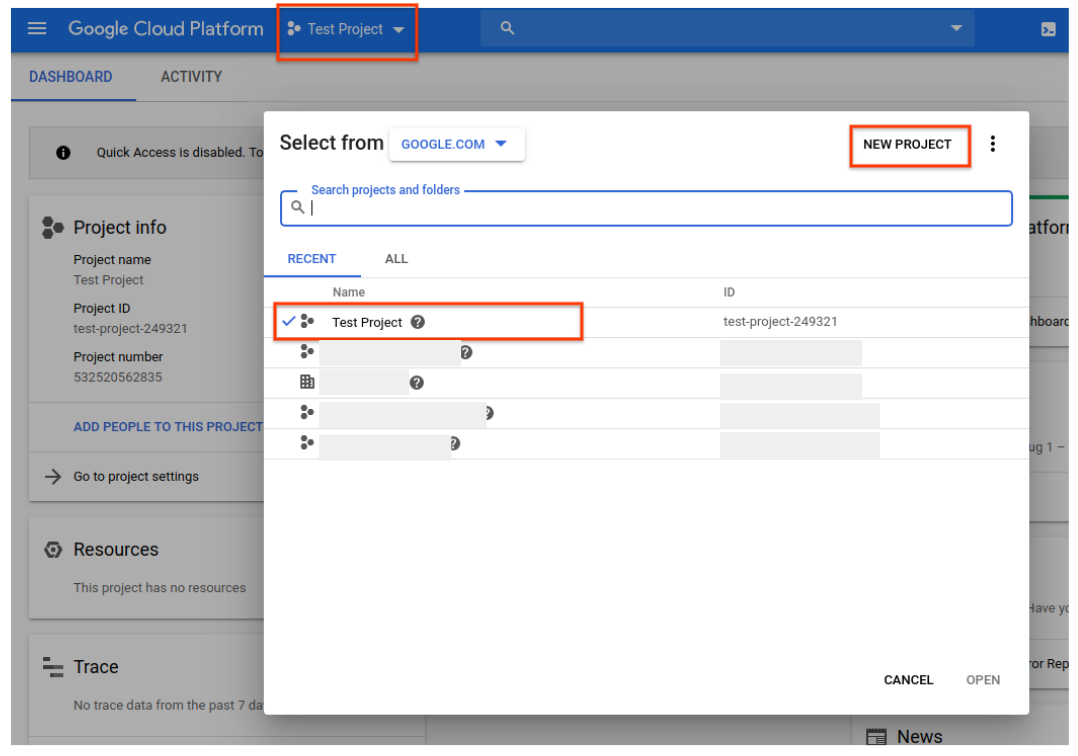
Wechseln Sie zur GCP Console.
Navigieren Sie zum Dropdown-Menü oben auf der Seite und wählen Sie das GCP-Projekt aus, das Sie mit Cloud Talent Solution verknüpfen möchten. Wenn Sie zuvor ein oder mehrere Projekte erstellt haben, werden diese in einer Liste im Popup-Menü angezeigt. Sie können entweder ein bereits vorhandenes Projekt auswählen (ein Häkchen wird neben dem ausgewählten Projekt angezeigt) oder ein neues Projekt erstellen, indem Sie auf NEUES PROJEKT klicken. Weitere Informationen zum Erstellen eines GCP-Projekts finden Sie in der -Dokumentation.
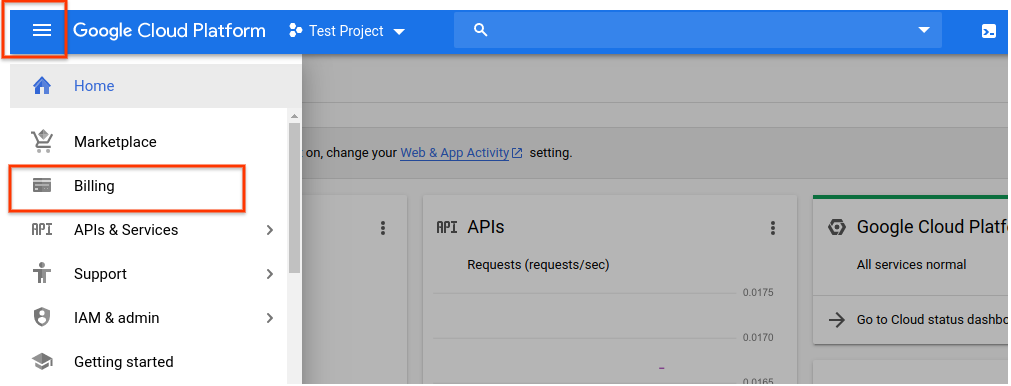
Wenn Sie ein neues Projekt erstellen, werden Sie aufgefordert, ein Abrechnungskonto mit diesem Projekt zu verknüpfen. Wenn Sie ein bereits vorhandenes Projekt verwenden, muss die Abrechnung aktiviert sein. Sie können jederzeit auf die Rechnungsinformationen des Projekts zugreifen, indem Sie im Hauptnavigationsmenü (das Hamburger-Symbol in der oberen linken Ecke) auf die Option Fakturierung klicken:
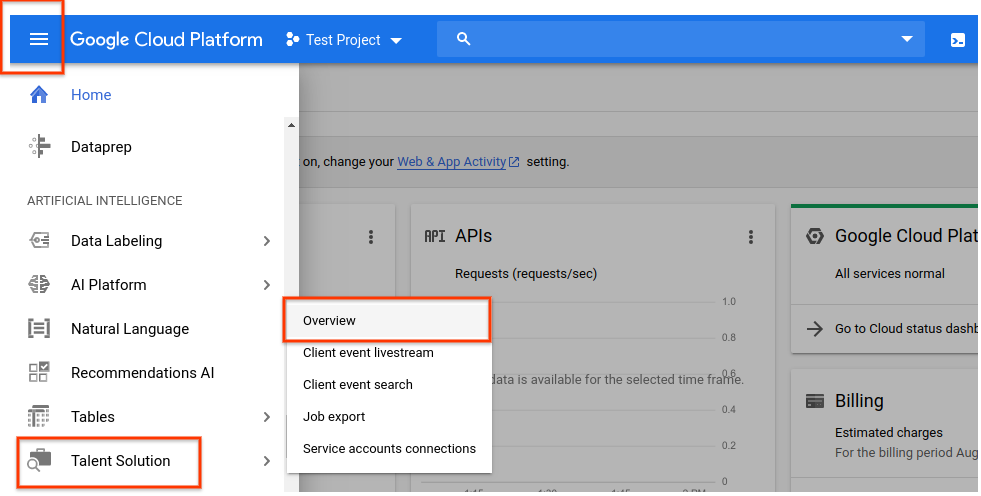
Nachdem Sie ein GCP-Projekt ausgewählt und mit einem Abrechnungskonto verknüpft haben, können Sie die Cloud Talent Solution API aktivieren. Gehen Sie zum Hauptnavigationsmenü und scrollen Sie nach unten zum Abschnitt Künstliche Intelligenz. Klicken Sie auf Talent Solution und wählen Sie im angezeigten Menü die Option Übersicht:
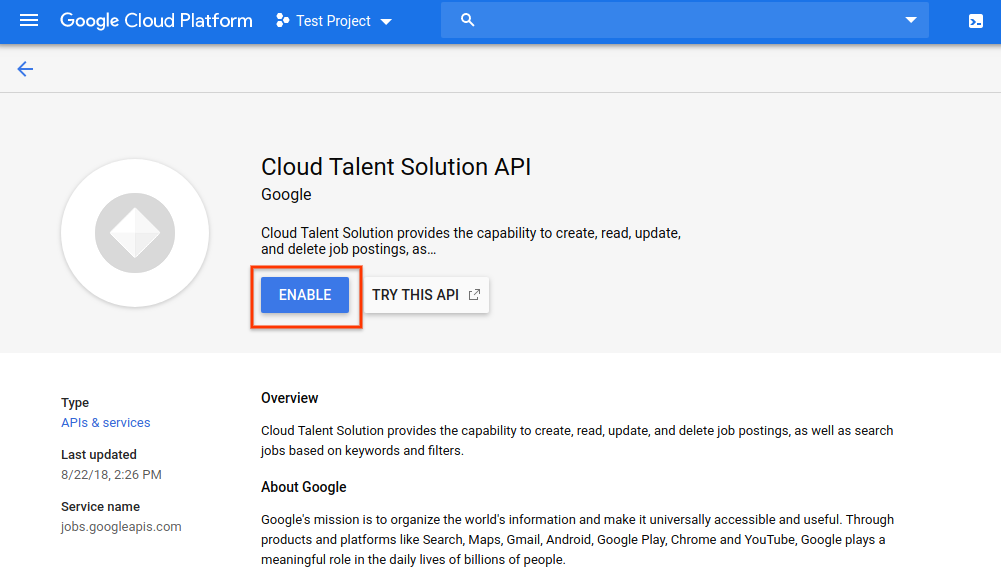
Wenn Sie die API zuerst ausprobieren möchten, ohne sie mit Ihrem Projekt zu verknüpfen, können Sie die Option TRY THIS API auswählen. Weitere Informationen zur Verwendung dieser Funktion finden Sie in der Dokumentation zum Job Search API Explorer.
Klicken Sie auf ENABLE, um die Cloud Talent Solution API für die Verwendung mit Ihrem GCP-Projekt zu aktivieren:
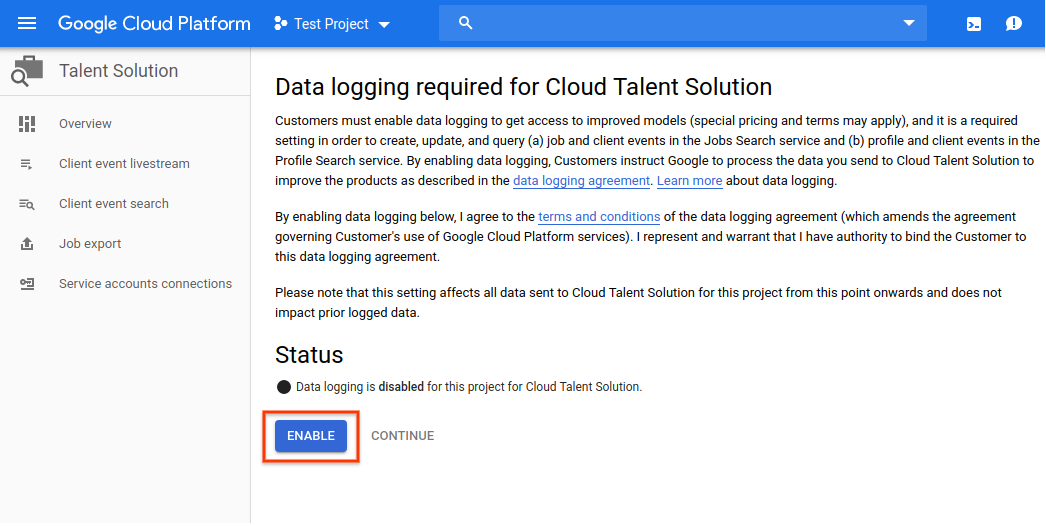
Die Seite für das Daten-Logging wird angezeigt. Sie müssen die Allgemeinen Geschäftsbedingungen akzeptieren, um vollen Zugriff auf die CTS-Funktionen zu haben. Wenn Sie diese Bedingungen nicht akzeptieren, können Sie nur Lösch-API-Anforderungen verwenden. Klicken Sie auf ENABLE (Aktivieren).
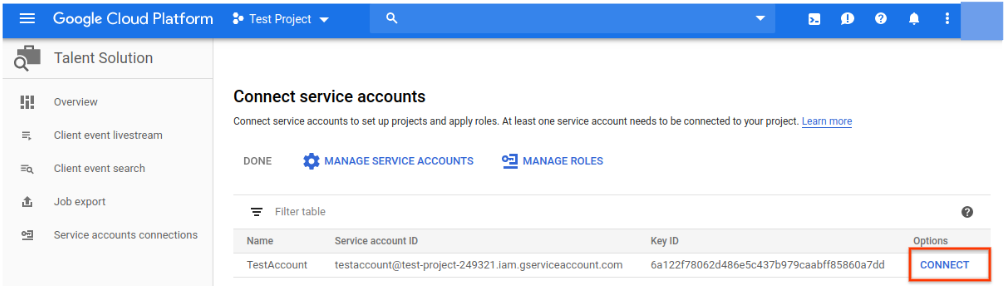
Sie werden nun aufgefordert, ein oder mehrere Dienstkonten mit der CTS-API zu verknüpfen.
Wenn Sie ein Projekt verwenden, dem bereits Dienstkonten zugeordnet sind, werden diese in einer Liste auf dieser Seite angezeigt. Klicken Sie neben den Konten, die Sie mit der CTS-API verknüpfen möchten, auf CONNECT. Sobald Sie dies getan haben, können Sie mit Schritt 8 fortfahren, um sicherzustellen, dass Sie einen JSON- oder P12-Berechtigungsnachweis für dieses Konto heruntergeladen haben.
Wenn Ihr Projekt noch keine Dienstkonten hat, werden Sie aufgefordert, eines zu erstellen. Geben Sie einen Namen Ihrer Wahl in das Feld Dienstkontoname ein. Ihre Eingabe wird automatisch in das Feld Dienstkonto-ID eingetragen. Das Feld Dienstkontobeschreibung ist optional, wird jedoch empfohlen, wenn Sie Ihrem Projekt mehrere Dienstkonten zuordnen möchten. Geben Sie eine kurze Beschreibung des Dienstkontos in dieses Feld ein und klicken Sie auf CREATE.
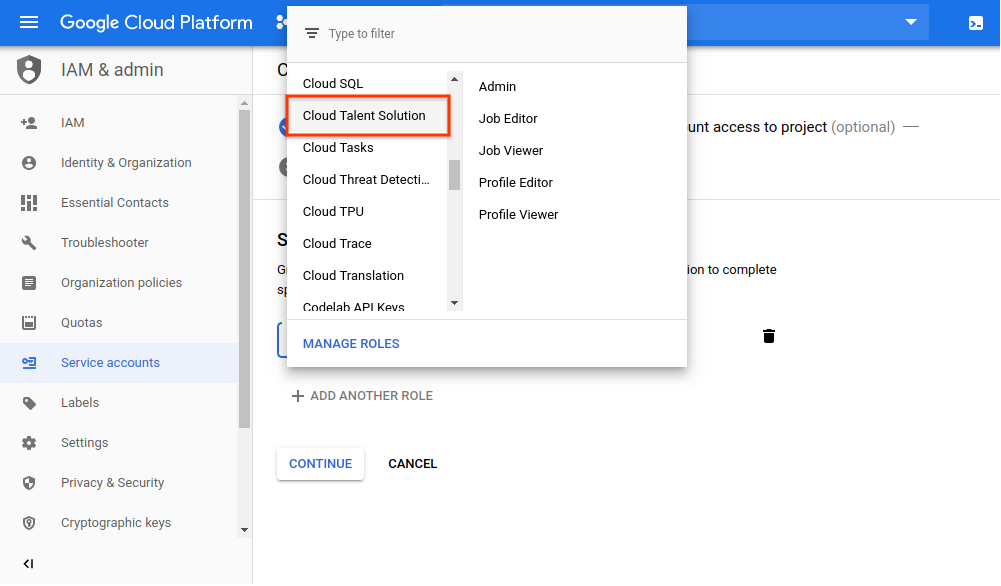
Auf der nächsten Seite können Sie Ihrem neuen Dienstkonto eine Rolle zuweisen. Auf der Seite CTS IAM-Berechtigungen finden Sie ausführliche Informationen zu den verfügbaren Rollen und den jeweils zulässigen Berechtigungen. Klicken Sie auf das Dropdown-Menü . Wählen Sie ein Rollenmenü aus und scrollen Sie nach unten zu Cloud Talent Solution. Sie können eine Rolle für dieses Dienstkonto aus den Optionen in der rechten Spalte auswählen:
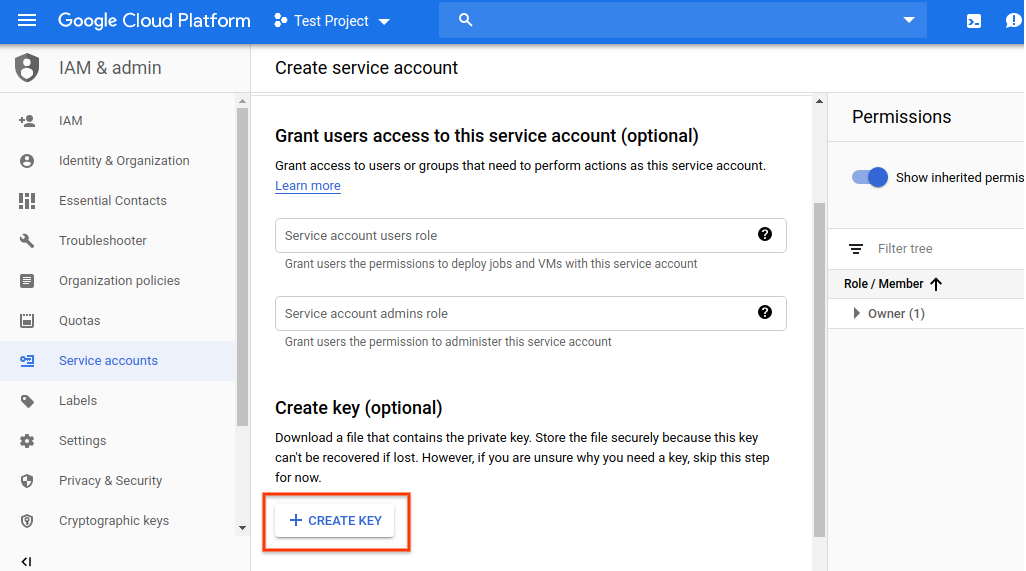
Auf der nächsten Seite haben Sie die Möglichkeit, mehrere Aufgaben zu erledigen. Diese sind nicht erforderlich, werden jedoch dringend empfohlen. Sie können einzelnen Benutzern Zugriff auf das soeben erstellte Dienstkonto gewähren, indem Sie ihre E-Mail-Adressen eingeben.
Sie können auch einen privaten Schlüssel für das Dienstkonto erstellen. Sie müssen während des -Authentifizierungsprozesses einen privaten Schlüssel verwenden, wenn Sie die API verwenden. Wenn Sie diese Aktionen jetzt nicht ausführen, können Sie jederzeit einen Schlüssel generieren und einzelne Benutzerinformationen hinzufügen/ändern, indem Sie über die Option IAM im Hauptnavigationsmenü auf das Dienstkonto zugreifen.
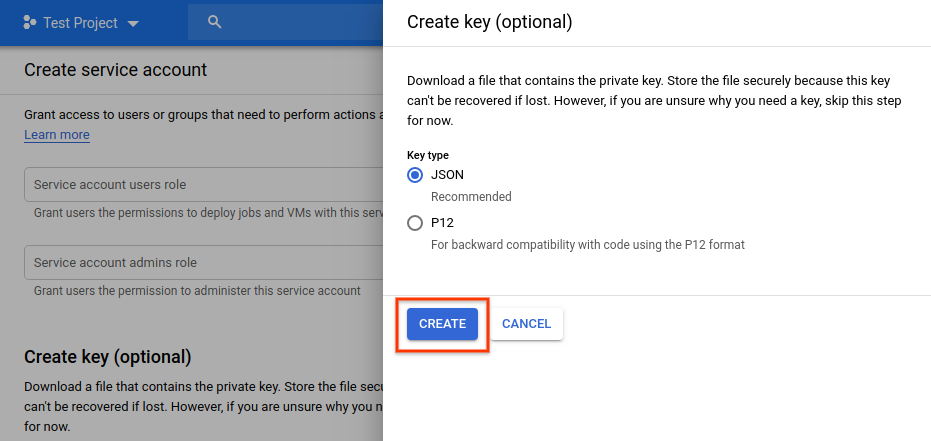
Klicken Sie auf SCHLÜSSEL ERSTELLEN:
Wählen Sie Ihr bevorzugtes Format aus dem Einblendmenü und klicken Sie auf CREATE:
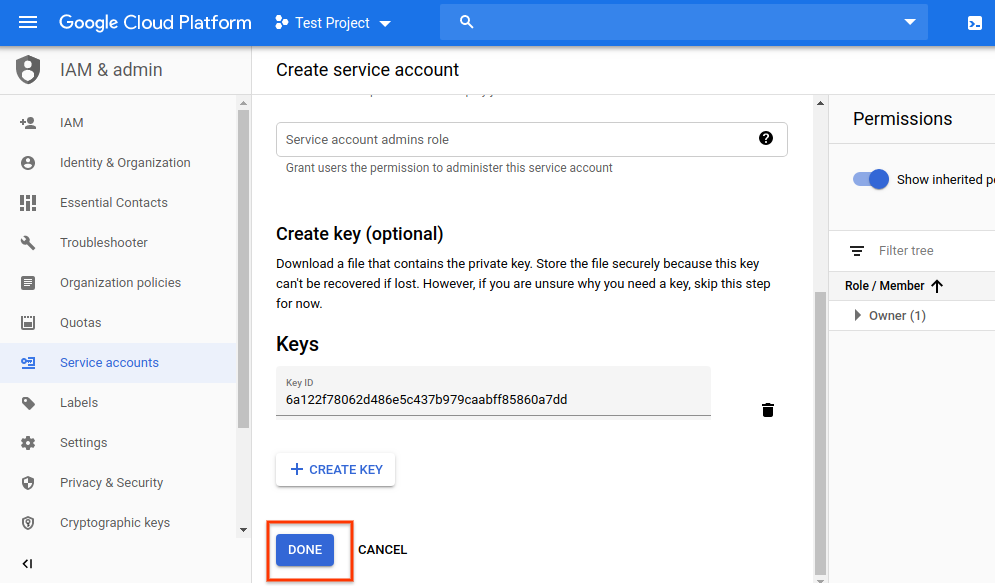
Eine neue JSON- oder P12-Anmeldeinformationsdatei wird automatisch heruntergeladen.
Speichern Sie diese Datei an einem bestimmten Ort und notieren Sie sich den Dateipfad.
Sie müssen die Umgebungsvariable GOOGLE_APPLICATION_CREDENTIALS auf diese Datei verweisen, wenn Sie den Authentifizierungsprozess durchlaufen.
Dies ist ein wichtiger Schritt für die Authentifizierung von Anfragen, die an Cloud Talent Solution gesendet werden.
Klicken Sie nach dem Herunterladen Ihrer Anmeldeinformationsdatei auf FERTIG:
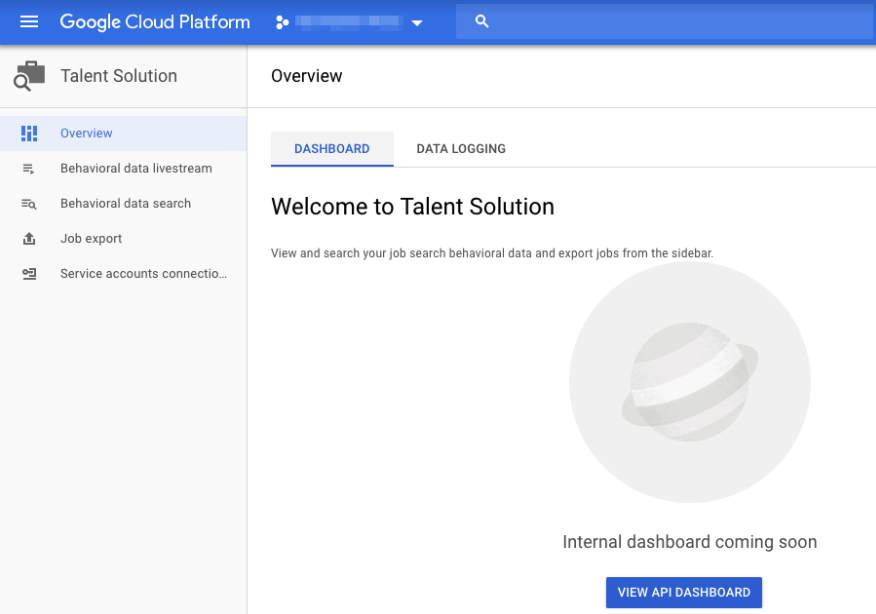
Ihr Dienstkonto wird jetzt auf der Seite Verbindungsdienstkonten angezeigt.
Klicken Sie auf CONNECT, um es mit der CTS-API zu verknüpfen:
Das Konto ist jetzt verbunden und Sie können jetzt mit der Integration von Cloud Talent Solution in Ihr System beginnen:
Legen Sie Ihre Authentifizierungsumgebungsvariable fest
Provide authentication credentials to your application code by setting the
environment variable GOOGLE_APPLICATION_CREDENTIALS. This
variable applies only to your current shell session. If you want the variable
to apply to future shell sessions, set the variable in your shell startup file,
for example in the ~/.bashrc or ~/.profile file.
Linux oder macOS
exportGOOGLE_APPLICATION_CREDENTIALS="KEY_PATH"
Replace KEY_PATH with the path of the JSON file that contains your credentials.
[[["Leicht verständlich","easyToUnderstand","thumb-up"],["Mein Problem wurde gelöst","solvedMyProblem","thumb-up"],["Sonstiges","otherUp","thumb-up"]],[["Schwer verständlich","hardToUnderstand","thumb-down"],["Informationen oder Beispielcode falsch","incorrectInformationOrSampleCode","thumb-down"],["Benötigte Informationen/Beispiele nicht gefunden","missingTheInformationSamplesINeed","thumb-down"],["Problem mit der Übersetzung","translationIssue","thumb-down"],["Sonstiges","otherDown","thumb-down"]],["Zuletzt aktualisiert: 2025-08-18 (UTC)."],[],[],null,["# Before You Begin\n\nOverview\n--------\n\nBefore you can begin using Cloud Talent Solution (CTS), you must\nenable the API in the Google Cloud Platform (GCP) Console. The steps below walk\nyou through the following actions:\n\n- Enable CTS on a GCP project.\n 1. Make sure billing is enabled for CTS.\n 2. Accept the Data Logging Terms \\& Conditions.\n 3. Create and/or assign one or more service accounts to Cloud Talent Solution.\n 4. Download a service account credential key.\n- Set your authentication environment variable.\n\nGCP Console set-up\n------------------\n\n1. Go to the [GCP Console](http://console.cloud.google.com).\n Navigate to the drop-down menu at the top of the page and choose the GCP\n project that you'd like to associate with Cloud Talent Solution. If you\n have previously created one or more projects, they will appear in a list\n in the pop-up menu. You can either choose a pre-existing project (a check\n mark will appear next to the project you select) or create\n a new project by clicking **NEW PROJECT** . For more details on creating a\n GCP project, please see the [documentation](/resource-manager/docs/creating-managing-projects).\n\n2. If you create a new project, you will be prompted to link a billing account\n to this project. If you are using a pre-existing project, make sure that you\n have billing enabled. You can access the project's billing information at\n any time by going to the main navigation menu (the hamburger icon in the\n upper left corner) and clicking the **Billing** option:\n\n | **Note:** You must enable billing to use Cloud Talent Solution, however you will not be charged unless you exceed the free quota of 1-10,000 API calls per month. See the [pricing](/talent-solution/pricing) page for more details.\n3. Once you have selected a GCP project and linked it to a billing account, you\n can enable the Cloud Talent Solution API. Go to the main navigation menu and\n scroll down to the **Artificial Intelligence** section. Click on\n **Talent Solution** and choose **Overview** from the menu that pops up:\n\n4. If you would first like to try the API without linking it to your project,\n you can choose the **TRY THIS API** option. See the\n [Job Search API Explorer](/talent-solution/job-search/docs/quickstart-api-explorer)\n documentation for more information on using this feature.\n To enable the Cloud Talent Solution API for use with your GCP project, click\n **ENABLE**:\n\n5. The data logging page appears. You must accept the terms \\& conditions\n to have full access to CTS features. If you choose not to accept these\n terms, you'll only be able to use deletion API requests. Click **ENABLE**:\n\n6. You are now prompted to link one or more service accounts to the CTS API.\n If you are using a project that already has service accounts associated with\n it, they will appear in a list on this page. Click **CONNECT** next to the\n account(s) that you want to link to the CTS API. Once you have done this,\n you can skip ahead to step 8 to make sure that you've downloaded a JSON or\n P12 credential for that account.\n\n If your project does not yet have any service accounts, you are prompted to\n create one. Type a name of your choosing into the **Service account name**\n box. Your input is automatically populated in the **Service account ID**\n box. The **Service account description** box is optional but recommended if\n you plan on associating multiple service accounts with your project. Enter\n a brief description of the service account into this box, then click\n **CREATE**.\n\n7. The next page allows you to assign a role to your new service account. See\n the CTS [IAM permissions](/talent-solution/docs/iam) page for full details\n on the available roles and the permissions allowed to each. Click on the\n drop-down **Select a role** menu and scroll down to\n **Cloud Talent Solution**. You can choose a role for this service account\n from the options in the right-hand column:\n\n8. The next page gives you the option to complete several tasks. These are\n not required but highly recommended. You can grant individual users access\n to the service account you just created by entering their email addresses.\n You can also create a private key for the service account. You must use a\n private key during the [authentication process](/talent-solution/job-search/docs/before-you-begin#set_up_your_environment_variables)\n when you use the API. If you choose not take these actions now, you can\n generate a key and add/change individual user information at any time by\n accessing the service account through the **IAM** option in the main\n navigation menu.\n\n Click **CREATE KEY**:\n\n Choose your preferred format from the pop-up menu and click **CREATE**:\n\n A new JSON or P12 credential file is automatically downloaded.\n Store this file in a specific location and make a note of the file path.\n You will need to point the \u003cvar translate=\"no\"\u003eGOOGLE_APPLICATION_CREDENTIALS\u003c/var\u003e\n environment variable to this file when you go through the\n [authentication process](/talent-solution/job-search/docs/before-you-begin#set_up_your_environment_variables).\n This is an essential step for authenticating requests to Cloud Talent Solution.\n\n Once your credential file has downloaded, click **DONE**:\n\n9. Your service account now appears on the **Connect service accounts** page.\n Click **CONNECT** to link it to the CTS API:\n\n10. The account is now connected, and you're now ready to begin integrating Cloud\n Talent Solution into your system:\n\nSet your authentication environment variable\n--------------------------------------------\n\n\nProvide authentication credentials to your application code by setting the\nenvironment variable `GOOGLE_APPLICATION_CREDENTIALS`. This\nvariable applies only to your current shell session. If you want the variable\nto apply to future shell sessions, set the variable in your shell startup file,\nfor example in the `~/.bashrc` or `~/.profile` file. \n\n### Linux or macOS\n\n```bash\nexport GOOGLE_APPLICATION_CREDENTIALS=\"\u003cvar translate=\"no\"\u003eKEY_PATH\u003c/var\u003e\"\n```\n\nReplace \u003cvar translate=\"no\"\u003eKEY_PATH\u003c/var\u003e with the path of the JSON file that contains your credentials.\n\nFor example: \n\n```bash\nexport GOOGLE_APPLICATION_CREDENTIALS=\"/home/user/Downloads/service-account-file.json\"\n```\n\n### Windows\n\nFor PowerShell: \n\n```bash\n$env:GOOGLE_APPLICATION_CREDENTIALS=\"\u003cvar translate=\"no\"\u003eKEY_PATH\u003c/var\u003e\"\n```\n\nReplace \u003cvar translate=\"no\"\u003eKEY_PATH\u003c/var\u003e with the path of the JSON file that contains your credentials.\n\nFor example: \n\n```bash\n$env:GOOGLE_APPLICATION_CREDENTIALS=\"C:\\Users\\username\\Downloads\\service-account-file.json\"\n```\n\nFor command prompt: \n\n set GOOGLE_APPLICATION_CREDENTIALS=\u003cvar translate=\"no\"\u003eKEY_PATH\u003c/var\u003e\n\nReplace \u003cvar translate=\"no\"\u003eKEY_PATH\u003c/var\u003e with the path of the JSON file that contains your credentials.\n\nFor more information, see\nthe [GCP authentication documentation](/docs/authentication/production).\n\nWhat's next\n-----------\n\nInstall a [client library](/talent-solution/job-search/docs/libraries) or see\nthe [create jobs and companies quickstart](/talent-solution/job-search/docs/quickstart-jobs-and-companies)\nto begin making API calls."]]