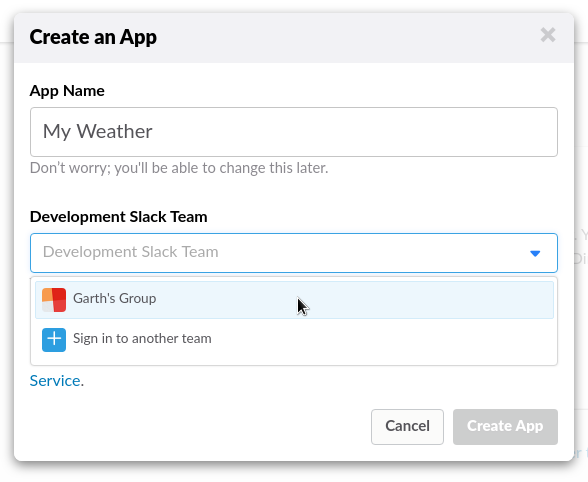
Escolha a equipe a que o aplicativo estará associado.
Clique no botão Create App.
Adicionar um usuário de bot
Clique em OAuth e permissões no menu à esquerda.
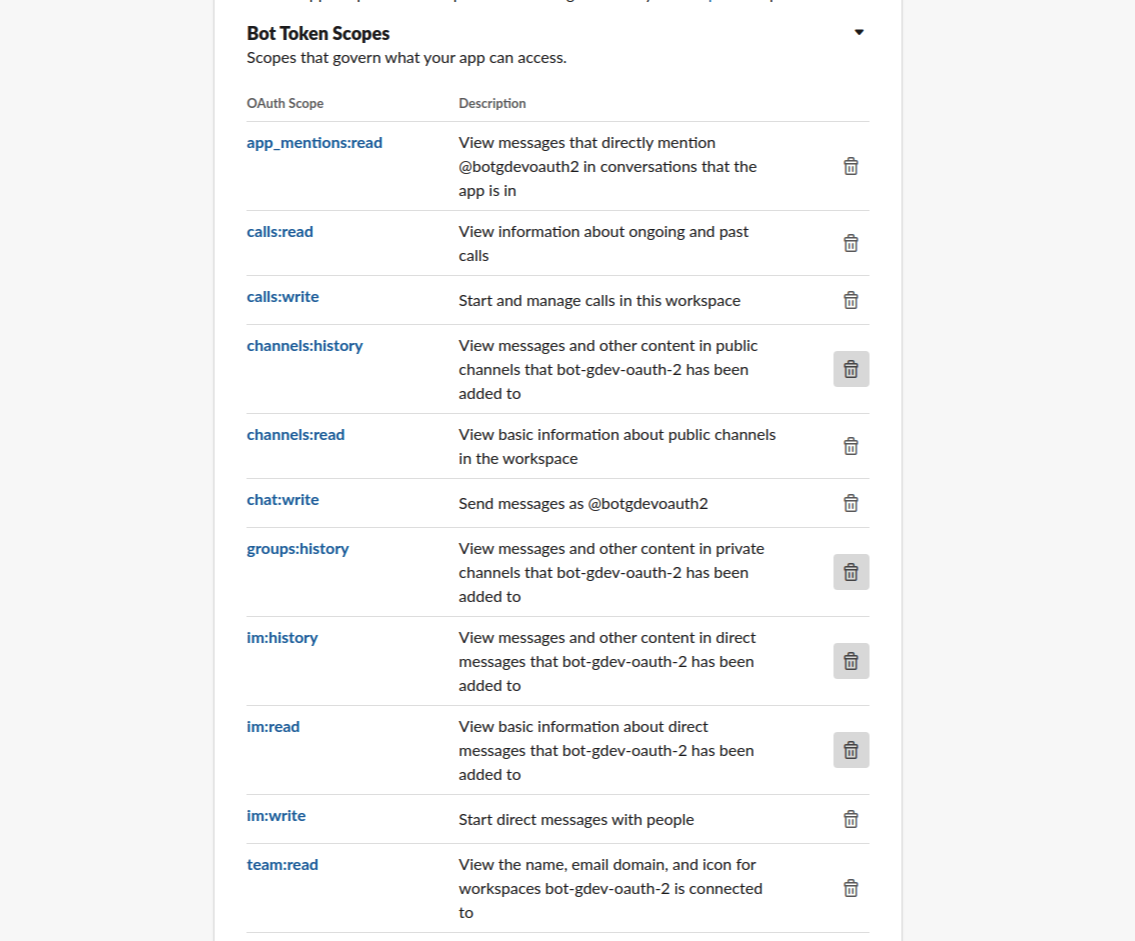
Acesse a seção Escopos e verifique se os seguintes escopos do OAuth estão na
seção "Scope Token Scopes"
()
Clique em Página inicial do aplicativo no menu à esquerda.
Ative Always Show My Bot as Online e edite App Display Name se
necessário. Isso é o que os usuários vão ver para seu bot.
Como ativar a integração no Dialogflow
No console para desenvolvedores do Slack, clique em Basic Information no menu à esquerda e role até a seção App Credentials. Anote os dados de Client ID, Client Secret e Verification Token.
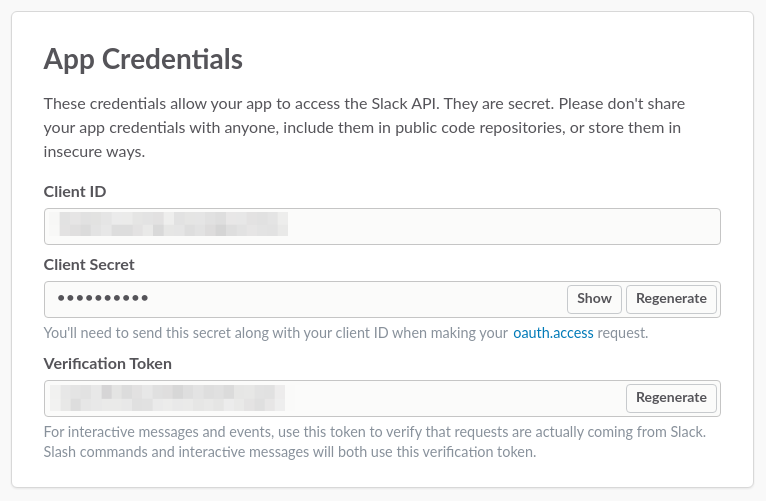
Vincular o Slack ao Dialogflow
No Dialogflow, acesse Integrations no menu à esquerda.
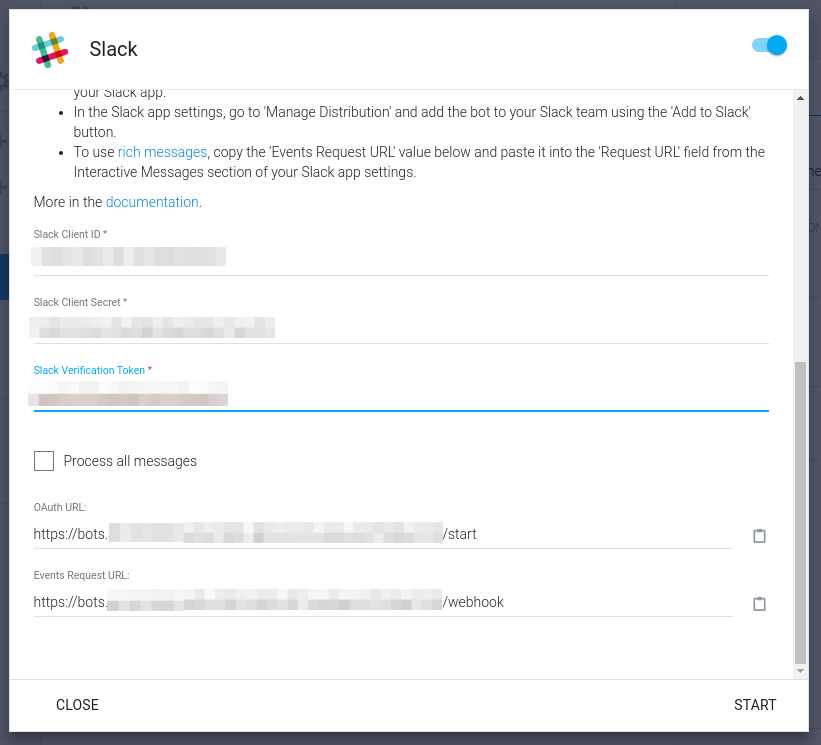
Clique no bloco Slack.
Digite os valores equivalentes nos seguintes campos:
ID do cliente
Client Secret
Verification Token
Clique em Start.
Como continuar a configuração do Slack
Agora que você configurou o Slack e o Dialogflow, ative o OAuth, os URLs de solicitações de evento (fornecidos pelo Dialogflow) e as assinaturas de evento.
Adicionar o URL do OAuth
Copie o URL do OAuth da página de configurações do Dialogflow no Slack.
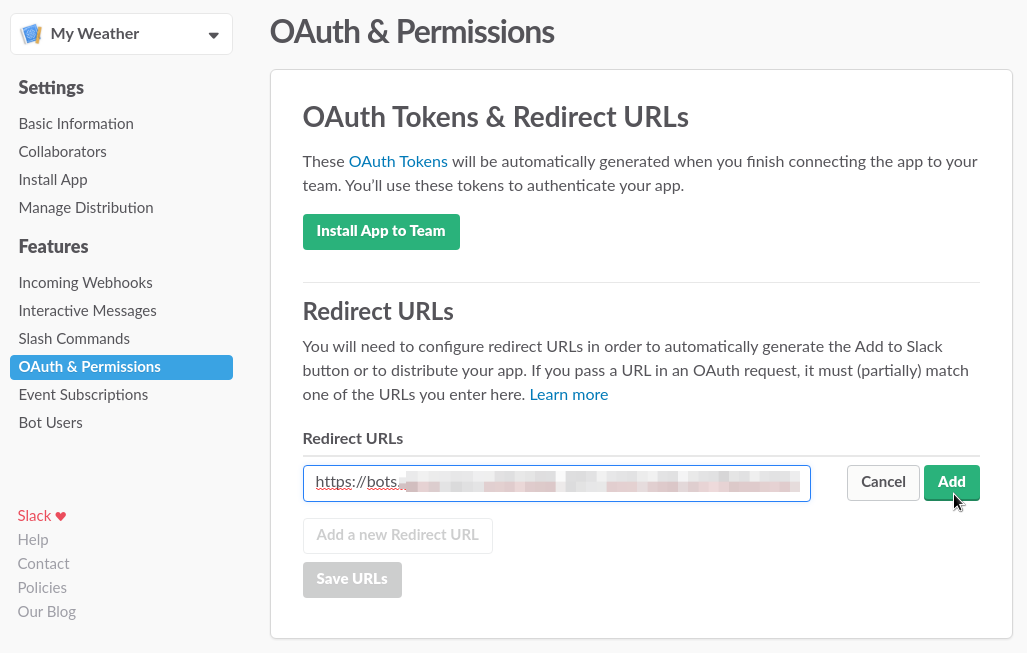
Acesse o Slack Developer Console e clique em OAuth & Permissions no menu à esquerda.
Clique no botão Add a new Redirect URL e cole o URL do OAuth.
Clique em Add.
Clique no botão Salvar URLs.
Adicionar o URL de solicitação de evento e ativar as inscrições de evento
Copie o URL de solicitação de evento da página de configurações do Dialogflow no Slack.
Acesse o Slack Developer Console e clique em Event Subscriptions no menu à esquerda.
Clique na chave para ativar os eventos e cole o URL de assinatura de evento no campo Request URL.
Depois de alguns instantes, você verá um campo verde "Verified" acima do campo "Request URL".
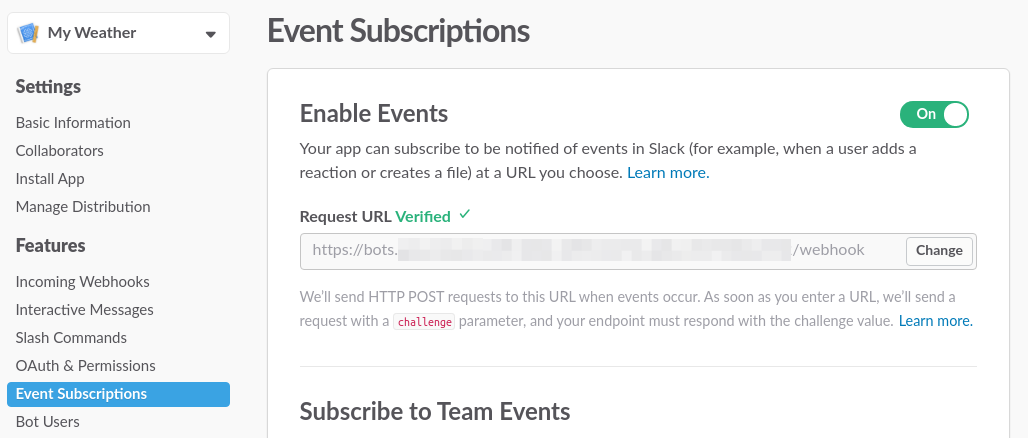
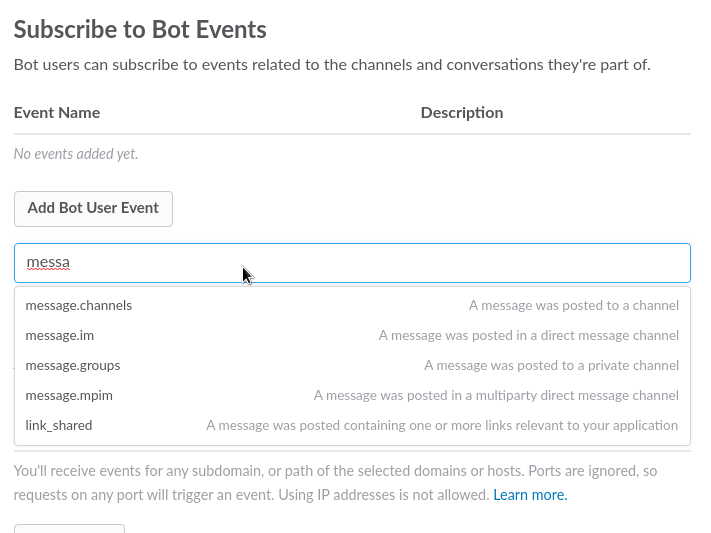
Na seção Subscribe to Bot Events , clique no botão Add Bot User Event.
Serão exibidos o campo de texto e a lista de eventos. Digite termos nesse campo para pesquisar os eventos a que você quer que o bot responda. Confira uma lista de eventos que sugerimos adicionar:
Nome do evento
Descrição do evento
message.im
Uma mensagem foi postada em um canal de mensagem direta.
message.groups
Uma mensagem foi postada em um canal privado.
message.channels
Uma mensagem foi postada em um canal.
im_created
Uma mensagem direta foi criada.
Na seção Inscrever-se em eventos em nome dos usuários,
clique no botão Adicionar evento do Workspace para adicionar o evento im_created
e pressione Salvar alterações.,
Quando terminar de atualizar essas configurações, clique no botão Salvar alterações na parte de baixo da página.
Adicionar o bot do Slack a uma equipe
No Slack Developer Console, clique em Manage Distribution no menu à esquerda.
Na seção Share Your App with Your Workplace, clique no botão Add to
Slack.
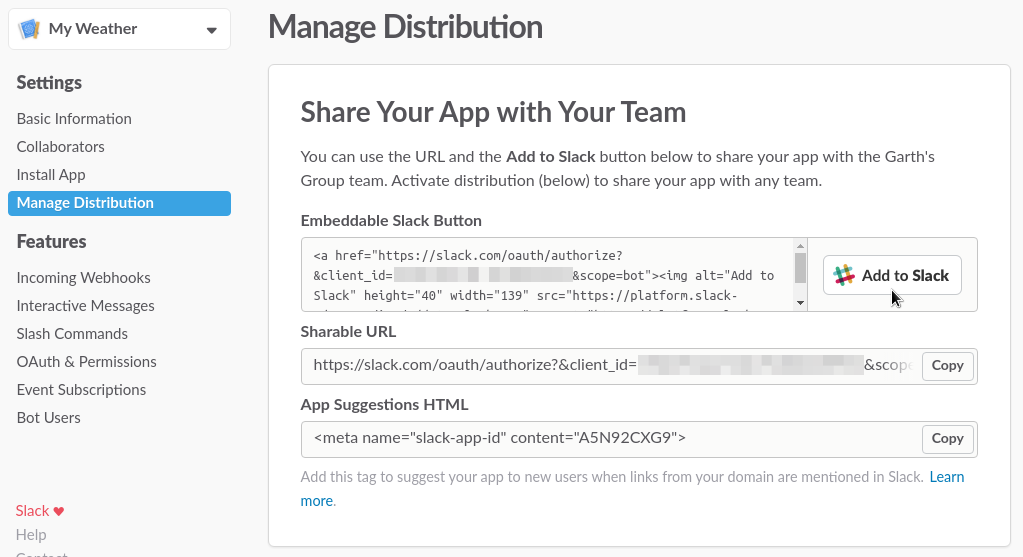
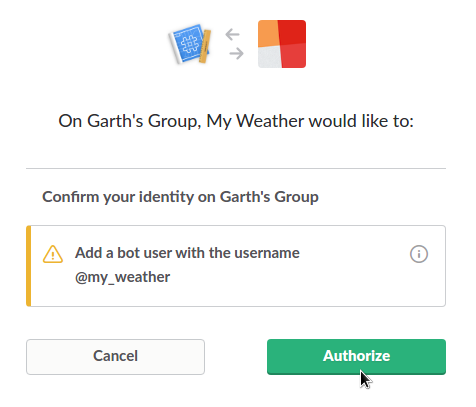
Na próxima página, clique no botão Authorize para adicionar o agente.
Teste
É possível testar o agente sem criar um bot público do Slack. Para fazer isso, acesse a página Integrações do agente e clique na chave no bloco Slack.
Na janela pop-up, clique no botão Test In Slack.
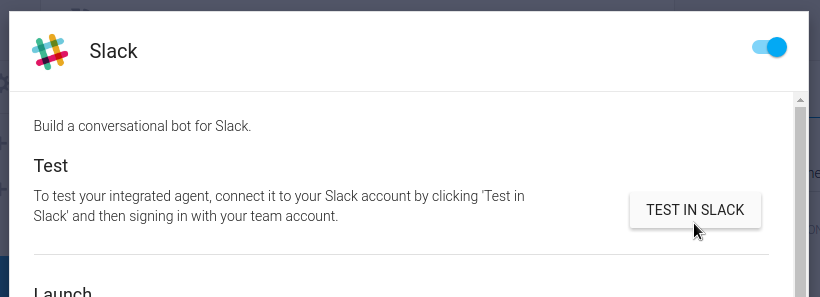
Você será solicitado a fazer login no Slack. Após fazer o login, vá até a instância e localize o usuário do bot chamado @dialogflow-bot. Envie uma mensagem direta ao agente para testá-lo ou adicione-o aos canais na sua instância.
Eventos
Os eventos a seguir são invocados por esta integração:
Evento
Descrição
SLACK_WELCOME
Acionado quando um usuário inicia uma conversa com o bot do Slack.
Não há campos obrigatórios para cartões no Slack. Qualquer combinação de elementos pode ser usada.
Botões com um URL e um postback de texto são compatíveis. Os botões com um URL são exibidos como hiperlinks.
Respostas rápidas
As respostas rápidas são compatíveis com as integrações do Slack de apenas um clique e correspondem a uma versão de texto dos botões interativos do Slack.
Respostas de payload personalizadas
Texto formatado na integração de apenas um clique do Slack
Seus bots do Slack podem enviar texto formatado, como mostra o exemplo a seguir:
{"slack":{"text":"This is an example of *bold*, _italic_, and `code`."}}
[[["Fácil de entender","easyToUnderstand","thumb-up"],["Meu problema foi resolvido","solvedMyProblem","thumb-up"],["Outro","otherUp","thumb-up"]],[["Difícil de entender","hardToUnderstand","thumb-down"],["Informações incorretas ou exemplo de código","incorrectInformationOrSampleCode","thumb-down"],["Não contém as informações/amostras de que eu preciso","missingTheInformationSamplesINeed","thumb-down"],["Problema na tradução","translationIssue","thumb-down"],["Outro","otherDown","thumb-down"]],["Última atualização 2025-08-18 UTC."],[[["\u003cp\u003eDialogflow allows you to create and train Slack bots for natural language understanding through its Slack integration.\u003c/p\u003e\n"],["\u003cp\u003eSetting up the integration requires a Slack account, a Slack Team, and specific app credentials from the Slack Developer Console that will be linked in Dialogflow.\u003c/p\u003e\n"],["\u003cp\u003eOAuth URLs and Event Request URLs, provided by Dialogflow, need to be added and configured within the Slack Developer Console for proper integration functionality.\u003c/p\u003e\n"],["\u003cp\u003eThe integration supports specific rich response messages like image responses, card responses, quick replies, and custom payload responses, including formatted text.\u003c/p\u003e\n"],["\u003cp\u003eOnly the default agent language is supported by this integration, and when using the integration end-user data is sent to Google and the third party, each having their own applicable terms of service, SLA, pricing, and quotas.\u003c/p\u003e\n"]]],[],null,["# Slack\n\nDialogflow's Slack Integration makes it easy to create your own Slack apps and bots\nand train them to understand natural language.\n\n\n| **Note:** When using a third party integration, requests and end-user data are sent to both Google and the third party. The terms of service, SLA, pricing, and quotas [for your agent edition](/dialogflow/docs/editions) are applicable for Google's handling of these requests. The third party's terms of service, SLA, pricing, and quotas are applicable for the third party's handling of these requests.\n\n\u003cbr /\u003e\n\nLimitations\n-----------\n\nOnly the\n[default agent language](/dialogflow/es/docs/agents-settings#lang)\nis supported by this integration.\n\nSetting Up Slack\n----------------\n\nIn order to set up the Slack integration for your agent, you'll need the\nfollowing:\n\n- a Slack account\n- a [Slack Team](https://slack.com/create#email)\n\n### Create a Slack App\n\n1. Navigate to the [Slack Developer Console](https://api.slack.com/apps/new)\n2. Enter a name for your app\n3. Choose a Team you would like the app associated with\n4. Click the **Create App** button\n\n### Add a Bot User\n\n1. Click on **OAuth \\& Permissions** in the left hand menu\n2. Go to **Scopes** section and make sure the following OAuth Scopes are in the Bot Token Scopes section\n3. Click on **App Home** in the left hand menu\n4. Enable **Always Show My Bot as Online** and edit **App Display Name** if needed (this is what users will see for your bot)\n\nEnabling Integration in Dialogflow\n----------------------------------\n\nIn the Slack Developer Console, click on **Basic Information** in the left hand\nmenu and scroll down to the **App Credentials** section. Make note of the\n**Client ID** , **Client Secret** , and **Verification Token**.\n\n### Link Slack to Dialogflow\n\n1. In Dialogflow, go to **Integrations** in the left hand menu\n2. Click on the **Slack** tile\n3. Enter the related values into the following fields:\n 1. **Client ID**\n 2. **Client Secret**\n 3. **Verification Token**\n4. Click **Start**\n\nContinuing Slack Setup\n----------------------\n\nNow that you've set up Slack and Dialogflow, you'll enable OAuth, Event\nRequests URLs (provided by Dialogflow) and Event Subscriptions.\n\n### Add OAuth URL\n\n1. Copy the **OAuth URL** from Dialogflow's Slack setting page\n\n| **Note:** If your Slack App is a classic Slack App and you haven't upgraded it yet, you will need to click **Show URLs for legacy Slack workflow** on Dialogflow's Slack setting page, and then copy the **OAuth URL** . Please see [Quickstart: differences between old and new Slack apps](https://api.slack.com/authentication/quickstart) for more information.\n\n1. Go to the Slack Developer Console and click on **OAuth \\& Permissions** in the left hand menu\n2. Click on the **Add a new Redirect URL** button and paste the OAuth URL\n3. Click **Add**\n4. Click **Save URLs** button\n\n### Add Event Request URL and Enable Event Subscriptions\n\n1. Copy the **Event Request URL** from Dialogflow's Slack setting page\n2. Go to the Slack Developer Console and click on **Event Subscriptions** in the left menu\n3. Click on the switch to enable Events, and paste the Event Subscription URL in to **Request URL** field \n\n After a few moments you should see a green \"Verified\" above the Request URL field.\n4. Under the **Subscribe to Bot Events** , click on the **Add Bot User Event**\n button \n\n \u003cbr /\u003e\n\n\n This will reveal text field and list of events. You can enter terms into this\n field to search for events you want your bot to respond to. Here's a list of\n events we suggest adding: \n\n5. Once you're done updating these settings, click the **Save Changes**\n button at the bottom of the page.\n\n### Add Your Slack Bot to a Team\n\n1. In the Slack Developer Console, click on **Manage Distribution** in the left menu\n2. Under the **Share Your App with Your Workplace** section, click the **Add to\n Slack** button\n3. On the next page, click the **Authorize** button to add the agent\n\nTesting\n-------\n\nYou can test your agent without creating a public Slack bot. To do so, go to the\n**Integrations** page for your agent and click the switch on the **Slack** tile.\nIn the pop-up window, click the **Test In Slack** button.\n\nYou'll be prompted to log in to Slack. Once logged in, navigate to the instance\nand locate the bot user called **@dialogflow-bot**. You can direct message the agent\nto test it or add it to channels in your instance.\n| **Note:** In order to change the name of the agent or add a logo, you'll need to make the bot public.\n\nEvents\n------\n\nThe following [events](/dialogflow/docs/events-overview)\nare invoked by this integration:\n\nRich response messages\n----------------------\n\nThe following\n[rich response messages](/dialogflow/docs/intents-rich-messages)\nare supported.\n\n### Image responses\n\nSupported formats and sizes:\n\n- gif\n- jpeg\n- png\n- bmp\n\n### Card responses\n\nThere are no mandatory fields for cards in Slack -- any combination of elements can be used.\n\nButtons with a URL and with a text postback are supported. Buttons with a URL are displayed as hyperlinks.\n\n### Quick reply responses\n\nQuick replies are supported in one-click Slack integrations and correspond to a text version of [Slack interactive buttons](https://api.slack.com/docs/message-buttons).\n\n### Custom payload responses\n\n**Formatted text in one-click Slack integration**\n\nYour Slack bots can send [formatted text](https://api.slack.com/docs/message-formatting#message_formatting), as the following example shows: \n\n```mysql\n{\n \"slack\": {\n \"text\": \"This is an example of *bold*, _italic_, and `code`.\"\n }\n}\n```"]]