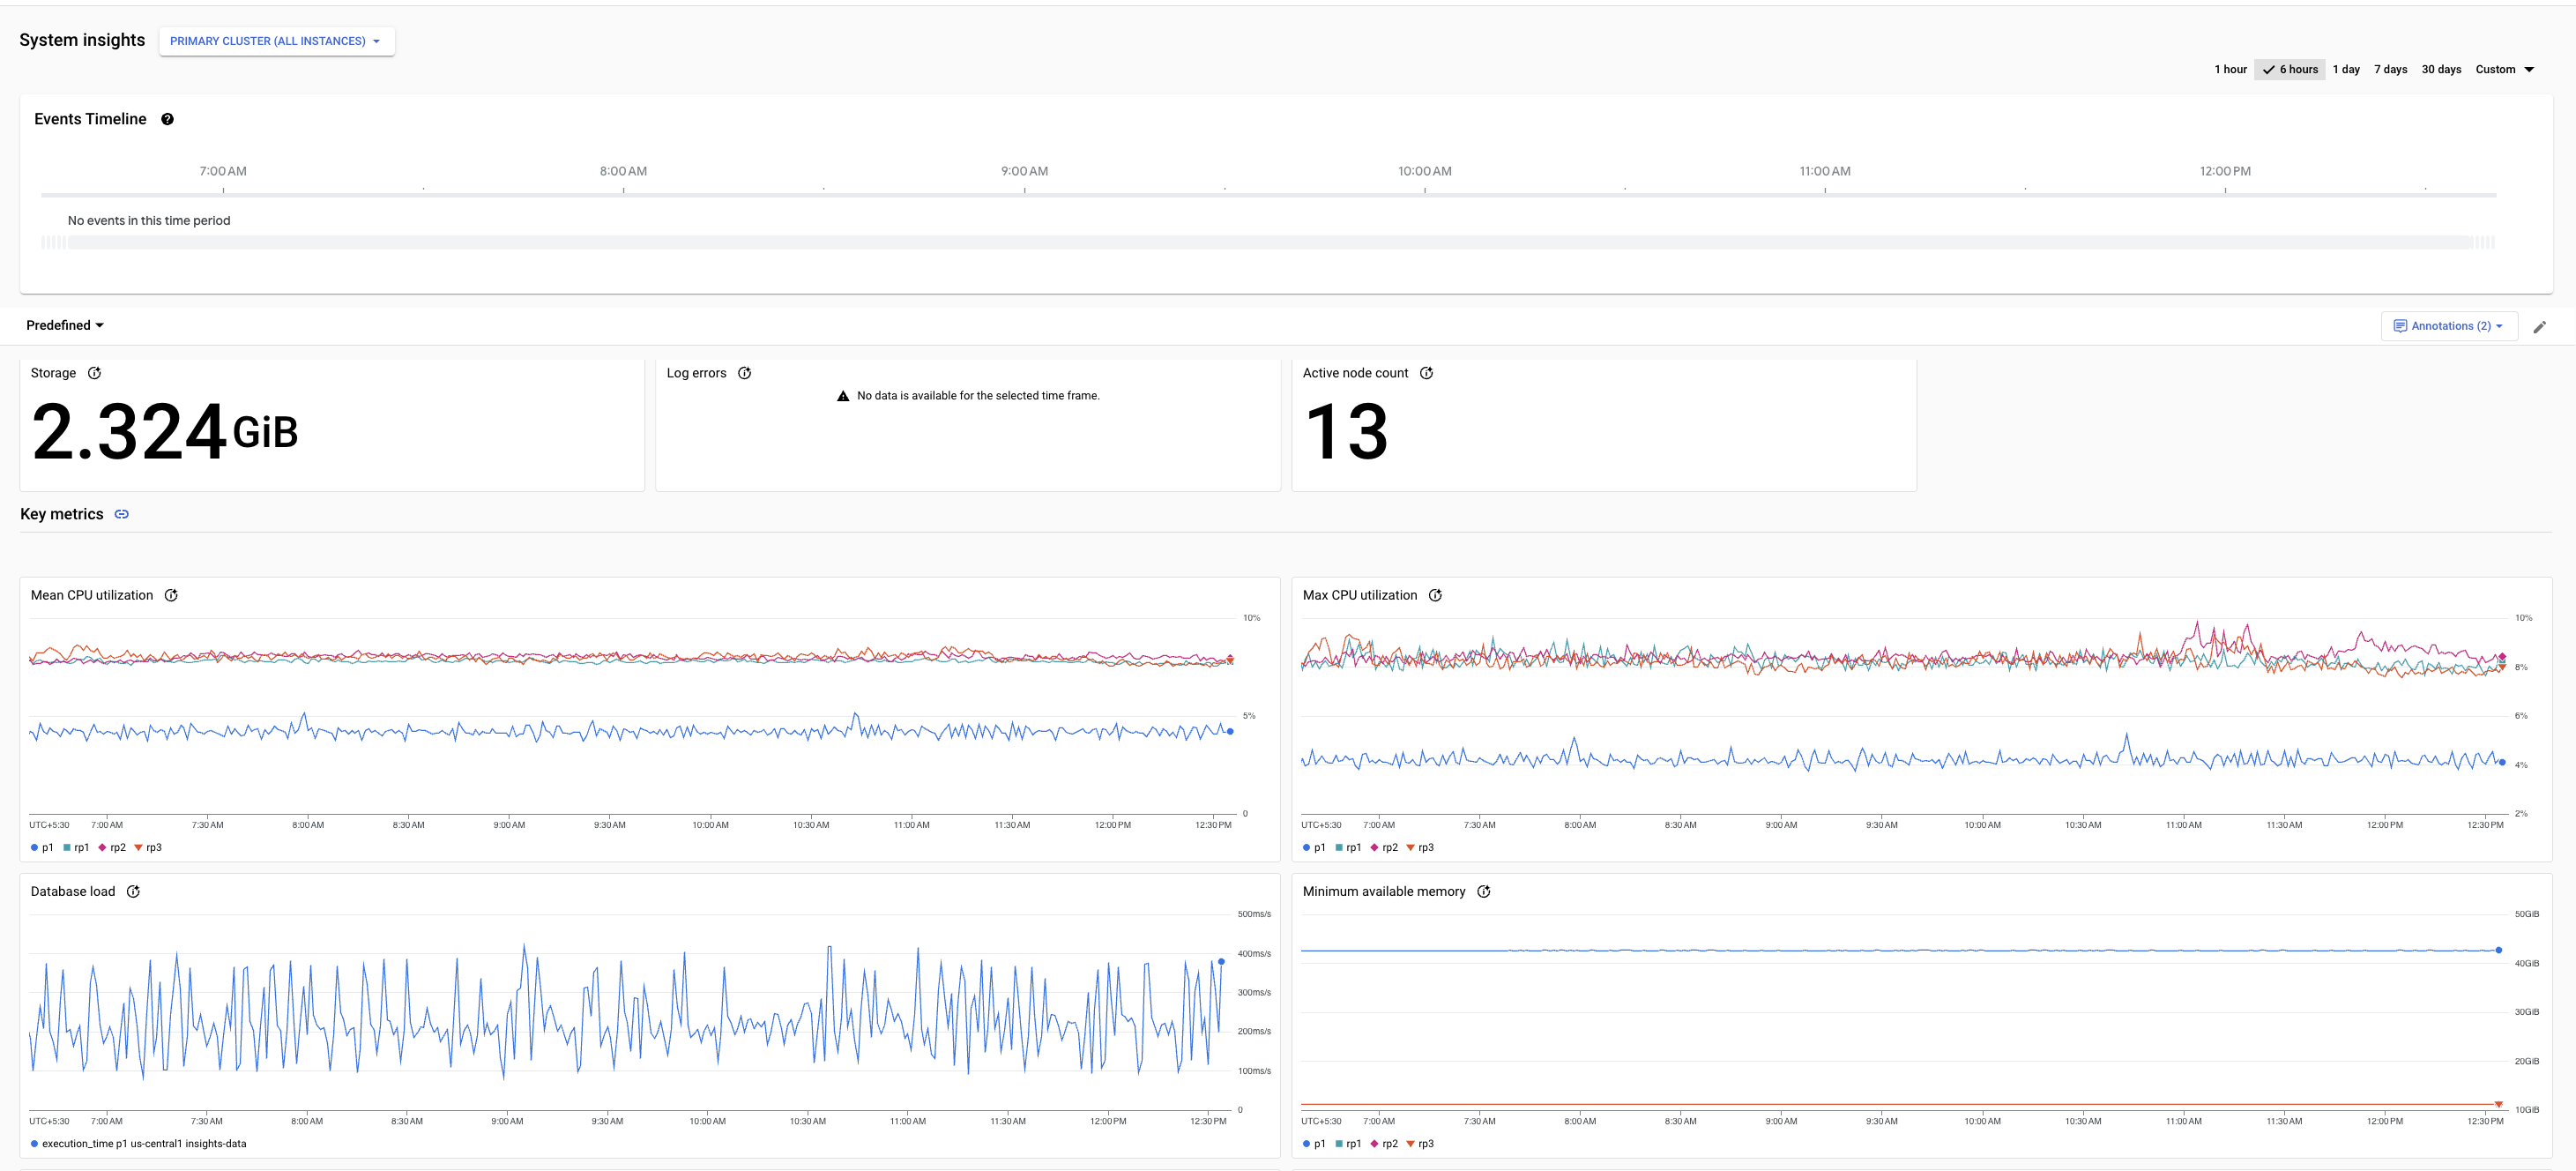
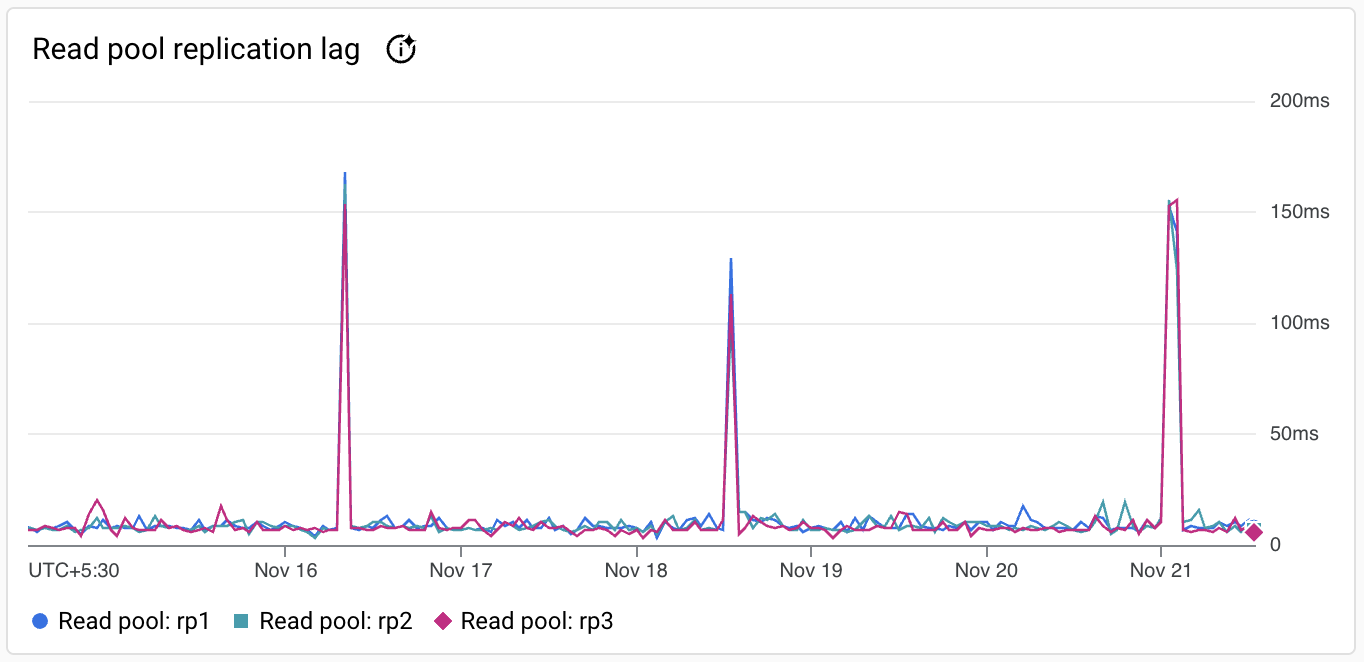
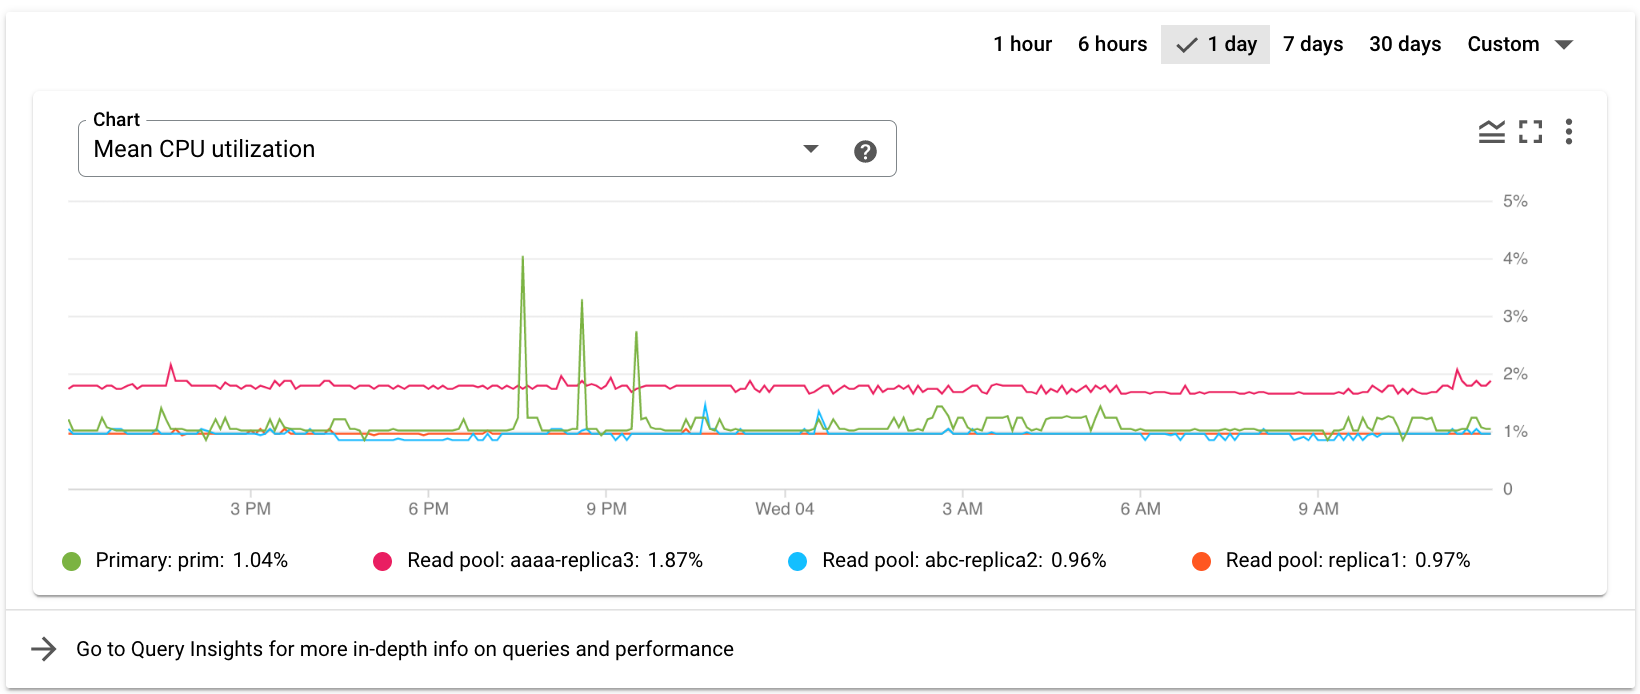
[[["易于理解","easyToUnderstand","thumb-up"],["解决了我的问题","solvedMyProblem","thumb-up"],["其他","otherUp","thumb-up"]],[["很难理解","hardToUnderstand","thumb-down"],["信息或示例代码不正确","incorrectInformationOrSampleCode","thumb-down"],["没有我需要的信息/示例","missingTheInformationSamplesINeed","thumb-down"],["翻译问题","translationIssue","thumb-down"],["其他","otherDown","thumb-down"]],["最后更新时间 (UTC):2025-08-19。"],[[["\u003cp\u003eAlloyDB instances can be monitored using the AlloyDB System insights dashboard, the Cloud Monitoring dashboard, or the AlloyDB cluster Overview page, each offering different views and levels of detail.\u003c/p\u003e\n"],["\u003cp\u003eThe AlloyDB System insights dashboard provides predefined and customizable views of key metrics, including storage, CPU utilization, connections, and log errors, and also allows for integrating metrics from other Google Cloud products.\u003c/p\u003e\n"],["\u003cp\u003eAccess to the AlloyDB System insights dashboard requires specific permissions, either a Basic viewer role or a Database Insights viewer role, and editing capabilities need permissions to update AlloyDB instances.\u003c/p\u003e\n"],["\u003cp\u003eCloud Monitoring allows for custom dashboards and setting up alerts, such as notifications for high memory usage, and is another method to monitor the general health of instances.\u003c/p\u003e\n"],["\u003cp\u003eThe cluster Overview page offers a quick way to see cluster-related metrics, allowing users to select different metrics from a drop-down list for display in a chart.\u003c/p\u003e\n"]]],[],null,["# Monitor instances\n\nThis page describes how to monitor AlloyDB instances using the\nfollowing methods:\n\n- [Monitor an instance using the AlloyDB System insights dashboard.](#monitoring)\n- [Monitor an instance using the Cloud Monitoring dashboard.](#cloud-monitoring)\n- [View metrics on the AlloyDB cluster Overview page.](#monitoring-overview)\n\nYou can use Gemini Cloud Assist to help you monitor and troubleshoot\nyour AlloyDB resources. For more information, see\n[Monitor and troubleshoot with Gemini assistance](/alloydb/docs/monitor-troubleshoot-with-gemini).\n\nBefore you begin\n----------------\n\nTo access the System insights dashboard,\n[enable access to AlloyDB for PostgreSQL in your Google Cloud project](/alloydb/docs/quickstart/create-and-connect).\n\n### Required roles\n\nTo use AlloyDB System insights, you need permissions to do the\nfollowing:\n\n- To access System insights, you need permissions to access the AlloyDB System insights dashboard.\n- To edit System insights, you need permissions to update AlloyDB instances.\n\nTo get these permissions, ask your administrator to grant you one of the\nfollowing roles:\n\n- Basic viewer (`roles/viewer`)\n- Database Insights viewer (`roles/databaseinsights.eventsViewer`)\n\nFor more information about granting roles, see\n[Manage access](/iam/docs/granting-changing-revoking-access).\n\nMonitor an instance using the AlloyDB System insights dashboard\n---------------------------------------------------------------\n\nThe AlloyDB System insights dashboard displays metrics of the resources\nthat you use and lets you monitor these resources and metrics.\n\nIn addition to the predefined dashboard generated by System insights, you can create a custom dashboard with the following customizations:\n\n- Add or remove AlloyDB metrics\n- Integrate metrics from other Google Cloud products, such as GKE Enterprise, to provide a more holistic view of your system\n- Reorganize the dashboard layout\n\nTo view the AlloyDB System insights dashboard, do the following:\n\n1. In the Google Cloud console, open the **AlloyDB** page.\n\n [Go to AlloyDB](https://console.cloud.google.com/alloydb)\n2. Click the name of a cluster to open its **Overview** page.\n\n3. Select the **System insights** tab.\n\nThe AlloyDB System insights dashboard opens. It shows details about the\ncluster at the top followed by charts for the key metrics.\nAlloyDB System insights dashboard\n\nPredefined and custom dashboards include the\nfollowing features:\n\n- By default, the **Cluster (all instances)** view is selected.\n You can choose to view metrics for the primary instance or for read pool instances.\n\n- The time selector shows `1 day` selected by default.\n To change the period, select one of the other predefined periods or\n click **Custom** and define a start and end time. Data is available for the last 30 days.\n\nEach dashboard includes the following sections:\n\n- The [summary cards](#summary-cards) show the latest or aggregated values for some\n metrics, and provide an overview of the database health and performance during the\n selected period.\n\n- The [metrics charts](#metrics-pg) show information about important metrics\n that help you gain insights into resource usage such as CPU, memory, connections,\n replication, and storage, and respond proactively as your application needs change.\n\n- The [system events](#events-timeline) show information that helps you evaluate the\n impact of system events on the health and performance of the instance.\n\n### Summary cards\n\nThe following table describes the summary cards displayed on the\nAlloyDB System insights dashboard. These cards provide an overview of\nthe database health and performance during the selected period.\n\n### Metrics charts\n\nThe System insights dashboard provides metrics at the following levels:\n\n- Primary cluster (All instances)\n- Primary instance\n- Individual read pool instances\n\nTo view the metrics for a specific level, click the **Primary cluster (All instances)** drop-down and select the corresponding dashboard.\n\nFor more information about metrics for each level, see [System insights metrics reference](/alloydb/docs/reference/system-insights-metrics).\n\nA chart card for a sample metric appears as follows.\nSample AlloyDB for PostgreSQL metric data\n\n\u003cbr /\u003e\n\nThe toolbar on each chart card provides the following set of standard options:\n\n- To hide or display the legend, click more_vert **More chart options** , and then click **Expand chart legend**.\n\n- To view metric values for a specific moment in the selected period,\n move the cursor over the chart.\n\n- To view a chart in full-screen mode, click more_vert **More chart options** , and then click **View in full screen**.\n\n- To zoom a chart, click query_stats **Explore data**.\n\n- To view additional options, click *more_vert*.\n Most charts offer these options:\n\n - **Download a PNG image**.\n - **Download a CSV file**.\n - **View in Metrics Explorer** . View the metric in [Metrics Explorer](/monitoring/charts/metrics-explorer). You can view other AlloyDB metrics in the Metrics Explorer by selecting the **AlloyDB instance** resource type.\n\n### Events timeline\n\nThe dashboard provides details about the following events. System\nevents appear in **Events timeline** within approximately 5 minutes after\nthe event occurs.\n\n### Create a custom dashboard\n\nThe **Predefined** dashboard includes a set of default metrics. You can create additional widgets to add other metrics for AlloyDB or other Google Cloud products and get a unified monitoring view from within AlloyDB. For example, if you are using AlloyDB with Google Kubernetes Engine (GKE) Enterprise edition (GKE Enterprise), you can customize the predefined dashboard in addition to AlloyDB metrics, you can add required GKE Enterprise metrics, such as pod related metrics or node metrics.\n\nYou can create one custom dashboard in addition to the predefined dashboard.\n\nTo create a custom dashboard, follow these steps:\n\n1. In the Google Cloud console, open the **AlloyDB** page.\n\n [Go to AlloyDB](https://console.cloud.google.com/alloydb)\n2. Click the name of a cluster to open its **Overview** page.\n\n3. Select the **System insights** tab.\n\n4. Click **Predefined** , and then click **Customize Dashboard**.\n\n5. To add a metric to the dashboard follow these steps:\n\n 1. In **Custom view name** , enter a name for the dashboard---for example, `my-custom-dashboard`.\n 2. Click **Add Widget**, and select a widget type to add a metric to the dashboard.\n\n A configuration pane opens. For example, you can select the **Metric** widget as the data, and then set the **Visualization** to **Stacked bar** , or you can select the **Stacked bar** widget and then select the metric.\n 3. Configure the widget.\n\n 4. To save your customized dashboard, click **Apply** in the toolbar.\n\n#### Edit custom dashboard\n\n1. Hold your pointer on the dashboard, and then click edit **Edit** to enter edit mode.\n2. To reposition a widget, click the widget header and drag it to a new location.\n3. To edit a widget, place your pointer on the dashboard, click edit **Edit** . To apply your changes to the dashboard, click **Apply** in the toolbar. To discard your changes, click **Cancel**.\n4. To delete a widget, hold your pointer on the widget, click more_vert **More chart options** , and then click **Delete widget** . To apply your changes to the dashboard, click **Apply** in the toolbar. To discard your changes, click **Cancel**.\n5. To save your modified dashboard, click **Save** in the toolbar.\n\nYou can see `my-custom-dashboard` in the list of dashboards. To delete a dashboard, place your pointer on the widget, and then click delete **Delete**\n\nMonitor an instance using the Cloud Monitoring dashboard\n--------------------------------------------------------\n\nCloud Monitoring offers predefined dashboards for several Google Cloud products.\nYou can also create your own [custom dashboards](/monitoring/charts/dashboards)\nto display data that is of interest to you and to monitor the general health of\nyour primary and read pool instances.\n\n### Set up alerts\n\nYou can use Cloud Monitoring to [set up alerts](/monitoring/alerts/using-alerting-ui#viewing_policies) for a project or a specified instance.\n\nFor example, you can set up an alert for a message to be sent to\nspecific email IDs when the **Memory usage** metric for a AlloyDB\ninstance exceeds the threshold of 80%.\n\nView cluster metrics on the AlloyDB cluster Overview page\n---------------------------------------------------------\n\nIn the cluster Overview page, the cluster related metrics appear at the top of\nthe page.\nCluster metrics monitoring chart\n\nSelect another metric from the **Chart** drop-down list. The chart shows the\ndata for the selected metric.\n\nWhat's next\n-----------\n\n- View the list of [AlloyDB metrics](/monitoring/api/metrics_gcp_a_b#gcp-alloydb).\n- View [System Insights reference](/alloydb/docs/reference/system-insights-metrics).\n- [Use Query Insights](/alloydb/docs/using-query-insights) to improve query performance.\n- Learn more about [Cloud Logging](/logging/docs/overview) and [Cloud Monitoring](/monitoring/docs/monitoring-overview).\n- [Monitor active queries](/alloydb/docs/monitor-active-queries) to identify causes of system latency and high CPU usage."]]