概览
开始使用 Cloud Talent Solution (CTS) 之前,您必须先在 Google Cloud Platform (GCP) Console 中启用此 API。以下步骤将引导您完成后续操作:
- 在 GCP 项目上启用 CTS。
- 确保 CTS 已启用结算功能。
- 接受《数据日志记录条款及条件》。
- 创建和/或分配给 Cloud Talent Solution 一个或多个服务账号。
- 下载服务账号凭据密钥。
- 设置身份验证环境变量。
GCP Console 设置
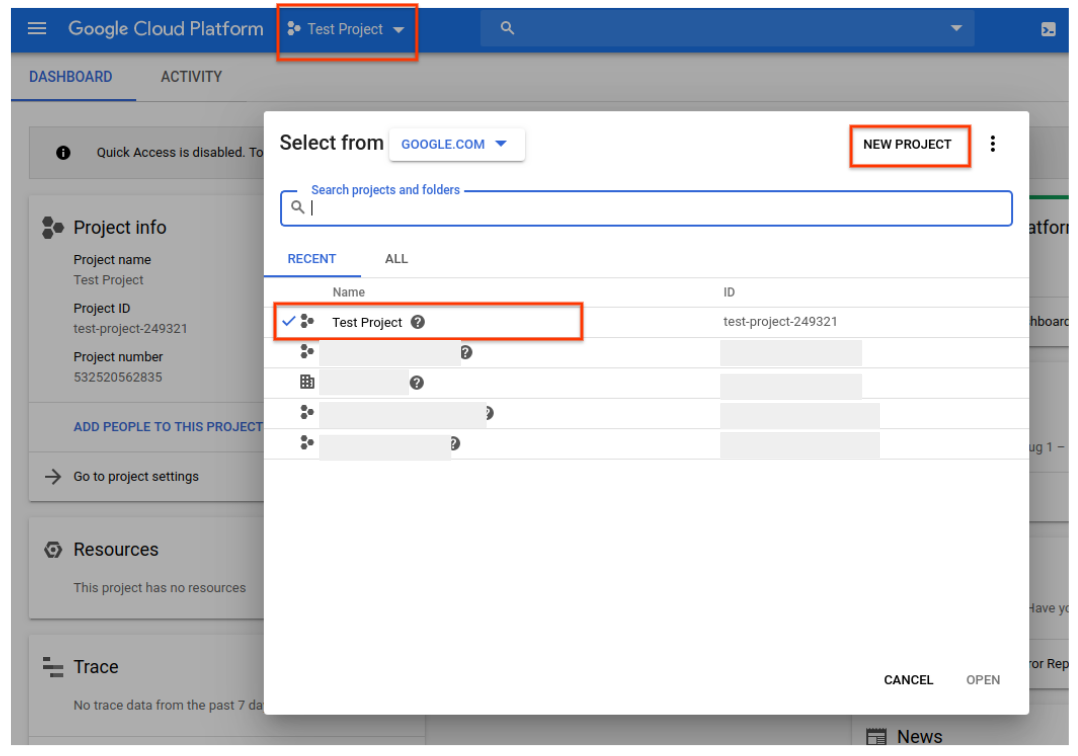
转到 GCP Console。 导航到页面顶部的下拉菜单,然后选择要与 Cloud Talent Solution 关联的 GCP 项目。如果您之前创建了一个或多个项目,则该项目或这些项目会显示在弹出式菜单的列表中。您可以选择现有项目(所选项目旁边会显示一个对勾标记),也可以通过点击新建项目来创建新项目。如需详细了解如何创建 GCP 项目,请参阅文档。
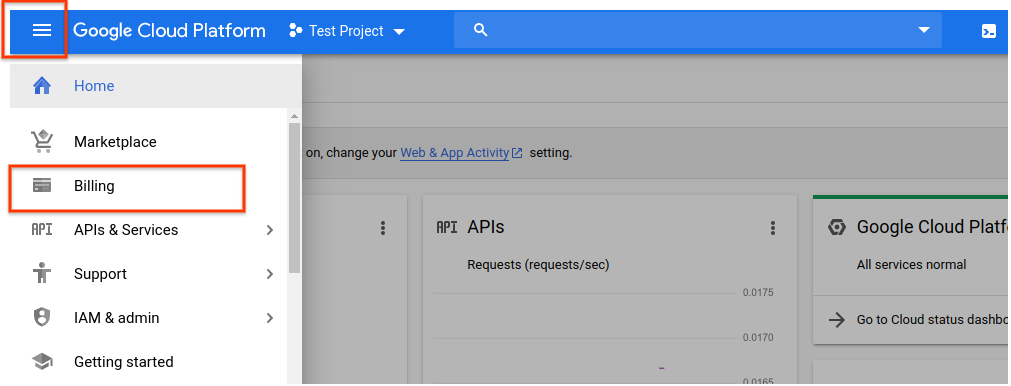
如果您创建新项目,则系统会提示您将一个结算账号关联到该项目。如果您使用的是现有项目,请确保已启用结算功能。您可以随时访问项目的结算信息,方法是:转到主导航菜单(左上角的汉堡形图标),然后点击结算选项:
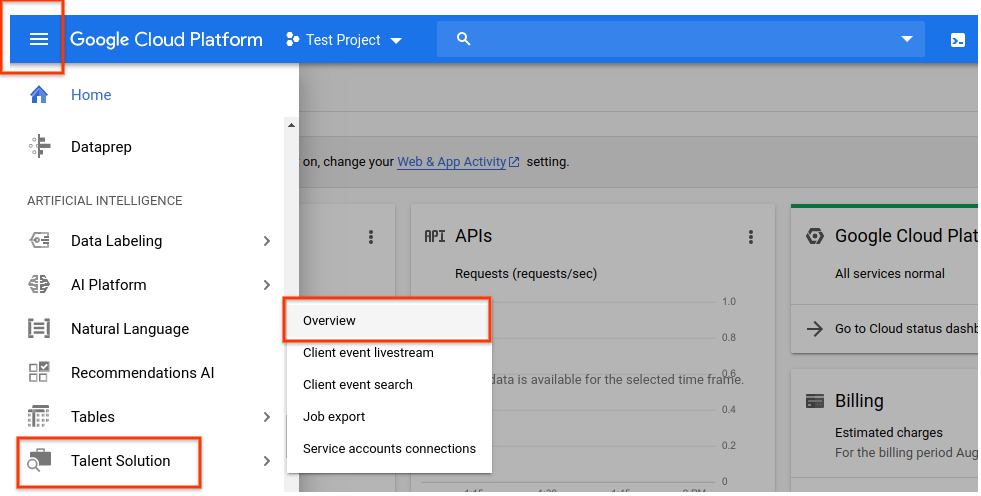
选择 GCP 项目并将其关联到结算账号后,您就可以启用 Cloud Talent Solution API。转到主导航菜单,然后向下滚动到人工智能部分。点击 Talent Solution,然后从弹出的菜单中选择概览:
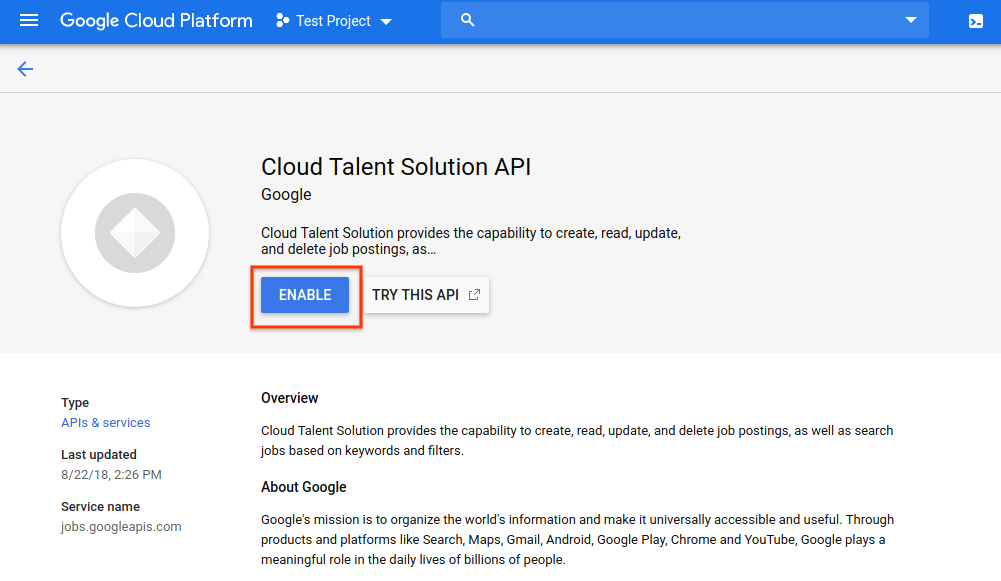
如果您想先试用 API 而不将其与项目关联,您可以选择试用此 API 选项。如需详细了解如何使用此功能,请参阅 Job Search API Explorer 文档。要启用 Cloud Talent Solution API 与您的 GCP 项目一起使用,请点击启用:
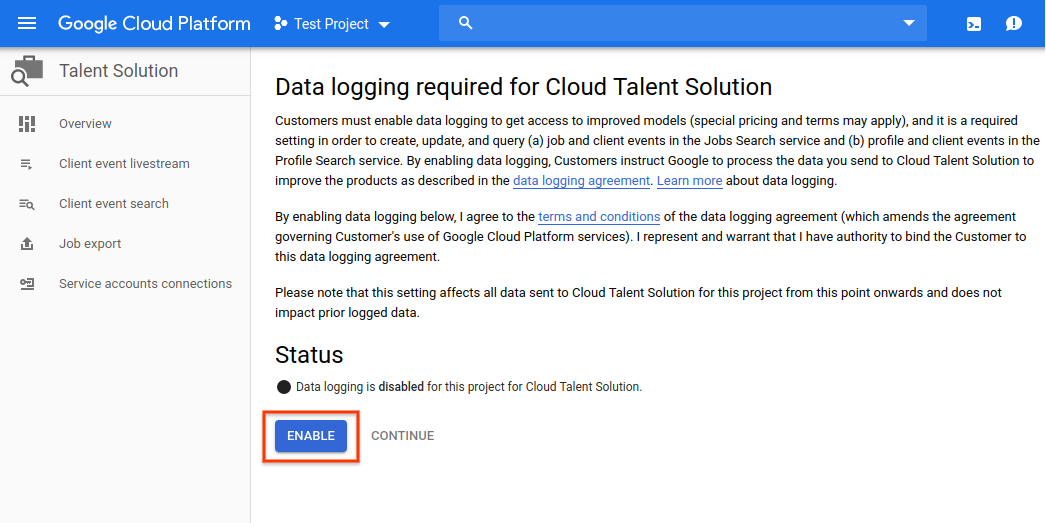
系统会显示数据日志记录页面。您必须接受条款和条件,才能使用 CTS 的所有功能。如果您选择不接受这些条款,您将只能使用删除 API 请求。点击启用:
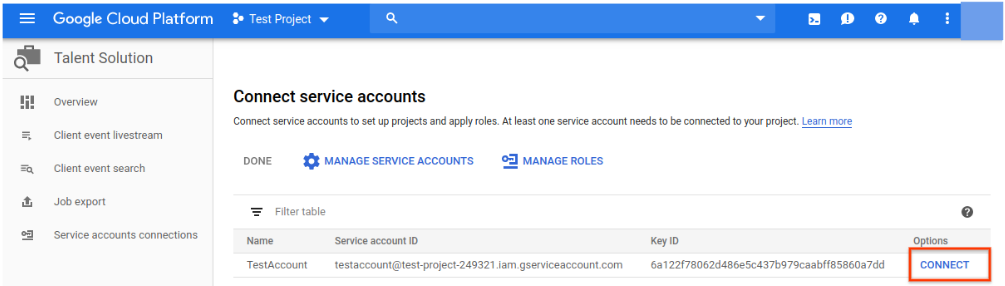
系统会提示您将一个或多个服务账号关联到 CTS API。如果您使用的项目已经有与之关联的服务账号,此页面上将会列出这些服务账号。点击您要关联到 CTS API 的账号旁边的关联。完成此操作后,您可以跳至第 8 步,以确保您已下载该账号的 JSON 或 P12 凭据。
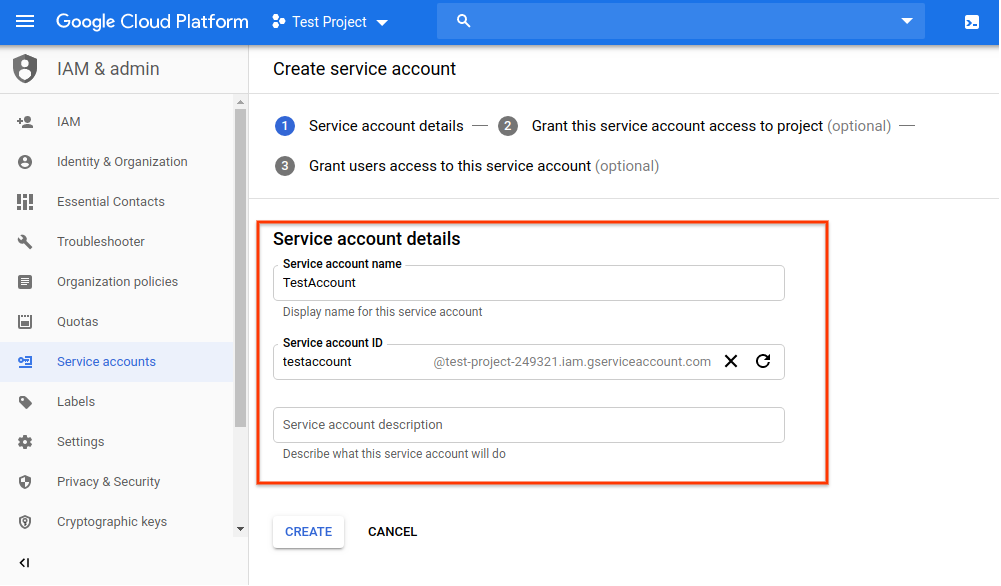
如果您的项目还没有任何服务账号,系统会提示您创建一个。在服务账号名称框中输入所选名称。您输入的内容会自动填充到服务账号 ID 框中。服务账号说明框是可选的,但如果您计划将多个服务账号关联到您的项目,则建议这样做。在此框中输入服务账号的简要说明,然后点击创建。
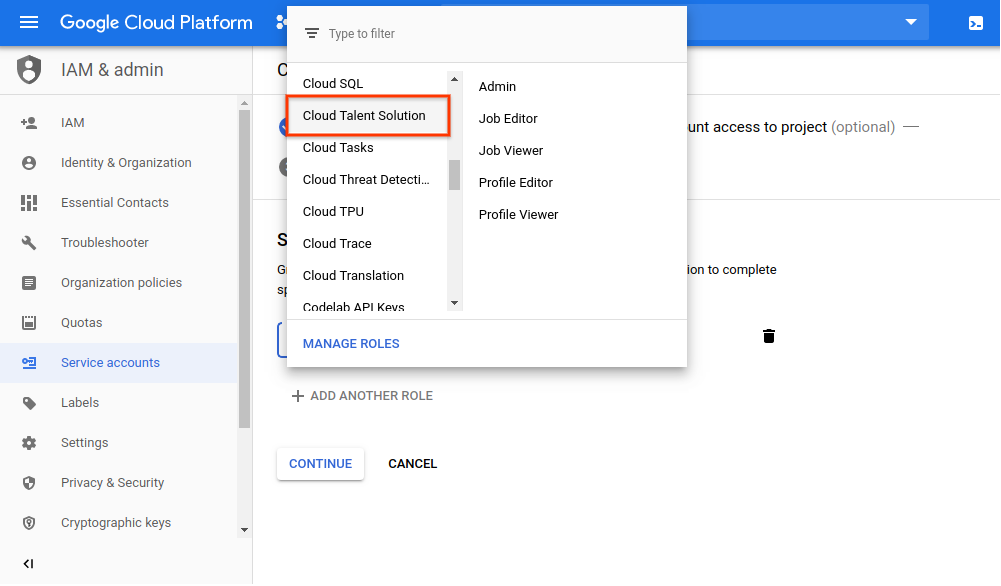
在下一页面上,您将可以为新服务账号分配角色。如需详细了解可用角色和每个角色可以拥有的权限,请参阅 CTS IAM 权限页面。点击选择角色下拉列表,然后向下滚动至 Cloud Talent Solution。您可以从右侧列的选项中为此服务账号选择角色:
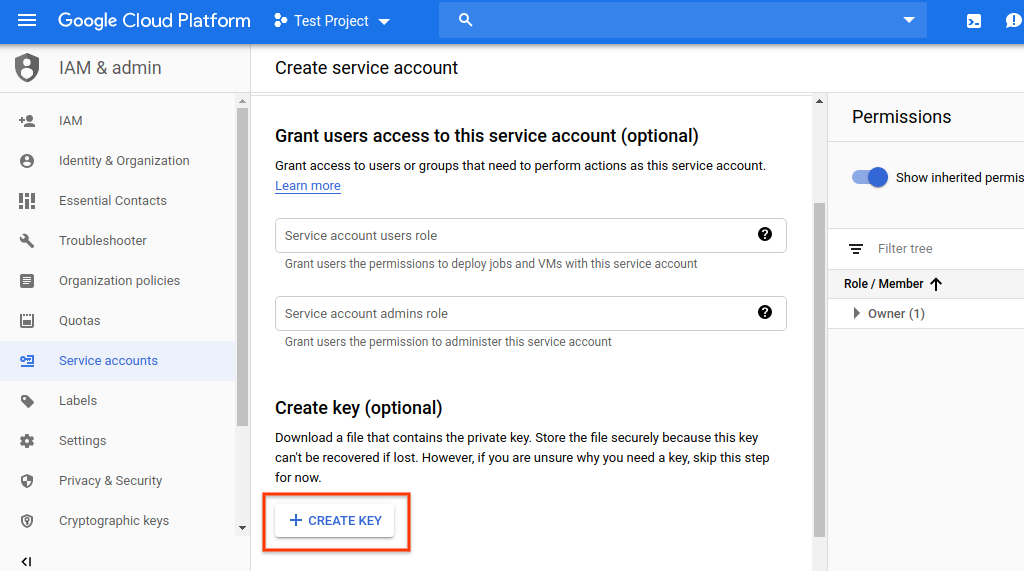
下一页提供了完成多个任务的选项。这些并非必需,但强烈建议使用。通过输入用户的电子邮件地址,您可以向各个用户授予对刚创建的服务账号的访问权限。 您还可以为服务账号创建私钥。使用 API 时,您必须在身份验证过程中使用私钥。如果您现在不执行这些操作,您可以通过主导航菜单中的 IAM 选项访问服务账户,随时生成密钥并添加/更改个人用户信息。
点击创建密钥:
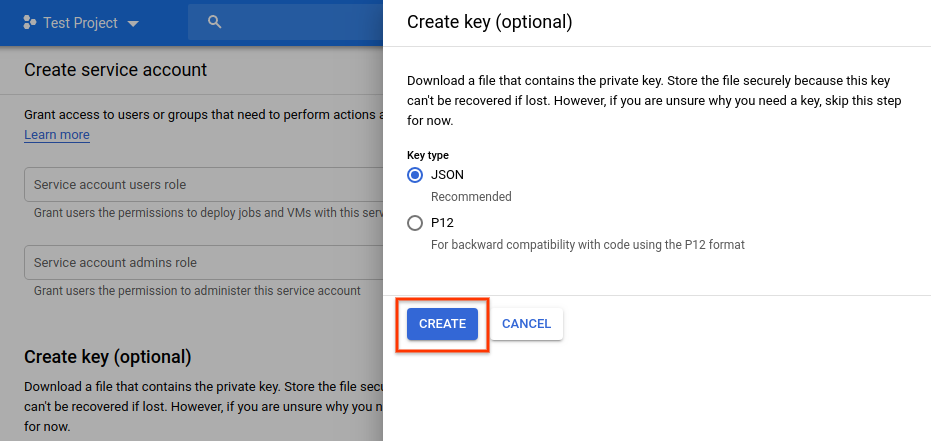
从弹出菜单中选择您的首选格式,然后点击创建:
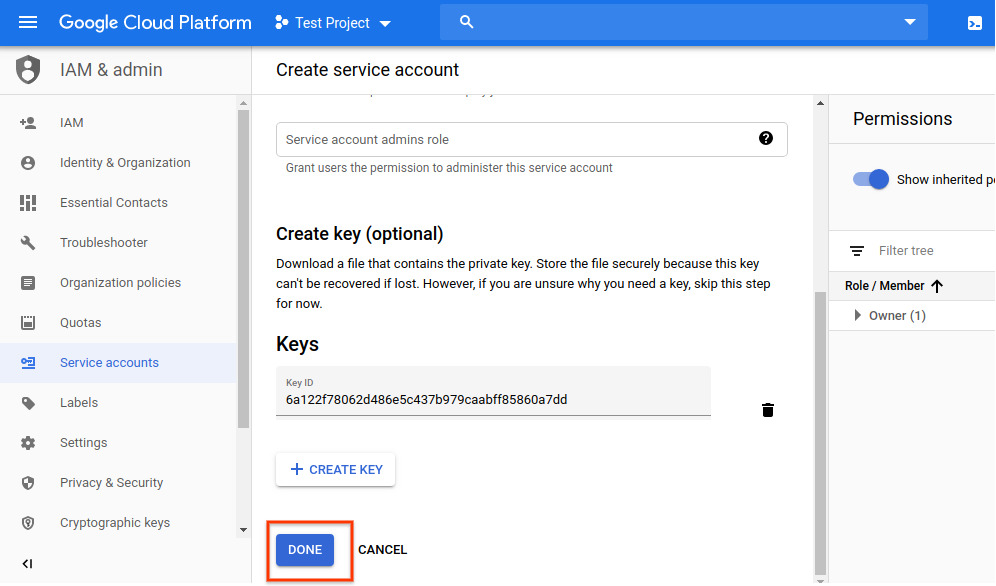
系统会自动下载新的 JSON 或 P12 凭据文件。将此文件存储在特定位置,并记下文件路径。在完成身份验证过程时,您需要将 GOOGLE_APPLICATION_CREDENTIALS 环境变量指向此文件。这是对发往 Cloud Talent Solution 的请求进行身份验证的重要步骤。
下载凭据文件后,点击完成:
您的服务账号现在显示在关联服务账号页面上。点击关联以将其关联到 CTS API:
现在,该账号已关联,您可以开始将 Cloud Talent Solution 集成到系统中了:
设置身份验证环境变量
Provide authentication credentials to your application code by setting the
environment variable GOOGLE_APPLICATION_CREDENTIALS. This
variable applies only to your current shell session. If you want the variable
to apply to future shell sessions, set the variable in your shell startup file,
for example in the ~/.bashrc or ~/.profile file.
Linux 或 macOS
export GOOGLE_APPLICATION_CREDENTIALS="KEY_PATH"Replace KEY_PATH with the path of the JSON file that contains your credentials.
For example:
export GOOGLE_APPLICATION_CREDENTIALS="/home/user/Downloads/service-account-file.json"
Windows
For PowerShell:
$env:GOOGLE_APPLICATION_CREDENTIALS="KEY_PATH"Replace KEY_PATH with the path of the JSON file that contains your credentials.
For example:
$env:GOOGLE_APPLICATION_CREDENTIALS="C:\Users\username\Downloads\service-account-file.json"
For command prompt:
set GOOGLE_APPLICATION_CREDENTIALS=KEY_PATHReplace KEY_PATH with the path of the JSON file that contains your credentials.
如需了解详情,请参阅 GCP 身份验证文档。
后续步骤
安装客户端库或查看创建职位和公司快速入门以开始进行 API 调用。