This tutorial shows how to upgrade a multi-cluster Google Kubernetes Engine (GKE) environment using Multi Cluster Ingress . This tutorial is a continuation of the multi-cluster GKE upgrades using Multi Cluster Ingress document that explains the process, architecture, and terms in more detail. We recommend that you read the concept document before this tutorial.
For a detailed comparison between Multi Cluster Ingress (MCI), Multi-cluster Gateway (MCG), and load balancer with Standalone Network Endpoint Groups (LB and Standalone NEGs), see Choose your multi-cluster load balancing API for GKE.
This document is intended for Google Cloud administrators who are responsible for maintaining fleets for GKE clusters.
We recommend auto-upgrading your GKE clusters. Auto-upgrade is a fully managed way of getting your clusters (control plane and nodes) automatically updated on a release schedule that is determined by Google Cloud. This requires no intervention from the operator. However, if you want more control over how and when clusters are upgraded, this tutorial walks through a method of upgrading multiple clusters where your apps run on all clusters. It then uses Multi Cluster Ingress to drain one cluster at a time before upgrading.
Architecture
This tutorial uses the following architecture. There are a total of three
clusters: two clusters (blue and green) act as identical clusters with the
same app deployed and one cluster (ingress-config) acts as the control plane
cluster that configures Multi Cluster Ingress. In this tutorial, you deploy a
sample app to two app clusters (blue and green clusters).

Objectives
- Create three GKE clusters and register them as a fleet.
- Configure one GKE cluster (
ingress-config) as the central configuration cluster. - Deploy a sample app to the other GKE clusters.
- Configure Multi Cluster Ingress to send client traffic to the app that is running on both app clusters.
- Set up a load generator to the app and configure monitoring.
- Remove (drain) one app cluster from the multi-cluster Ingress and upgrade the drained cluster.
- Spill traffic back to the upgraded cluster using Multi Cluster Ingress.
Costs
In this document, you use the following billable components of Google Cloud:
To generate a cost estimate based on your projected usage,
use the pricing calculator.
When you finish the tasks that are described in this document, you can avoid continued billing by deleting the resources that you created. For more information, see Clean up.
Before you begin
- This tutorial requires you to
Set up Multi Cluster Ingress
so that the following is set up:
- Two or more clusters with the same apps, such as namespaces, Deployments, and Services, running on all clusters.
- Autoupgrade is turned off for all clusters.
- Clusters are VPC-native clusters that use alias IP address ranges
- Have HTTP load balancing enabled (enabled by default).
gcloud --versionmust be 369 or higher. GKE cluster registration steps depend on this version or higher.
-
In the Google Cloud console, on the project selector page, select or create a Google Cloud project.
Roles required to select or create a project
- Select a project: Selecting a project doesn't require a specific IAM role—you can select any project that you've been granted a role on.
-
Create a project: To create a project, you need the Project Creator role
(
roles/resourcemanager.projectCreator), which contains theresourcemanager.projects.createpermission. Learn how to grant roles.
-
Verify that billing is enabled for your Google Cloud project.
-
In the Google Cloud console, activate Cloud Shell.
Set your default project:
export PROJECT=$(gcloud info --format='value(config.project)')
gcloud config set project ${PROJECT}
Enable the GKE, Hub, and
multiclusteringressAPIs:gcloud services enable container.googleapis.com \ gkehub.googleapis.com \ multiclusteringress.googleapis.com \ multiclusterservicediscovery.googleapis.com
Set up the environment
In Cloud Shell, clone the repository to get the files for this tutorial:
cd ${HOME}
git clone https://github.com/GoogleCloudPlatform/kubernetes-engine-samples
Create a
WORKDIRdirectory:cd kubernetes-engine-samples/networking/gke-multicluster-upgrade-mci/ export WORKDIR=`pwd`
Create and register GKE clusters to Hub
In this section, you create three GKE clusters and register them to GKE Hub.
Create GKE clusters
In Cloud Shell, create three GKE clusters:
gcloud container clusters create ingress-config --location us-west1-a \
--release-channel=None --no-enable-autoupgrade --num-nodes=4 \
--enable-ip-alias --workload-pool=${PROJECT}.svc.id.goog --quiet --async
gcloud container clusters create blue --location us-west1-b --num-nodes=3 \
--release-channel=None --no-enable-autoupgrade --enable-ip-alias \
--workload-pool=${PROJECT}.svc.id.goog --quiet --async
gcloud container clusters create green --location us-west1-c --num-nodes=3 \
--release-channel=None --no-enable-autoupgrade --enable-ip-alias \
--workload-pool=${PROJECT}.svc.id.goog --quiet
For the purpose of this tutorial, you create the clusters in a single region, in three different zones:
us-west1-a,us-west1-b, andus-west1-c. For more information about regions and zones, see Geography and regions.Wait a few minutes until all clusters are successfully created. Ensure that the clusters are running:
gcloud container clusters listThe output is similar to the following:
NAME: ingress-config
LOCATION: us-west1-a
MASTER_VERSION: 1.22.8-gke.202
MASTER_IP: 35.233.186.135
MACHINE_TYPE: e2-medium
NODE_VERSION: 1.22.8-gke.202
NUM_NODES: 4
STATUS: RUNNING

NAME: blue
LOCATION: us-west1-b
MASTER_VERSION: 1.22.8-gke.202
MASTER_IP: 34.82.35.222
MACHINE_TYPE: e2-medium
NODE_VERSION: 1.22.8-gke.202
NUM_NODES: 3
STATUS: RUNNING

NAME: green
LOCATION: us-west1-c
MASTER_VERSION: 1.22.8-gke.202
MASTER_IP: 35.185.204.26
MACHINE_TYPE: e2-medium
NODE_VERSION: 1.22.8-gke.202
NUM_NODES: 3
STATUS: RUNNING
Create a
kubeconfigfile and connect to all clusters to generate entries in thekubeconfigfile:touch gke-upgrade-kubeconfig export KUBECONFIG=gke-upgrade-kubeconfig gcloud container clusters get-credentials ingress-config \ --location us-west1-a --project ${PROJECT} gcloud container clusters get-credentials blue --location us-west1-b \ --project ${PROJECT} gcloud container clusters get-credentials green --location us-west1-c \ --project ${PROJECT}You use the
kubeconfigfile to create authentication to clusters by creating a user and context for each cluster. After you create thekubeconfigfile, you can quickly switch context between clusters.Verify that you have three clusters in the
kubeconfigfile:kubectl config view -ojson | jq -r '.clusters[].name'The output is the following:
gke_gke-multicluster-upgrades_us-west1-a_ingress-config
gke_gke-multicluster-upgrades_us-west1-b_blue
gke_gke-multicluster-upgrades_us-west1-c_green
Get the context for the three clusters for later use:
export INGRESS_CONFIG_CLUSTER=$(kubectl config view -ojson | jq \
    -r '.clusters[].name' | grep ingress-config)
export BLUE_CLUSTER=$(kubectl config view -ojson | jq \
    -r '.clusters[].name' | grep blue)
export GREEN_CLUSTER=$(kubectl config view -ojson | jq \
    -r '.clusters[].name' | grep green)
echo -e "${INGRESS_CONFIG_CLUSTER}\n${BLUE_CLUSTER}\n${GREEN_CLUSTER}"
The output is the following:
gke_gke-multicluster-upgrades_us-west1-a_ingress-config
gke_gke-multicluster-upgrades_us-west1-b_blue
gke_gke-multicluster-upgrades_us-west1-c_green
Register GKE clusters to a fleet
Registering your clusters to a fleet lets you operate your Kubernetes clusters across hybrid environments. Clusters registered to fleets can use advanced GKE features such as Multi Cluster Ingress. To register a GKE cluster to a fleet, you can use a Google Cloud service account directly, or use the recommended Workload Identity Federation for GKE approach, which allows a Kubernetes service account in your GKE cluster to act as an Identity and Access Management service account.
Register the three clusters as a fleet:
gcloud container fleet memberships register ingress-config \
    --gke-cluster=us-west1-a/ingress-config \
    --enable-workload-identity

gcloud container fleet memberships register blue \
    --gke-cluster=us-west1-b/blue \
    --enable-workload-identity

gcloud container fleet memberships register green \
    --gke-cluster=us-west1-c/green \
    --enable-workload-identity
Verify that the clusters are registered:
gcloud container fleet memberships listThe output is similar to the following:
NAME: blue
EXTERNAL_ID: 401b4f08-8246-4f97-a6d8-cf1b78c2a91d

NAME: green
EXTERNAL_ID: 8041c36a-9d42-40c8-a67f-54fcfd84956e

NAME: ingress-config
EXTERNAL_ID: 65ac48fe-5043-42db-8b1e-944754a0d725
Configure the
ingress-configcluster as the configuration cluster for Multi Cluster Ingress by enabling themulticlusteringressfeature through the Hub:gcloud container fleet ingress enable --config-membership=ingress-configThe preceding command adds the
MulticlusterIngressandMulticlusterServiceCRDs (Custom Resource Definitions) to theingress-configcluster. This command takes a few minutes to complete. Wait before proceeding to the next step.Verify that the
ingress-clustercluster was successfully configured for Multi Cluster Ingress:watch gcloud container fleet ingress describeWait until the output is similar to the following:
createTime: '2022-07-05T10:21:40.383536315Z' membershipStates: projects/662189189487/locations/global/memberships/blue: state: code: OK updateTime: '2022-07-08T10:59:44.230329189Z' projects/662189189487/locations/global/memberships/green: state: code: OK updateTime: '2022-07-08T10:59:44.230329950Z' projects/662189189487/locations/global/memberships/ingress-config: state: code: OK updateTime: '2022-07-08T10:59:44.230328520Z' name: projects/gke-multicluster-upgrades/locations/global/features/multiclusteringress resourceState: state: ACTIVE spec: multiclusteringress: configMembership: projects/gke-multicluster-upgrades/locations/global/memberships/ingress-config state: state: code: OK description: Ready to use updateTime: '2022-07-08T10:57:33.303543609Z' updateTime: '2022-07-08T10:59:45.247576318Z'To exit the
watchcommand, press Control+C.
Deploy a sample application to the blue and green clusters
In Cloud Shell, deploy the sample
whereamiapp to theblueandgreenclusters:kubectl --context ${BLUE_CLUSTER} apply -f ${WORKDIR}/application-manifests kubectl --context ${GREEN_CLUSTER} apply -f ${WORKDIR}/application-manifestsWait a few minutes and ensure that all Pods in the
blueandgreenclusters have aRunningstatus:kubectl --context ${BLUE_CLUSTER} get pods kubectl --context ${GREEN_CLUSTER} get podsThe output is similar to the following:
NAME                                   READY   STATUS    RESTARTS   AGE
whereami-deployment-756c7dc74c-zsmr6   1/1     Running   0          74s
NAME                                   READY   STATUS    RESTARTS   AGE
whereami-deployment-756c7dc74c-sndz7   1/1     Running   0          68s.
Configure multi-cluster Ingress
In this section, you create a multi-cluster Ingress that sends traffic to the
application running on both blue and green clusters. You use
Cloud Load Balancing
to create a load balancer that uses the whereami app in both the blue and
green clusters as backends. To create the load balancer, you need two
resources: a MultiClusterIngress and one or more MultiClusterServices.
MultiClusterIngress and MultiClusterService objects are multi-cluster
analogs for the existing Kubernetes Ingress and Service resources used in the
single cluster context.
In Cloud Shell, deploy the
MulticlusterIngressresource to theingress-configcluster:kubectl --context ${INGRESS_CONFIG_CLUSTER} apply -f ${WORKDIR}/multicluster-manifests/mci.yamlThe output is the following:
multiclusteringress.networking.gke.io/whereami-mci createdDeploy the
MulticlusterServiceresource to theingress-configcluster:kubectl --context ${INGRESS_CONFIG_CLUSTER} apply -f ${WORKDIR}/multicluster-manifests/mcs-blue-green.yamlThe output is the following:
multiclusterservice.networking.gke.io/whereami-mcs createdTo compare the two resources, do the following:
Inspect the
MulticlusterIngressresource:kubectl --context ${INGRESS_CONFIG_CLUSTER} get multiclusteringress -o yamlThe output contains the following:
spec:
  template:
    spec:
      backend:
        serviceName: whereami-mcs
        servicePort: 8080
The
MulticlusterIngressresource is similar to the Kubernetes Ingress resource except that theserviceNamespecification points to aMulticlusterServiceresource.Inspect the
MulticlusterServiceresource:kubectl --context ${INGRESS_CONFIG_CLUSTER} get multiclusterservice -o yamlThe output contains the following:
spec:
  clusters:
  - link: us-west1-b/blue
  - link: us-west1-c/green
  template:
    spec:
      ports:
      - name: web
        port: 8080
        protocol: TCP
        targetPort: 8080
      selector:
        app: whereami
The
MulticlusterServiceresource is similar to a Kubernetes Service resource, except it has aclustersspecification. Theclustersvalue is the list of registered clusters where theMulticlusterServiceresource is created.Verify that the
MulticlusterIngressresource created a load balancer with a backend service pointing to theMulticlusterServiceresource:watch kubectl --context ${INGRESS_CONFIG_CLUSTER} \ get multiclusteringress -o jsonpath="{.items[].status.VIP}"This may take up to 10 minutes. Wait until the output is similar to the following:
34.107.246.9To exit the
watchcommand, pressControl+C.
In Cloud Shell, get the Cloud Load Balancing VIP:
export GCLB_VIP=$(kubectl --context ${INGRESS_CONFIG_CLUSTER} \
       get multiclusteringress -o json | jq -r '.items[].status.VIP') \
       && echo ${GCLB_VIP}
The output is similar to the following:
34.107.246.9Use
curlto access the load balancer and the deployed application:curl ${GCLB_VIP}The output is similar to the following:
{
  "cluster_name": "green",
  "host_header": "34.107.246.9",
  "pod_name": "whereami-deployment-756c7dc74c-sndz7",
  "pod_name_emoji": "😇",
  "project_id": "gke-multicluster-upgrades",
  "timestamp": "2022-07-08T14:26:07",
  "zone": "us-west1-c"
}
Run the
curlcommand repeatedly. Notice that the requests are being load balanced between thewhereamiapplication that is deployed to two clusters,blueandgreen.
Set up the load generator
In this section, you set up a loadgenerator Service that generates client
traffic to the Cloud Load Balancing VIP. First, traffic is sent to the
blue and green clusters because the MulticlusterService resource is set up
to send traffic to both clusters. Later, you configure the MulticlusterService
resource to send traffic to a single cluster.
Configure the
loadgeneratormanifest to send client traffic to the Cloud Load Balancing:TEMPLATE=loadgen-manifests/loadgenerator.yaml.templ && envsubst < ${TEMPLATE} > ${TEMPLATE%.*}Deploy the
loadgeneratorin theingress-configcluster:kubectl --context ${INGRESS_CONFIG_CLUSTER} apply -f ${WORKDIR}/loadgen-manifestsVerify that the
loadgeneratorPods in theingress-configcluster all have a status ofRunning:kubectl --context ${INGRESS_CONFIG_CLUSTER} get podsThe output is similar to the following:
NAME                             READY   STATUS    RESTARTS   AGE
loadgenerator-5498cbcb86-hqscp   1/1     Running   0          53s
loadgenerator-5498cbcb86-m2z2z   1/1     Running   0          53s
loadgenerator-5498cbcb86-p56qb   1/1     Running   0          53s
If any of the Pods don't have a status of
Running, wait a few minutes and then run the command again.
Monitor traffic
In this section, you monitor the traffic to the whereami app using the
Google Cloud console.
In the previous section, you set up a loadgenerator deployment that simulates
client traffic by accessing the whereami app through the
Cloud Load Balancing VIP. You can monitor these metrics through the
Google Cloud console. You set up monitoring first so that you can monitor as
you drain clusters for upgrades (described in the next section).
Create a dashboard to show the traffic reaching Multi Cluster Ingress:
export DASH_ID=$(gcloud monitoring dashboards create \
    --config-from-file=dashboards/cloud-ops-dashboard.json \
    --format=json | jq  -r ".name" | awk -F '/' '{print $4}')
The output is similar to the following:
Created [721b6c83-8f9b-409b-a009-9fdf3afb82f8]Metrics from Cloud Load Balancing are available in the Google Cloud console. Generate the URL:
echo "https://console.cloud.google.com/monitoring/dashboards/builder/${DASH_ID}/?project=${PROJECT}&timeDomain=1h"The output is similar to the following:
https://console.cloud.google.com/monitoring/dashboards/builder/721b6c83-8f9b-409b-a009-9fdf3afb82f8/?project=gke-multicluster-upgrades&timeDomain=1h"In a browser, go to the URL generated by the preceding command.
The traffic to the sample application is going from the load generator to both
blueandgreenclusters (noted by the two zones the clusters are in). The timeline metrics chart shows traffic going to both backends.Thek8s1-mouseover values indicate that the network endpoint group (NEGs) for the two frontendMulticlusterServicesare running in theblueandgreenclusters.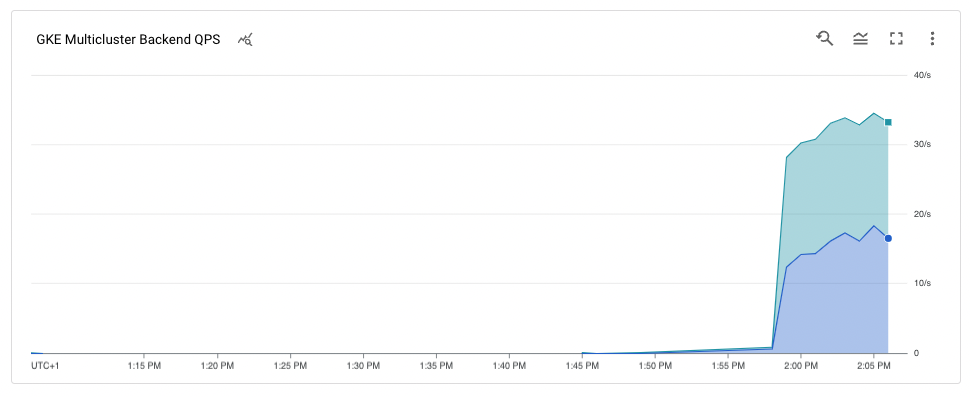
Drain and upgrade the blue cluster
In this section, you drain the blue cluster. Draining a cluster means that you
remove it from the load balancing pool. After you drain the blue cluster, all
client traffic destined for the application goes to the green cluster.
You can monitor this process as described in the previous section. After the
cluster is drained, you can upgrade the drained cluster. After the upgrade, you
can put it back in the load balancing pool. You repeat these steps to upgrade
the other cluster (not shown in this tutorial).
To drain the blue cluster, you update the MulticlusterService resource in
the ingress-cluster cluster and remove the blue cluster from the clusters
specification.
Drain the blue cluster
In Cloud Shell, update the
MulticlusterServiceresource in theingress-configcluster:kubectl --context ${INGRESS_CONFIG_CLUSTER} \ apply -f ${WORKDIR}/multicluster-manifests/mcs-green.yamlVerify that you only have the
greencluster in theclustersspecification:kubectl --context ${INGRESS_CONFIG_CLUSTER} get multiclusterservice \ -o json | jq '.items[].spec.clusters'The output is the following:
[
  {
    "link": "us-west1-c/green"
  }
]
Only the
greencluster is listed in theclustersspecification so only thegreencluster is in the load balancing pool.You can see metrics from the Cloud Load Balancing metrics in the Google Cloud console. Generate the URL:
echo "https://console.cloud.google.com/monitoring/dashboards/builder/${DASH_ID}/?project=${PROJECT}&timeDomain=1h"In a browser, go to the URL generated from the previous command.
The chart shows that only the
greencluster is receiving traffic.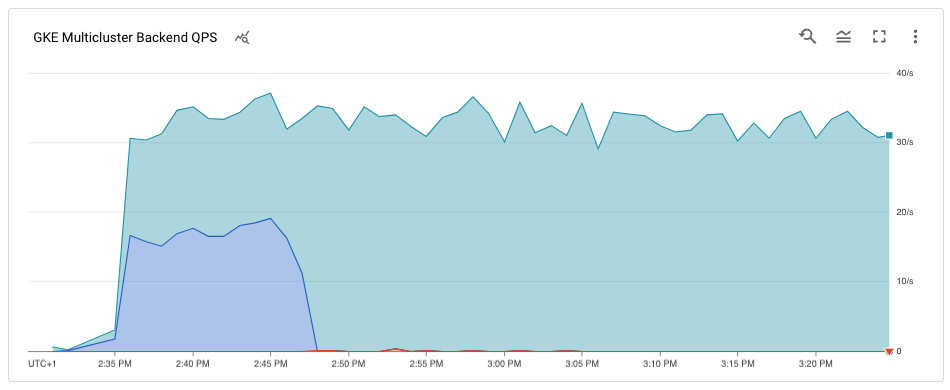
Upgrade the blue cluster
Now that the blue cluster is no longer receiving any client traffic, you can
upgrade the cluster (control plane and nodes).
In Cloud Shell, get the current version of the clusters:
gcloud container clusters listThe output is similar to the following:
NAME: ingress-config
LOCATION: us-west1-a
MASTER_VERSION: 1.22.8-gke.202
MASTER_IP: 35.233.186.135
MACHINE_TYPE: e2-medium
NODE_VERSION: 1.22.8-gke.202
NUM_NODES: 4
STATUS: RUNNING

NAME: blue
LOCATION: us-west1-b
MASTER_VERSION: 1.22.8-gke.202
MASTER_IP: 34.82.35.222
MACHINE_TYPE: e2-medium
NODE_VERSION: 1.22.8-gke.202
NUM_NODES: 3
STATUS: RUNNING

NAME: green
LOCATION: us-west1-c
MASTER_VERSION: 1.22.8-gke.202
MASTER_IP: 35.185.204.26
MACHINE_TYPE: e2-medium
NODE_VERSION: 1.22.8-gke.202
NUM_NODES: 3
STATUS: RUNNING
Your cluster versions might be different depending on when you complete this tutorial.
Get the list of available
MasterVersionsversions in the zone:gcloud container get-server-config --location us-west1-b --format=json | jq \ '.validMasterVersions[0:20]'The output is similar to the following:
[
  "1.24.1-gke.1400",
  "1.23.7-gke.1400",
  "1.23.6-gke.2200",
  "1.23.6-gke.1700",
  "1.23.6-gke.1501",
  "1.23.6-gke.1500",
  "1.23.5-gke.2400",
  "1.23.5-gke.1503",
  "1.23.5-gke.1501",
  "1.22.10-gke.600",
  "1.22.9-gke.2000",
  "1.22.9-gke.1500",
  "1.22.9-gke.1300",
  "1.22.8-gke.2200",
  "1.22.8-gke.202",
  "1.22.8-gke.201",
  "1.22.8-gke.200",
  "1.21.13-gke.900",
  "1.21.12-gke.2200",
  "1.21.12-gke.1700"
]
Get a list of available
NodeVersionsversions in the zone:gcloud container get-server-config --location us-west1-b --format=json | jq \ '.validNodeVersions[0:20]'The output is similar to the following:
[
  "1.24.1-gke.1400",
  "1.23.7-gke.1400",
  "1.23.6-gke.2200",
  "1.23.6-gke.1700",
  "1.23.6-gke.1501",
  "1.23.6-gke.1500",
  "1.23.5-gke.2400",
  "1.23.5-gke.1503",
  "1.23.5-gke.1501",
  "1.22.10-gke.600",
  "1.22.9-gke.2000",
  "1.22.9-gke.1500",
  "1.22.9-gke.1300",
  "1.22.8-gke.2200",
  "1.22.8-gke.202",
  "1.22.8-gke.201",
  "1.22.8-gke.200",
  "1.22.7-gke.1500",
  "1.22.7-gke.1300",
  "1.22.7-gke.900"
]
Set an environment variable for a
MasterVersionandNodeVersionversion that is in theMasterVersionsandNodeVersionslists, and is higher than the current version for thebluecluster, for example:export UPGRADE_VERSION="1.22.10-gke.600"This tutorial uses the
1.22.10-gke.600version. Your cluster versions might be different depending on the versions that are available when you complete this tutorial. For more information about upgrading, see upgrading clusters and node pools.Upgrade the
control planenode for thebluecluster:gcloud container clusters upgrade blue \ --location us-west1-b --master --cluster-version ${UPGRADE_VERSION}To confirm the upgrade, press
Y.This process takes a few minutes to complete. Wait until the upgrade is complete before proceeding.
After the update is complete, the output is the following:
Updated
[https://container.googleapis.com/v1/projects/gke-multicluster-upgrades/zones/us-west1-b/clusters/blue].
Upgrade the nodes in the
bluecluster:gcloud container clusters upgrade blue \ --location=us-west1-b --node-pool=default-pool \ --cluster-version ${UPGRADE_VERSION}To confirm the update, press
Y.This process takes a few minutes to complete. Wait until the node upgrade is complete before proceeding.
After the upgrade is complete, the output is the following:
Upgrading blue... Done with 3 out of 3 nodes (100.0%): 3 succeeded...done.
Updated [https://container.googleapis.com/v1/projects/gke-multicluster-upgrades/zones/us-west1-b/clusters/blue].
Verify that the
bluecluster is upgraded:gcloud container clusters listThe output is similar to the following:
NAME: ingress-config
LOCATION: us-west1-a
MASTER_VERSION: 1.22.8-gke.202
MASTER_IP: 35.233.186.135
MACHINE_TYPE: e2-medium
NODE_VERSION: 1.22.8-gke.202
NUM_NODES: 4
STATUS: RUNNING

NAME: blue
LOCATION: us-west1-b
MASTER_VERSION: 1.22.10-gke.600
MASTER_IP: 34.82.35.222
MACHINE_TYPE: e2-medium
NODE_VERSION: 1.22.10-gke.600
NUM_NODES: 3
STATUS: RUNNING

NAME: green
LOCATION: us-west1-c
MASTER_VERSION: 1.22.8-gke.202
MASTER_IP: 35.185.204.26
MACHINE_TYPE: e2-medium
NODE_VERSION: 1.22.8-gke.202
NUM_NODES: 3
STATUS: RUNNING
Add the blue cluster back to the load balancing pool
In this section, you add the blue cluster back into the load balancing pool.
In Cloud Shell, verify that the application deployment is running on the
bluecluster before you add it back to the load balancing pool:kubectl --context ${BLUE_CLUSTER} get podsThe output is similar to the following:
NAME                                   READY   STATUS    RESTARTS   AGE
whereami-deployment-756c7dc74c-xdnb6   1/1     Running   0          17m
Update the
MutliclusterServiceresource to add thebluecluster back to the load balancing pool:kubectl --context ${INGRESS_CONFIG_CLUSTER} apply \ -f ${WORKDIR}/multicluster-manifests/mcs-blue-green.yamlVerify that you have both
blueandgreenclusters in the clusters specification:kubectl --context ${INGRESS_CONFIG_CLUSTER} get multiclusterservice \ -o json | jq '.items[].spec.clusters'The output is the following:
[
  {
    "link": "us-west1-b/blue"
  },
  {
    "link": "us-west1-c/green"
  }
]
The
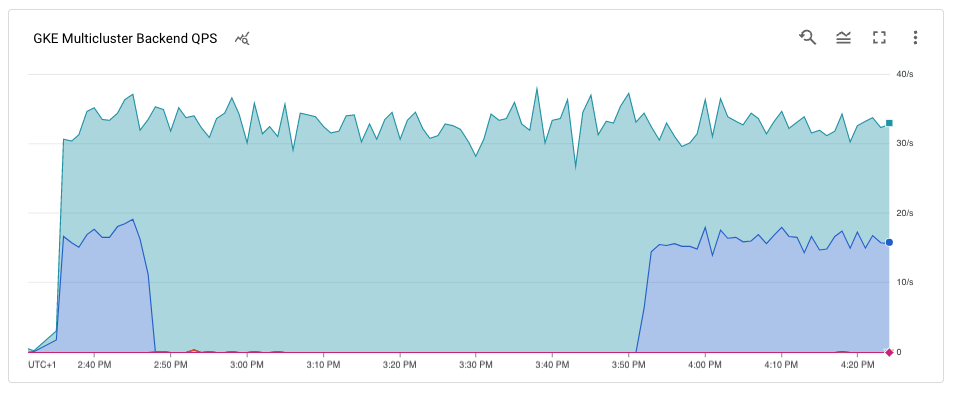
blueandgreenclusters are now in theclustersspecification.Metrics from the Cloud Load Balancing metrics are available in the Google Cloud console. Generate the URL:
echo "https://console.cloud.google.com/monitoring/dashboards/builder/${DASH_ID}/?project=${PROJECT}&timeDomain=1h"In a browser, go to the URL generated by the previous command.
The chart shows that both blue and green clusters are receiving traffic from the load generator using the load balancer.
Congratulations. You successfully upgraded a GKE cluster in a multi-cluster architecture using Multi Cluster Ingress.
To upgrade the
greencluster, repeat the process to drain and upgrade the blue cluster, replacingbluewithgreenthroughout.
Clean up
To avoid incurring charges to your Google Cloud account for the resources used in this tutorial, either delete the project that contains the resources, or keep the project and delete the individual resources.
The easiest way to eliminate billing is to delete the Google Cloud project that you created for the tutorial. Alternatively, you can delete the individual resources.
Delete the clusters
In Cloud Shell, unregister and delete the
blueandgreenclusters:gcloud container fleet memberships unregister blue --gke-cluster=us-west1-b/blue gcloud container clusters delete blue --location us-west1-b --quiet gcloud container fleet memberships unregister green --gke-cluster=us-west1-c/green gcloud container clusters delete green --location us-west1-c --quietDelete the
MuticlusterIngressresource from theingress-configcluster:kubectl --context ${INGRESS_CONFIG_CLUSTER} delete -f ${WORKDIR}/multicluster-manifests/mci.yamlThis command deletes the Cloud Load Balancing resources from the project.
Unregister and delete the
ingress-configcluster:gcloud container fleet memberships unregister ingress-config --gke-cluster=us-west1-a/ingress-config gcloud container clusters delete ingress-config --location us-west1-a --quietVerify all clusters are deleted:
gcloud container clusters listThe output is the following:
*<null>*Reset the
kubeconfigfile:unset KUBECONFIGRemove the
WORKDIRfolder:cd ${HOME} rm -rf ${WORKDIR}
Delete the project
- In the Google Cloud console, go to the Manage resources page.
- In the project list, select the project that you want to delete, and then click Delete.
- In the dialog, type the project ID, and then click Shut down to delete the project.
What's next
- Learn more about Multi Cluster Ingress.
- Learn how to deploy Multi Cluster Ingress across clusters.
- Explore reference architectures, diagrams, and best practices about Google Cloud. Take a look at our Cloud Architecture Center.