Dokumen ini menunjukkan cara administrator dapat men-deploy Endpoint Verification ke organisasi mereka untuk menilai dan memantau postur keamanan perangkat di organisasi mereka. Sebagai administrator, Anda men-deploy Verifikasi Endpoint dari konsol Google Admin.
Untuk mengetahui informasi selengkapnya tentang Endpoint Verification, lihat Ringkasan Endpoint Verification.
Untuk men-deploy Verifikasi Endpoint, Anda harus menyelesaikan proses berikut:
- Aktifkan Verifikasi Endpoint.
- Instal Verifikasi Endpoint di perangkat Anda.
- Jika diperlukan untuk jenis perangkat Anda, instal aplikasi pendukung Verifikasi Endpoint.
Sebelum memulai
- Anda harus memiliki akun administrator Google Workspace dengan hak istimewa Setelan Layanan.
-
Login ke konsol Google Admin menggunakan akun administrator Google Workspace Anda.
Anda harus memiliki unit organisasi dengan setidaknya satu perangkat yang menjalankan salah satu sistem operasi berikut:
- ChromeOS
- Apple® Mac® OS X® El Capitan (10.11) atau yang lebih baru
- Microsoft® Windows® 10 dan 11
- Linux® Debian® dan Ubuntu®
- Anda harus menggunakan Chrome 110 atau yang lebih baru. Meskipun Anda dapat menginstal Verifikasi Endpoint di browser berbasis Chromium, verifikasi endpoint hanya didukung di browser Chrome.
Mengaktifkan Verifikasi Endpoint
Untuk mengumpulkan informasi tentang perangkat yang mengakses resource organisasi Anda, Verifikasi Endpoint harus diaktifkan untuk unit organisasi Anda. Secara default, Verifikasi Endpoint diaktifkan.
Untuk mengonfirmasi apakah Verifikasi Endpoint diaktifkan, lakukan hal berikut:
-
Dari Halaman beranda konsol Admin, buka Perangkat.
- Di menu navigasi, klik Seluler & endpoint > Setelan > Setelan universal.
- Klik Akses Data > Verifikasi Endpoint.
- Dari panel Unit Organisasi, pilih unit organisasi Anda.
- Pastikan kotak centang Pantau perangkat mana yang mengakses data organisasi
dicentang.
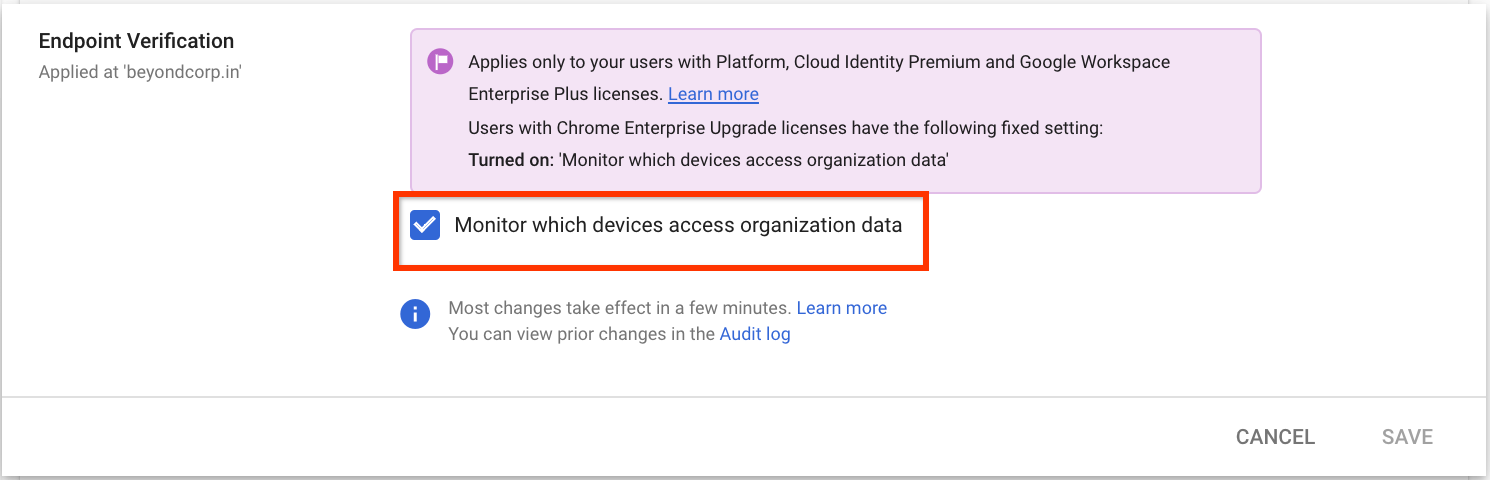
- Klik Simpan. Jika mengonfigurasi unit organisasi turunan, Anda mungkin dapat mewarisi atau mengganti setelan unit organisasi induk.
Menginstal Endpoint Verification di perangkat Anda
-
Dari Halaman beranda konsol Admin, buka Perangkat.
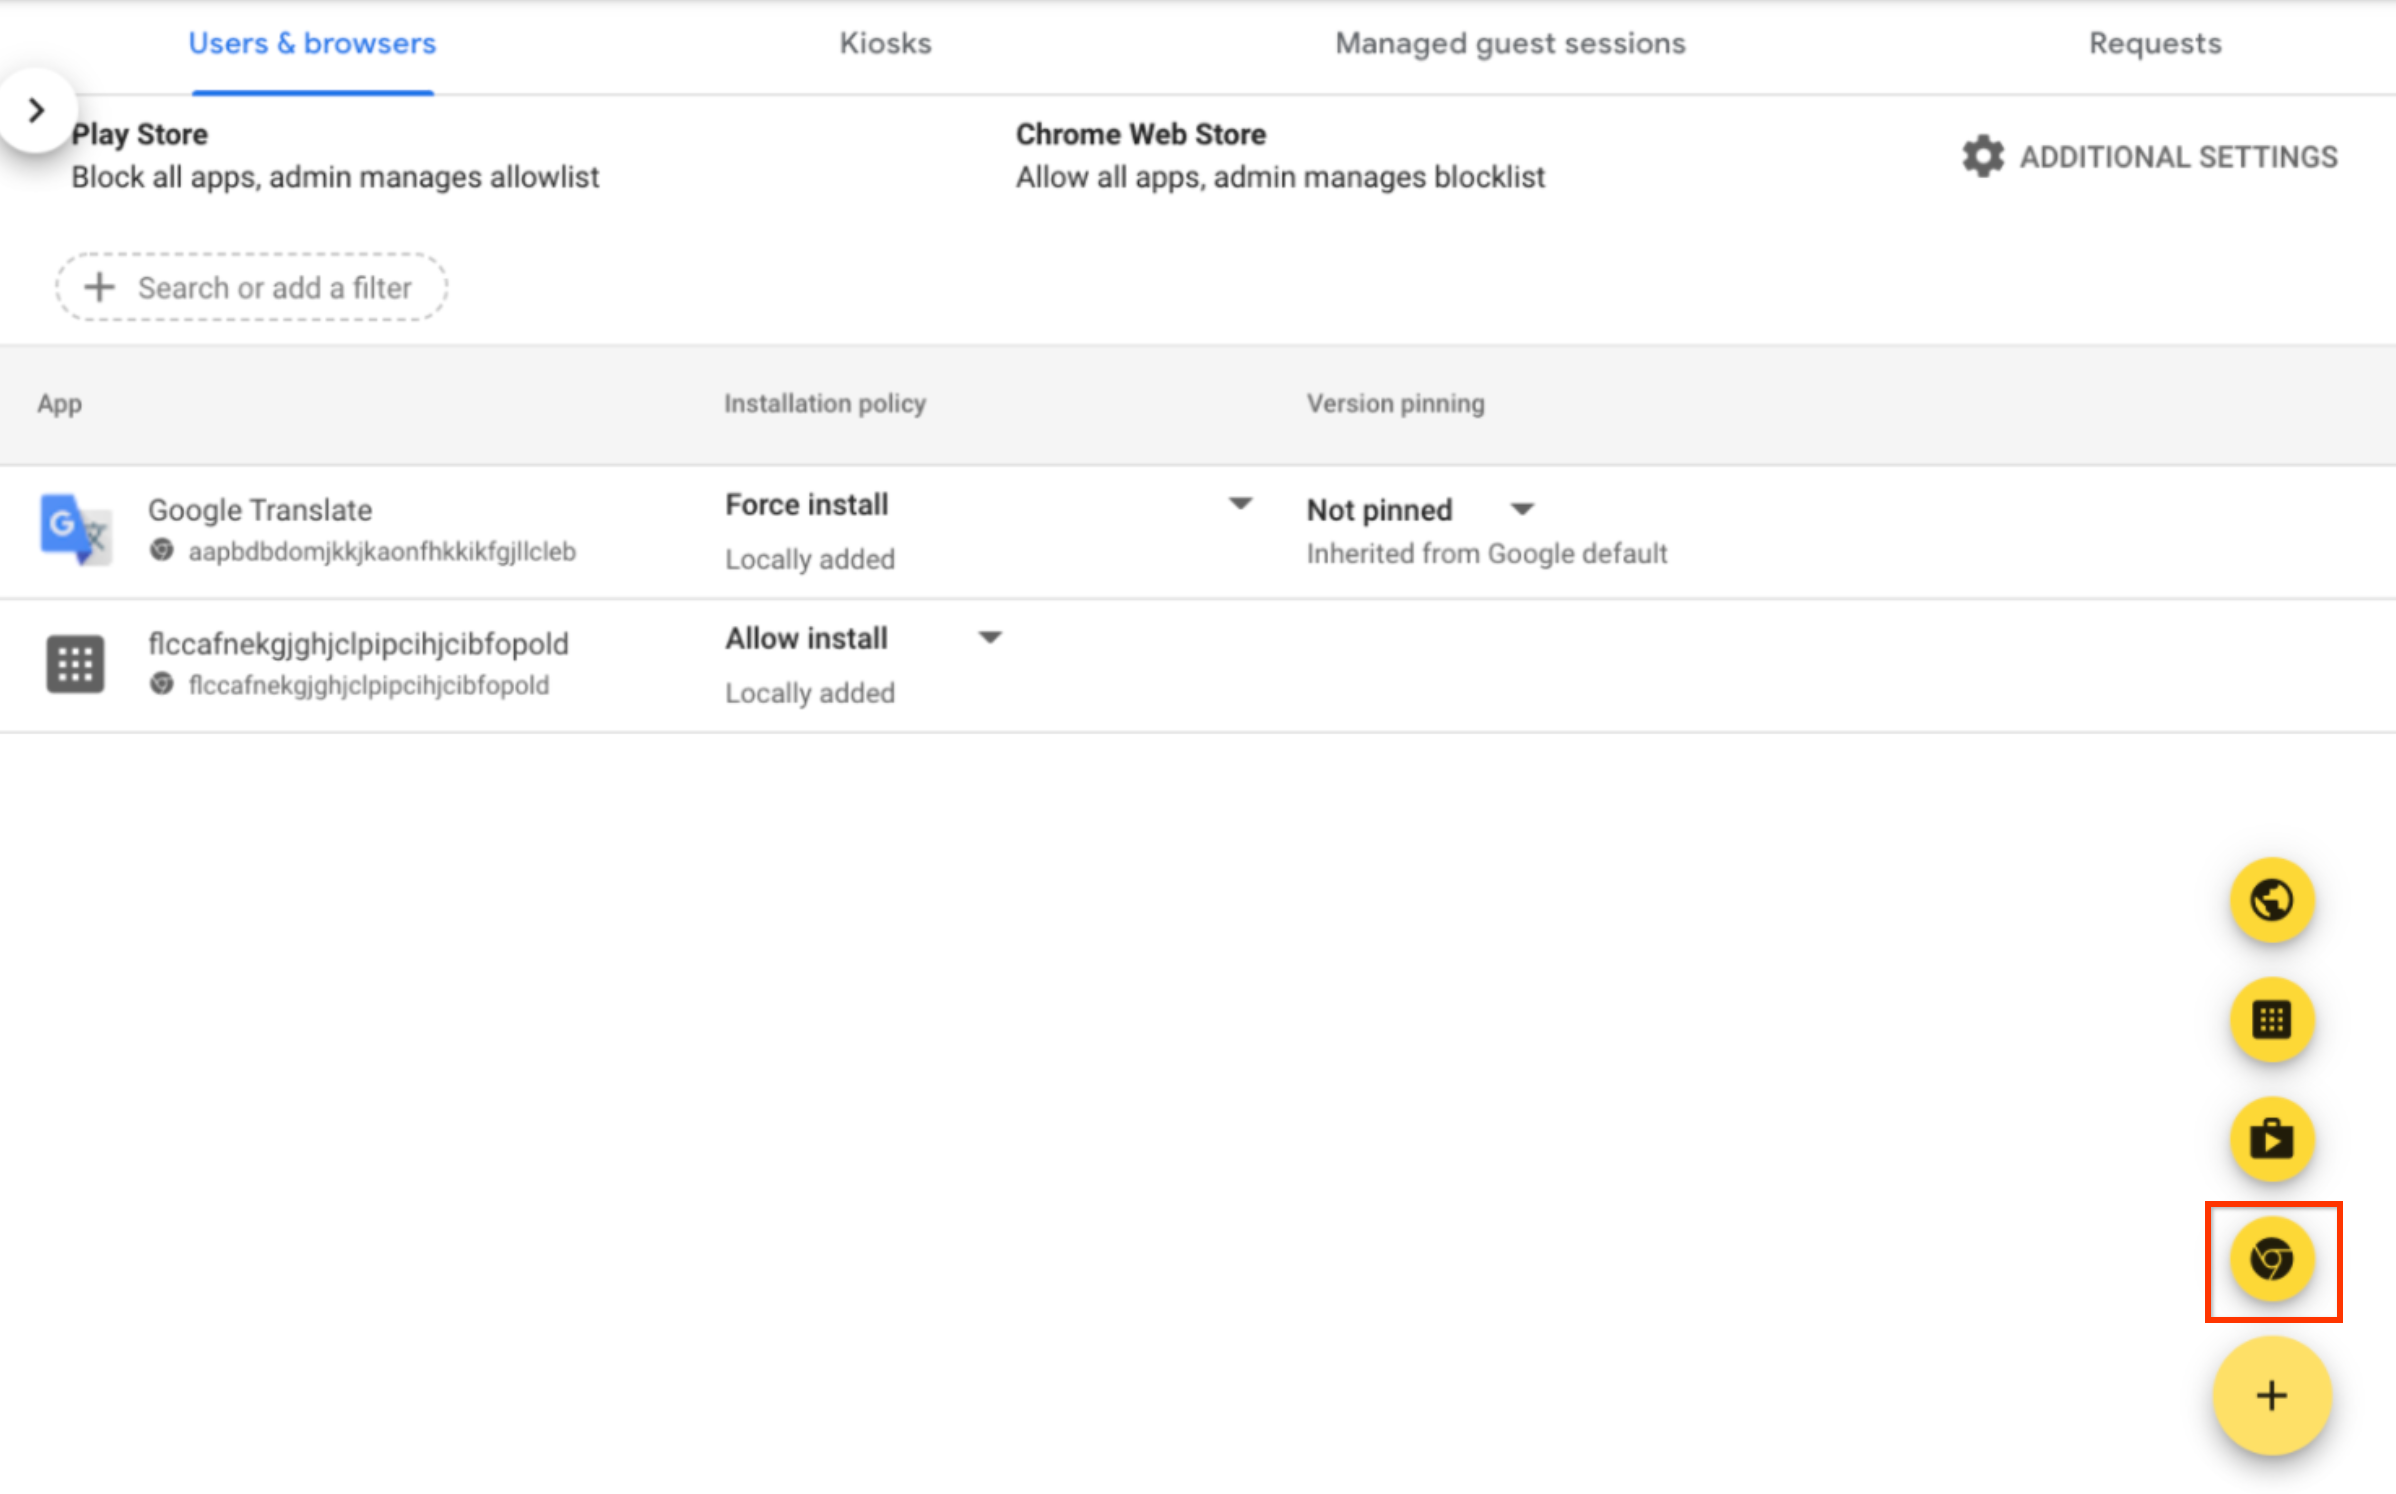
- Di menu navigasi, klik Chrome > Aplikasi & ekstensi > Pengguna & browser.
- Dari panel Unit Organisasi, pilih unit organisasi yang ingin Anda instal ekstensi Endpoint Verification-nya.
Arahkan pointer ke Tambahkan, lalu klik Tambahkan dari Chrome Web Store.
- Di kolom Telusuri toko, masukkan Endpoint Verification.
- Klik Verifikasi Endpoint, lalu klik Pilih.
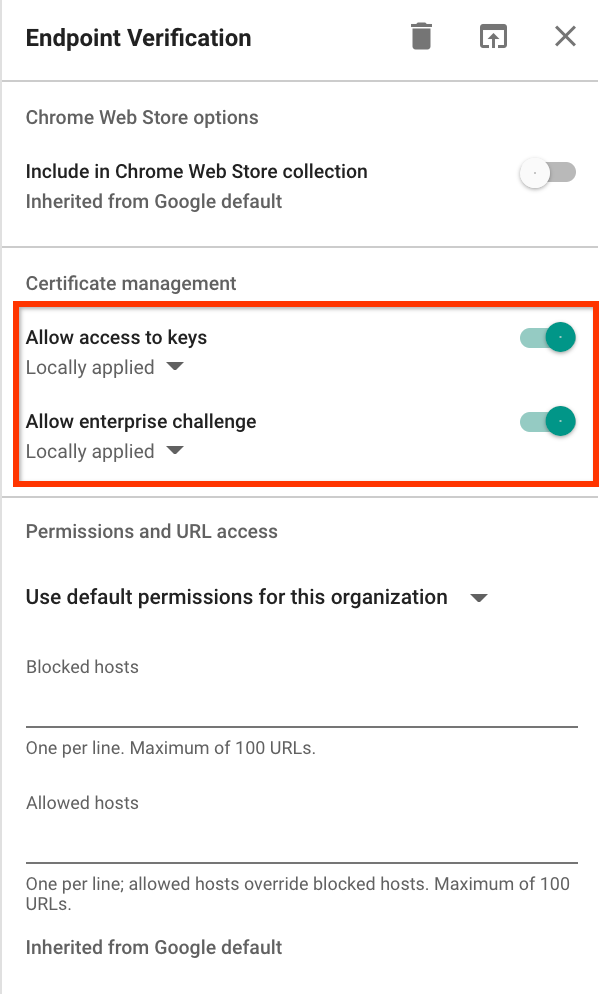
- Pada dialog Verifikasi Endpoint, pastikan Izinkan akses ke kunci
dan Izinkan verifikasi dengan kunci perusahaan diaktifkan.
- Izinkan akses ke kunci: mengizinkan ekstensi Verifikasi Endpoint mengakses sertifikat dan kunci klien di ChromeOS.
- Izinkan tantangan perusahaan: mengizinkan ekstensi Verifikasi Endpoint menggunakan fitur Akses Terverifikasi di ChromeOS. Untuk mengetahui informasi selengkapnya, lihat Ringkasan Akses Terverifikasi Chrome.
Klik drop-down Kebijakan penginstalan untuk Verifikasi Endpoint, lalu pilih Instal otomatis.

- Klik Simpan.
Menginstal aplikasi pendukung Verifikasi Endpoint
Jika Anda ingin melakukan salah satu tugas berikut, instal aplikasi pendukung Verifikasi Endpoint di unit organisasi Anda:
- Menyiapkan integrasi Chrome Enterprise Premium dan CrowdStrike Falcon Zero Trust Assessment (Falcon ZTA).
- Menyiapkan akses berbasis sertifikat untuk Google Cloud resource.
- Mengumpulkan atribut perangkat dari perangkat yang menggunakan Chrome versi M92 atau yang lebih lama.
Men-deploy paket aplikasi pendukung
Gunakan alat pengelolaan perangkat pilihan Anda untuk men-deploy paket berikut:
- macOS:
helper.dmg - Windows:
EndpointVerification.msi
Anda dapat menggunakan Jamf di perangkat Apple Mac dan Active Directory di perangkat Microsoft Windows seperti yang ditunjukkan dalam contoh berikut.
Jamf
- Download file
helper.dmg. - Pasang file
helper.dmgdan ekstrakEndpointVerification.pkg. - Untuk men-deploy
EndpointVerification.pkg, ikuti petunjuk di Men-deploy Paket Mac. Setelah muncul di halaman Aplikasi, aplikasi siap di-deploy dengan Blueprint. - Untuk men-deploy aplikasi ke semua perangkat, ikuti petunjuk di Men-deploy Aplikasi ke Semua Perangkat dalam Cetak Biru.
Active Directory
- Download file
EndpointVerification.msidan gunakan file ini saat membuat titik distribusi. - Ikuti petunjuk di Menggunakan Kebijakan Grup untuk menginstal software dari jarak jauh.