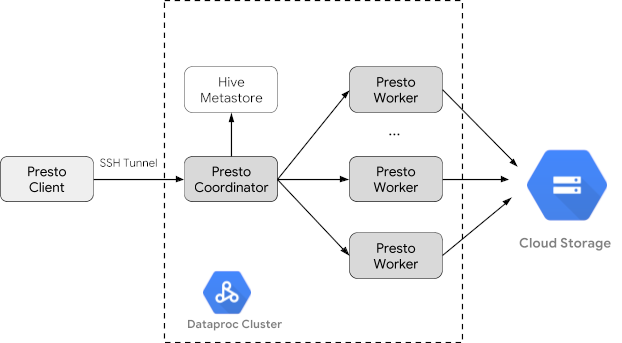
Trino(旧称 Presto)は、1 つ以上の異種混合データソースに分散された大規模なデータセットをクエリするために設計された分散 SQL クエリエンジンです。Trino は、コネクタを介して Hive、MySQL、Kafka などのデータソースに対してクエリを実行できます。このチュートリアルでは、次の方法について説明します。
- Dataproc クラスタに Trino サービスをインストールする
- クラスタ上の Trino サービスと通信するローカルマシンにインストールされた Trino クライアントから一般公開データをクエリする
- Trino Java JDBC ドライバを介してクラスタ上の Trino サービスと通信する Java アプリケーションからクエリを実行する
目標
- BigQuery からデータを抽出する
- データを CSV ファイルとして Cloud Storage に読み込む
- データを変換する
- データを Hive 外部テーブルとして公開し、Trino でデータをクエリ可能にする
- データを CSV 形式から Parquet 形式に変換してクエリを高速化する
費用
このドキュメントでは、課金対象である次の Google Cloudコンポーネントを使用します。
料金計算ツールを使うと、予想使用量に基づいて費用の見積もりを生成できます。
始める前に
まだ作成していない場合は、 Google Cloud プロジェクトとこのチュートリアルで使用するデータを保持する Cloud Storage バケットを作成します。 1. プロジェクトを設定する- Sign in to your Google Cloud account. If you're new to Google Cloud, create an account to evaluate how our products perform in real-world scenarios. New customers also get $300 in free credits to run, test, and deploy workloads.
-
In the Google Cloud console, on the project selector page, select or create a Google Cloud project.
Roles required to select or create a project
- Select a project: Selecting a project doesn't require a specific IAM role—you can select any project that you've been granted a role on.
-
Create a project: To create a project, you need the Project Creator
(
roles/resourcemanager.projectCreator), which contains theresourcemanager.projects.createpermission. Learn how to grant roles.
-
Verify that billing is enabled for your Google Cloud project.
-
Enable the Dataproc, Compute Engine, Cloud Storage, and BigQuery APIs.
Roles required to enable APIs
To enable APIs, you need the Service Usage Admin IAM role (
roles/serviceusage.serviceUsageAdmin), which contains theserviceusage.services.enablepermission. Learn how to grant roles. -
Install the Google Cloud CLI.
-
外部 ID プロバイダ(IdP)を使用している場合は、まず連携 ID を使用して gcloud CLI にログインする必要があります。
-
gcloud CLI を初期化するには、次のコマンドを実行します。
gcloud init -
In the Google Cloud console, on the project selector page, select or create a Google Cloud project.
Roles required to select or create a project
- Select a project: Selecting a project doesn't require a specific IAM role—you can select any project that you've been granted a role on.
-
Create a project: To create a project, you need the Project Creator
(
roles/resourcemanager.projectCreator), which contains theresourcemanager.projects.createpermission. Learn how to grant roles.
-
Verify that billing is enabled for your Google Cloud project.
-
Enable the Dataproc, Compute Engine, Cloud Storage, and BigQuery APIs.
Roles required to enable APIs
To enable APIs, you need the Service Usage Admin IAM role (
roles/serviceusage.serviceUsageAdmin), which contains theserviceusage.services.enablepermission. Learn how to grant roles. -
Install the Google Cloud CLI.
-
外部 ID プロバイダ(IdP)を使用している場合は、まず連携 ID を使用して gcloud CLI にログインする必要があります。
-
gcloud CLI を初期化するには、次のコマンドを実行します。
gcloud init - In the Google Cloud console, go to the Cloud Storage Buckets page.
- Click Create.
- On the Create a bucket page, enter your bucket information. To go to the next
step, click Continue.
-
In the Get started section, do the following:
- Enter a globally unique name that meets the bucket naming requirements.
- To add a
bucket label,
expand the Labels section (),
click add_box
Add label, and specify a
keyand avaluefor your label.
-
In the Choose where to store your data section, do the following:
- Select a Location type.
- Choose a location where your bucket's data is permanently stored from the Location type drop-down menu.
- If you select the dual-region location type, you can also choose to enable turbo replication by using the relevant checkbox.
- To set up cross-bucket replication, select
Add cross-bucket replication via Storage Transfer Service and
follow these steps:
Set up cross-bucket replication
- In the Bucket menu, select a bucket.
In the Replication settings section, click Configure to configure settings for the replication job.
The Configure cross-bucket replication pane appears.
- To filter objects to replicate by object name prefix, enter a prefix that you want to include or exclude objects from, then click Add a prefix.
- To set a storage class for the replicated objects, select a storage class from the Storage class menu. If you skip this step, the replicated objects will use the destination bucket's storage class by default.
- Click Done.
-
In the Choose how to store your data section, do the following:
- Select a default storage class for the bucket or Autoclass for automatic storage class management of your bucket's data.
- To enable hierarchical namespace, in the Optimize storage for data-intensive workloads section, select Enable hierarchical namespace on this bucket.
- In the Choose how to control access to objects section, select whether or not your bucket enforces public access prevention, and select an access control method for your bucket's objects.
-
In the Choose how to protect object data section, do the
following:
- Select any of the options under Data protection that you
want to set for your bucket.
- To enable soft delete, click the Soft delete policy (For data recovery) checkbox, and specify the number of days you want to retain objects after deletion.
- To set Object Versioning, click the Object versioning (For version control) checkbox, and specify the maximum number of versions per object and the number of days after which the noncurrent versions expire.
- To enable the retention policy on objects and buckets, click the Retention (For compliance) checkbox, and then do the following:
- To enable Object Retention Lock, click the Enable object retention checkbox.
- To enable Bucket Lock, click the Set bucket retention policy checkbox, and choose a unit of time and a length of time for your retention period.
- To choose how your object data will be encrypted, expand the Data encryption section (), and select a Data encryption method.
- Select any of the options under Data protection that you
want to set for your bucket.
-
In the Get started section, do the following:
- Click Create.
- 環境変数を設定します。
- PROJECT: プロジェクト ID。
- BUCKET_NAME: 始める前にで作成した Cloud Storage バケットの名前。
- REGION: このチュートリアルで使用するクラスタが作成されるリージョン。例: 「us-west1」
- WORKERS: このチュートリアルでは 3~5 人のワーカーをおすすめします。
export PROJECT=project-id
export WORKERS=number
export REGION=region
export BUCKET_NAME=bucket-name
- ローカルマシンで Google Cloud CLI を実行して、クラスタを作成します。
gcloud beta dataproc clusters create trino-cluster \ --project=${PROJECT} \ --region=${REGION} \ --num-workers=${WORKERS} \ --scopes=cloud-platform \ --optional-components=TRINO \ --image-version=2.1 \ --enable-component-gateway - ローカルマシンで次のコマンドを実行して、始める前にで作成した Cloud Storage バケットに、BigQuery の taxi データをヘッダーなしの CSV ファイルとしてインポートします。
bq --location=us extract --destination_format=CSV \ --field_delimiter=',' --print_header=false \ "bigquery-public-data:chicago_taxi_trips.taxi_trips" \ gs://${BUCKET_NAME}/chicago_taxi_trips/csv/shard-*.csv - Cloud Storage バケット内の CSV ファイルと Parquet ファイルに基づいて Hive 外部テーブルを作成します。
- Hive 外部テーブル
chicago_taxi_trips_csvを作成します。gcloud dataproc jobs submit hive \ --cluster trino-cluster \ --region=${REGION} \ --execute " CREATE EXTERNAL TABLE chicago_taxi_trips_csv( unique_key STRING, taxi_id STRING, trip_start_timestamp TIMESTAMP, trip_end_timestamp TIMESTAMP, trip_seconds INT, trip_miles FLOAT, pickup_census_tract INT, dropoff_census_tract INT, pickup_community_area INT, dropoff_community_area INT, fare FLOAT, tips FLOAT, tolls FLOAT, extras FLOAT, trip_total FLOAT, payment_type STRING, company STRING, pickup_latitude FLOAT, pickup_longitude FLOAT, pickup_location STRING, dropoff_latitude FLOAT, dropoff_longitude FLOAT, dropoff_location STRING) ROW FORMAT DELIMITED FIELDS TERMINATED BY ',' STORED AS TEXTFILE location 'gs://${BUCKET_NAME}/chicago_taxi_trips/csv/';" - Hive 外部テーブルの作成を確認します。
gcloud dataproc jobs submit hive \ --cluster trino-cluster \ --region=${REGION} \ --execute "SELECT COUNT(*) FROM chicago_taxi_trips_csv;" - 別の Hive 外部テーブル
chicago_taxi_trips_parquetを作成します。列は同じにしますが、クエリ パフォーマンスを向上させるために、データは Parquet 形式で保存されます。gcloud dataproc jobs submit hive \ --cluster trino-cluster \ --region=${REGION} \ --execute " CREATE EXTERNAL TABLE chicago_taxi_trips_parquet( unique_key STRING, taxi_id STRING, trip_start_timestamp TIMESTAMP, trip_end_timestamp TIMESTAMP, trip_seconds INT, trip_miles FLOAT, pickup_census_tract INT, dropoff_census_tract INT, pickup_community_area INT, dropoff_community_area INT, fare FLOAT, tips FLOAT, tolls FLOAT, extras FLOAT, trip_total FLOAT, payment_type STRING, company STRING, pickup_latitude FLOAT, pickup_longitude FLOAT, pickup_location STRING, dropoff_latitude FLOAT, dropoff_longitude FLOAT, dropoff_location STRING) STORED AS PARQUET location 'gs://${BUCKET_NAME}/chicago_taxi_trips/parquet/';" - Hive CSV テーブルから Hive Parquet テーブルにデータを読み込みます。
gcloud dataproc jobs submit hive \ --cluster trino-cluster \ --region=${REGION} \ --execute " INSERT OVERWRITE TABLE chicago_taxi_trips_parquet SELECT * FROM chicago_taxi_trips_csv;" - データが正しく読み込まれたことを確認します。
gcloud dataproc jobs submit hive \
    --cluster trino-cluster \
    --region=${REGION} \
    --execute "SELECT COUNT(*) FROM chicago_taxi_trips_parquet;"
- Hive 外部テーブル
- ローカルマシンで次のコマンドを実行して、クラスタのマスターノードに SSH 接続します。コマンドの実行中、ローカル ターミナルは応答しなくなります。
gcloud compute ssh trino-cluster-m
- クラスタのマスターノードの SSH ターミナル ウィンドウで、マスターノードで実行されている Trino サーバーに接続する Trino CLI を実行します。
trino --catalog hive --schema default
trino:defaultプロンプトで、Trino で Hive テーブルの検出が可能なことを確認します。show tables;
Table
‐‐‐‐‐‐‐‐‐‐‐‐‐‐‐‐‐‐‐‐‐‐‐‐‐‐‐‐‐
 chicago_taxi_trips_csv
 chicago_taxi_trips_parquet
(2 rows)
trino:defaultプロンプトからクエリを実行し、Parquet と CSV データのクエリのパフォーマンスを比較します。- Parquet データのクエリ
select count(*) from chicago_taxi_trips_parquet where trip_miles > 50;
_col0 ‐‐‐‐‐‐‐‐ 117957 (1 row)
Query 20180928_171735_00006_2sz8c, FINISHED, 3 nodes Splits: 308 total, 308 done (100.00%) 0:16 [113M rows, 297MB] [6.91M rows/s, 18.2MB/s] - CSV データのクエリ
select count(*) from chicago_taxi_trips_csv where trip_miles > 50;
_col0
‐‐‐‐‐‐‐‐
 117957
(1 row)

Query 20180928_171936_00009_2sz8c, FINISHED, 3 nodes
Splits: 881 total, 881 done (100.00%)
0:47 [113M rows, 41.5GB] [2.42M rows/s, 911MB/s]
- Parquet データのクエリ
- In the Google Cloud console, go to the Manage resources page.
- In the project list, select the project that you want to delete, and then click Delete.
- In the dialog, type the project ID, and then click Shut down to delete the project.
- クラスタを削除するには:
gcloud dataproc clusters delete --project=${PROJECT} trino-cluster \ --region=${REGION} - 始める前にで作成した Cloud Storage バケット(バケットに保存されているデータファイルを含む)を削除するには:
gcloud storage rm gs://${BUCKET_NAME} --recursive
Dataproc クラスタを作成する
optional-components フラグ(イメージ バージョン 2.1 以降で使用可能)を使用して、Dataproc クラスタを作成し、クラスタに Trino オプション コンポーネントをインストールします。また、enable-component-gateway フラグを使用して、コンポーネント ゲートウェイを有効にし、 Google Cloud コンソールから Trino ウェブ UI にアクセスできるようにします。
データを準備する
bigquery-public-data の chicago_taxi_trips データセットを CSV ファイルとして Cloud Storage にエクスポートし、データを参照する Hive 外部テーブルを作成します。
クエリを実行する
クエリは、Trino CLI またはアプリケーションからローカルで実行できます。
Trino CLI のクエリ
このセクションでは、Trino CLI を使用して Hive Parquet taxi データセットをクエリする方法を説明します。
Java アプリケーションのクエリ
Trino Java JDBC ドライバを介して Java アプリケーションからクエリを実行する方法は次のとおりです。
1. Trino Java JDBC ドライバをダウンロードします。
1. Maven pom.xml にある trino-jdbc 依存関係を追加します。
<dependency>
  <groupId>io.trino</groupId>
  <artifactId>trino-jdbc</artifactId>
  <version>376</version>
</dependency>
package dataproc.codelab.trino;
import java.sql.Connection;
import java.sql.DriverManager;
import java.sql.ResultSet;
import java.sql.SQLException;
import java.sql.Statement;
import java.util.Properties;
public class TrinoQuery {
  private static final String URL = "jdbc:trino://trino-cluster-m:8080/hive/default";
  private static final String SOCKS_PROXY = "localhost:1080";
  private static final String USER = "user";
  private static final String QUERY =
      "select count(*) as count from chicago_taxi_trips_parquet where trip_miles > 50";
  public static void main(String[] args) {
    try {
      Properties properties = new Properties();
      properties.setProperty("user", USER);
      properties.setProperty("socksProxy", SOCKS_PROXY);
      Connection connection = DriverManager.getConnection(URL, properties);
      try (Statement stmt = connection.createStatement()) {
        ResultSet rs = stmt.executeQuery(QUERY);
        while (rs.next()) {
          int count = rs.getInt("count");
          System.out.println("The number of long trips: " + count);
        }
      }
    } catch (SQLException e) {
      e.printStackTrace();
    }
  }
}
ロギングとモニタリング
ロギング
Trino のログは、クラスタのマスターノードとワーカーノードの /var/log/trino/ にあります。
ウェブ UI
クラスタのマスターノード上で実行されている Trino ウェブ UI をローカル ブラウザで開くには、コンポーネント ゲートウェイの URL を表示してアクセスするをご覧ください。
モニタリング
Trino は、ランタイム テーブルを介してクラスタのランタイム情報を公開します。(trino:default からの)Trino セッションのプロンプトで、次のクエリを実行してランタイム テーブルのデータを表示します。
select * FROM system.runtime.nodes;
クリーンアップ
チュートリアルが終了したら、作成したリソースをクリーンアップして、割り当ての使用を停止し、課金されないようにできます。次のセクションで、リソースを削除または無効にする方法を説明します。
プロジェクトの削除
課金されないようにする最も簡単な方法は、チュートリアル用に作成したプロジェクトを削除することです。
プロジェクトを削除するには: