Objetivos
Neste tutorial, mostramos como instalar o componente Jupyter do Dataproc em um novo cluster e, em seguida, se conectar à interface do notebook Jupyter UI execução no cluster a partir do navegador local usando o gateway de componentes do Dataproc.
Custos
Neste documento, você vai usar os seguintes componentes faturáveis do Google Cloud:
Para gerar uma estimativa de custo baseada na sua projeção de uso,
use a calculadora de preços.
Antes de começar
Se ainda não tiver feito isso, crie um Google Cloud projeto e um bucket do Cloud Storage.
Como configurar o projeto
- Sign in to your Google Cloud account. If you're new to Google Cloud, create an account to evaluate how our products perform in real-world scenarios. New customers also get $300 in free credits to run, test, and deploy workloads.
-
In the Google Cloud console, on the project selector page, select or create a Google Cloud project.
Roles required to select or create a project
- Select a project: Selecting a project doesn't require a specific IAM role—you can select any project that you've been granted a role on.
-
Create a project: To create a project, you need the Project Creator
(
roles/resourcemanager.projectCreator), which contains theresourcemanager.projects.createpermission. Learn how to grant roles.
-
Verify that billing is enabled for your Google Cloud project.
-
Enable the Dataproc, Compute Engine, and Cloud Storage APIs.
Roles required to enable APIs
To enable APIs, you need the Service Usage Admin IAM role (
roles/serviceusage.serviceUsageAdmin), which contains theserviceusage.services.enablepermission. Learn how to grant roles. -
Install the Google Cloud CLI.
-
Ao usar um provedor de identidade (IdP) externo, primeiro faça login na gcloud CLI com sua identidade federada.
-
Para inicializar a gcloud CLI, execute o seguinte comando:
gcloud init -
In the Google Cloud console, on the project selector page, select or create a Google Cloud project.
Roles required to select or create a project
- Select a project: Selecting a project doesn't require a specific IAM role—you can select any project that you've been granted a role on.
-
Create a project: To create a project, you need the Project Creator
(
roles/resourcemanager.projectCreator), which contains theresourcemanager.projects.createpermission. Learn how to grant roles.
-
Verify that billing is enabled for your Google Cloud project.
-
Enable the Dataproc, Compute Engine, and Cloud Storage APIs.
Roles required to enable APIs
To enable APIs, you need the Service Usage Admin IAM role (
roles/serviceusage.serviceUsageAdmin), which contains theserviceusage.services.enablepermission. Learn how to grant roles. -
Install the Google Cloud CLI.
-
Ao usar um provedor de identidade (IdP) externo, primeiro faça login na gcloud CLI com sua identidade federada.
-
Para inicializar a gcloud CLI, execute o seguinte comando:
gcloud init Como criar um bucket do Cloud Storage no projeto para armazenar todos os notebooks criados neste tutorial.
- In the Google Cloud console, go to the Cloud Storage Buckets page.
- Click Create.
- On the Create a bucket page, enter your bucket information. To go to the next
step, click Continue.
-
In the Get started section, do the following:
- Enter a globally unique name that meets the bucket naming requirements.
- To add a
bucket label,
expand the Labels section (),
click add_box
Add label, and specify a
keyand avaluefor your label.
-
In the Choose where to store your data section, do the following:
- Select a Location type.
- Choose a location where your bucket's data is permanently stored from the Location type drop-down menu.
- If you select the dual-region location type, you can also choose to enable turbo replication by using the relevant checkbox.
- To set up cross-bucket replication, select
Add cross-bucket replication via Storage Transfer Service and
follow these steps:
Set up cross-bucket replication
- In the Bucket menu, select a bucket.
In the Replication settings section, click Configure to configure settings for the replication job.
The Configure cross-bucket replication pane appears.
- To filter objects to replicate by object name prefix, enter a prefix that you want to include or exclude objects from, then click Add a prefix.
- To set a storage class for the replicated objects, select a storage class from the Storage class menu. If you skip this step, the replicated objects will use the destination bucket's storage class by default.
- Click Done.
-
In the Choose how to store your data section, do the following:
- Select a default storage class for the bucket or Autoclass for automatic storage class management of your bucket's data.
- To enable hierarchical namespace, in the Optimize storage for data-intensive workloads section, select Enable hierarchical namespace on this bucket.
- In the Choose how to control access to objects section, select whether or not your bucket enforces public access prevention, and select an access control method for your bucket's objects.
-
In the Choose how to protect object data section, do the
following:
- Select any of the options under Data protection that you
want to set for your bucket.
- To enable soft delete, click the Soft delete policy (For data recovery) checkbox, and specify the number of days you want to retain objects after deletion.
- To set Object Versioning, click the Object versioning (For version control) checkbox, and specify the maximum number of versions per object and the number of days after which the noncurrent versions expire.
- To enable the retention policy on objects and buckets, click the Retention (For compliance) checkbox, and then do the following:
- To enable Object Retention Lock, click the Enable object retention checkbox.
- To enable Bucket Lock, click the Set bucket retention policy checkbox, and choose a unit of time and a length of time for your retention period.
- To choose how your object data will be encrypted, expand the Data encryption section (), and select a Data encryption method.
- Select any of the options under Data protection that you
want to set for your bucket.
-
In the Get started section, do the following:
- Click Create. Seus notebooks serão armazenados no Cloud Storage em
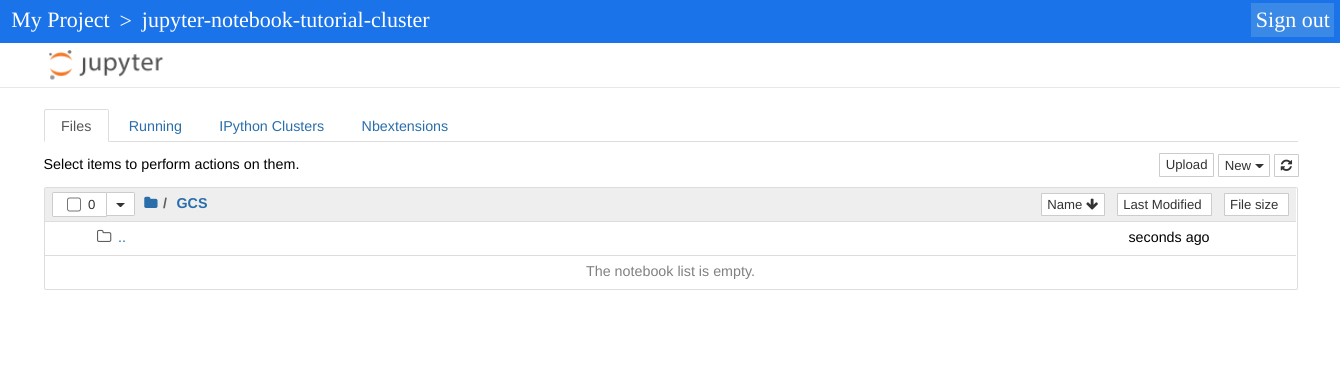
gs://bucket-name/notebooks/jupyter.- Clique no link GCS. A UI da Web do notebook Jupyter mostra os notebooks armazenados no bucket do Cloud Storage, incluindo os criados neste tutorial.
- In the Google Cloud console, go to the Manage resources page.
- In the project list, select the project that you want to delete, and then click Delete.
- In the dialog, type the project ID, and then click Shut down to delete the project.
- Para excluir o cluster:
gcloud dataproc clusters delete cluster-name \ --region=${REGION} - Para excluir o bucket do Cloud Storage criado em Antes de começar, siga a etapa 2, incluindo os notebooks
armazenados no bucket:
gcloud storage rm gs://${BUCKET_NAME} --recursive
Criar um cluster e instalar o componente Jupyter
Crie um cluster com o componente Jupyter instalado.
Abrir as IUs do Jupyter e do JupyterLab
Clique nos links do gateway de componentes do consoleGoogle Cloud no console Google Cloud para abrir o notebook Jupyter ou as IUs do JupyterLab em execução no
O diretório de nível superior exibido pela instância do Jupyter é um diretório virtual que permite ver o conteúdo do bucket do Cloud Storage ou do sistema de arquivos local. Escolha um dos locais clicando no link GCS do Cloud Storage ou em Disco local para o sistema de arquivos local do nó mestre no cluster.
Limpar
Depois de concluir o tutorial, você pode limpar os recursos que criou para que eles parem de usar a cota e gerar cobranças. Nas seções a seguir, você aprenderá a excluir e desativar esses recursos.
Exclua o projeto
O jeito mais fácil de evitar cobranças é excluindo o projeto que você criou para o tutorial.
Para excluir o projeto:
excluir o cluster
Excluir o bucket
A seguir