Objetivos
En este tutorial se muestra cómo instalar el componente Jupyter de Dataproc en un clúster nuevo y, a continuación, conectarse a la interfaz de usuario del cuaderno de Jupyter que se ejecuta en el clúster desde el navegador local mediante la pasarela de componentes de Dataproc.
Costes
En este documento, se utilizan los siguientes componentes facturables de Google Cloud:
Para generar una estimación de costes basada en el uso previsto,
utiliza la calculadora de precios.
Antes de empezar
Si aún no lo has hecho, crea un Google Cloud proyecto y un contenedor de Cloud Storage.
Configurar un proyecto
- Sign in to your Google Cloud account. If you're new to Google Cloud, create an account to evaluate how our products perform in real-world scenarios. New customers also get $300 in free credits to run, test, and deploy workloads.
-
In the Google Cloud console, on the project selector page, select or create a Google Cloud project.
Roles required to select or create a project
- Select a project: Selecting a project doesn't require a specific IAM role—you can select any project that you've been granted a role on.
-
Create a project: To create a project, you need the Project Creator
(
roles/resourcemanager.projectCreator), which contains theresourcemanager.projects.createpermission. Learn how to grant roles.
-
Verify that billing is enabled for your Google Cloud project.
-
Enable the Dataproc, Compute Engine, and Cloud Storage APIs.
Roles required to enable APIs
To enable APIs, you need the Service Usage Admin IAM role (
roles/serviceusage.serviceUsageAdmin), which contains theserviceusage.services.enablepermission. Learn how to grant roles. -
Install the Google Cloud CLI.
-
Si utilizas un proveedor de identidades (IdP) externo, primero debes iniciar sesión en la CLI de gcloud con tu identidad federada.
-
Para inicializar gcloud CLI, ejecuta el siguiente comando:
gcloud init -
In the Google Cloud console, on the project selector page, select or create a Google Cloud project.
Roles required to select or create a project
- Select a project: Selecting a project doesn't require a specific IAM role—you can select any project that you've been granted a role on.
-
Create a project: To create a project, you need the Project Creator
(
roles/resourcemanager.projectCreator), which contains theresourcemanager.projects.createpermission. Learn how to grant roles.
-
Verify that billing is enabled for your Google Cloud project.
-
Enable the Dataproc, Compute Engine, and Cloud Storage APIs.
Roles required to enable APIs
To enable APIs, you need the Service Usage Admin IAM role (
roles/serviceusage.serviceUsageAdmin), which contains theserviceusage.services.enablepermission. Learn how to grant roles. -
Install the Google Cloud CLI.
-
Si utilizas un proveedor de identidades (IdP) externo, primero debes iniciar sesión en la CLI de gcloud con tu identidad federada.
-
Para inicializar gcloud CLI, ejecuta el siguiente comando:
gcloud init Crea un segmento de Cloud Storage en tu proyecto para almacenar los cuadernos que crees en este tutorial.
- In the Google Cloud console, go to the Cloud Storage Buckets page.
- Click Create.
- On the Create a bucket page, enter your bucket information. To go to the next
step, click Continue.
-
In the Get started section, do the following:
- Enter a globally unique name that meets the bucket naming requirements.
- To add a
bucket label,
expand the Labels section (),
click add_box
Add label, and specify a
keyand avaluefor your label.
-
In the Choose where to store your data section, do the following:
- Select a Location type.
- Choose a location where your bucket's data is permanently stored from the Location type drop-down menu.
- If you select the dual-region location type, you can also choose to enable turbo replication by using the relevant checkbox.
- To set up cross-bucket replication, select
Add cross-bucket replication via Storage Transfer Service and
follow these steps:
Set up cross-bucket replication
- In the Bucket menu, select a bucket.
In the Replication settings section, click Configure to configure settings for the replication job.
The Configure cross-bucket replication pane appears.
- To filter objects to replicate by object name prefix, enter a prefix that you want to include or exclude objects from, then click Add a prefix.
- To set a storage class for the replicated objects, select a storage class from the Storage class menu. If you skip this step, the replicated objects will use the destination bucket's storage class by default.
- Click Done.
-
In the Choose how to store your data section, do the following:
- Select a default storage class for the bucket or Autoclass for automatic storage class management of your bucket's data.
- To enable hierarchical namespace, in the Optimize storage for data-intensive workloads section, select Enable hierarchical namespace on this bucket.
- In the Choose how to control access to objects section, select whether or not your bucket enforces public access prevention, and select an access control method for your bucket's objects.
-
In the Choose how to protect object data section, do the
following:
- Select any of the options under Data protection that you
want to set for your bucket.
- To enable soft delete, click the Soft delete policy (For data recovery) checkbox, and specify the number of days you want to retain objects after deletion.
- To set Object Versioning, click the Object versioning (For version control) checkbox, and specify the maximum number of versions per object and the number of days after which the noncurrent versions expire.
- To enable the retention policy on objects and buckets, click the Retention (For compliance) checkbox, and then do the following:
- To enable Object Retention Lock, click the Enable object retention checkbox.
- To enable Bucket Lock, click the Set bucket retention policy checkbox, and choose a unit of time and a length of time for your retention period.
- To choose how your object data will be encrypted, expand the Data encryption section (), and select a Data encryption method.
- Select any of the options under Data protection that you
want to set for your bucket.
-
In the Get started section, do the following:
- Click Create. Tus cuadernos se almacenarán en Cloud Storage en
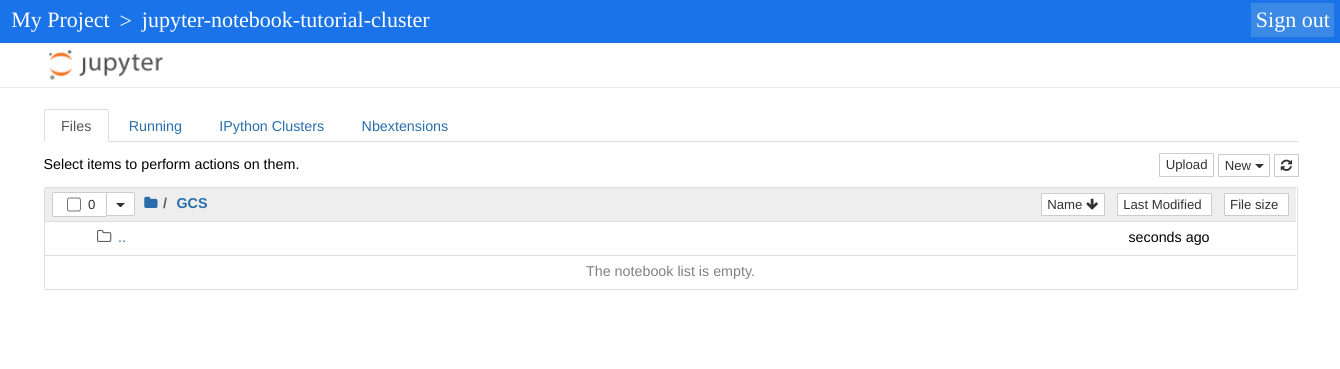
gs://bucket-name/notebooks/jupyter.- Haz clic en el enlace GCS. La interfaz web del cuaderno de Jupyter muestra los cuadernos almacenados en tu segmento de Cloud Storage, incluidos los que crees en este tutorial.
- In the Google Cloud console, go to the Manage resources page.
- In the project list, select the project that you want to delete, and then click Delete.
- In the dialog, type the project ID, and then click Shut down to delete the project.
- Para eliminar tu clúster, sigue estos pasos:
gcloud dataproc clusters delete cluster-name \ --region=${REGION} - Para eliminar el segmento de Cloud Storage que has creado en el paso 2 de la sección Antes de empezar, incluidos los cuadernos almacenados en el segmento, haz lo siguiente:
gcloud storage rm gs://${BUCKET_NAME} --recursive
Crear un clúster e instalar el componente Jupyter
Crea un clúster con el componente Jupyter instalado.
.Abrir las interfaces de usuario de Jupyter y JupyterLab
Haz clic en los enlaces de Component Gateway de la consolaGoogle Cloud en la consola Google Cloud para abrir las interfaces de usuario de Jupyter Notebook o JupyterLab que se ejecutan en tu clúster.
El directorio de nivel superior que muestra tu instancia de Jupyter es un directorio virtual que te permite ver el contenido de tu segmento de Cloud Storage o de tu sistema de archivos local. Para elegir una de las dos ubicaciones, haz clic en el enlace GCS de Cloud Storage o en Disco local para el sistema de archivos local del nodo maestro de tu clúster.
Limpieza
Cuando hayas terminado el tutorial, puedes eliminar los recursos que has creado para que dejen de usar cuota y generar cargos. En las siguientes secciones se explica cómo eliminar o desactivar dichos recursos.
Eliminar el proyecto
La forma más fácil de evitar que te cobren es eliminar el proyecto que has creado para el tutorial.
Para ello, sigue las instrucciones que aparecen a continuación:
Elimina el clúster
Eliminar el segmento
Siguientes pasos