To minimize risk to your AlloyDB for PostgreSQL production workloads, you can use a staging cluster to test new features, performance, and functionality before you apply updates to your production systems. A staging cluster is a copy of your production cluster that adds a layer of control to the maintenance update process. Using a staging cluster to test maintenance updates lets you identify and address potential issues in a non-production environment. This approach reduces the risk of downtime and performance degradation in your production systems.
Maintenance updates to AlloyDB are periodic, often monthly. Updates include new features, bug fixes, database compatibility upgrades, and security-related fixes. While AlloyDB releases are forward-compatible, we recommend that you test new releases on a staging environment to ensure database stability and predictability for the critical applications on your production cluster.
To use a staging cluster, you follow these high-level steps:
- Set up a staging cluster.
- Configure a maintenance window on a production cluster.
- Manage staging cluster updates.
- Manage production cluster updates.
This staging validation approach to AlloyDB maintenance ensures that your production environment remains stable, performant, and secure while it benefits from the latest AlloyDB features and patches.
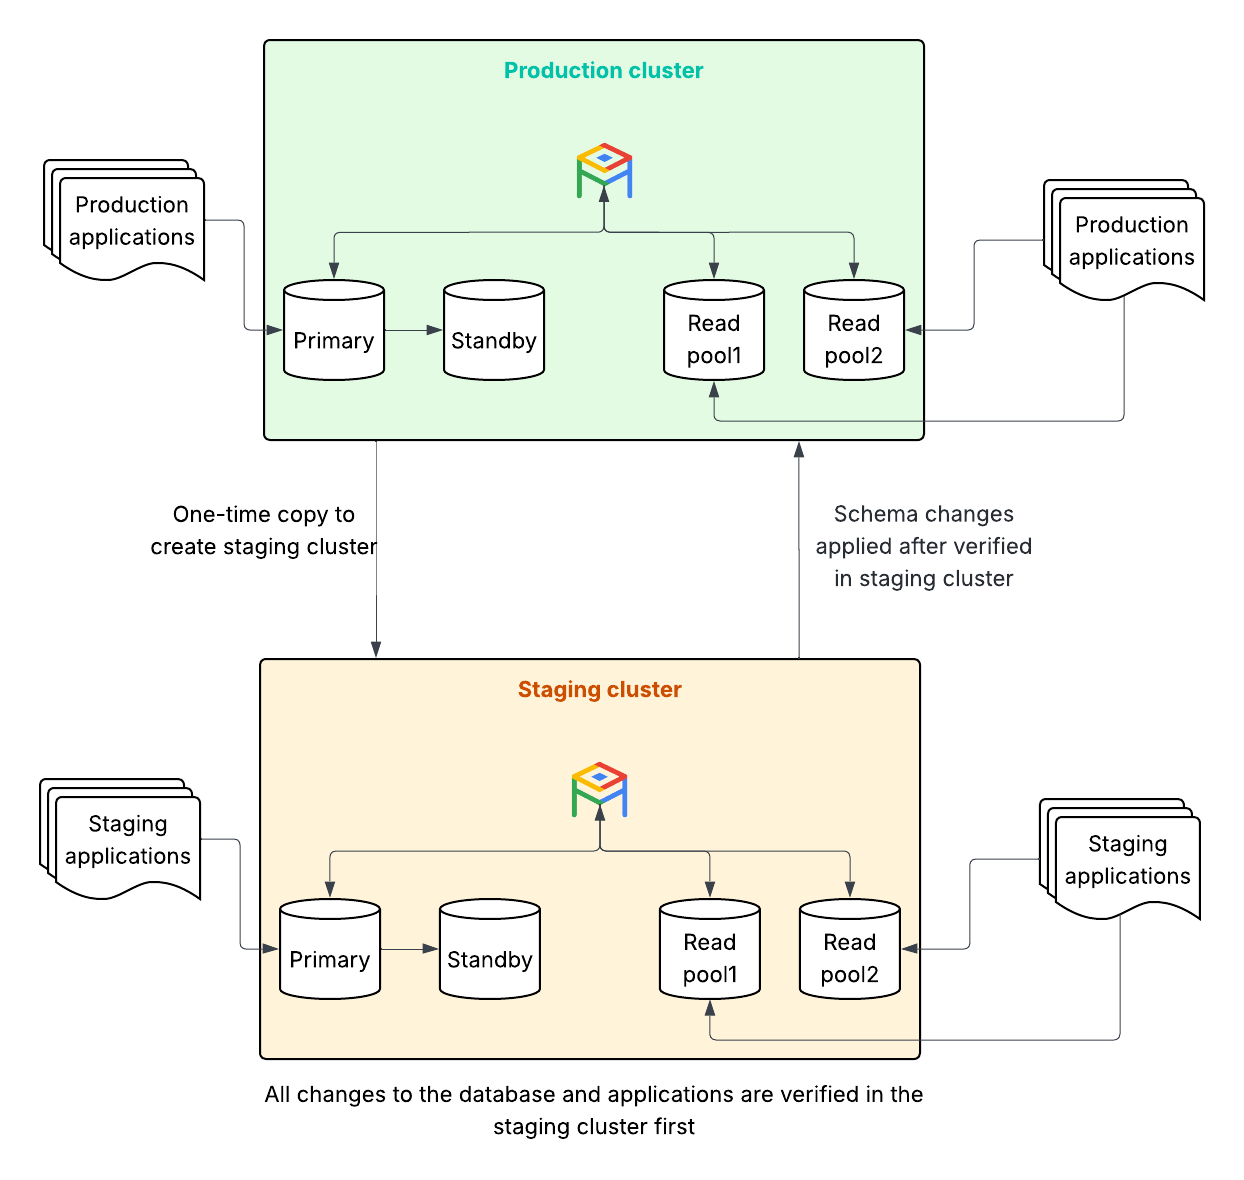
The following diagram shows the relationship between your staging cluster and production cluster, and the operational flow of the update process:
To learn more about how maintenance updates work with AlloyDB clusters, see Maintenance overview. To learn more about managing maintenance windows, see Manage AlloyDB for PostgreSQL cluster maintenance windows.
Before you begin
The Google Cloud project you use must be enabled to access AlloyDB.
To set up a staging cluster, you must create or already have an existing AlloyDB production cluster. For more information, see Create a cluster and its primary instance.
You must have one of the following IAM roles in the Google Cloud project that you're using:
roles/alloydb.admin: the AlloyDB Admin predefined IAM roleroles/owner: the Owner basic IAM roleroles/editor: the Editor basic IAM role
If you don't have any of these roles, contact your Organization Administrator to request access.
Set up a staging cluster
The key to a successful staging-first strategy is to make sure that your staging cluster is similar to your production environment and that it receives updates before production. You configure a staging-first strategy when you don't set a maintenance window on your staging cluster. AlloyDB first updates clusters without maintenance windows.
Create a staging cluster from your production backup
Deploy a staging cluster that mirrors your production environment, and make sure that your staging cluster has the same AlloyDB version, configuration, and data as your production cluster.
To ensure that your staging cluster is identical to your production environment,
use the restore command to clone your production database to your staging
cluster and to make sure data similarity and configuration matching. We also
recommend that you separate the staging and production environments on different
projects.
You can use the following two methods to create a production backup:
- Create a new staging cluster by performing a full restore of an existing production cluster backup. This method doesn't involve recovery of a database. However, depending on the backup schedule, the data can be up to 24 hours old. To use this method, see Restore a cluster from a stored backup.
- Create a new staging cluster by performing point-in-time-recovery (PITR) to a specific time of an existing production database backup, including to the latest time. With this option, you get the latest data, and the method is easier. Although, depending on the last PITR backup time, it might take longer to restore or recover the data to the time that you specify. To use this method, see Use point-in-time recovery (PITR).
Verify that a maintenance window isn't set on the staging cluster
Don't set a maintenance window for your staging cluster. By default, newly created AlloyDB clusters, even those that you restore from a backup, don't have a maintenance window set. This is the correct state for your staging environment. AlloyDB updates clusters that don't have scheduled maintenance windows before it updates clusters with scheduled maintenance windows.
You can verify that there's no maintenance window set as follows:
Console
Go to the Clusters page.
Click a cluster in the Resource Name column. It opens to the Overview page.
On the Overview page, in the Maintenance section, view the maintenance window details for your cluster.
Optional: On the Systems insights page, you can view the maintenance operation status details, such as the Events Timeline.
To view Unified Maintenance management, enter "Cloud Hub maintenance" in the search bar and select Maintenance. On this page, you can view a maintenance summary, Google-controlled maintenance, and planned maintenance details.
gcloud
To use the gcloud CLI, you can install and initialize the Google Cloud CLI, or you can use Cloud Shell.
gcloud alloydb clusters describe STAGING_CLUSTER_ID \
    --region=LOCATION_ID \
    --project=PROJECT_ID
Look for the
maintenanceSchedulefield in the output. If no maintenance window is set, this field is absent or empty. If, for any reason, a maintenance window is set, clear it.gcloud alloydb clusters update STAGING_CLUSTER_ID \ --region=LOCATION_ID \ --clear-maintenance-window \ --project=PROJECT_ID
Configure a maintenance window on a production cluster
For your production cluster, it's important to schedule a maintenance window. This gives you control over when the updates occur and lets you align them with your business's low-traffic periods.
Set a maintenance window on the production cluster
Schedule a maintenance window for your production cluster. Choose a day and hour when your production system experiences the lowest load. The total time required for a single maintenance event can vary.
AlloyDB automatically delays updates to your production cluster for at least one week after it updates your staging cluster. If you find issues after the staging cluster updates, you can deny the production maintenance updates for up to 30 days, and work with Google Cloud Support to resolve the issues.
Set a maintenance window on your production cluster as follows:
Console
Go to the Clusters page.
Click a cluster in the Resource Name column.
In the Overview page, in the Maintenance section, click Edit. A configuration window opens.
In the Preferred maintenance window section, select the day of the week for this maintenance window. The default option is "Any window."
When you create a cluster, AlloyDB assigns this default maintenance window to it.
If you select a day for maintenance updates, then select the hour of the day for the maintenance window.
Click Update to save the changes.
gcloud
To use the gcloud CLI, you can install and initialize the Google Cloud CLI, or you can use Cloud Shell.
To retrieve the configuration details for an AlloyDB cluster,
run the following using the
gcloud alloydb clusters update
command.
gcloud alloydb clusters update PRODUCTION_CLUSTER_ID \
    --region=LOCATION_ID \
    --maintenance-window-day=DAY_OF_WEEK \
    --maintenance-window-hour=HOUR_OF_DAY \
    --project=PROJECT_ID
Make the following replacements:
PRODUCTION_CLUSTER_ID: the ID of your production cluster.LOCATION_ID: the Google Cloud region.DAY_OF_WEEK: the preferred day for maintenance, such asSUNDAY.HOUR_OF_DAY: the preferred hour for maintenance in UTC (0-23).The following example shows how to set the maintenance window for Sundays at 2 AM UTC:
gcloud alloydb clusters update my-prod-cluster \
    --region=us-central1 \
    --maintenance-window-day=SUNDAY \
    --maintenance-window-hour=2 \
    --project=my-production-project
Verify the maintenance window on the production cluster
To confirm that the maintenance window is set for your production cluster,
run the
gcloud alloydb clusters describe
command:
gcloud alloydb clusters describe PRODUCTION_CLUSTER_ID \
--region=LOCATION_ID \
--project=PROJECT_ID
The output returns the maintenanceSchedule field with the specified
maintenance day and hour.
Opt in to maintenance notifications
We recommend that you opt in to receive notifications about scheduled maintenance events for your production cluster. The notifications help you plan when to begin your testing.
To opt in for maintenance notifications, follow these steps:
Go to the Clusters page.
Click a cluster in the Resource Name column. It opens to the Overview page.
In the Overview page, in the Maintenance section, click Show details to expand the section. Then, click Edit in the Notifications row. It opens the Communication page.
In the Communication page, select the Product communications tab.
In the row for AlloyDB, in the Email column, toggle the notification button to On.
After you configure the maintenance window for your production cluster, AlloyDB updates it no sooner than seven days after your staging cluster update. When you choose to receive notifications, you receive an email notification that a maintenance update is scheduled for your production cluster.
Staging cluster updates
Use your staging environment to validate the upcoming production update.
Check the pre-update status
Because your staging cluster has no maintenance window, it's among the first clusters to receive the update. However, AlloyDB doesn't send notifications for clusters that aren't configured with the maintenance window. Even so, you can monitor when maintenance updates occur using the Logs Explorer in the Google Cloud console.
In the Google Cloud console, go to the Logs Explorer page:
If you use the search bar to find this page, then select the result with the Logging subheading.
Select All Resources, choose your staging cluster, and click Apply.
Select All lognames, select maintenance_events, and click Apply.
In the Timeline pane, select the time range for when your staging cluster receives updates.
Perform post-update functional verification
After AlloyDB updates the staging cluster, perform functional tests to confirm that the updates are safe and suitable to apply to your production environment.
Perform post-update performance verification
Verify your staging cluster after the maintenance update finishes. Assess any performance impacts on your database after staging cluster updates. Perform comprehensive functional and performance testing to make sure that your applications behave as expected and that they meet performance SLAs.
To ensure stability and optimal operation, do the following:
- Compare pre-update baselines with key metrics.
- Run load tests to identify regressions.
- Analyze query performance.
- Monitor resource utilization.
Take action based on verification results
Review the verification results and take the following actions based on the results:
- Verification succeeds: if your functional and performance tests on the staging cluster are successful, this means that your staging environment is error-free and that you can let the production maintenance proceed as scheduled in its scheduled window. Prepare for the production update and inform relevant stakeholders.
- Verification fails: if your functional and performance tests on the staging cluster fail and you encounter functional errors, performance degradations, or unexpected behavior in your staging environment after the maintenance update, then you must deny the production maintenance.
Deny a scheduled maintenance event
To deny a scheduled maintenance event for your production cluster, you must set the start date, end date, and the time of day that the interval begins and ends.
The start and end dates must be in the following format: YYYY-MM-DD. The start
date, end date, and time are all in the UTC time zone.
To use the gcloud CLI, you can install and initialize the Google Cloud CLI, or you can use Cloud Shell.
To add a deny maintenance period to an AlloyDB cluster, complete the following steps:
Run the
gcloud alloydb clusters updatecommand with thedeny-maintenance-period-start-date,deny-maintenance-period-end-date, anddeny-maintenance-period-timeflags:gcloud alloydb clusters update CLUSTER_ID \ --region LOCATION_ID \ --deny-maintenance-period-start-date START_DATE \ --deny-maintenance-period-end-date END_DATE \ --deny-maintenance-period-time TIMEReplace the following:
CLUSTER_ID: the cluster to configure for the maintenance-free period.LOCATION_ID: the Google Cloud region where this cluster is located—for example,us-central1.START_DATE: the maintenance-free period start date inYYYY-MM-DDUTC format.END_DATE: the end of the maintenance-free period inYYYY-MM-DDUTC format.TIME: the time of the maintenance-free period inHH:MMUTC format. The hours are represented in the 24-hour format where values range from00:00to23:59—for example,16:45.
Document all issues, including error messages, performance metrics, and steps to reproduce the issues.
Open a high-priority support case with Google Cloud and provide all the documented issues. Google Cloud works with you to analyze and resolve the issues.
Production cluster updates
If the staging verification is successful and you allow the production maintenance to proceed, the updates occur during the scheduled maintenance window.
Verify the maintenance window
To monitor for upcoming maintenance events on your production cluster, follow these steps:
Console
Go to the Clusters page.
Click a cluster in the Resource Name column. It opens to the Overview page.
On the Overview page, in the Maintenance section, view the maintenance window details for your cluster.
Optional: On the Systems insights page, you can view the maintenance operation status details, such as the Events Timeline.
To view Unified Maintenance management, enter "Cloud Hub maintenance" in the search bar and select Maintenance. On this page, you can view a maintenance summary, Google-controlled maintenance, and planned maintenance details.
gcloud
To use the gcloud CLI, you can install and initialize the Google Cloud CLI, or you can use Cloud Shell.
Run the following using
gcloud alloydb clusters describe:
gcloud alloydb clusters describe PRODUCTION_CLUSTER_ID \
    --region=LOCATION_ID \
    --project=PROJECT_ID
If a maintenance event is planned, the output includes maintenanceSchedule
and a startTime. If you chose to receive notifications, you also receive
email notifications.
Monitor production during a maintenance window
Although Google Cloud automates the maintenance process, we recommend that you monitor your production environment for the following during the scheduled maintenance window:
- Application health: monitor application logs and health checks for any signs of disruption.
- Database connectivity: confirm that your applications can reconnect to the database after the interruption.
- AlloyDB metrics: use Google Cloud Monitoring to observe AlloyDB metrics—CPU, memory, connections, and replication lag—and to make sure that they return to expected levels after the update.
Post-maintenance update verification
After the maintenance update completes, verify your production environment for critical functionality and performance indicators.
- Key application functionality: run a smoke test of your most critical application features.
- Basic performance checks: review dashboards for spikes in latency or resource consumption.