Vertex AI Agent Engine, yang merupakan bagian dari Vertex AI Platform, adalah serangkaian layanan yang memungkinkan developer men-deploy, mengelola, dan menskalakan agen AI dalam produksi. Agent Engine menangani infrastruktur untuk menskalakan agen dalam produksi sehingga Anda dapat berfokus pada pembuatan aplikasi. Vertex AI Agent Engine menawarkan layanan berikut yang dapat Anda gunakan secara terpisah atau bersamaan:
Runtime:
- Deploy dan menskalakan agen dengan kemampuan pengelolaan menyeluruh dan runtime terkelola.
- Sesuaikan image container agen dengan skrip penginstalan waktu build untuk dependensi sistem.
- Gunakan fitur keamanan termasuk kepatuhan VPC-SC dan konfigurasi autentikasi dan IAM.
- Akses model dan alat seperti panggilan fungsi.
- Men-deploy agen yang dibuat menggunakan framework Python yang berbeda dan protokol terbuka Agent2Agent.
- Pahami perilaku agen dengan Google Cloud Trace (mendukung OpenTelemetry), Cloud Monitoring, dan Cloud Logging.
Kualitas dan evaluasi (Pratinjau): Evaluasi kualitas agen dengan layanan Evaluasi AI Generatif terintegrasi dan optimalkan agen dengan menjalankan pelatihan model Gemini.
Contoh Toko (Pratinjau): Simpan dan ambil contoh few-shot secara dinamis untuk meningkatkan performa agen.
Sesi (Pratinjau): Sesi Agent Engine memungkinkan Anda menyimpan setiap interaksi antara pengguna dan agen, sehingga memberikan sumber pasti untuk konteks percakapan.
Bank Memori (Pratinjau): Bank Memori Agent Engine memungkinkan Anda menyimpan dan mengambil informasi dari sesi untuk mempersonalisasi interaksi agen.
Eksekusi Kode (Pratinjau): Eksekusi Kode Agent Engine memungkinkan agen Anda menjalankan kode di lingkungan sandbox yang aman, terisolasi, dan terkelola.

Vertex AI Agent Engine adalah bagian dari Vertex AI Agent Builder, serangkaian fitur untuk menemukan, membangun, dan men-deploy agen AI.
Membuat dan men-deploy di Vertex AI Agent Engine
Catatan: Untuk pengalaman pengembangan dan deployment berbasis IDE yang disederhanakan dengan Vertex AI Agent Engine, pertimbangkan agent-starter-pack. MLOps menyediakan template siap pakai, UI bawaan untuk eksperimen, serta menyederhanakan deployment, operasi, evaluasi, penyesuaian, dan kemampuan pengamatan.
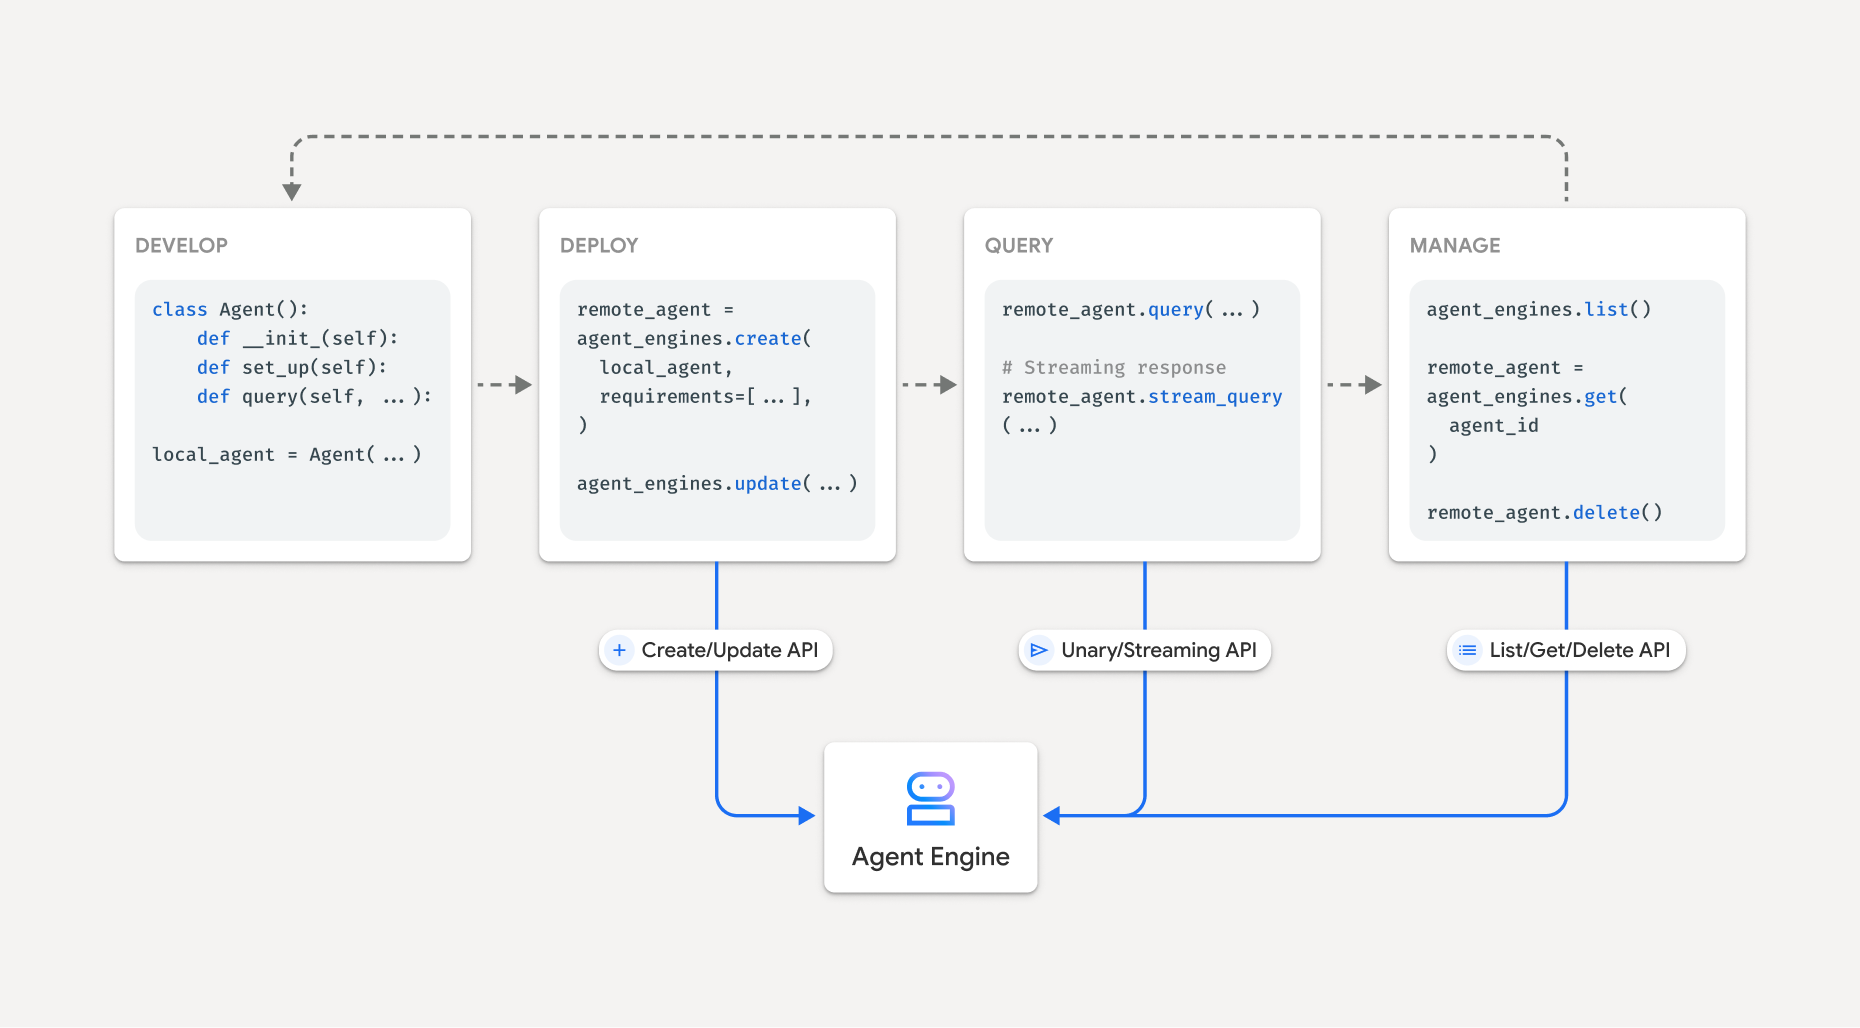
Alur kerja untuk membangun agen di Vertex AI Agent Engine adalah:
| Langkah | Deskripsi |
|---|---|
| 1. Menyiapkan lingkungan | Siapkan project Google Anda dan instal Vertex AI SDK untuk Python versi terbaru. |
| 2. Mengembangkan agen | Mengembangkan agen yang dapat di-deploy di Vertex AI Agent Engine. |
| 3. Men-deploy agen | Men-deploy agen di runtime terkelola Vertex AI Agent Engine. |
| 4. Menggunakan agen | Kueri agen dengan mengirim permintaan API. |
| 5. Mengelola agen yang di-deploy | Mengelola dan menghapus agen yang telah Anda deploy ke Vertex AI Agent Engine. |
Langkah-langkahnya diilustrasikan oleh diagram berikut:
Framework yang didukung
Tabel berikut menjelaskan tingkat dukungan yang diberikan Vertex AI Agent Engine untuk berbagai framework agen:
| Level dukungan | Framework agen |
|---|---|
| Template kustom: Anda dapat menyesuaikan template kustom untuk mendukung deployment ke Vertex AI Agent Engine dari framework Anda. | CrewAI, framework kustom |
| Integrasi Vertex AI SDK: Vertex AI Agent Engine menyediakan template terkelola per framework di Vertex AI SDK dan dokumentasi. | AG2, LlamaIndex |
| Integrasi penuh: Fitur diintegrasikan untuk berfungsi di seluruh framework, Vertex AI Agent Engine, dan ekosistem Google Cloud yang lebih luas. | Agent Development Kit (ADK), LangChain, LangGraph |
Men-deploy dalam produksi dengan Agent Starter Pack
Agent Starter Pack adalah kumpulan template agen AI generatif siap produksi yang dibuat untuk Vertex AI Agent Engine. Paket Pemula Agen menyediakan hal berikut:
- Template agen siap pakai: ReAct, RAG, multi-agen, dan template lainnya.
- Playground interaktif: Uji dan berinteraksi dengan agen Anda.
- Infrastruktur otomatis: Menggunakan Terraform untuk pengelolaan resource yang efisien.
- Pipeline CI/CD: Alur kerja deployment otomatis yang memanfaatkan Cloud Build.
- Kemampuan observasi: Dukungan bawaan untuk Cloud Trace dan Cloud Logging.
Untuk memulai, lihat Panduan memulai.
Kasus penggunaan
Untuk mempelajari Vertex AI Agent Engine dengan contoh end-to-end, lihat referensi berikut:
| Kasus Penggunaan | Deskripsi | Link |
|---|---|---|
| Membangun agen dengan terhubung ke API publik | Mengonversi antar-mata uang. Buat fungsi yang terhubung ke aplikasi pertukaran mata uang, sehingga model dapat memberikan jawaban yang akurat untuk kueri seperti "Berapa nilai tukar euro terhadap dolar hari ini?" |
Notebook Vertex AI SDK for Python - Pengantar Membangun dan Men-deploy Agen dengan Vertex AI Agent Engine |
| Mendesain project surya komunitas. Identifikasi potensi lokasi, cari kantor pemerintah dan pemasok yang relevan, serta tinjau gambar satelit dan potensi tenaga surya di wilayah dan bangunan untuk menemukan lokasi optimal untuk memasang panel surya Anda. |
Notebook Vertex AI SDK for Python - Membangun dan Men-deploy Agen Google Maps API dengan Vertex AI Agent Engine | |
| Membangun agen dengan menghubungkan ke database | Integrasi dengan AlloyDB dan Cloud SQL untuk PostgreSQL. | Postingan blog - Mengumumkan LangChain di Vertex AI untuk AlloyDB dan Cloud SQL untuk PostgreSQL Notebook Vertex AI SDK untuk Python - Deploying a RAG Application with Cloud SQL for PostgreSQL to Vertex AI Agent Engine Notebook Vertex AI SDK untuk Python - Deploying a RAG Application with AlloyDB for PostgreSQL to Vertex AI Agent Engine |
| Bangun agen dengan alat yang mengakses data di database Anda. | Notebook Vertex AI SDK for Python - Deploying an Agent with Vertex AI Agent Engine and MCP Toolbox for Databases | |
| Buat kueri dan pahami penyimpanan data terstruktur menggunakan natural language. | Notebook Vertex AI SDK for Python - Membangun Agen Penelusuran Percakapan dengan Vertex AI Agent Engine dan RAG di Vertex AI Search | |
| Membuat kueri dan memahami database grafik menggunakan natural language | Postingan blog - GraphRAG dan agen AI GenAI menggunakan Vertex AI Agent Engine dengan LangChain dan Neo4j | |
| Membuat kueri dan memahami penyimpanan vektor menggunakan natural language | Postingan blog - Menyederhanakan RAG GenAI dengan MongoDB Atlas dan Vertex AI Agent Engine | |
| Membangun agen dengan Agent Development Kit | Bangun dan deploy agen menggunakan Agent Development Kit. | Agent Development Kit -- Deploy ke Vertex AI Agent Engine |
| Kelola konteks dengan Sesi dan Bank Memori Vertex AI Agent Engine dalam mode ekspres Vertex AI tanpa penagihan. | Agent Development Kit -- Sesi dan Bank Memori Vertex AI Agent Engine dalam mode ekspres Vertex AI. | |
| Membangun agen dengan framework OSS | Bangun dan deploy agen menggunakan framework open source OneTwo. | Postingan blog - OneTwo dan Vertex AI Agent Engine: menjelajahi pengembangan agen AI tingkat lanjut di Google Cloud |
| Bangun dan deploy agen menggunakan framework open source LangGraph. | Notebook Vertex AI SDK for Python - Membangun dan Men-deploy Aplikasi LangGraph dengan Vertex AI Agent Engine | |
| Melakukan proses debug dan mengoptimalkan agen | Bangun dan lacak agen menggunakan OpenTelemetry dan Cloud Trace. | Notebook Vertex AI SDK for Python - Debugging dan Mengoptimalkan Agen: Panduan untuk Melakukan Tracing di Vertex AI Agent Engine |
| Membangun sistem multi-agen dengan protokol A2A (pratinjau) | Buat agen yang dapat beroperasi dan berkomunikasi serta berkolaborasi dengan agen lain, terlepas dari framework-nya. | Untuk mengetahui informasi selengkapnya, lihat dokumentasi protokol A2A. |
Keamanan perusahaan
Vertex AI Agent Engine mendukung beberapa fitur untuk membantu Anda memenuhi persyaratan keamanan perusahaan, mematuhi kebijakan keamanan organisasi Anda, dan mengikuti praktik terbaik keamanan. Fitur berikut didukung:
Kontrol Layanan VPC: Vertex AI Agent Engine mendukung Kontrol Layanan VPC untuk memperkuat keamanan data dan mengurangi risiko pemindahan data yang tidak sah. Jika Kontrol Layanan VPC dikonfigurasi, agen yang di-deploy akan mempertahankan akses aman ke API dan layanan Google, seperti BigQuery API, Cloud SQL Admin API, dan Vertex AI API, sehingga memverifikasi operasi yang lancar dalam perimeter yang Anda tentukan. Yang penting, Kontrol Layanan VPC secara efektif memblokir semua akses internet publik, membatasi pergerakan data ke batas jaringan yang diizinkan dan secara signifikan meningkatkan postur keamanan perusahaan Anda.
Antarmuka Private Service Connect: Untuk Vertex AI Agent Engine Runtime, PSC-I memungkinkan agen Anda berinteraksi dengan layanan yang dihosting secara pribadi di VPC pengguna. Untuk mengetahui informasi selengkapnya, lihat Menggunakan antarmuka Private Service Connect dengan Vertex AI Agent Engine.
Kunci enkripsi yang dikelola pelanggan (CMEK): Vertex AI Agent Engine mendukung CMEK untuk melindungi data Anda dengan kunci enkripsi Anda sendiri, sehingga Anda memiliki kepemilikan dan kontrol penuh atas kunci yang melindungi data Anda dalam penyimpanan di Google Cloud. Untuk mengetahui informasi selengkapnya, lihat CMEK Agent Engine.
Residensi data (DRZ): Vertex AI Agent Engine mendukung Residensi data (DRZ) untuk memastikan bahwa semua data dalam penyimpanan dan yang digunakan disimpan dalam region yang ditentukan.
HIPAA: Sebagai bagian dari Vertex AI Platform, Vertex AI Agent Engine mendukung beban kerja HIPAA.
Transparansi Akses: Transparansi Akses memberi Anda log yang mencatat tindakan yang dilakukan personel Google saat mengakses konten Anda. Untuk mengetahui informasi selengkapnya tentang cara mengaktifkan Transparansi Akses untuk Vertex AI Agent Engine, lihat Transparansi Akses di Vertex AI.
Tabel berikut menunjukkan fitur keamanan perusahaan yang didukung untuk setiap layanan Agent Engine:
| Fitur keamanan | Runtime | Sesi | Bank Memori | Contoh Toko | Mengeksekusi kode |
|---|---|---|---|---|---|
| Kontrol Layanan VPC | Ya | Ya | Ya | Tidak | Tidak |
| Kunci enkripsi yang dikelola pelanggan | Ya | Ya | Ya | Tidak | Tidak |
| Residensi data (DRZ) dalam penyimpanan | Ya | Ya | Ya | Tidak | Tidak |
| Residensi data (DRZ) yang digunakan | Tidak | Ya | Ya* | Tidak | Ya |
| HIPAA | Ya | Ya | Ya | Ya | Tidak |
| Transparansi Akses | Ya | Ya | Ya | Tidak | Tidak |
* Hanya saat menggunakan endpoint regional Gemini.
Region yang didukung
Vertex AI Agent Engine Runtime, Agent Engine Sessions, dan Vertex AI Agent Engine Memory Bank didukung di wilayah berikut:
| Wilayah | Lokasi | Versi yang didukung |
|---|---|---|
us-central1 |
Iowa | v1 didukung untuk fitur GA. v1beta1 didukung untuk fitur Pratinjau. |
us-east4 |
Northern Virginia | v1 didukung untuk fitur GA. v1beta1 didukung untuk fitur Pratinjau. |
us-west1 |
Oregon | v1 didukung untuk fitur GA. v1beta1 didukung untuk fitur Pratinjau. |
europe-west1 |
Belgia | v1 didukung untuk fitur GA. v1beta1 didukung untuk fitur Pratinjau. |
europe-west2 |
London | v1 didukung untuk fitur GA. v1beta1 didukung untuk fitur Pratinjau. |
europe-west3 |
Frankfurt | v1 didukung untuk fitur GA. v1beta1 didukung untuk fitur Pratinjau. |
europe-west4 |
Belanda | v1 didukung untuk fitur GA. v1beta1 didukung untuk fitur Pratinjau. |
europe-southwest1 |
Madrid | v1 didukung untuk fitur GA. v1beta1 didukung untuk fitur Pratinjau. |
asia-east1 |
Taiwan | v1 didukung untuk fitur GA. v1beta1 didukung untuk fitur Pratinjau. |
asia-northeast1 |
Tokyo | v1 didukung untuk fitur GA. v1beta1 didukung untuk fitur Pratinjau. |
asia-south1 |
Mumbai | v1 didukung untuk fitur GA. v1beta1 didukung untuk fitur Pratinjau. |
asia-southeast1 |
Singapura | v1 didukung untuk fitur GA. v1beta1 didukung untuk fitur Pratinjau. |
australia-southeast2 |
Melbourne | v1 didukung untuk fitur GA. v1beta1 didukung untuk fitur Pratinjau. |
Untuk Eksekusi Kode Agent Engine (Pratinjau), region berikut didukung.
| Wilayah | Lokasi | Versi yang didukung |
|---|---|---|
us-central1 |
Iowa | Versi v1beta1 didukung. |
Kuota
Batas berikut berlaku untuk Vertex AI Agent Engine untuk project tertentu di setiap region:| Deskripsi | Batas |
|---|---|
| Membuat, menghapus, atau memperbarui Agent Engine Vertex AI per menit | 10 |
| Membuat, menghapus, atau memperbarui sesi Vertex AI Agent Engine per menit | 100 |
Query atau StreamQuery Vertex AI Agent Engine per menit |
90 |
| Menambahkan peristiwa ke sesi Vertex AI Agent Engine per menit | 300 |
| Jumlah maksimum resource Vertex AI Agent Engine | 100 |
| Membuat, menghapus, atau memperbarui resource memori Vertex AI Agent Engine per menit | 100 |
| Mendapatkan, mencantumkan, atau mengambil dari Vertex AI Agent Engine Memory Bank per menit | 300 |
| Permintaan eksekusi per menit di lingkungan sandbox (Eksekusi Kode) | 1000 |
| Entitas lingkungan sandbox (Eksekusi Kode) per region | 1000 |
Permintaan postingan Agen A2A seperti sendMessage dan cancelTaskper menit |
60 |
Permintaan pengambilan Agen A2A seperti getTask dan getCard per menit |
600 |
Koneksi dua arah live serentak menggunakan BidiStreamQuery API per menit |
10 |
Harga
Untuk mengetahui informasi tentang harga Agent Engine Runtime, lihat harga Vertex AI.
Migrasi ke SDK berbasis klien
Modul agent_engines dalam Vertex AI SDK untuk Python sedang di-refactor ke desain berbasis klien karena alasan utama berikut:
- Untuk menyelaraskan dengan Google ADK dan Google Gen AI SDK dalam representasi jenis kanonis. Hal ini memastikan cara yang konsisten dan standar untuk merepresentasikan jenis data di berbagai SDK, yang menyederhanakan interoperabilitas dan mengurangi overhead konversi.
- Untuk cakupan tingkat klien dari Google Cloud parameter dalam aplikasi multi-project multi-lokasi. Hal ini memungkinkan aplikasi mengelola interaksi dengan resource di berbagai project Google Cloud dan lokasi geografis dengan mengonfigurasi setiap instance klien dengan setelan project dan lokasi tertentu.
- Untuk meningkatkan kemudahan penemuan dan kohesi layanan Vertex AI Agent Engine