Vertex AI Agent Engine, a part of the Vertex AI Platform, is a set of services that enables developers to deploy, manage, and scale AI agents in production. Agent Engine handles the infrastructure to scale agents in production so you can focus on creating applications. Vertex AI Agent Engine offers the following services that you can use individually or in combination:
Runtime:
- Deploy and scale agents with a managed runtime and end-to-end management capabilities.
- Customize the agent's container image with build-time installation scripts for system dependencies.
- Use security features including VPC-SC compliance and configuration of authentication and IAM.
- Access models and tools such as function calling.
- Deploy agents built using different Python frameworks and the Agent2Agent open protocol.
- Understand agent behavior with Google Cloud Trace (supporting OpenTelemetry), Cloud Monitoring, and Cloud Logging.
Quality and evaluation (Preview): Evaluate agent quality with the integrated Gen AI Evaluation service and optimize agents with Gemini model training runs.
Example Store (Preview): Store and dynamically retrieve few-shot examples to improve agent performance.
Sessions (Preview): Agent Engine Sessions lets you store individual interactions between users and agents, providing definitive sources for conversation context.
Memory Bank (Preview): Agent Engine Memory Bank lets you store and retrieve information from sessions to personalize agent interactions.
Code Execution (Preview): Agent Engine Code Execution lets your agent run code in a secure, isolated, and managed sandbox environment.

Vertex AI Agent Engine is part of Vertex AI Agent Builder, a suite of features for discovering, building, and deploying AI agents.
Create and deploy on Vertex AI Agent Engine
Note: For a streamlined, IDE-based development and deployment experience with Vertex AI Agent Engine, consider the agent-starter-pack. It provides ready-to-use templates, a built-in UI for experimentation, and simplifies deployment, operations, evaluation, customization, and observability.
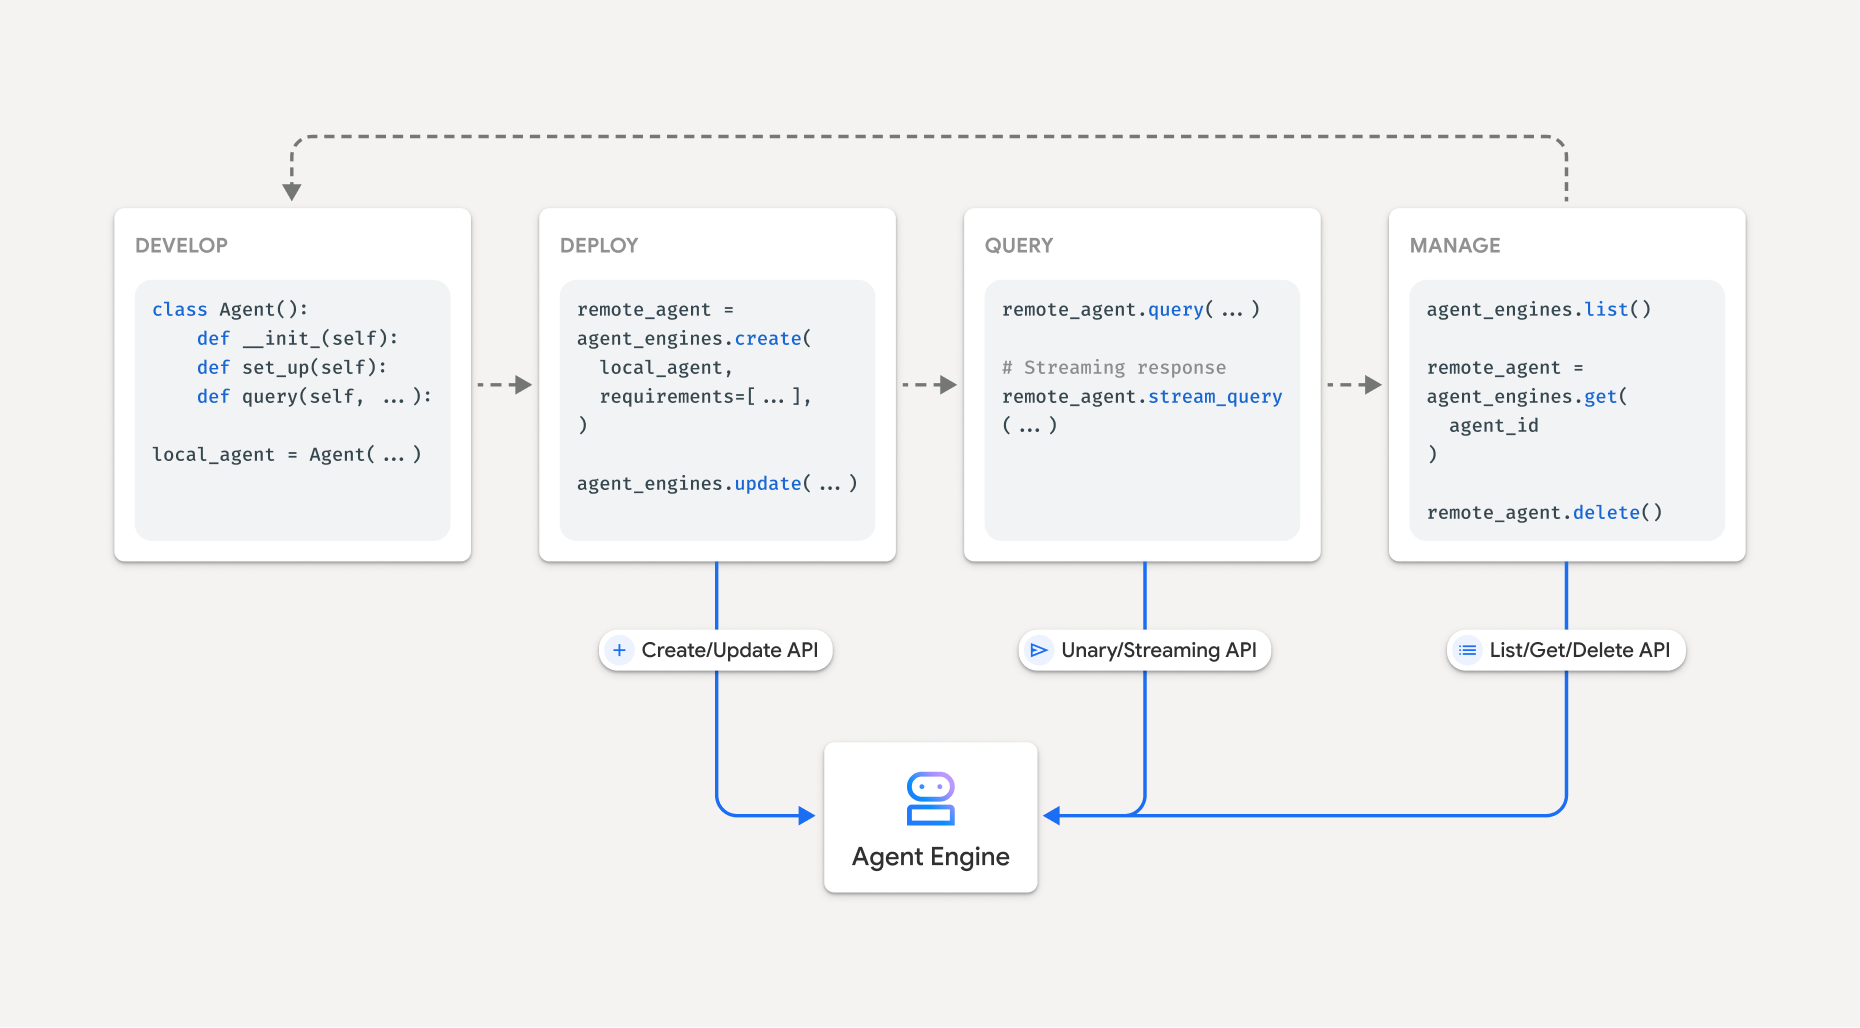
The workflow for building an agent on Vertex AI Agent Engine is:
| Steps | Description |
|---|---|
| 1. Set up the environment | Set up your Google project and install the latest version of the Vertex AI SDK for Python. |
| 2. Develop an agent | Develop an agent that can be deployed on Vertex AI Agent Engine. |
| 3. Deploy the agent | Deploy the agent on the Vertex AI Agent Engine managed runtime. |
| 4. Use the agent | Query the agent by sending an API request. |
| 5. Manage the deployed agent | Manage and delete agents that you have deployed to Vertex AI Agent Engine. |
The steps are illustrated by the following diagram:
Supported frameworks
The following table describes the level of support Vertex AI Agent Engine provides for various agent frameworks:
| Support level | Agent frameworks |
|---|---|
| Custom template: You can adapt a custom template to support deployment to Vertex AI Agent Engine from your framework. | CrewAI, custom frameworks |
| Vertex AI SDK integration: Vertex AI Agent Engine provides managed templates per framework in the Vertex AI SDK and documentation. | AG2, LlamaIndex |
| Full integration: Features are integrated to work across the framework, Vertex AI Agent Engine, and broader Google Cloud ecosystem. | Agent Development Kit (ADK), LangChain, LangGraph |
Deploy in production with Agent Starter Pack
The Agent Starter Pack is a collection of production-ready generative AI agent templates built for Vertex AI Agent Engine. The Agent Starter Pack provides the following:
- Pre-built agent templates: ReAct, RAG, multi-agent, and other templates.
- Interactive playground: Test and interact with your agent.
- Automated infrastructure: Uses Terraform for streamlined resource management.
- CI/CD pipelines: Automated deployment workflows leveraging Cloud Build.
- Observability: Built-in support for Cloud Trace and Cloud Logging.
To get started, see the Quickstart.
Use cases
To learn about Vertex AI Agent Engine with end-to-end examples, see the following resources:
| Use Case | Description | Links |
|---|---|---|
| Build agents by connecting to public APIs | Convert between currencies. Create a function that connects to a currency exchange app, allowing the model to provide accurate answers to queries such as "What's the exchange rate for euros to dollars today?" |
Vertex AI SDK for Python notebook - Intro to Building and Deploying an Agent with Vertex AI Agent Engine |
| Designing a community solar project. Identify potential locations, look up relevant government offices and suppliers, and review satellite images and solar potential of regions and buildings to find the optimal location to install your solar panels. |
Vertex AI SDK for Python notebook - Building and Deploying a Google Maps API Agent with Vertex AI Agent Engine | |
| Build agents by connecting to databases | Integration with AlloyDB and Cloud SQL for PostgreSQL. | Blog post - Announcing LangChain on Vertex AI Agent Builder for AlloyDB and Cloud SQL for PostgreSQL Vertex AI SDK for Python notebook - Deploying a RAG Application with Cloud SQL for PostgreSQL to Vertex AI Agent Engine Vertex AI SDK for Python notebook - Deploying a RAG Application with AlloyDB for PostgreSQL to Vertex AI Agent Engine |
| Build agents with tools that access data in your database. | Vertex AI SDK for Python notebook - Deploying an Agent with Vertex AI Agent Engine and MCP Toolbox for Databases | |
| Query and understand structured datastores using natural language. | Vertex AI SDK for Python notebook - Building a Conversational Search Agent with Vertex AI Agent Engine and RAG on Vertex AI Search | |
| Query and understand graph databases using natural language | Blog post - GenAI GraphRAG and AI agents using Vertex AI Agent Engine with LangChain and Neo4j | |
| Query and understand vector stores using natural language | Blog post - Simplify GenAI RAG with MongoDB Atlas and Vertex AI Agent Engine | |
| Build agents with Agent Development Kit | Build and deploy agents using Agent Development Kit. | Agent Development Kit -- Deploy to Vertex AI Agent Engine |
| Manage context with Vertex AI Agent Engine Sessions and Memory Bank in Vertex AI express mode without billing. | Agent Development Kit -- Vertex AI Agent Engine Sessions and Memory Bank in Vertex AI express mode. | |
| Build agents with OSS frameworks | Build and deploy agents using the OneTwo open-source framework. | Blog post - OneTwo and Vertex AI Agent Engine: exploring advanced AI agent development on Google Cloud |
| Build and deploy agents using the LangGraph open-source framework. | Vertex AI SDK for Python notebook - Building and Deploying a LangGraph Application with Vertex AI Agent Engine | |
| Debugging and optimizing agents | Build and trace agents using OpenTelemetry and Cloud Trace. | Vertex AI SDK for Python notebook - Debugging and Optimizing Agents: A Guide to Tracing in Vertex AI Agent Engine |
| Build multi-agent systems with A2A protocol (preview) | Build interoperable agents that communicate and collaborate with other agents regardless of their framework. | For more information, see the A2A protocol documentation. |
Enterprise security
Vertex AI Agent Engine supports several features to help you meet enterprise security requirements, adhere to your organization's security policies, and follow security best practices. The following features are supported:
VPC Service Controls: Vertex AI Agent Engine supports VPC Service Controls to strengthen data security and mitigate the risks of data exfiltration. When VPC Service Controls is configured, the deployed agent retains secure access to Google APIs and services, such as BigQuery API, Cloud SQL Admin API, and Vertex AI API, verifying seamless operation within your defined perimeter. Critically, VPC Service Controls effectively blocks all public internet access, confining data movement to your authorized network boundaries and significantly enhancing your enterprise security posture.
Private Service Connect interface: For Vertex AI Agent Engine Runtime, PSC-I lets your agents interact with privately hosted services in a user's VPC. For more information, see Using Private Service Connect interface with Vertex AI Agent Engine.
Customer-managed encryption keys (CMEK): Vertex AI Agent Engine supports CMEK to protect your data with your own encryption keys, which gives you ownership and full control of the keys that protect your data at rest in Google Cloud. For more information, see Agent Engine CMEK.
Data residency (DRZ): Vertex AI Agent Engine supports Data residency (DRZ) to ensure that all data at rest and in use are stored within the specified region.
HIPAA: As a part of Vertex AI Platform, Vertex AI Agent Engine supports HIPAA workloads.
Access Transparency: Access Transparency provides you with logs that capture the actions Google personnel take when accessing your content. For more information about how to enable Access Transparency for Vertex AI Agent Engine, see Access Transparency in Vertex AI.
The following table shows which enterprise security features are supported for each Agent Engine service:
| Security feature | Runtime | Sessions | Memory Bank | Example Store | Code Execution |
|---|---|---|---|---|---|
| VPC Service Controls | Yes | Yes | Yes | No | No |
| Customer-managed encryption keys | Yes | Yes | Yes | No | No |
| Data residency (DRZ) at rest | Yes | Yes | Yes | No | No |
| Data residency (DRZ) in use | No | Yes | Yes* | No | Yes |
| HIPAA | Yes | Yes | Yes | Yes | No |
| Access Transparency | Yes | Yes | Yes | No | No |
* Only when using a Gemini regional endpoint.
Supported regions
See Locations for a list of supported regions for Vertex AI Agent Engine.
Quota
See Quota and system limits for Vertex AI Agent Engine quota information.
Pricing
For information about pricing for Agent Engine Runtime, see Vertex AI pricing.
Migration to the client-based SDK
The agent_engines module within the Vertex AI SDK for Python is being refactored to a
client-based design for the following key reasons:
- To align with Google ADK and Google Gen AI SDK in canonical type representations. This ensures a consistent and standardized way of representing data types across different SDKs, which simplifies interoperability and reduces conversion overhead.
- For client-level scoping of Google Cloud parameters in multi-project multi-location applications. This allows an application to manage interactions with resources across different Google Cloud projects and geographical locations by configuring each client instance with its specific project and location settings.
- To improve discoverability and cohesiveness of Vertex AI Agent Engine services