In Cloud Service Mesh 1.5 and later, auto mutual TLS (auto mTLS) is enabled by default. With auto mTLS, a client sidecar proxy automatically detects if the server has a sidecar. The client sidecar sends mTLS to workloads with sidecars and sends plaintext to workloads without sidecars. Note, however, services accept both plaintext and mTLS traffic. As you inject sidecar proxies to your Pods, we recommend that you also configure your services to only accept mTLS traffic.
With Cloud Service Mesh, you can enforce mTLS, outside of your application code, by applying a single YAML file. Cloud Service Mesh gives you the flexibility to apply an authentication policy to the entire service mesh, to a namespace, or to an individual workload.

Costs
In this document, you use the following billable components of Google Cloud:
To generate a cost estimate based on your projected usage,
use the pricing calculator.
When you finish this tutorial, you can avoid ongoing costs by deleting the resources you created. For more information, see Clean up.
Before you begin
Provision Cloud Service Mesh on a GKE cluster. There are various supported setup methods:
Clone the repository:
git clone https://github.com/GoogleCloudPlatform/anthos-service-mesh-samples
cd anthos-service-mesh-samples
Deploy an ingress gateway
Set the current context for
kubectlto the cluster:gcloud container clusters get-credentials CLUSTER_NAME \ --project=PROJECT_ID \ --zone=CLUSTER_LOCATIONCreate a namespace for your ingress gateway:
kubectl create namespace asm-ingressEnable the namespace for injection. The steps depend on your control plane implementation.
Managed (TD)
Apply the default injection label to the namespace:
kubectl label namespace asm-ingress \
    istio.io/rev- istio-injection=enabled --overwrite
Managed (Istiod)
Recommended: Run the following command to apply the default injection label to the namespace:
  kubectl label namespace asm-ingress \
      istio.io/rev- istio-injection=enabled --overwrite
If you are an existing user with the Managed Istiod control plane: We recommend that you use default injection, but revision-based injection is supported. Use the following instructions:
Run the following command to locate the available release channels:
kubectl -n istio-system get controlplanerevisionThe output is similar to the following:
NAME AGE asm-managed-rapid 6d7hIn the output, the value under the
NAMEcolumn is the revision label that corresponds to the available release channel for the Cloud Service Mesh version.Apply the revision label to the namespace:
kubectl label namespace asm-ingress \
    istio-injection- istio.io/rev=REVISION_LABEL --overwrite
Deploy the example gateway in the
anthos-service-mesh-samplesrepository:kubectl apply -n asm-ingress \ -f docs/shared/asm-ingress-gatewayExpected output:
serviceaccount/asm-ingressgateway configured
service/asm-ingressgateway configured
deployment.apps/asm-ingressgateway configured
gateway.networking.istio.io/asm-ingressgateway configured
Deploy the Online Boutique sample application
If you haven't, set the current context for
kubectlto the cluster:gcloud container clusters get-credentials CLUSTER_NAME \ --project=PROJECT_ID \ --zone=CLUSTER_LOCATIONCreate the namespace for the sample application:
kubectl create namespace onlineboutiqueLabel the
onlineboutiquenamespace to automatically inject Envoy proxies. Follow the steps to enable automatic sidecar injection.Deploy the sample app, the
VirtualServicefor the frontend, and service accounts for the workloads. For this tutorial, you will deploy Online Boutique, a microservice demo app.kubectl apply \ -n onlineboutique \ -f docs/shared/online-boutique/virtual-service.yaml kubectl apply \ -n onlineboutique \ -f docs/shared/online-boutique/service-accounts
View your services
View the pods in the
onlineboutiquenamespace:kubectl get pods -n onlineboutiqueExpected output:
NAME                                     READY   STATUS    RESTARTS   AGE
adservice-85598d856b-m84m6               2/2     Running   0          2m7s
cartservice-c77f6b866-m67vd              2/2     Running   0          2m8s
checkoutservice-654c47f4b6-hqtqr         2/2     Running   0          2m10s
currencyservice-59bc889674-jhk8z         2/2     Running   0          2m8s
emailservice-5b9fff7cb8-8nqwz            2/2     Running   0          2m10s
frontend-77b88cc7cb-mr4rp                2/2     Running   0          2m9s
loadgenerator-6958f5bc8b-55q7w           2/2     Running   0          2m8s
paymentservice-68dd9755bb-2jmb7          2/2     Running   0          2m9s
productcatalogservice-84f95c95ff-c5kl6   2/2     Running   0          114s
recommendationservice-64dc9dfbc8-xfs2t   2/2     Running   0          2m9s
redis-cart-5b569cd47-cc2qd               2/2     Running   0          2m7s
shippingservice-5488d5b6cb-lfhtt         2/2     Running   0          2m7s
All of the pods for your application should be up and running, with a
2/2in theREADYcolumn. This indicates that the pods have an Envoy sidecar proxy injected successfully. If it does not show2/2after a couple of minutes, visit the Troubleshooting guide.Get the external IP, and set it to a variable:
kubectl get services -n asm-ingress
export FRONTEND_IP=$(kubectl --namespace asm-ingress \
get service --output jsonpath='{.items[0].status.loadBalancer.ingress[0].ip}' \
)
You see output similar to the following:
NAME                   TYPE           CLUSTER-IP      EXTERNAL-IP   PORT(S)                                      AGE
asm-ingressgateway   LoadBalancer   10.19.247.233   35.239.7.64   80:31380/TCP,443:31390/TCP,31400:31400/TCP   27m
Visit the
EXTERNAL-IPaddress in your web browser. You should expect to see the Online Boutique shop in your browser.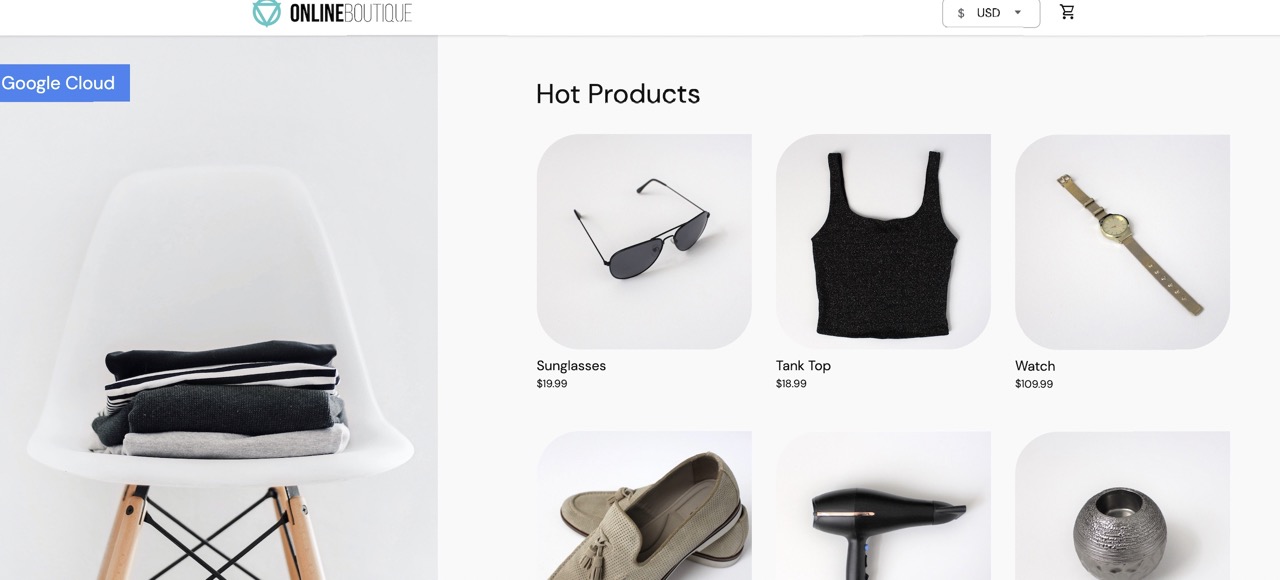
Create a TestCurl pod
Create a TestCurl pod to send plaintext traffic for testing.
  apiVersion: v1
  kind: Pod
  metadata:
    name: testcurl
    namespace: default
    annotations:
      sidecar.istio.io/inject: "false"
  spec:
    containers:
    - name: curl
      image: curlimages/curl
      command: ["sleep", "600"]
Access Online Boutique
Set the current context for
kubectlto the cluster where you deployed Online Boutique:gcloud container clusters get-credentials CLUSTER_NAME \ --project=PROJECT_ID \ --zone=CLUSTER_LOCATIONList the services in the
frontendnamespace:kubectl get services -n frontendNotice that
frontend-externalis aLoadBalancer, and it has an external IP address. The sample application includes a service that is a load balancer so that it can be deployed on GKE without Cloud Service Mesh.Visit the application in your browser using the external IP address of the
frontend-externalservice:http://FRONTEND_EXTERNAL_IP/Cloud Service Mesh provides you the ability to deploy an ingress gateway. You can also access the Online Boutique using the external IP address of the ingress gateway. Get the external IP of the gateway. Replace the placeholders with the following information:
- GATEWAY_SERVICE_NAME : The name of the ingress gateway
service. If you deployed the sample gateway without modification, or if
you deployed the
default ingress gateway,
the name is
istio-ingressgateway. - GATEWAY_NAMESPACE: The namespace in which you deployed
the ingress gateway. If you deployed the default ingress gateway, the
namespace is
istio-system.
kubectl get service GATEWAY_NAME -n GATEWAY_NAMESPACE- GATEWAY_SERVICE_NAME : The name of the ingress gateway
service. If you deployed the sample gateway without modification, or if
you deployed the
default ingress gateway,
the name is
Open another tab in your browser and visit the application using the external IP address of the ingress gateway:
http://INGRESS_GATEWAY_EXTERNAL_IP/Run the following command to
curlthefrontendservice with plain HTTP from another Pod. Because the services are in different namespaces, you need to curl the DNS name of thefrontendservice.kubectl debug --image istio/base --target istio-proxy -it \ $(kubectl get pod -l app=productcatalogservice -n product-catalog -o jsonpath={.items..metadata.name}) \ -n product-catalog -- \ curl http://frontend.frontend.svc.cluster.local:80/ -o /dev/null -s -w '%{http_code}\n'Your request succeeds with status
200, because by default, both TLS and plaintext traffic are accepted.
Enable mutual TLS per namespace
You enforce mTLS by applying a PeerAuthentication policy with kubectl.
Save the following authentication policy as
mtls-namespace.yaml.cat <<EOF > mtls-namespace.yaml apiVersion: "security.istio.io/v1beta1" kind: "PeerAuthentication" metadata: name: "namespace-policy" spec: mtls: mode: STRICT EOFThe line
mode: STRICTin the YAML configures the services to only accept mTLS. By default, themodeisPERMISSIVE, which configures services to accept both plaintext and mTLS.Apply the authentication policy to configure all Online Boutique services to only accept mTLS:
for ns in ad cart checkout currency email frontend loadgenerator \
     payment product-catalog recommendation shipping; do
kubectl apply -n $ns -f mtls-namespace.yaml
done
Expected output:
peerauthentication.security.istio.io/namespace-policy created
peerauthentication.security.istio.io/namespace-policy created
peerauthentication.security.istio.io/namespace-policy created
peerauthentication.security.istio.io/namespace-policy created
peerauthentication.security.istio.io/namespace-policy created
peerauthentication.security.istio.io/namespace-policy created
peerauthentication.security.istio.io/namespace-policy created
peerauthentication.security.istio.io/namespace-policy created
peerauthentication.security.istio.io/namespace-policy created
peerauthentication.security.istio.io/namespace-policy created
peerauthentication.security.istio.io/namespace-policy created
Go to the tab in your browser that accesses the Online Boutique using the external IP address of the
frontend-externalservice:http://FRONTEND_EXTERNAL_IP/Refresh the page. The browser displays the following error:
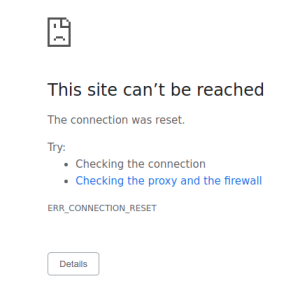
Refreshing the page causes plaintext to be sent to the
frontendservice. Because of theSTRICTauthentication policy, the sidecar proxy blocks the request to the service.Go to the tab in your browser that accesses the Online Boutique using the external IP address of the
istio-ingressgateway, and refresh the page, which displays successfully. When you access Online Boutique using the ingress gateway, the request takes the following path:
mTLS authentication flow:
- The browser sends a plaintext HTTP request to the server.
- The ingress gateway proxy container intercepts the request.
- The ingress gateway proxy performs a TLS handshake with the server-side proxy (the frontend service in this example). This handshake includes an exchange of certificates. These certs are pre-loaded into the proxy containers by Cloud Service Mesh.
- The ingress gateway proxy performs a secure naming check on the server's certificate, verifying that an authorized identity is running the server.
- The ingress gateway and server proxies establish a mutual TLS connection, and the server proxy forwards the request to the server application container (the frontend service).
Run the following command to
curlthefrontendservice with plain HTTP from another Pod.kubectl exec testcurl -n default -- curl \ http://frontend.frontend.svc.cluster.local:80/ -o /dev/null -s -w '%{http_code}\n'Your request fails as we are sending plaintext traffic from sidecar-less workload where STRICT
peerAuthenticationpolicy is applied.
Find and delete authentication policies
For a list of all the
PeerAuthenticationpolicies in the service mesh:kubectl get peerauthentication --all-namespacesThe output is similar to the following:
NAMESPACE         NAME               MODE     AGE
ad                namespace-policy   STRICT   17m
cart              namespace-policy   STRICT   17m
checkout          namespace-policy   STRICT   17m
currency          namespace-policy   STRICT   17m
email             namespace-policy   STRICT   17m
frontend          namespace-policy   STRICT   17m
loadgenerator     namespace-policy   STRICT   17m
payment           namespace-policy   STRICT   17m
product-catalog   namespace-policy   STRICT   17m
recommendation    namespace-policy   STRICT   17m
shipping          namespace-policy   STRICT   17m
Delete the authentication policy from all of the Online Boutique namespaces:
for ns in ad cart checkout currency email frontend loadgenerator payment \
  product-catalog recommendation shipping; do
    kubectl delete peerauthentication -n $ns namespace-policy
done;
Expected output:
peerauthentication.security.istio.io "namespace-policy" deleted
peerauthentication.security.istio.io "namespace-policy" deleted
peerauthentication.security.istio.io "namespace-policy" deleted
peerauthentication.security.istio.io "namespace-policy" deleted
peerauthentication.security.istio.io "namespace-policy" deleted
peerauthentication.security.istio.io "namespace-policy" deleted
peerauthentication.security.istio.io "namespace-policy" deleted
peerauthentication.security.istio.io "namespace-policy" deleted
peerauthentication.security.istio.io "namespace-policy" deleted
peerauthentication.security.istio.io "namespace-policy" deleted
peerauthentication.security.istio.io "namespace-policy" deleted
Access the Online Boutique using the external IP address of the
frontend-externalservice, and refresh the page. The page displays as expected.Run the following command to
curlthefrontendservice with plain HTTP from another Pod.kubectl debug --image istio/base --target istio-proxy -it \ $(kubectl get pod -l app=productcatalogservice -n product-catalog -o jsonpath={.items..metadata.name}) \ -n product-catalog -- \ curl http://frontend.frontend.svc.cluster.local:80/ -o /dev/null -s -w '%{http_code}\n'Your request succeeds with status
200, because by default, both TLS and plaintext traffic are accepted.
If you refresh the page in the Google Cloud console that displays the
Workloads list, it now shows that the mTLS status is Permissive.
Enable mutual TLS per workload
To set a PeerAuthentication policy for a specific workload, you must configure
the selector section and specify the labels that match the desired workload.
However, Cloud Service Mesh can't aggregate workload-level policies for outbound
mTLS traffic to a service. You need to configure a destination rule to manage
that behavior.
Apply an authentication policy to a specific workload. Notice how the following policy uses labels and selectors to target the specific
frontenddeployment.cat <<EOF | kubectl apply -n frontend -f - apiVersion: "security.istio.io/v1beta1" kind: "PeerAuthentication" metadata: name: "frontend" namespace: "frontend" spec: selector: matchLabels: app: frontend mtls: mode: STRICT EOFExpected output:
peerauthentication.security.istio.io/frontend created
Configure a matching destination rule.
cat <<EOF | kubectl apply -n frontend -f -
apiVersion: "networking.istio.io/v1alpha3"
kind: "DestinationRule"
metadata:
  name: "frontend"
spec:
  host: "frontend.demo.svc.cluster.local"
  trafficPolicy:
    tls:
      mode: ISTIO_MUTUAL
EOF
Expected output:
destinationrule.networking.istio.io/frontend created
Access the Online Boutique using the external IP address of the
frontend-externalservice, and refresh the page. The page doesn't display because because thefrontend serviceis set toSTRICTmTLS, and the sidecar proxy blocks the request.Run the following command to
curlthefrontendservice with plain HTTP from another Pod.kubectl exec testcurl -n default -- curl \ http://frontend.frontend.svc.cluster.local:80/ -o /dev/null -s -w '%{http_code}\n'Your request fails as we are sending plaintext traffic from sidecar-less workload where STRICT
peerAuthenticationpolicy is applied.Delete the authentication policy:
kubectl delete peerauthentication -n frontend frontendExpected output:
peerauthentication.security.istio.io "frontend" deletedDelete the destination rule:
kubectl delete destinationrule -n frontend frontendExpected output:
destinationrule.networking.istio.io "frontend" deleted
Enforcing mesh-wide mTLS
To prevent all your services in the mesh from accepting plaintext traffic, set
a mesh-wide PeerAuthentication policy with the mTLS mode set to STRICT.
The mesh-wide PeerAuthentication policy shouldn't have a selector and must be
applied in the root namespace, istio-system. When you deploy the policy, the
control plane automatically provisions TLS certificates so that workloads can
authenticate with each other.
Enforce mesh-wide mTLS:
kubectl apply -f - <<EOF
apiVersion: "security.istio.io/v1beta1"
kind: "PeerAuthentication"
metadata:
  name: "mesh-wide"
  namespace: "istio-system"
spec:
  mtls:
    mode: STRICT
EOF
Expected output:
peerauthentication.security.istio.io/mesh-wide created
Access the Online Boutique using the external IP address of the
frontend-externalservice, and refresh the page. The page doesn't display.Run the following command to
curlthefrontendservice with plain HTTP from another Pod.kubectl exec testcurl -n default -- curl \ http://frontend.frontend.svc.cluster.local:80/ -o /dev/null -s -w '%{http_code}\n'Your request fails as we are sending plaintext traffic from sidecar-less workload where STRICT
peerAuthenticationpolicy is applied.Delete the
mesh-widepolicy:kubectl delete peerauthentication -n istio-system mesh-wideExpected output:
peerauthentication.security.istio.io "mesh-wide" deleted
Clean up
To avoid incurring charges to your Google Cloud account for the resources used in this tutorial, either delete the project that contains the resources, or keep the project and delete the individual resources.
If you want to prevent additional charges, delete the cluster:
gcloud container clusters delete  CLUSTER_NAME  \
    --project=PROJECT_ID \
    --zone=CLUSTER_LOCATION
If you want to keep your cluster and remove the Online Boutique sample:
- Delete the application namespaces:
kubectl delete -f online-boutique/kubernetes-manifests/namespacesExpected output:
namespace "ad" deleted namespace "cart" deleted namespace "checkout" deleted namespace "currency" deleted namespace "email" deleted namespace "frontend" deleted namespace "loadgenerator" deleted namespace "payment" deleted namespace "product-catalog" deleted namespace "recommendation" deleted namespace "shipping" deleted- Delete the service entries:
kubectl delete -f online-boutique/istio-manifests/allow-egress-googleapis.yamlExpected output:
serviceentry.networking.istio.io "allow-egress-googleapis" deleted
serviceentry.networking.istio.io "allow-egress-google-metadata" deleted
What's next
- For a general guide on configuring
PeerAuthenticationpolicies, see Configuring transport security.