Tetap teratur dengan koleksi
Simpan dan kategorikan konten berdasarkan preferensi Anda.
Buat instance Deep Learning VM menggunakan konsol Google Cloud
Halaman ini menunjukkan cara membuat instance Deep Learning VM Images menggunakan Google Cloud Marketplace di konsol Google Cloud .
Sebelum memulai
Sign in to your Google Cloud account. If you're new to
Google Cloud,
create an account to evaluate how our products perform in
real-world scenarios. New customers also get $300 in free credits to
run, test, and deploy workloads.
In the Google Cloud console, on the project selector page,
select or create a Google Cloud project.
Klik Mulai. Jika Anda melihat jendela pemilihan project,
pilih project tempat instance akan dibuat. Jika ini pertama kalinya Anda meluncurkan VM Compute Engine, Anda harus menunggu hingga proses konfigurasi API awal selesai.
Di halaman New Deep Learning VM deployment, masukkan
Deployment name. Ini akan menjadi root nama mesin virtual Anda.
Compute Engine akan menambahkan -vm ke nama ini saat memberi nama instance Anda.
Pilih Zona, atau biarkan default.
Di bagian Machine type, pilih spesifikasi yang Anda inginkan untuk VM, atau biarkan default.
Di bagian GPU, pilih Jenis GPU dan Jumlah GPU,
atau biarkan nilai default.
Jika Anda tidak ingin menggunakan GPU,
klik tombol Hapus GPU.
Anda memiliki opsi untuk memilih Aktifkan akses ke JupyterLab melalui URL, bukan SSH (Beta). Dengan mengaktifkan fitur Beta ini, Anda dapat
mengakses instance
JupyterLab menggunakan URL. Siapa pun yang memiliki peran Editor atau Pemilik di project Google Cloud Anda dapat mengakses URL ini. Fitur ini hanya berfungsi di Amerika Serikat, Uni Eropa, dan Asia.
Pilih Framework machine learning, atau biarkan default.
Klik Deploy.
Anda baru saja membuat instance Deep Learning VM pertama Anda.
Setelah instance di-deploy, Google Cloud konsol akan membuka
halaman Deployment Manager
tempat Anda dapat mengelola
instance Deep Learning VM dan deployment lainnya.
Mengakses instance baru Anda
Setelah dibuat, instance Deep Learning VM akan otomatis dimulai. Untuk mengaksesnya:
Di kolom Name,
klik nama instance mesin virtual Anda.
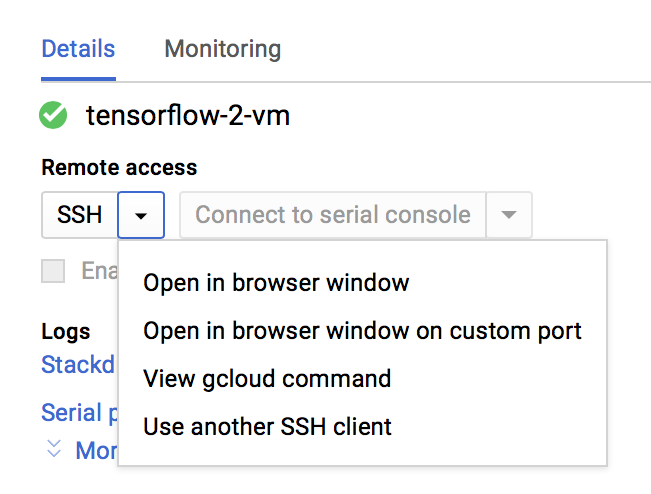
Di bagian Remote Access, klik menu drop-down pertama dan
pilih cara Anda ingin mengakses instance. Anda dapat memilih untuk berinteraksi
dengan antarmuka pengguna grafis atau di command line.
Compute Engine akan menyebarkan kunci SSH Anda dan membuat pengguna Anda. Untuk mengetahui informasi selengkapnya, lihat Menghubungkan ke Instance.
[[["Mudah dipahami","easyToUnderstand","thumb-up"],["Memecahkan masalah saya","solvedMyProblem","thumb-up"],["Lainnya","otherUp","thumb-up"]],[["Sulit dipahami","hardToUnderstand","thumb-down"],["Informasi atau kode contoh salah","incorrectInformationOrSampleCode","thumb-down"],["Informasi/contoh yang saya butuhkan tidak ada","missingTheInformationSamplesINeed","thumb-down"],["Masalah terjemahan","translationIssue","thumb-down"],["Lainnya","otherDown","thumb-down"]],["Terakhir diperbarui pada 2025-08-17 UTC."],[[["\u003cp\u003eThis guide outlines how to create a Deep Learning VM instance using the Google Cloud Marketplace within the Google Cloud console, starting with the "Get started" button.\u003c/p\u003e\n"],["\u003cp\u003eUsers can customize their VM by selecting a deployment name, zone, machine type, GPU type, number of GPUs, and a machine learning framework, or they can opt for default settings.\u003c/p\u003e\n"],["\u003cp\u003eAfter deployment, the VM can be accessed via the VM Instances page, where users can choose between interacting with a graphical user interface or on the command line.\u003c/p\u003e\n"],["\u003cp\u003eThe instance can be manually stopped and started from the VM Instances page, and finally, the deployment can be deleted to avoid incurring unnecessary charges.\u003c/p\u003e\n"],["\u003cp\u003eJupyterLab access via a URL is an available beta feature in select regions, granting access to users in the Editor or Owner role within your Google Cloud project.\u003c/p\u003e\n"]]],[],null,["# Quickstart: Create a Deep Learning VM instance by using the Google Cloud console\n\nCreate a Deep Learning VM instance by using the Google Cloud console\n====================================================================\n\nThis page shows you how to create a Deep Learning VM Images instance\nby using Google Cloud Marketplace in the Google Cloud console.\n\nBefore you begin\n----------------\n\n- Sign in to your Google Cloud account. If you're new to Google Cloud, [create an account](https://console.cloud.google.com/freetrial) to evaluate how our products perform in real-world scenarios. New customers also get $300 in free credits to run, test, and deploy workloads.\n- In the Google Cloud console, on the project selector page,\n select or create a Google Cloud project.\n\n | **Note**: If you don't plan to keep the resources that you create in this procedure, create a project instead of selecting an existing project. After you finish these steps, you can delete the project, removing all resources associated with the project.\n\n [Go to project selector](https://console.cloud.google.com/projectselector2/home/dashboard)\n-\n [Verify that billing is enabled for your Google Cloud project](/billing/docs/how-to/verify-billing-enabled#confirm_billing_is_enabled_on_a_project).\n\n- In the Google Cloud console, on the project selector page,\n select or create a Google Cloud project.\n\n | **Note**: If you don't plan to keep the resources that you create in this procedure, create a project instead of selecting an existing project. After you finish these steps, you can delete the project, removing all resources associated with the project.\n\n [Go to project selector](https://console.cloud.google.com/projectselector2/home/dashboard)\n-\n [Verify that billing is enabled for your Google Cloud project](/billing/docs/how-to/verify-billing-enabled#confirm_billing_is_enabled_on_a_project).\n\n| **Note:** This quickstart assumes that all settings will remain at their defaults. For more information about the VM options available to you, see [Choose an\n| Image](/deep-learning-vm/docs/images).\n\nCreate a new instance\n---------------------\n\n1. Go to the Deep Learning VM Cloud Marketplace page in\n the Google Cloud console.\n\n [Go to the Deep Learning VM Cloud Marketplace page](https://console.cloud.google.com/marketplace/details/click-to-deploy-images/deeplearning)\n2. Click **Get started**. If you see a project selection window,\n choose the project in which to create the instance. If this is the first\n time you've launched a Compute Engine VM, you must wait for the initial API\n configuration process to complete.\n\n3. On the **New Deep Learning VM deployment** page, enter a\n **Deployment name** . This will be the root of your virtual machine name.\n Compute Engine appends `-vm` to this name when naming your instance.\n\n4. Select a **Zone**, or keep the default.\n\n5. Under **Machine type**, select the specifications that you\n want for your VM, or keep the default.\n\n6. Under **GPUs** , select the **GPU type** and **Number of GPUs** ,\n or keep the default values.\n If you don't want to use GPUs,\n click the **Delete GPU** button.\n\n7. You have the option to select **Enable access to JupyterLab via URL\n instead of SSH (Beta)**. Enabling this Beta feature lets you\n access your JupyterLab\n instance using a URL. Anyone who is in the Editor or Owner role in your\n Google Cloud project can access this URL. This feature\n only works in the United States, the European Union, and Asia.\n\n8. Select a machine learning **Framework**, or keep the default.\n\n9. Click **Deploy**.\n\nYou've just created your first Deep Learning VM instance.\nAfter the instance is deployed, the Google Cloud console opens\nthe [Deployment Manager page](https://console.cloud.google.com/dm/deployments)\nwhere you can manage your\nDeep Learning VM instances and other deployments.\n\nAccess your new instance\n------------------------\n\nOnce you've created your Deep Learning VM instance, it starts\nautomatically. To access it:\n\n1. Go to the VM Instances page in the Google Cloud console.\n\n [Go to the VM\n Instances page](https://console.cloud.google.com/compute/instances)\n2. Under the **Name** column,\n click the name of your virtual machine instance.\n\n3. In the **Remote Access** section, click the first drop-down list and\n choose how you'd like to access the instance. You can choose to interact\n with a graphical user interface or on the command line.\n\n [](../images/dlvm-qs1.png)\n\n \u003cbr /\u003e\n\nCompute Engine will propagate your SSH keys and create your user. For more\ninformation, see [Connecting to\nInstances](/compute/docs/instances/connecting-to-instance).\n\nStop the instance\n-----------------\n\n1. Go to the VM Instances page in the Google Cloud console.\n\n [Go to the VM\n Instances page](https://console.cloud.google.com/compute/instances)\n2. Select the checkbox next to the Deep Learning VM instance.\n\n3. Click **Stop**.\n\nStart the instance\n------------------\n\nAfter an instance is created, the instance starts automatically. To start the instance\nmanually when it's stopped:\n\n1. Go to the VM Instances page in the Google Cloud console.\n\n [Go to the VM\n Instances page](https://console.cloud.google.com/compute/instances)\n2. Select the checkbox next to the Deep Learning VM instance.\n\n3. Click **Start**.\n\nClean up\n--------\n\n\nTo avoid incurring charges to your Google Cloud account for\nthe resources used on this page, follow these steps.\n\n1. Go to the Deployments page in the Google Cloud console.\n\n [Go to the\n Deployments page](https://console.cloud.google.com/dm/deployments)\n2. Select the checkbox next to the Deep Learning VM deployment.\n\n3. Click **Delete**.\n\nWhat's next\n-----------\n\n- Read a more in-depth description of this process in [Creating a\n Deep Learning VM instance from\n Google Cloud Marketplace](/deep-learning-vm/docs/cloud-marketplace).\n- Learn more about [Images, image families, and\n instances](/deep-learning-vm/docs/concepts-images)."]]