Menyiapkan integrasi Chrome Enterprise Premium dengan Microsoft Intune
Tetap teratur dengan koleksi
Simpan dan kategorikan konten berdasarkan preferensi Anda.
Dokumen ini menunjukkan cara menyiapkan integrasi Chrome Enterprise Premium dengan Microsoft Intune.
Penyiapan integrasi ini melibatkan penyiapan Intune,
penyiapan Endpoint Verification, penyiapan Azure workload identity,
dan pengaktifan Microsoft Intune di unit organisasi Anda.
Sebelum memulai
Untuk menyiapkan Intune untuk Chrome Enterprise Premium, lakukan hal berikut:
Di menu navigasi, klik Perangkat seluler & endpoint > Setelan > Integrasi pihak ketiga > Partner keamanan dan MDM > Kelola.
Cari Microsoft Intune, lalu klik Open connection.
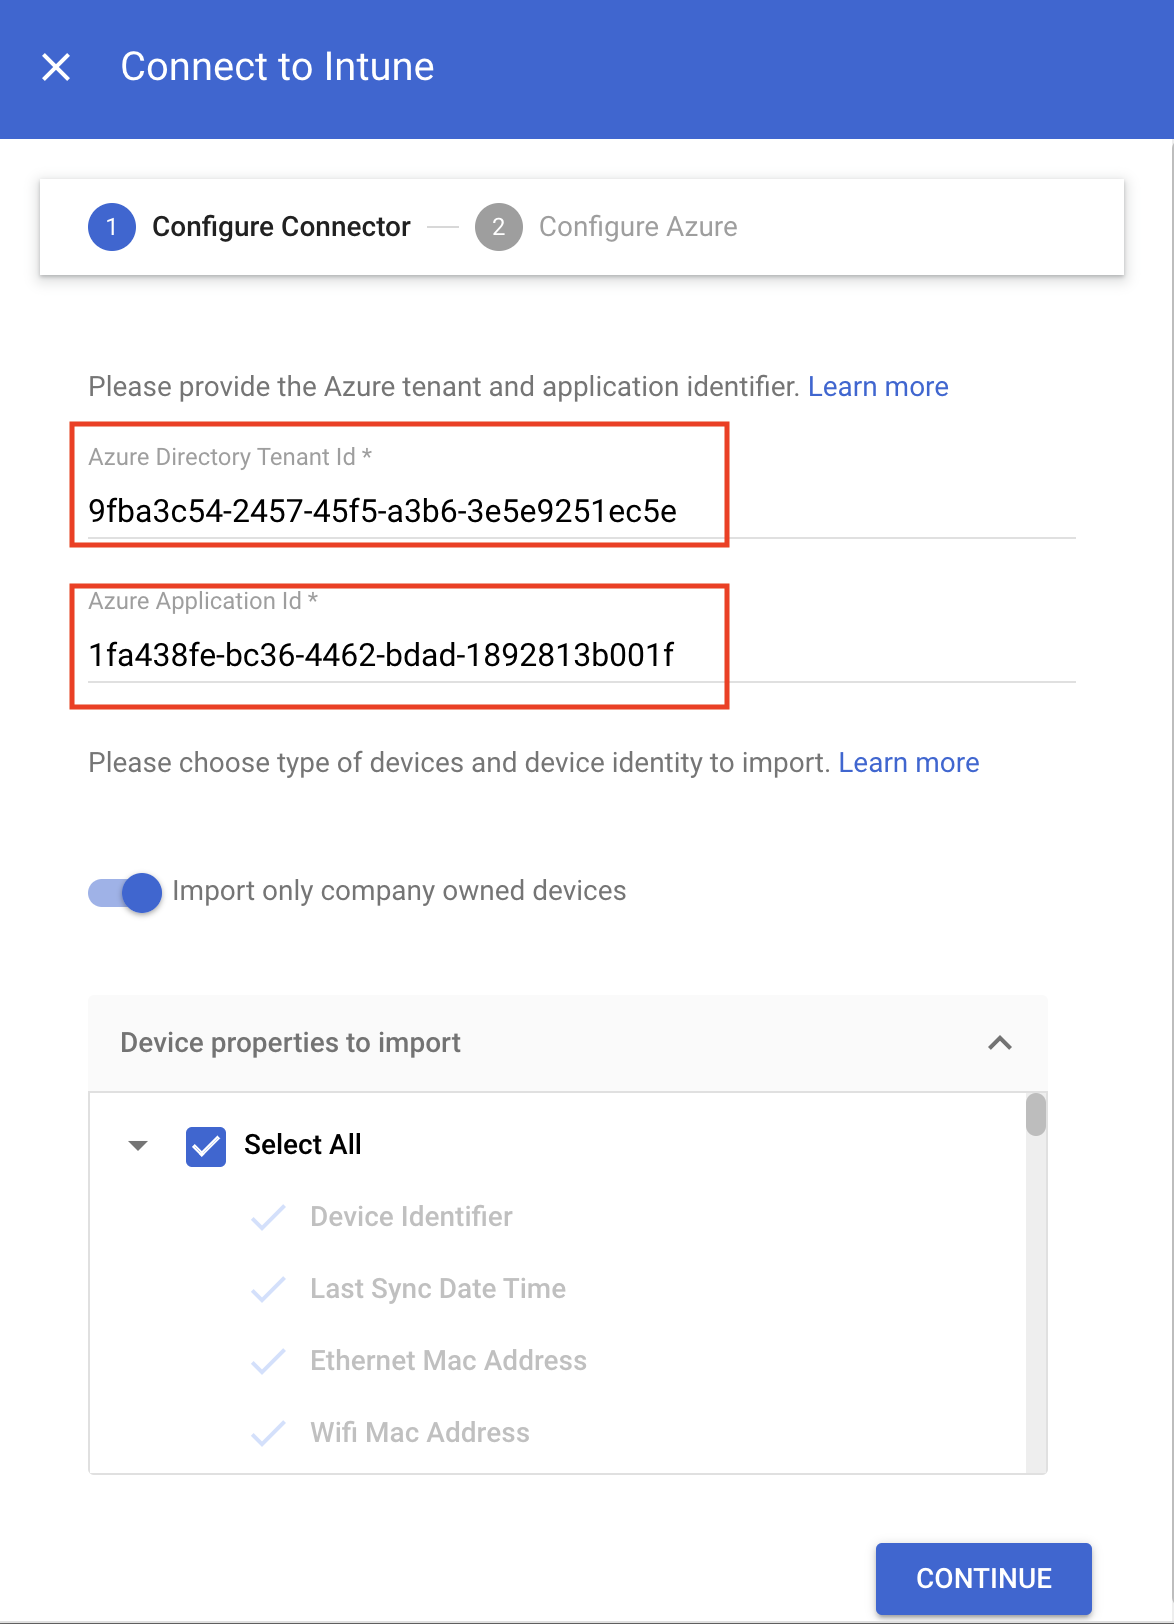
Dalam dialog Connect to Intune, masukkan ID tenant di kolom Azure directory tenant id dan ID aplikasi di kolom Azure application id.
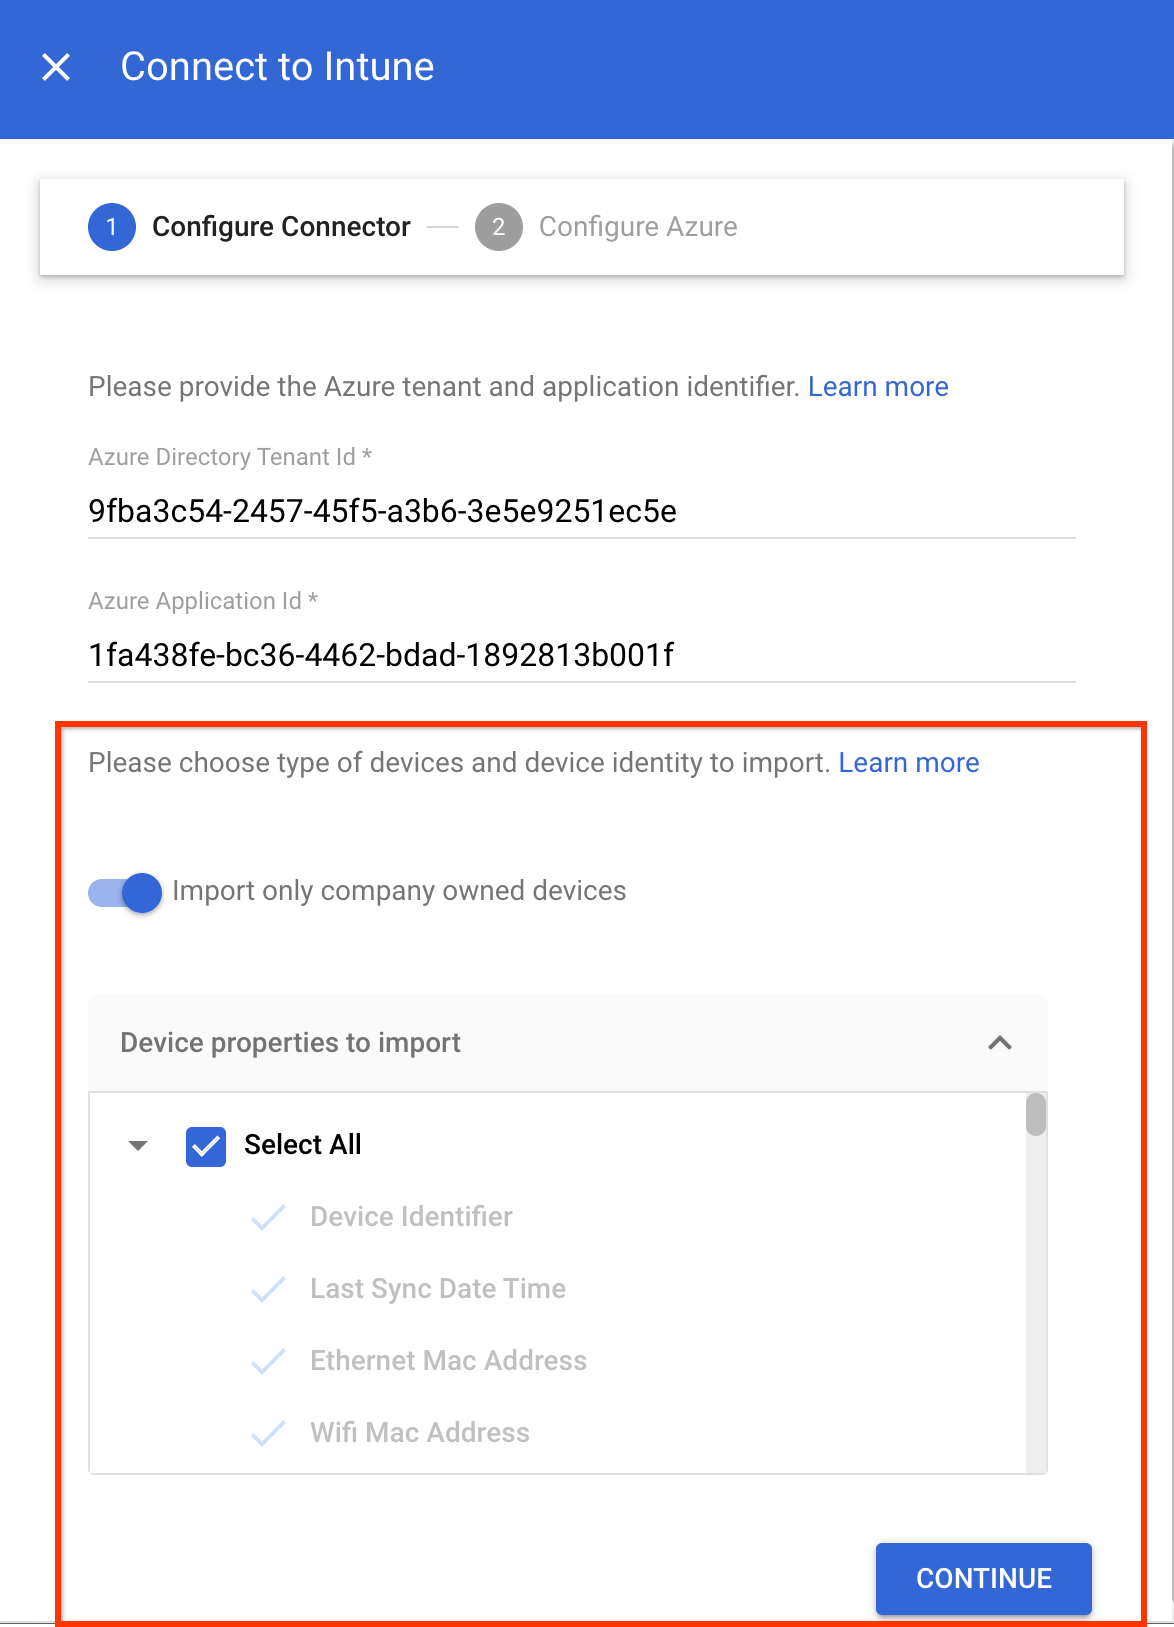
Bergantung pada apakah Anda ingin mengimpor perangkat milik perusahaan saja atau mengimpor semua perangkat, lakukan tindakan yang sesuai:
Untuk mengimpor perangkat milik perusahaan saja, klik tombol Impor perangkat milik perusahaan saja.
Di bagian Properti perangkat yang akan diimpor, pilih properti yang harus disimpan di Chrome Enterprise Premium.
Untuk mengimpor semua perangkat, di bagian Properti perangkat yang akan diimpor, pilih properti yang harus disimpan di Chrome Enterprise Premium.
Properti perangkat wajib seperti device identifier, last sync time,
serial number, dan wifi MAC address dikumpulkan secara default.
Untuk mengetahui informasi selengkapnya tentang properti perangkat yang dikumpulkan Intune, lihat Properti perangkat Intune.
Klik Lanjutkan.
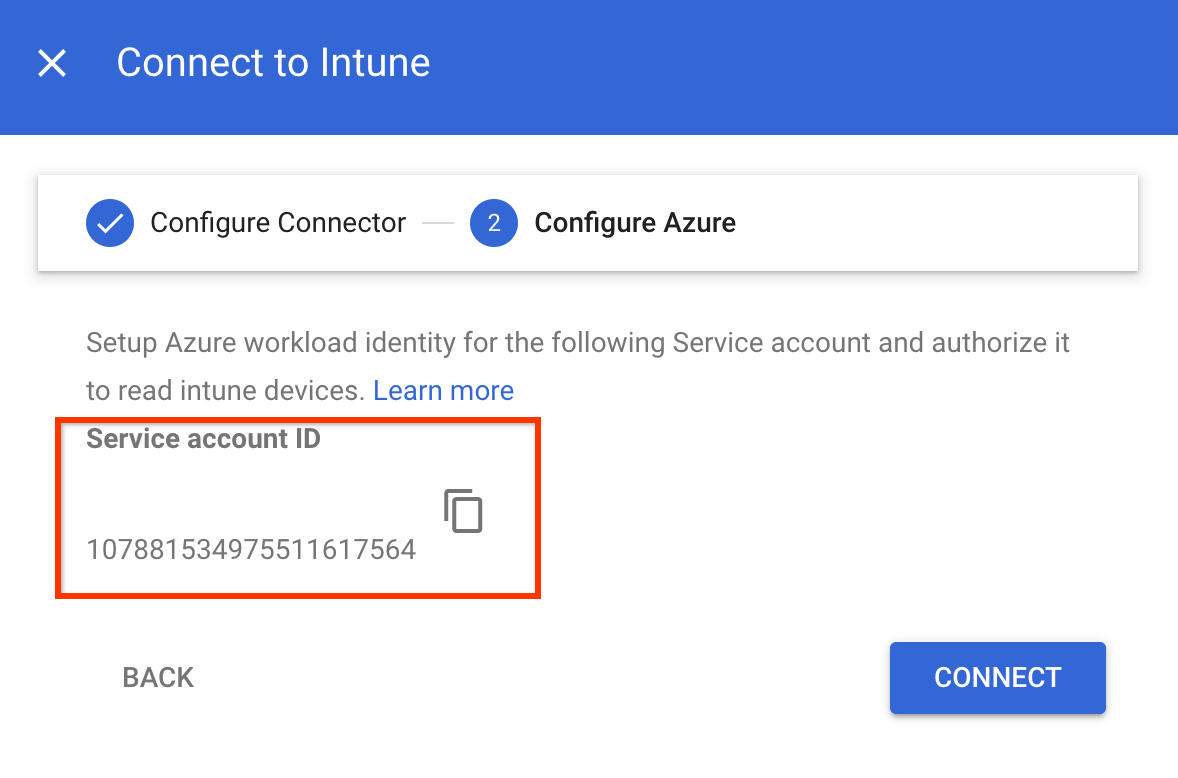
Salin Service account ID.
Gunakan ID akun layanan untuk memberikan otorisasi pada Azure workload identity
guna mengumpulkan data dari perangkat Intune:
Telusuri izin DeviceManagementManagedDevices.Read.All dan DeviceManagementApps.Read.All, lalu tambahkan izin ini ke Microsoft Graph.
Saat meminta izin API, pilih Izin aplikasi.
DeviceManagementManagedDevices.Read.All memberikan akses baca ke semua perangkat dan propertinya yang dikelola oleh Intune,
dan DeviceManagementApps.Read.All memberikan akses baca ke log audit Intune untuk peristiwa penghapusan perangkat.
Di menu navigasi, klik Perangkat seluler & endpoint > Setelan > Integrasi pihak ketiga > Partner keamanan dan MDM.
Dari panel Unit organisasi, pilih unit organisasi Anda.
Centang kotak Microsoft Intune, lalu klik Simpan.
Microsoft Intune kini tercantum di bagian Partner keamanan dan MDM.
Bergantung pada ukuran organisasi Anda, mungkin perlu waktu beberapa detik untuk
menjalin koneksi antara Verifikasi Endpoint dan Intune. Setelah
koneksi dibuat, perangkat mungkin memerlukan waktu beberapa menit hingga satu jam
untuk melaporkan data Intune.
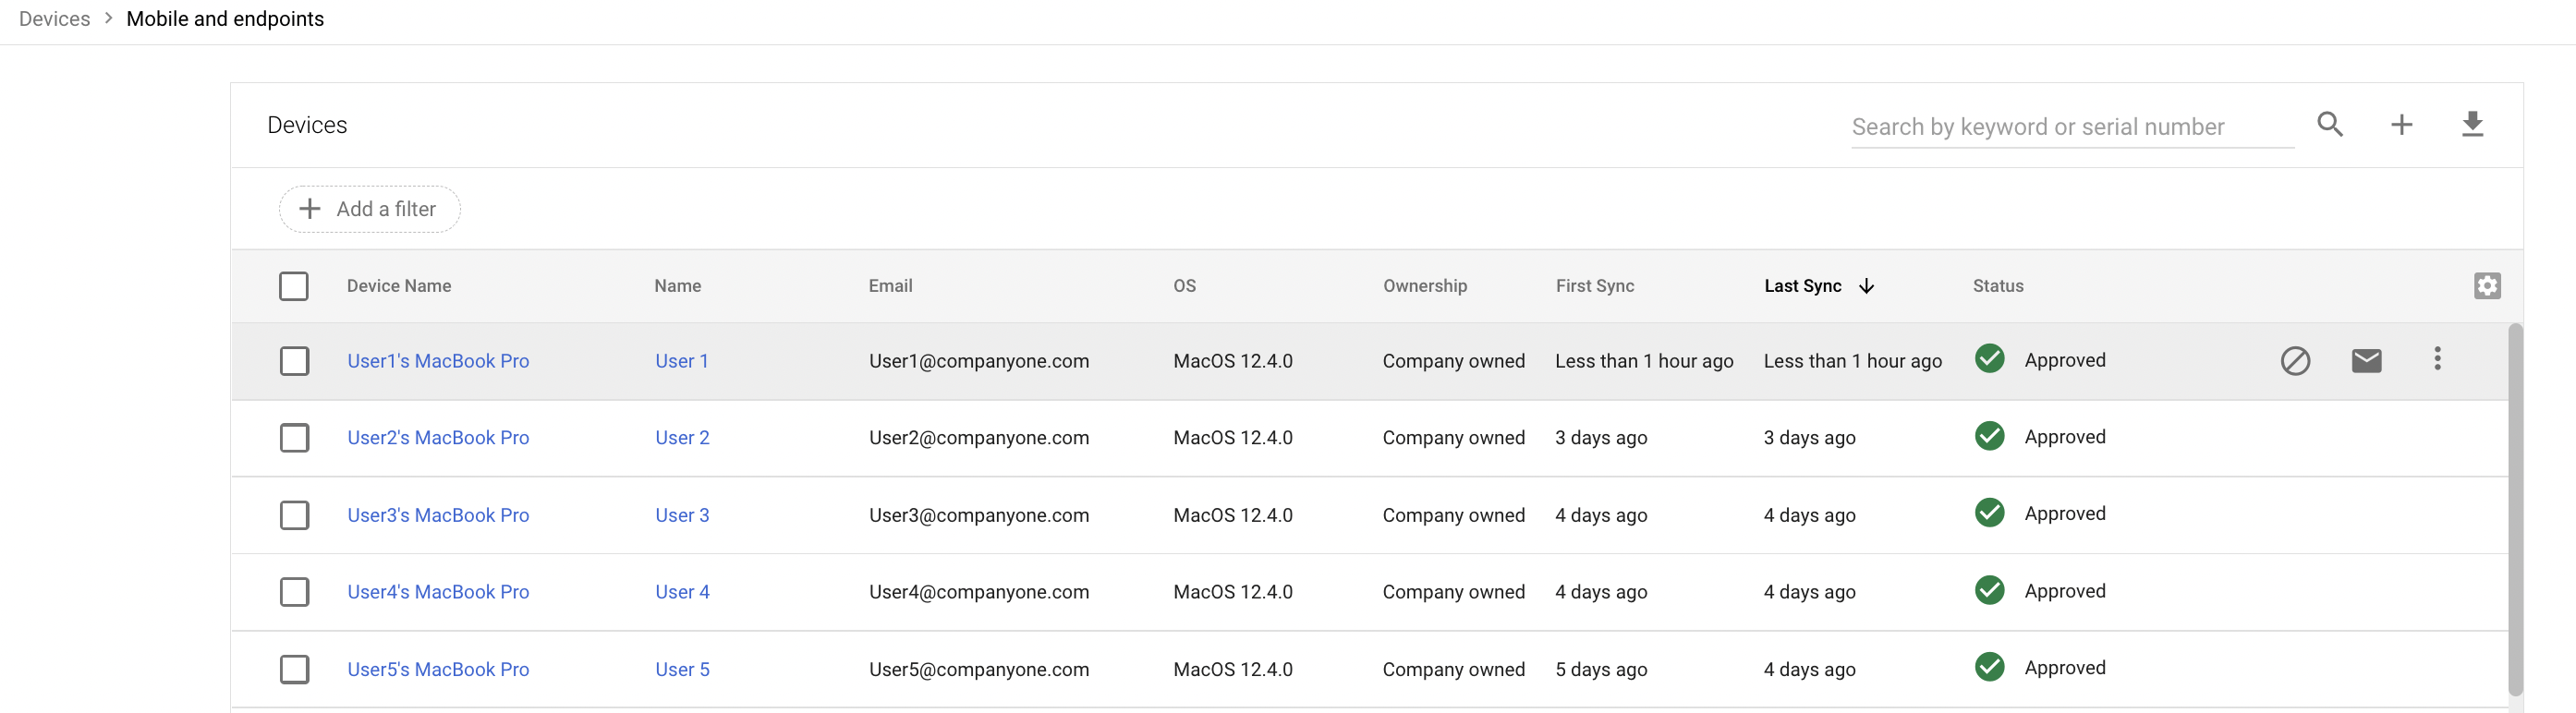
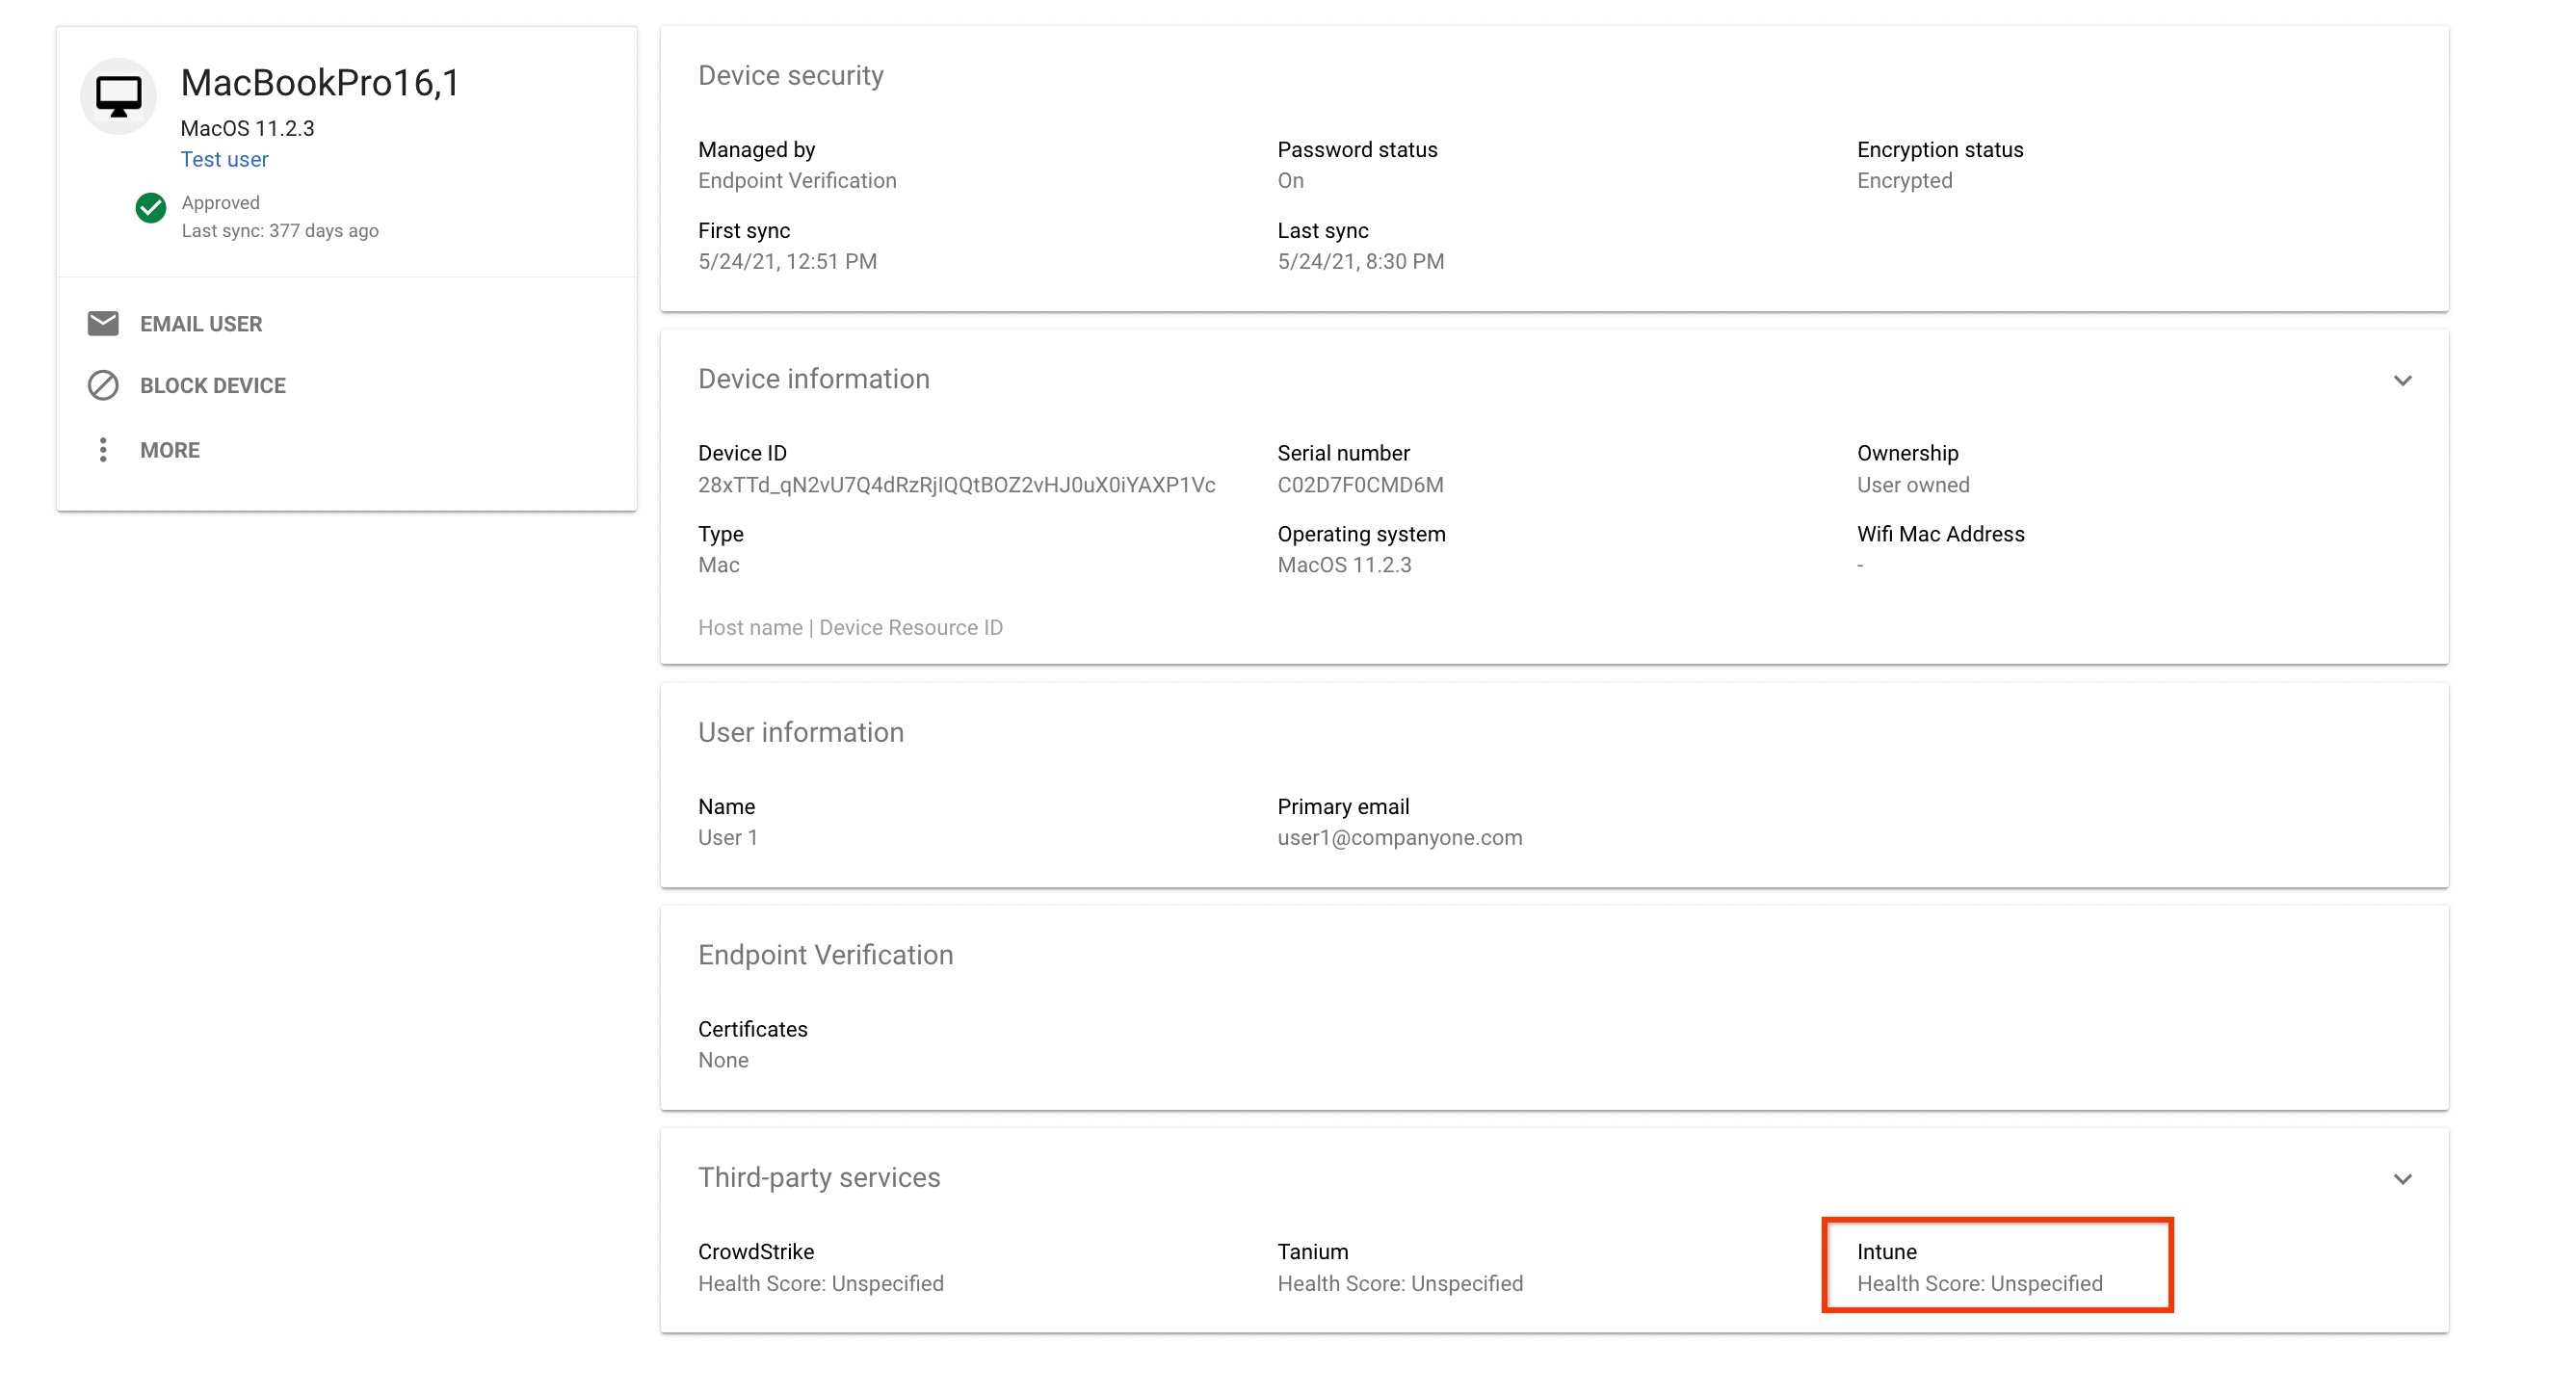
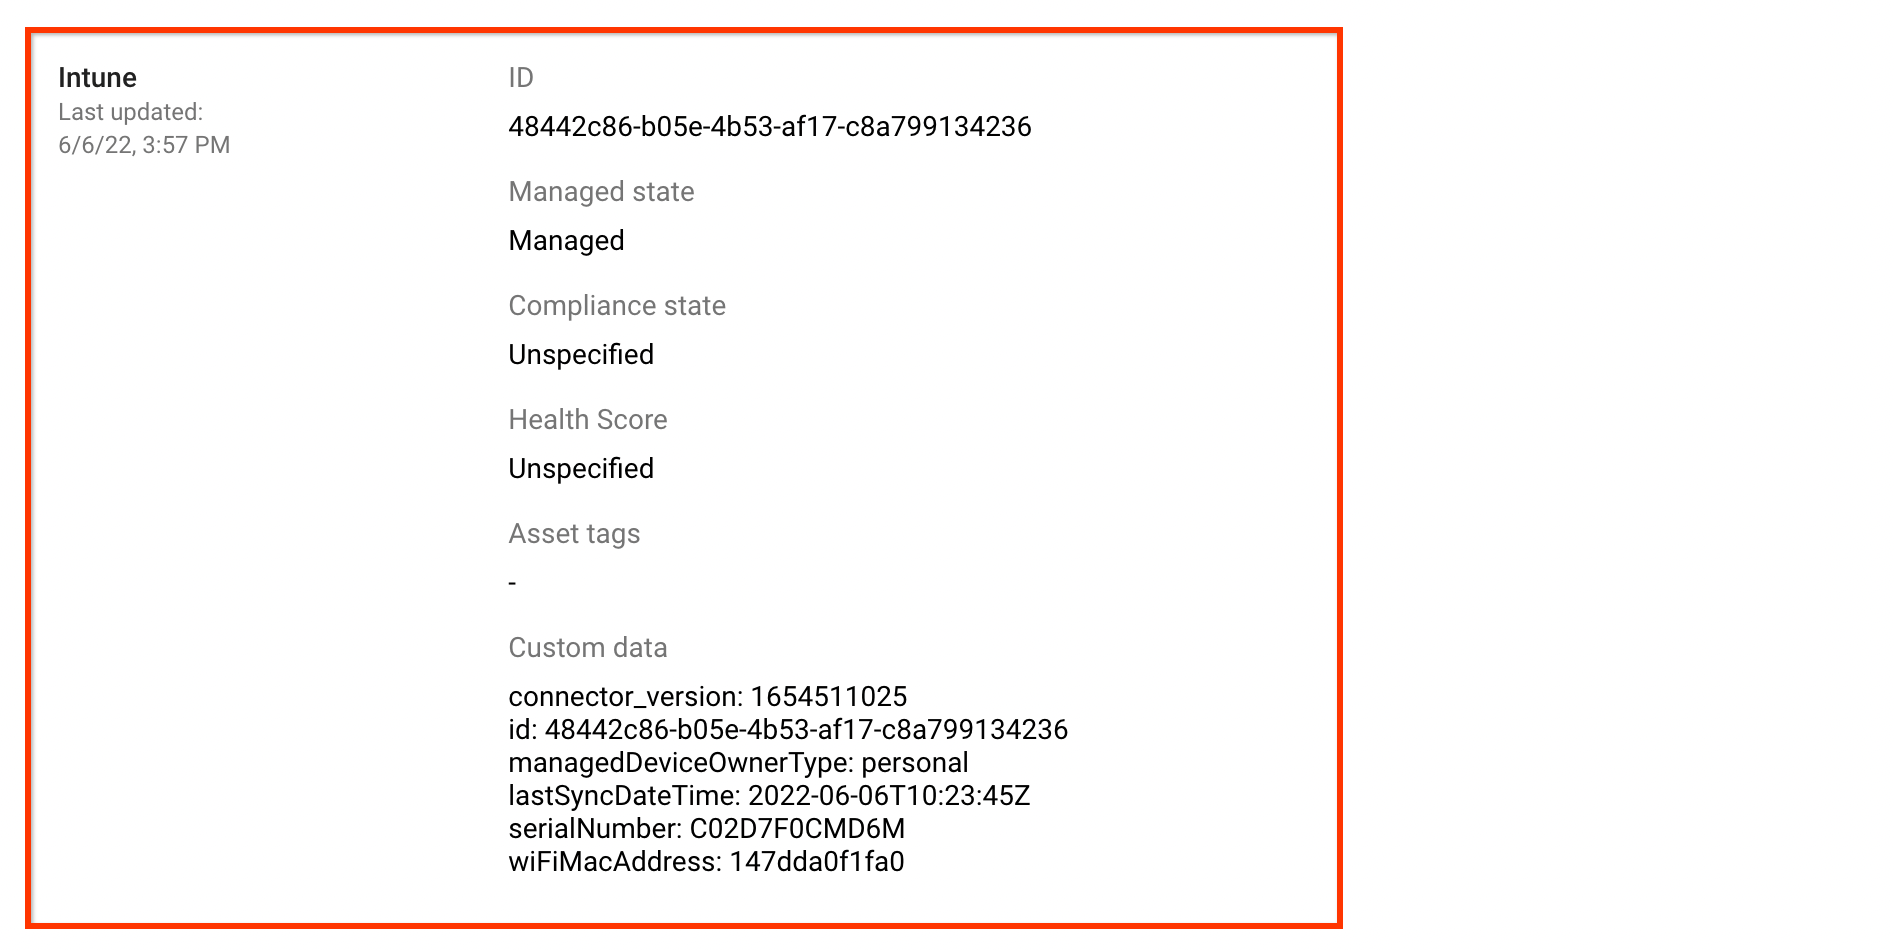
Memverifikasi data Intune di perangkat
Dari Halaman beranda konsol Admin, buka Perangkat.
[[["Mudah dipahami","easyToUnderstand","thumb-up"],["Memecahkan masalah saya","solvedMyProblem","thumb-up"],["Lainnya","otherUp","thumb-up"]],[["Sulit dipahami","hardToUnderstand","thumb-down"],["Informasi atau kode contoh salah","incorrectInformationOrSampleCode","thumb-down"],["Informasi/contoh yang saya butuhkan tidak ada","missingTheInformationSamplesINeed","thumb-down"],["Masalah terjemahan","translationIssue","thumb-down"],["Lainnya","otherDown","thumb-down"]],["Terakhir diperbarui pada 2025-09-05 UTC."],[],[],null,["# Set up Chrome Enterprise Premium integration with Microsoft Intune\n\nThis document shows you how to set up Chrome Enterprise Premium integration with Microsoft Intune.\nSetting up this integration involves setting up Intune,\nsetting up Endpoint Verification, setting up Azure workload identity,\nand enabling Microsoft Intune on your organizational units.\n\nBefore you begin\n----------------\n\n- To set up Intune for Chrome Enterprise Premium, do the following:\n\n - [Understand the supported configurations](https://docs.microsoft.com/en-us/mem/intune/fundamentals/supported-devices-browsers) and ensure that your environment satisfies the networking requirements.\n - [Sign in to your trial subscription or create a new Intune subscription](https://docs.microsoft.com/en-us/mem/intune/fundamentals/account-sign-up).\n - [Set DNS registration to connect your company's domain name with Intune](https://docs.microsoft.com/en-us/mem/intune/fundamentals/custom-domain-name-configure).\n - [Add users and groups, or connect Active Directory to sync with Intune](https://docs.microsoft.com/en-us/mem/intune/fundamentals/users-add).\n - [Give users permission to use Intune by assigning licenses](https://docs.microsoft.com/en-us/mem/intune/fundamentals/licenses-assign).\n\n For more information, see [Set up Intune](https://docs.microsoft.com/en-us/mem/intune/fundamentals/setup-steps).\n- Ensure that the devices in your organization run one of the following\n operating systems:\n\n - macOS version 10.11 or later\n - Microsoft® Windows 10 or later\n- [Set up Endpoint Verification for your organization](/endpoint-verification/docs/deploying-with-admin-console).\n\nConnect to Intune\n-----------------\n\n1. [Find your Microsoft 365 tenant ID](https://docs.microsoft.com/en-us/onedrive/find-your-office-365-tenant-id).\n2. [Register your application to obtain an application ID](https://docs.microsoft.com/en-us/azure/active-directory/develop/quickstart-register-app).\n3. From the Admin console Home page, go to **Devices**.\n\n [Go to Devices](https://admin.google.com/ac/devices/list)\n4. In the navigation menu, click **Mobile \\& endpoints \\\u003e Settings \\\u003e Third-party integrations \\\u003e Security and MDM partners \\\u003e Manage**.\n5. Look for **Microsoft Intune** and click **Open connection**.\n6. In the **Connect to Intune** dialog, enter the tenant ID in the **Azure directory tenant id** field and application ID in the **Azure application id** field.\n\n7. Depending on whether you want to import only company-owned devices or import all devices, perform the appropriate action:\n - To import only company-owned devices, click the **Import only company-owned devices** toggle. In the **Device properties to import** section, select the properties that must be stored in Chrome Enterprise Premium.\n - To import all devices, in the **Device properties to import** section, select the properties that must be stored in Chrome Enterprise Premium.\n\n The mandatory device properties such as `device identifier`, `last sync time`,\n `serial number`, and `wifi MAC address` are collected by default.\n\n For more information about the device properties that Intune collects, see [Intune device properties](https://docs.microsoft.com/en-us/graph/api/resources/intune-devices-manageddevice?view=graph-rest-1.0#properties).\n8. Click **Continue**.\n9. Copy the **Service account ID** . \n10. Use the **Service account ID** to authorize Azure workload identity to collect data from the Intune devices:\n 1. [Configure your app to trust an external identity provider](https://docs.microsoft.com/en-us/azure/active-directory/develop/workload-identity-federation-create-trust?tabs=azure-portal#other-identity-providers-example).\n\n Specify the following values in the corresponding fields:\n - **Name**: Any name for the federated credential.\n - **Subject identifier** : The **Service account ID** that you copied.\n - **Issuer** : `https://accounts.google.com`.\n 2. [Grant your app permissions](https://docs.microsoft.com/en-us/azure/active-directory/develop/quickstart-configure-app-access-web-apis#application-permission-to-microsoft-graph):\n 1. Search for `DeviceManagementManagedDevices.Read.All` and `DeviceManagementApps.Read.All` permissions and add these permissions to Microsoft Graph. When requesting the API permissions, select **Application permissions** .\n\n `DeviceManagementManagedDevices.Read.All` provides read access to all devices and their properties managed by Intune,\n and `DeviceManagementApps.Read.All` provides read access to the Intune audit logs for device deletion events.\n 2. [Grant admin consent to the permissions configured for your application](https://docs.microsoft.com/en-us/azure/active-directory/develop/quickstart-configure-app-access-web-apis#admin-consent-button).\n11. In the **Connect to Intune** dialog, click **Connect**.\n\nThe connection to Intune is set to open.\n\nEnable Intune for your organizational unit\n------------------------------------------\n\nTo collect device information by using Intune, enable Intune for\nyour organizational unit by doing the following:\n\n\n1. From the Admin console Home page, go to **Devices**.\n\n [Go to Devices](https://admin.google.com/ac/devices/list)\n2. In the navigation menu, click **Mobile \\& endpoints \\\u003e Settings \\\u003e Third-party integrations \\\u003e Security and MDM partners**.\n3. From the **Organizational units** pane, select your organization unit.\n4. Select the checkbox for **Microsoft Intune** , and click **Save**.\n\n **Microsoft Intune** is now listed in the **Security and MDM partners** section.\n Depending on the size of your organization, it might take a few seconds to\n establish the connection between Endpoint Verification and Intune. After\n the connection is established, the devices might take a few minutes to an hour\n to report Intune data.\n\nVerify Intune data on devices\n-----------------------------\n\n1. From the Admin console Home page, go to **Devices**.\n\n [Go to Devices](https://admin.google.com/u/1/ac/dm)\n2. Click **Endpoints**.\n3. Select any device from your organizational unit for which Intune is enabled.\n\n4. Verify that the Microsoft Intune data is listed in the **Third-party services** section.\n\n5. To see the complete details, expand the **Third-party services** section.\n\n The following image shows details of the data collected by Intune:\n\nThe compliance states reported by Intune are broadly categorized into the following\ncompliance states:\n\nWhat's next\n-----------\n\n- [Create and assign custom access levels](/chrome-enterprise-premium/docs/create-access-levels-intune)"]]