Tetap teratur dengan koleksi
Simpan dan kategorikan konten berdasarkan preferensi Anda.
Pelajari cara mulai membuat workstation dengan Cloud Workstations.
Workstation adalah lingkungan pengembangan yang telah dikonfigurasi sebelumnya yang ditentukan oleh administrator
atau tim platform dalam konfigurasi workstation. Konfigurasi workstation mencakup image container yang digunakan oleh workstation. Administrator Anda memilih apakah akan menggunakan salah satu image dasar yang telah dikonfigurasi sebelumnya Cloud Workstations atau apakah akan memberikan referensi ke image container yang disesuaikan.
Untuk mengikuti panduan langkah demi langkah tugas ini langsung di
Google Cloud konsol, klik Pandu saya:
Sebelum mulai menggunakan Cloud Workstations, pastikan Anda memiliki
izin yang diperlukan
dan menyelesaikan langkah-langkah penyiapan yang diperlukan ini.
Anda dapat melewati bagian ini jika sudah menyelesaikan penyiapan ini.
Sign in to your Google Cloud account. If you're new to
Google Cloud,
create an account to evaluate how our products perform in
real-world scenarios. New customers also get $300 in free credits to
run, test, and deploy workloads.
In the Google Cloud console, on the project selector page,
select or create a Google Cloud project.
Opsional: Jika Anda tidak memiliki konfigurasi workstation yang tersedia di
konsolGoogle Cloud ,
minta administrator Anda untuk membuat konfigurasi workstation untuk
Anda, atau pastikan Anda memiliki peran IAM Admin Cloud Workstations di
project sehingga Anda dapat membuat resource ini sendiri.
Untuk memeriksa peran IAM Anda, buka halaman IAM di Google Cloud konsol:
Link Buat mungkin dinonaktifkan jika tidak ada konfigurasi workstation dalam project atau jika Anda tidak memiliki izin untuk melihatnya.
Minta Admin Cloud Workstations organisasi Anda untuk membuat konfigurasi workstation bagi Anda.
Terima Nama workstation default.
Jika mau, Anda dapat memasukkan nama resource Anda sendiri untuk
workstation Anda—misalnya, test-workstation.
Ikuti konvensi penamaan resource Compute Engine dan pilih nama yang unik dalam cluster workstation.
Klik panah peluas arrow_drop_down di kolom Konfigurasi, lalu pilih konfigurasi workstation untuk menentukan workstation Anda.
Klik Buat
untuk membuat workstation Anda.
Meluncurkan workstation
Setelah membuat workstation, Anda dapat memulainya, lalu meluncurkannya untuk memulai pengembangan:
Klik Workstations.
Temukan workstation yang Anda buat dalam daftar workstation yang tersedia,
centang kotak di sampingnya, lalu klik Start. Tindakan ini akan memulai workstation Anda dan mencocokkannya dengan konfigurasi workstation induk.
Jika diminta untuk memulai workstation, klik Start untuk mengonfirmasi.
Status berubah menjadi Starting dan ikon status
refreshberputar saat operasi
mulai sedang berlangsung. Mungkin perlu waktu beberapa menit untuk memulai workstation Anda.
Setelah workstation siap, statusnya akan berubah menjadi Running dan ikon status akan berubah menjadi tanda centang
check_circle.
Klik Launch. Workstation terhubung ke port 80 secara default.
Opsional: Anda juga dapat mengklik panah
arrow_drop_downpeluas
di samping Luncurkan dan memilih dari daftar opsi peluncuran:
Terhubung ke port 80 (default)
Hubungkan ke aplikasi web di port
Penerusan port
Menghubungkan menggunakan SSH
Luncurkan dengan JetBrains Gateway (jika Anda menggunakan JetBrains IDE)
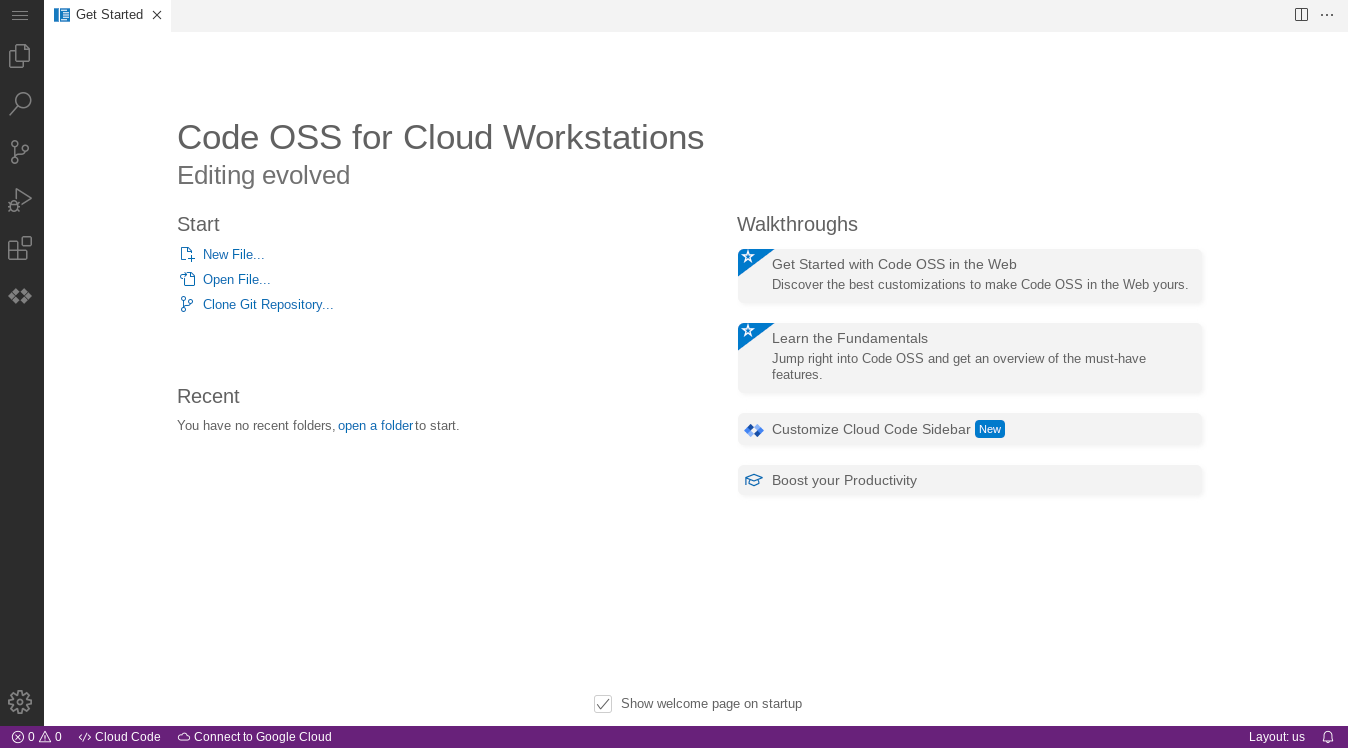
Contoh berikut menunjukkan halaman selamat datang untuk editor dasar Cloud Workstations
.
Halaman Anda mungkin terlihat berbeda, bergantung pada cara Anda menentukan konfigurasi workstation:
Untuk mengetahui informasi selengkapnya tentang cara menghubungkan melalui SSH, lihat
Dukungan SSH.
Untuk menghapus workstation dari konsol Google Cloud :
Di konsol Google Cloud , buka
Cloud Workstations>Workstations.
Centang kotak di samping workstation yang ingin Anda hapus.
Klik menu opsimore_vertLainnya, lalu pilih Hapus untuk menghapus workstation yang dipilih.
Jika konfigurasi workstation Anda menggunakan persistent disk dan kebijakan pemulihan ditetapkan untuk mempertahankan persistent disk setelah Anda menghapus workstation, pastikan untuk mengingatkan Admin Cloud Workstations Anda agar menghapus persistent disk untuk Anda secara manual.
Untuk mengetahui informasi selengkapnya tentang cara menghapus konfigurasi workstation, cluster workstation, dan project, lihat Menghapus resource. Google Cloud
[[["Mudah dipahami","easyToUnderstand","thumb-up"],["Memecahkan masalah saya","solvedMyProblem","thumb-up"],["Lainnya","otherUp","thumb-up"]],[["Sulit dipahami","hardToUnderstand","thumb-down"],["Informasi atau kode contoh salah","incorrectInformationOrSampleCode","thumb-down"],["Informasi/contoh yang saya butuhkan tidak ada","missingTheInformationSamplesINeed","thumb-down"],["Masalah terjemahan","translationIssue","thumb-down"],["Lainnya","otherDown","thumb-down"]],["Terakhir diperbarui pada 2025-08-11 UTC."],[],[],null,["# Create and launch a workstation\n\nLearn how to get started creating a workstation with Cloud Workstations.\n\nA *workstation* is a preconfigured development environment that administrators\nor platform teams define in a *workstation configuration* . The workstation\nconfiguration includes the container image used by the workstation. Your\nadministrators choose whether to use one of the Cloud Workstations\n[preconfigured base images](/workstations/docs/preconfigured-base-images)\nor whether to provide a reference to a\n[customized container image](/workstations/docs/customize-container-images).\n\n*** ** * ** ***\n\nTo follow step-by-step guidance for this task directly in the\nGoogle Cloud console, click **Guide me**:\n\n[Guide me](https://console.cloud.google.com/freetrial?redirectPath=/?journey_id=workstations--set-up--intro&walkthrough_id=workstations--set-up--launch)\n\n*** ** * ** ***\n\n### Before you begin\n\nBefore you begin using Cloud Workstations, be sure that you have the\n[required permissions](/workstations/docs/access-control#enable_required_roles)\nand that you complete these required setup steps.\nYou can skip this section if you've already completed this setup.\n\nSign in to your Google Cloud account. If you're new to Google Cloud, [create an account](https://console.cloud.google.com/freetrial) to evaluate how our products perform in real-world scenarios. New customers also get $300 in free credits to run, test, and deploy workloads.\n\nIn the Google Cloud console, on the project selector page,\nselect or create a Google Cloud project.\n| **Note**: If you don't plan to keep the resources that you create in this procedure, create a project instead of selecting an existing project. After you finish these steps, you can delete the project, removing all resources associated with the project.\n\n[Go to project selector](https://console.cloud.google.com/projectselector2/home/dashboard)\n\n\n[Verify that billing is enabled for your Google Cloud project](/billing/docs/how-to/verify-billing-enabled#confirm_billing_is_enabled_on_a_project).\n\n\nEnable the Cloud Workstations API.\n\n\n[Enable the API](https://console.cloud.google.com/flows/enableapi?apiid=workstations.googleapis.com) \nIn the Google Cloud console, on the project selector page,\nselect or create a Google Cloud project.\n| **Note**: If you don't plan to keep the resources that you create in this procedure, create a project instead of selecting an existing project. After you finish these steps, you can delete the project, removing all resources associated with the project.\n\n[Go to project selector](https://console.cloud.google.com/projectselector2/home/dashboard)\n\n\n[Verify that billing is enabled for your Google Cloud project](/billing/docs/how-to/verify-billing-enabled#confirm_billing_is_enabled_on_a_project).\n\n\nEnable the Cloud Workstations API.\n\n\n[Enable the API](https://console.cloud.google.com/flows/enableapi?apiid=workstations.googleapis.com)\n1.\n\n\n Enable the Cloud Workstations API.\n\n\n [Enable the API](https://console.cloud.google.com/flows/enableapi?apiid=workstations.googleapis.com)\n2. Optional: If you don't have workstation configurations available in the\n [Google Cloud console](https://console.cloud.google.com/workstations/),\n ask your administrator to create a workstation configuration for\n you, or make sure that you have a Cloud Workstations Admin IAM role on the\n project so that you can create these resources yourself.\n To check your IAM roles, go to the IAM\n page in the Google Cloud console:\n\n [Go to IAM](https://console.cloud.google.com/iam-admin/iam)\n\nCreate a workstation\n--------------------\n\nTo create a workstation, follow these steps:\n\n\u003cbr /\u003e\n\n1. In the Google Cloud console, navigate to the\n **Cloud Workstations** \\\u003e **Workstations**\n page.\n\n\n [Go to Workstations](https://console.cloud.google.com/workstations/list)\n\n \u003cbr /\u003e\n\n2. Click add_box**Create**.\n\n The **Create** link might be disabled if there aren't any\n workstation configurations in the project or if you don't have permissions\n to view them.\n Ask your organization's Cloud Workstations Admin to create a\n workstation configuration for you.\n\n3. Accept the default workstation **Name**.\n\n If you prefer, you can enter your own resource name for your\n workstation---for example, `test-workstation`.\n Follow the Compute Engine resource\n [naming conventions](/compute/docs/naming-resources)\n and choose a name that is unique within the workstation cluster.\n\n4. Click the arrow_drop_downexpander\n arrow in the **Configuration** field and select the\n workstation configuration to define your workstation.\n\n5. Click **Create**\n to create your workstation.\n\nLaunch a workstation\n--------------------\n\nNow that you have created a workstation, you can start it and then launch it to begin development:\n\n\u003cbr /\u003e\n\n1. Click **Workstations**.\n2. Find the workstation that you created in the list of available workstations, select the checkbox beside it, and then click **Start**. This starts your workstation, and matches it to the parent workstation configuration.\n3. If prompted to start your workstation, click **Start** to confirm. The status changes to **Starting** and the status icon refreshspins while the start operation is in progress. It might take a few minutes to start your workstation.\n4. When your workstation is ready, the status changes to **Running** and the status icon changes to a check_circle checkmark.\n5. Click **Launch** . The workstation connects to port `80` by default.\n\n\n Optional: You can also click the\n arrow_drop_downexpander\n arrow next to **Launch** and select from the list of launch options:\n - **Connect to port 80** (default)\n - **Connect to web app on port**\n - **Port forwarding**\n - **Connect using SSH**\n - **Launch with JetBrains Gateway** (if you are using a JetBrains IDE)\n6. The following example shows the welcome page for the Cloud Workstations\n [base editor](/workstations/docs/base-editor-overview).\n Your page might look different, depending on how you define your\n workstation configuration:\n\n For more information about connecting through SSH, see\n [SSH support](/workstations/docs/ssh-support).\n\n For more information about connecting to web apps running on your\n workstation, see\n [Access HTTP servers running on a workstation](/workstations/docs/access-http-servers-running-on-workstations).\n\nClean up\n--------\n\nTo delete a workstation from the Google Cloud console:\n\n1. In the Google Cloud console, go to **Cloud Workstations** \\\u003e **Workstations**.\n2. Select the checkbox beside the workstation that you want to delete.\n3. Click themore_vert**More** options menu and select **Delete** to delete the selected workstation.\n\nIf your workstation configuration uses persistent disks and the\n[reclaim policy](/workstations/docs/reference/rest/v1/projects.locations.workstationClusters.workstationConfigs#reclaimpolicy)\nis set to retain persistent disks after you delete the workstation, be sure to\nremind your Cloud Workstations Admin to manually delete the\npersistent disk for you.\n\n\nFor more about deleting workstation configurations,\nworkstation clusters, and Google Cloud projects,\nsee [Delete resources](/workstations/docs/delete-resources).\n\nWhat's next\n-----------\n\n- Use the\n [Cloud Workstations base editor](/workstations/docs/base-editor-overview).\n\n- Learn more about configuring additional options in your\n [workstation configuration](/workstations/docs/create-configuration).\n\n- Customize your\n [workstation configuration](/workstations/docs/customize-development-environment)\n through the API.\n\n- Create [customized container images](/workstations/docs/customize-container-images)\n that extend the\n [preconfigured base images](/workstations/docs/preconfigured-base-images)\n provided by Cloud Workstations."]]