You can connect Security Command Center Enterprise tier to your Microsoft Azure environment to do the following:
- Enable the detection of findings related to misconfigurations.
- Identify potential attack paths from the public internet to your high-value Microsoft Azure assets.
- Map compliance of Microsoft Azure resources with various standards and benchmarks.
The Security Command Center to Microsoft Azure connection creates a single place for your team to manage and remediate misconfigurations in both Google Cloud and Azure.
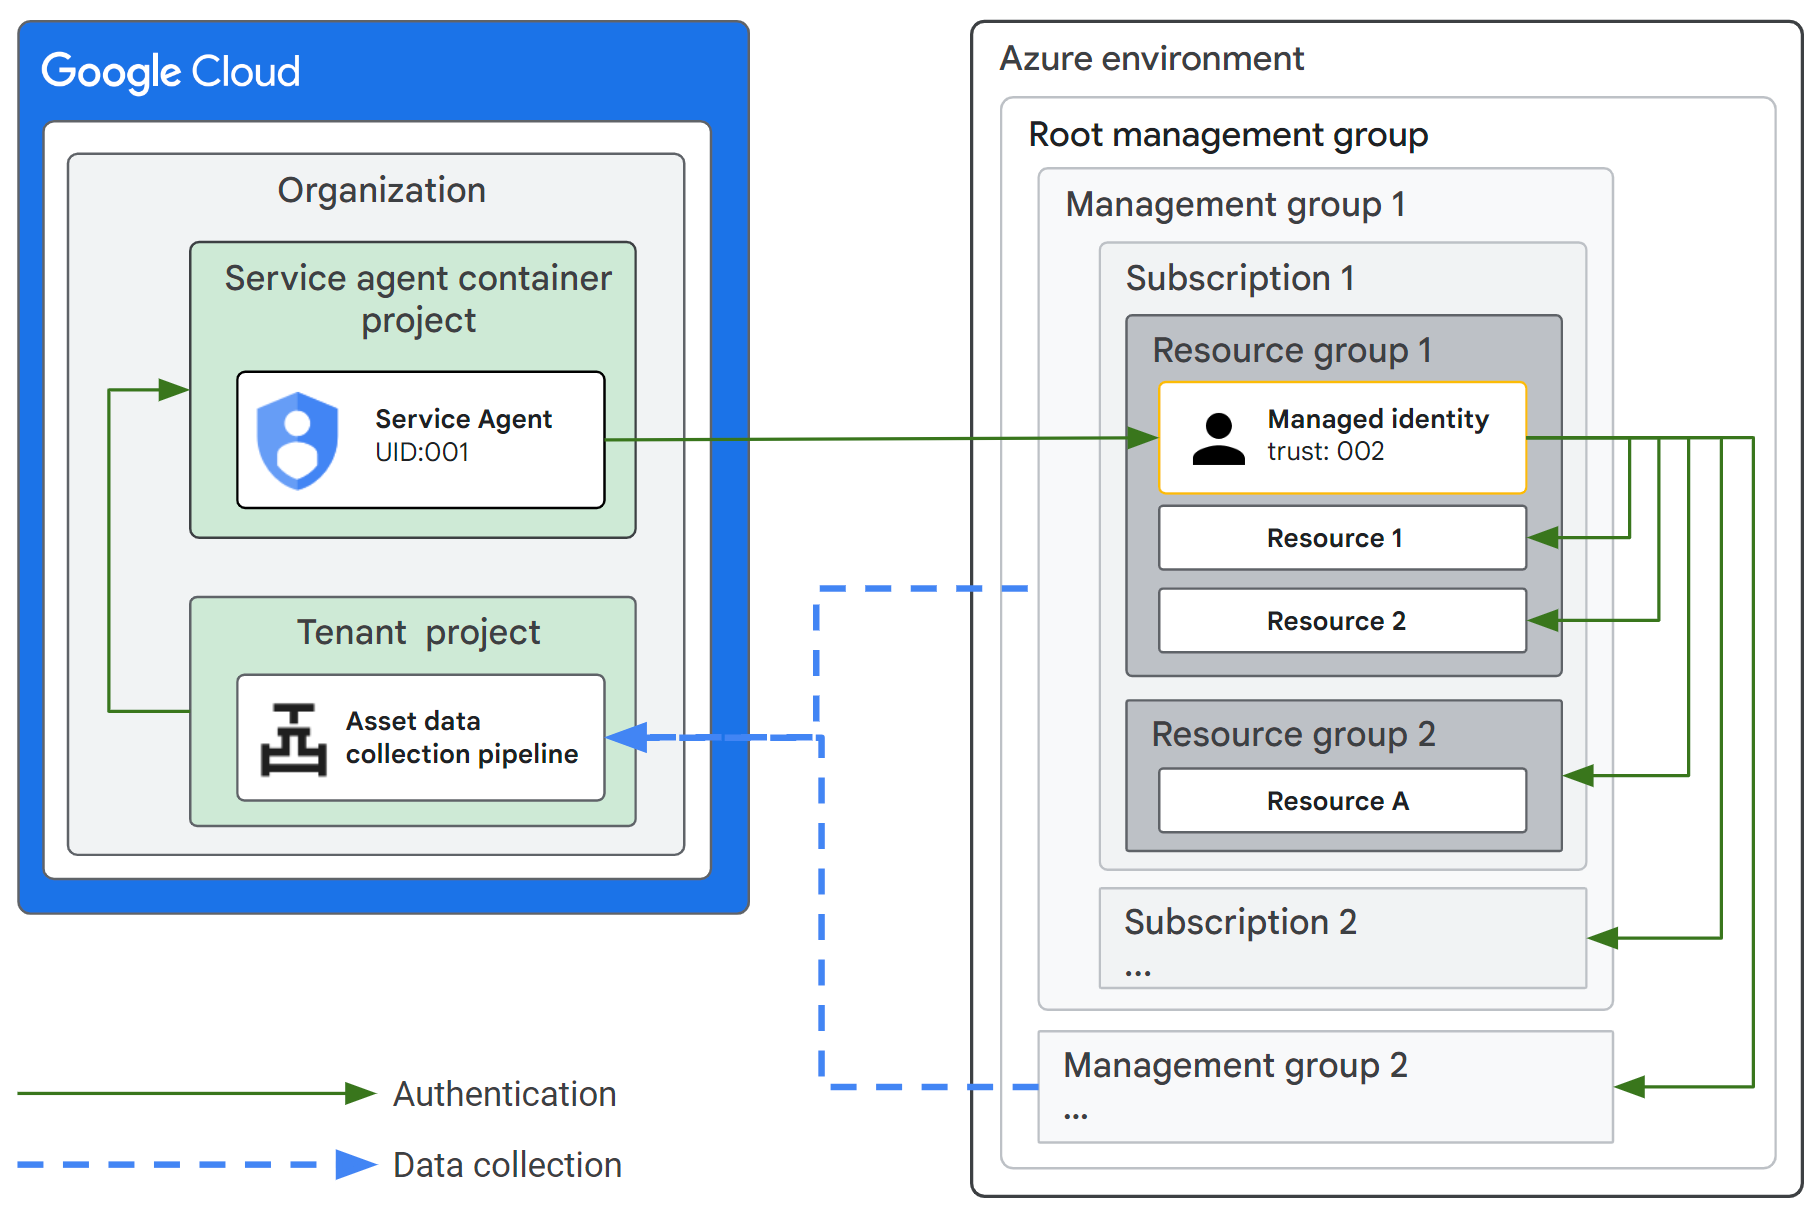
You configure a trust connection between Security Command Center and Azure, using a Google Cloud service agent and a Microsoft Azure user-assigned managed identity with access to Azure resources you want to monitor. You manage and control the trust configuration in your Microsoft Azure environment.
You can create one Azure connection for each Google Cloud organization.
Security Command Center uses this connection to periodically collect data about Microsoft Azure resources that you define. This data is handled in the same way as Service Data per the Google Cloud Privacy Notice. The connector uses API calls to collect Azure asset data. These API calls may incur Microsoft Azure charges.
During a scan, the data collection pipeline depends on the service agent to authenticate to the Microsoft Azure environment using the user-assigned managed identity.
The following diagram shows how trust is established between Security Command Center and Azure.
This document describes how to set up the connection with Microsoft Azure. At a high level, the steps are the following:
Perform the prerequisite steps in Before you begin.
Create the Azure connector and configure which subscriptions and locations to scan. You need the Microsoft Azure Tenant ID to do these steps. This creates the service agent ID.
Configure the Azure environment to create a dedicated user-assigned managed identity with the following roles:
Reader in the scope of the Microsoft Azure root management group to read resources, subscriptions, and management group hierarchy.
Key Vault Reader in the scope of the Microsoft Azure root management group to read metadata about key vaults and related certificates, keys, and secrets.
Storage Blob Data Reader in the scope of the Microsoft Azure root management group to read metadata about resources. Grant this role if you plan to enable Grant permissions for Sensitive Data Protection discovery when you configure the Azure connector.
Directory readers in Microsoft Entra ID to read groups and memberships.
Security reader in Microsoft Entra ID to read authorization policies.
The default display name for the root management group is
Tenant root group.These permissions are needed for Security Command Center to identify management groups, groups with memberships, and role definitions, which are located at a level higher than subscriptions in the resource hierarchy.
You also configure a federated identity credential for the user-assigned managed identity using information about the service agent.
You can either do the steps manually or use Terraform. You need the service agent ID when doing the steps manually.
Complete the configuration of the Azure connector and test the connection. You use information about the user-assigned managed identity to do these steps.
The Azure connector does not ingest Azure logs needed for SIEM curated detection capabilities in Security Command Center Enterprise. For that information, see Connect to Microsoft Azure for log data collection.
Before you begin
The following sections describe the prerequisites, decisions, and information needed before you configure the connection between Security Command Center and Microsoft Azure.
Review Microsoft Azure features
Make sure you are familiar with the following concepts and capabilities in Microsoft Azure:
Workload identity federation in Azure, federated credentials, and configuring a federated identity on a user-assigned managed identity.
Creating and managing resource groups using the Microsoft Azure portal, the Azure CLI, or Terraform.
Assigning Azure built-in roles and Microsoft Entra built-in roles.
Plan for the data collection
When you plan the data collection strategy, do the following. You need this information when performing the steps in this document.
Create or identify the resource group where you will create the user-defined managed identity. You need the resource group name during configuration.
Replace the RESOURCE_GROUP_NAME variable with the resource group name to populate the value in upcoming steps of this document.
Identify the resources that you want to collect data for. If you plan to collect data from only specific subscriptions or regions, identify and record these during planning.
You can also configure the Azure connector to discover resources automatically across all subscriptions and regions.
Set up permissions in Google Cloud
In Google Cloud, to create and manage a connection to
the third-party cloud providers, you must be granted the
Cloud Asset Owner (roles/cloudasset.owner)
role in the organization. For more information about granting roles, see
Manage Access.
Set up permissions in Microsoft Azure
To do the steps in Configure Microsoft Azure manually or Configure Microsoft Azure using Terraform, you must have an Azure identity with at least one resource group created, plus the following permissions to configure IAM policies for Microsoft Azure and Microsoft Entra.
Microsoft.Authorization/roleAssignments/writepermission in scope of the root management group. This is available in either of the following built-in roles: Role Based Access Control Administrator or User Access Administrator.The following permissions in the scope of a resource group where the user-assigned managed identity will be created:
Microsoft.ManagedIdentity/userAssignedIdentities/writeMicrosoft.ManagedIdentity/userAssignedIdentities/federatedIdentityCredentials/write
These are available in the built-in Managed Identity Contributor role.
The Microsoft Entra permission,
microsoft.directory/roleAssignments/allProperties/allTasks. This is available in the Microsoft Entra built-in role Privileged Role Administrator.
You must have elevated access to set permissions in the scope of the root management group. See Elevate access to manage all Azure subscriptions and management groups for the steps to elevate access for a Global Administrator.
Enable and configure the Security Command Center Azure connector
Do the following to create and configure the Azure connector.
Make sure you have the permissions defined in the section Set up permissions in Google Cloud.
Make sure you have the 36-character Microsoft Azure Tenant ID.
Open the Connectors tab on the Settings page.
Select the organization where you activated Security Command Center Enterprise.
Click Add connector > Microsoft Azure.
On the Configure connector page, enter the Azure tenant ID.
To let Sensitive Data Protection profile your Azure data, keep Grant permissions for Sensitive Data Protection discovery selected. This option adds the Storage Blob Data Reader role in the Terraform template for the user-defined managed identity.
Select either of the following:
Add subscriptions automatically: Security Command Center will automatically discover and include subscriptions and management groups. You can optionally exclude subscription IDs from being collected by adding them to the Exclude Azure subscriptions field.
Add subscriptions individually: Security Command Center will not automatically discover subscriptions. You must define at least one subscription using the Add Azure Subscription field.
Under the Select Azure locations to collect data from section, optionally select one or more Microsoft Azure locations to collect data from. Leave this field empty to collect from all locations. When you select a location from the menu, the deselected locations are excluded.
The recommended settings are Automatically discover your Azure subscriptions and use all Microsoft Azure locations.
Click Next. The Connect to Azure page opens.
Leave the Connect to Azure page open and continue with Configure the Microsoft Azure environment.
After you configure Microsoft Azure, you will return to this page to finish configuring the Azure connector.
Configure the Microsoft Azure environment
Complete one of the following sections:
Configure Microsoft Azure manually
The following section describes high-level manual steps to configure the Azure environment that establishes trust between Security Command Center and Microsoft Azure. This procedure is not comprehensive. Each section provides links to Microsoft Azure documentation that explains how to accomplish that task.
Prerequisites
Make sure you have the permissions defined in the section Set up permissions in Microsoft Azure.
Make sure you have the service agent ID, which was generated when you created the Security Command Center Azure connector.
Step 1: Create a user-assigned managed identity in a resource group
Follow the steps in Manage user-assigned managed identities to create the user-assigned managed identity.
When creating the identity, specify the following:
- Subscription: Select the subscription where the identity will be managed.
- Resource group: Specify the resource group name, RESOURCE_GROUP_NAME, where the identity will be managed. You identified this when planning for the data collection.
- Region: Select a region, for example,
East US. - Name: Enter a name for the user-assigned managed identity, for example:
gcp-managed-identity. Replace the variable USER_ASSIGNED_MANAGED_IDENTITY_NAME with the identity name and it will be populated in the steps of this document where it is required.
Record the following information. You will use this in upcoming steps.
- Client ID: the 36-character value assigned to the identity.
- Object (principal) ID: the 36-character value assigned to the identity.
- Identity name: the value you defined for the Name.
Step 2: Create a federated credential for the user-assigned managed identity
To add a federated credential in the user-assigned managed identity, follow the steps in Configure a user-assigned managed identity to trust an external identity provider.
Use the guidance described by the Other issuer scenario and set the following:
- Federated credential scenario: Choose Other: Configure an identity managed by an external OpenID Connect provider to access Microsoft Azure resources as this application.
- Issuer URL: Enter
https://accounts.google.com. - Subject identifier: Enter the service agent ID generated when you created the Security Command Center Azure connector.
- Name: Enter a name for the federated credential, for example:
gcp-managed-identity-fic. - Audience: Enter
https://cloud.google.com
Step 3: Assign Microsoft Azure built-in roles
Follow the steps in Assign Azure roles using the Azure portal to assign the following Microsoft Azure built-in roles to the user-assigned managed identity:
- Key Vault Reader
- Reader
- Storage Blob Data Reader
Grant these roles at the root management group scope.
Step 4: Assign the Microsoft Entra ID built-in roles
Follow the steps in Assign Microsoft Entra roles to users to assign the following Microsoft Entra ID built-in roles to the user-assigned managed identity:
- Directory Readers
- Security Reader
When you are done, continue with section Complete the Azure connector configuration.
Configure Microsoft Azure using Terraform
The following high-level steps describe how to use Terraform to configure Microsoft Azure. This procedure is not comprehensive. For more detail about using Terraform to provision resources, see Terraform on Azure documentation.
Open the Connect to Azure page that you left open when you created the Azure connector.
Click Download Terraform Templates. This downloads the
azure_terraform.zipfile containing multiple JSON files.Sign in to Microsoft Azure, and then open Azure Cloud Shell with either BASH or Azure PowerShell.
Configure Terraform according to your organization policies using one of the following instructions:
Copy the
azure_terraform.zipfile to your Azure Cloud Shell environment, and then extract the contents. You will see the following files:main.tf.json,outputs.tf.json,providers.tf.json, andvariables.tf.json.Create copies of these files in a separate directory.
- Create a new directory to test the sample Terraform code and make it the current directory.
In the newly created directory, create copies of the extracted JSON files with the same name as the original file:
- Create a new file named
main.tf.json, and then copy and paste the code from the extractedmain.tf.jsonfile. - Create a new file named
providers.tf.json, and then copy and paste the code from the extractedproviders.tf.jsonfile. - Create a new file named
outputs.tf.json, and then copy and paste the code from the extractedoutputs.tf.jsonfile. - Create a new file named
variables.tf.json, and then copy and paste the code from the extractedvariables.tf.jsonfile.
- Create a new file named
Run the following command to initialize the Terraform deployment.
terraform init -upgradeRun the following command to create an execution plan.
terraform plan -out main.tfplan -var="resource_group_name=RESOURCE_GROUP_NAME" -var="user_assigned_managed_identity_name=USER_ASSIGNED_MANAGED_IDENTITY_NAME"Replace the following:
RESOURCE_GROUP_NAME: the name of the Microsoft Azure resource group where the user-assigned managed identity will be created.USER_ASSIGNED_MANAGED_IDENTITY_NAME: the name of the user-assigned managed identity to be created. If this is not specified, the default value isgoogle-cloud-managed-identity.
Execute the following command to apply the execution plan to the Microsoft Azure infrastructure.
terraform apply main.tfplanContinue with the section Complete the Azure connector configuration.
Complete the Azure connector configuration
Make sure you have the following information about the Microsoft Azure user-assigned managed identity:
- Client ID: the 36-character value assigned to the identity.
- Object (principal) ID: the 36-character value assigned to the identity.
For information about how to find this information, see List user-assigned managed identities.
Open the Connect to Azure page that you left open when you created the Azure connector.
Under the Azure managed identity details section, enter the following:
- Managed identity client ID: this is the Client ID.
- Managed identity object ID: this is the Object (principal) ID.
Click Continue.
In the Test connector page, click Test Connector to verify that Security Command Center can connect to the Microsoft Azure environment.
If the connection is successful, Google Cloud service agent can assume the Microsoft Azure user-assigned managed identity and has the required Microsoft Azure and Microsoft Entra permissions. If the connection isn't successful, see Troubleshooting errors when testing the connection.
Click Save. The Connectors page appears.
The connector starts scanning and collecting data from the Azure subscriptions and locations that you specified. It might take up to 24 hours for findings to appear.
Troubleshooting errors when testing the connection
The following section describes errors that may occur when you test the connection between Security Command Center and Microsoft Azure, and how to resolve each.
AZURE_ENABLED_SUBSCRIPTIONS_NOT_FOUND error
The Azure connector didn't find enabled subscriptions in the tenant identified by the Azure tenant ID field. Check for the following:
- If Add subscriptions automatically is selected, check that the
tenant includes subscriptions that are in the
Enabledstate and that don't appear in the Exclude Azure subscriptions field. - If Add subscriptions individually is selected, check that the
subscriptions you specified have the
Enabledstate.
AZURE_FAILED_TO_ASSUME_MANAGED_IDENTITY error
The connection is invalid because the Microsoft Azure user-assigned managed identity can't be assumed by the Google Cloud service agent. The following may be possible causes:
- The user-assigned managed identity specified in the connection does not exist or the configuration is incorrect.
- The user-assigned managed identity specified in the connection may be missing the federated identity credential required to trust the Google Cloud service agent.
To resolve this issue, do the following:
- Review the settings when you created the user-assigned managed identity in a resource group to ensure that identity exists and that the configuration is correct.
- Review the settings defined in the federated identity credential to ensure that the configuration is correct.
AZURE_MANAGED_IDENTITY_MISSING_REQUIRED_PERMISSION error
The connection is invalid because the Azure user-assigned managed identity is missing a required Microsoft Azure or Microsoft Entra role. The error message includes the missing role.
To resolve this issue, review the settings that you set when you configured the Microsoft Azure built-in roles and Microsoft Entra built-in roles to ensure that the configuration is correct.
AZURE_MANAGED_IDENTITY_ASSUMPTION_FAILED_AND_MISSING_REQUIRED_PERMISSION error
The connection is invalid because the Microsoft Azure user-assigned managed identity has failed to be assumed by the Google Cloud service agent and, at the same time, is missing some of the required Microsoft Azure or Microsoft Entra roles.
The error message includes details about which scope the user-assigned managed identity failed to assume and which roles are missing.
To resolve this issue, do the following:
- Review the settings assigned when you created the user-assigned managed identity in a resource group to ensure that the identity in the connection exists and that the settings are correct.
- Review the settings that you set when you configured the Microsoft Azure built-in roles and Microsoft Entra built-in roles to ensure that the configuration is correct.
Other troubleshooting tips
The following section describes behaviors and possible steps to address.
Finding is returned for a deleted Azure resource
After an Azure resource is deleted, it can take up to 40 hours for it to be removed from the Security Command Center asset inventory system. If you choose to resolve a finding by deleting the resource, you may see the finding reported within this time period because the asset has not yet been removed from the Security Command Center asset inventory system.
What's next
- If you are setting up Security Command Center Enterprise for the first time, configure additional features using the set up guide.
You can also do the following:
- Review and remediate findings from Azure data.
- View resources related to findings in the Security Operations console.
- View attack path simulations for Azure resources.