This tutorial shows how to replicate data between Managed Service for Apache Kafka clusters, by using the MirrorMaker 2.0 Source connector.
The clusters can be in the same project or in different projects, and they can be in the same region or different regions. For this tutorial, you set up replication across regions but within the same project. However, the steps are the same for other combinations.
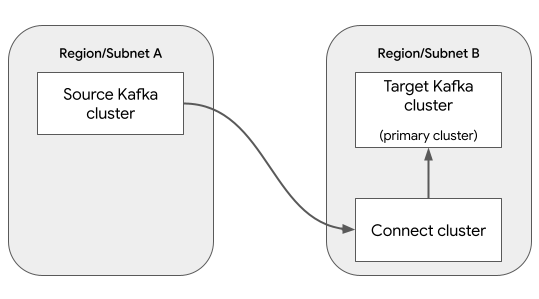
Architecture
For this scenario, there are three clusters:
A Kafka cluster whose data is being replicated. This cluster is called the source cluster, because it's the source of the data.
A Kafka cluster where the replicated data is written. This cluster is called the target cluster.
A Connect cluster, which lets you create and manage the MirrorMaker 2.0 Source connector.
A Connect cluster has a primary Kafka cluster, which is the Kafka cluster associated with the Connect cluster. To minimize latency for write operations, it's recommended to designate the target cluster as the primary cluster, and to put the Connect cluster in the same region as the target cluster.
The following diagram shows these components:
Data replication is performed by the MirrorMaker 2.0 Source connector. Two other MirrorMaker 2.0 connectors are optional for this scenario:
MirrorMaker 2.0 Checkpoint connector: Enables seamless failover, by ensuring that consumers on the target cluster can resume processing from the same point as the source cluster.
MirrorMaker 2.0 Heartbeat connector: Generates periodic heartbeat messages on the source Kafka cluster, which lets you monitor the health and status of the data replication.
This tutorial does not use these optional connectors. For more information, see When to use MirrorMaker 2.0.
Before you begin
Console
- Sign in to your Google Cloud account. If you're new to Google Cloud, create an account to evaluate how our products perform in real-world scenarios. New customers also get $300 in free credits to run, test, and deploy workloads.
-
In the Google Cloud console, on the project selector page, select or create a Google Cloud project.
Roles required to select or create a project
- Select a project: Selecting a project doesn't require a specific IAM role—you can select any project that you've been granted a role on.
-
Create a project: To create a project, you need the Project Creator
(
roles/resourcemanager.projectCreator), which contains theresourcemanager.projects.createpermission. Learn how to grant roles.
-
Verify that billing is enabled for your Google Cloud project.
-
Enable the Managed Kafka API.
Roles required to enable APIs
To enable APIs, you need the Service Usage Admin IAM role (
roles/serviceusage.serviceUsageAdmin), which contains theserviceusage.services.enablepermission. Learn how to grant roles. -
Make sure that you have the following role or roles on the project: Managed Kafka Cluster Editor, Managed Kafka Connect Cluster Editor, Managed Kafka Connector Editor
Check for the roles
-
In the Google Cloud console, go to the IAM page.
Go to IAM - Select the project.
-
In the Principal column, find all rows that identify you or a group that you're included in. To learn which groups you're included in, contact your administrator.
- For all rows that specify or include you, check the Role column to see whether the list of roles includes the required roles.
Grant the roles
-
In the Google Cloud console, go to the IAM page.
Go to IAM - Select the project.
- Click Grant access.
-
In the New principals field, enter your user identifier. This is typically the email address for a Google Account.
- In the Select a role list, select a role.
- To grant additional roles, click Add another role and add each additional role.
- Click Save.
-
gcloud
- Sign in to your Google Cloud account. If you're new to Google Cloud, create an account to evaluate how our products perform in real-world scenarios. New customers also get $300 in free credits to run, test, and deploy workloads.
-
Install the Google Cloud CLI.
-
If you're using an external identity provider (IdP), you must first sign in to the gcloud CLI with your federated identity.
-
To initialize the gcloud CLI, run the following command:
gcloud init -
Create or select a Google Cloud project.
Roles required to select or create a project
- Select a project: Selecting a project doesn't require a specific IAM role—you can select any project that you've been granted a role on.
-
Create a project: To create a project, you need the Project Creator
(
roles/resourcemanager.projectCreator), which contains theresourcemanager.projects.createpermission. Learn how to grant roles.
-
Create a Google Cloud project:
gcloud projects create PROJECT_ID
Replace
PROJECT_IDwith a name for the Google Cloud project you are creating. -
Select the Google Cloud project that you created:
gcloud config set project PROJECT_ID
Replace
PROJECT_IDwith your Google Cloud project name.
-
Verify that billing is enabled for your Google Cloud project.
-
Enable the Managed Kafka API:
Roles required to enable APIs
To enable APIs, you need the Service Usage Admin IAM role (
roles/serviceusage.serviceUsageAdmin), which contains theserviceusage.services.enablepermission. Learn how to grant roles.gcloud services enable managedkafka.googleapis.com
-
Grant roles to your user account. Run the following command once for each of the following IAM roles:
  roles/managedkafka.clusterEditor,
  roles/managedkafka.connectClusterEditor,
  roles/managedkafka.connectorEditor
gcloud projects add-iam-policy-binding PROJECT_ID --member="user:USER_IDENTIFIER" --role=ROLE
Replace the following:
PROJECT_ID: Your project ID.USER_IDENTIFIER: The identifier for your user account. For example,myemail@example.com.ROLE: The IAM role that you grant to your user account.
Create the source Kafka cluster
In this step, you create a Managed Service for Apache Kafka cluster. This cluster is the source cluster, which contains the data to replicate.
Console
Go to the Managed Service for Apache Kafka > Clusters page.
Click Create.
In the Cluster name box, enter a name for the cluster.
In the Region list, select a location for the cluster.
For Network configuration, configure the subnet where the cluster is accessible.
- For Project, select your project.
- For Network, select a VPC network in your project.
- For Subnet, select a subnet.
- Click Done.
Click Create.
While the cluster is being created, the cluster state is Creating. When the
cluster has finished being created, the state is Active.
gcloud
To create the source Kafka cluster, run the
managed-kafka clusters create
command.
gcloud managed-kafka clusters create SOURCE_KAFKA_CLUSTER \
--location=SOURCE_REGION \
--cpu=3 \
--memory=3GiB \
--subnets=projects/PROJECT_ID/regions/SOURCE_REGION/subnetworks/SOURCE_SUBNET \
--async
Replace the following:
SOURCE_KAFKA_CLUSTER: a name for the Kafka clusterSOURCE_REGION: the location of the clusterFor information about supported locations, see Managed Service for Apache Kafka locations.
PROJECT_ID: your project IDSOURCE_SUBNET: the subnet where you want to deploy the cluster; for example,default
The command runs asynchronously and returns an operation ID:
Check operation [projects/PROJECT_ID/locations/SOURCE_SUBNET/operations/OPERATION_ID] for status.
To track the progress of the create operation, use the
gcloud managed-kafka operations describe
command:
gcloud managed-kafka operations describe OPERATION_ID \
  --location=SOURCE_REGION
For more information, see Monitor the cluster creation operation.
Create a Kafka topic
When the source cluster is ready, create a topic as follows:
Console
Go to the Managed Service for Apache Kafka > Clusters page.
Click the name of the cluster.
In the cluster details page, click Create Topic.
In the Topic name box, enter a name for the topic.
Click Create.
gcloud
To create a Kafka topic, run the
managed-kafka topics create
command.
gcloud managed-kafka topics create TOPIC_NAME \
--cluster=SOURCE_KAFKA_CLUSTER \
--location=SOURCE_REGION \
--partitions=10 \
--replication-factor=3
Replace the following:
TOPIC_NAME: the name of the Kafka topic to createSOURCE_KAFKA_CLUSTER: the name of the source clusterSOURCE_REGION: the region where you created the source cluster
Create the target Kafka cluster
In this step, you create a second Managed Service for Apache Kafka cluster. This cluster is the target cluster, to which MirrorMaker 2.0 replicates data.
Console
Go to the Managed Service for Apache Kafka > Clusters page.
Click Create.
In the Cluster name box, enter a name for the cluster.
In the Region list, select a location for the cluster. Choose a different region from where the source cluster is located.
For Network configuration, configure the subnet where the target cluster is accessible. The subnet must be in the same VPC network as the source cluster's subnet.
- For Project, select your project.
- For Network, select the same VPC network as the source cluster's subnet.
- For Subnet, select the subnet.
- Click Done.
Click Create.
While the cluster is being created, the cluster state is Creating. When the
cluster has finished being created, the state is Active.
gcloud
To create the target Kafka cluster, run the
managed-kafka clusters create
command.
gcloud managed-kafka clusters create TARGET_KAFKA_CLUSTER \
--location=TARGET_REGION \
--cpu=3 \
--memory=3GiB \
--subnets=projects/PROJECT_ID/regions/TARGET_REGION/subnetworks/TARGET_SUBNET \
--async
Replace the following:
TARGET_KAFKA_CLUSTER: a name for the Kafka clusterTARGET_REGION: the location of the cluster; choose a different region from where the source cluster is located.For information about supported locations, see Managed Service for Apache Kafka locations.
PROJECT_ID: your project IDTARGET_SUBNET: the subnet where you want to deploy the cluster; for example,defaultSelect a subnet in the same VPC as the source cluster.
Create a Connect cluster
In this step, you create a Connect cluster. Creating a Connect cluster usually takes 20-30 minutes.
Before you start this step, make sure the target Kafka cluster from the previous step is fully created.
Console
Go to the Managed Service for Apache Kafka > Connect Clusters page.
Click Create.
For the Connect cluster name, enter a string. Example:
my-connect-cluster.For Primary Kafka cluster, select the target Kafka cluster that you created in the previous step. (Do not select your source Kafka cluster.)
For Location, Network configuration, and Worker subnet, you can either use the default values, or customize them to your specific requirements.
To enable the Connect cluster to access the subnet of the source cluster, perform the following steps:
Expand Accessible subnets.
Click Add a connected subnet.
For Subnet URI path, enter the subnet of the source Kafka cluster. Use the following format:
projects/PROJECT_ID/regions/SOURCE_REGION/subnetworks/SOURCE_SUBNETReplace the following:
PROJECT_ID: your project IDSOURCE_REGION: the region where you created the source Kafka clusterSOURCE_SUBNET: the name of the subnet for the source Kafka cluster
To enable the Connect cluster to resolve the DNS domain of the source cluster, perform the following steps:
Expand Resolvable DNS domains.
Click Add a DNS domain.
In the Kafka cluster list, select the source Kafka cluster.
Click Create.
While the cluster is being created, the cluster state is Creating. When the
cluster has finished being created, the state is Active.
gcloud
To create a Connect cluster, run the
gcloud managed-kafka connect-clusters create
command.
gcloud managed-kafka connect-clusters create CONNECT_CLUSTER \
  --location=TARGET_REGION \
  --cpu=12 \
  --memory=12GiB \
  --primary-subnet=projects/PROJECT_ID/regions/TARGET_REGION/subnetworks/TARGET_SUBNET \
  --kafka-cluster=TARGET_KAFKA_CLUSTER \
  --dns-name=SOURCE_KAFKA_CLUSTER.SOURCE_REGION.managedkafka.PROJECT_ID.cloud.goog. \
  --additional-subnet=projects/PROJECT_ID/regions/SOURCE_REGION/subnetworks/SOURCE_SUBNET \
  --async
Replace the following:
CONNECT_CLUSTER: a name for the Connect clusterTARGET_REGION: the region where you created the target Kafka clusterPROJECT_ID: your project IDTARGET_SUBNET: the subnet where you created the target Kafka clusterTARGET_KAFKA_CLUSTER: the name of the target Kafka clusterSOURCE_KAFKA_CLUSTER: the name of the source Kafka clusterSOURCE_REGION: the region where you created the source Kafka clusterSOURCE_SUBNET: the name of the subnet for the source Kafka cluster
The command runs asynchronously and returns an operation ID:
Check operation [projects/PROJECT_ID/locations/TARGET_REGION/operations/OPERATION_ID] for status.
To track the progress of the create operation, use the
gcloud managed-kafka operations describe
command:
gcloud managed-kafka operations describe OPERATION_ID \
  --location=TARGET_REGION
For more information, see Monitor the cluster creation operation.
Create a MirrorMaker 2.0 Source connector
In this step, you create a MirrorMaker 2.0 Source connector. This connector replicates messages from the source Kafka cluster to the target Kafka cluster.
Console
Go to the Managed Service for Apache Kafka > Connect Clusters page.
Click the name of the Connect cluster.
Click Create connector.
For the Connector name, enter a string. Example:
mm2-connector.In the Connector plugin list, select
MirrorMaker 2.0 Source.Select Use primary Kafka cluster as target cluster.
For Source cluster, select Managed Service for Apache Kafka Cluster.
In the Kafka cluster list, select your source cluster.
In the Comma-separated topic names or topic regex box, enter the name of the Kafka topic or topics that you want to replicate.
Click Create.
gcloud
To create a MirrorMaker 2.0 Source connector, run the
gcloud managed-kafka connectors create
command.
gcloud managed-kafka connectors create CONNECTOR_NAME \
  --location=TARGET_REGION \
  --connect-cluster=CONNECT_CLUSTER \
  --configs=connector.class=org.apache.kafka.connect.mirror.MirrorSourceConnector,\
source.cluster.alias=source,\
source.cluster.bootstrap.servers=bootstrap.SOURCE_KAFKA_CLUSTER.SOURCE_REGION.managedkafka.PROJECT_ID.cloud.goog:9092,\
target.cluster.alias=target,\
target.cluster.bootstrap.servers=bootstrap.TARGET_KAFKA_CLUSTER.TARGET_REGION.managedkafka.PROJECT_ID.cloud.goog:9092,\
tasks.max=3,\
topics=TOPIC_NAME
Replace the following:
CONNECTOR_NAME: a name for the connector, such asmm2-connectorTARGET_REGION: the region where you created the Connect cluster and the target Kafka clusterCONNECT_CLUSTER: the name of your Connect clusterSOURCE_KAFKA_CLUSTER: the name of the source Kafka clusterSOURCE_REGION: the region where you created the source Kafka clusterPROJECT_ID: your project IDTARGET_KAFKA_CLUSTER: the name of the target Kafka clusterTOPIC_NAME: the name of the topic to replicate. This parameter can also specify a comma-separated list of topic names or a regular expression.
The MirrorMaker 2.0 Source connector creates a new topic in the target cluster
named "source.TOPIC_NAME", where
TOPIC_NAME is the name of the topic in the source
cluster.
View results
To verify that messages are being replicated, you can use the Kafka command line tools. For information about setting up the Kafka CLI, see Set up a client machine in the document Produce and consume messages with the CLI.
For example, to send a message to the source cluster, enter the following at the command line:
export BOOTSTRAP=bootstrap.SOURCE_KAFKA_CLUSTER.SOURCE_REGION.managedkafka.PROJECT_ID.cloud.goog:9092

for msg in {1..10}; do
  echo "message $msg"
done | kafka-console-producer.sh --topic TOPIC_NAME \
       --bootstrap-server $BOOTSTRAP --producer.config client.properties
To read the duplicated messages from the target cluster, enter the following at the command line:
export BOOTSTRAP=bootstrap.TARGET_KAFKA_CLUSTER.TARGET_REGION.managedkafka.PROJECT_ID.cloud.goog:9092

kafka-console-consumer.sh --topic source.TOPIC_NAME --from-beginning \
 --bootstrap-server $BOOTSTRAP --consumer.config client.properties
The output looks like the following:
message 1
message 2
message 3
message 4
[...]
Clean up
To avoid incurring charges to your Google Cloud account for the resources used in this tutorial, either delete the project that contains the resources, or keep the project and delete the individual resources.
Console
Delete the Connect cluster.
Go to the Managed Service for Apache Kafka > Connect Clusters page.
Select the Connect cluster and click Delete.
Delete the source Kafka cluster.
Go to the Managed Service for Apache Kafka > Clusters page.
Select the Kafka cluster and click Delete.
Repeat the previous step to delete the target Kafka cluster.
gcloud
To delete the Connect cluster, use the
gcloud managed-kafka connect-clusters deletecommand.gcloud managed-kafka connect-clusters delete CONNECT_CLUSTER \ --location=TARGET_REGION --asyncTo delete the source Kafka cluster, use the
gcloud managed-kafka clusters deletecommand.gcloud managed-kafka clusters delete SOURCE_KAFKA_CLUSTER \ --location=SOURCE_REGION --asyncRepeat the previous step to delete the target Kafka cluster.
gcloud managed-kafka clusters delete TARGET_KAFKA_CLUSTER \
  --location=TARGET_REGION --async
What's next
- Troubleshoot a MirrorMaker 2.0 connector
- Learn more about the MirrorMaker 2.0 connector.
- Learn more about Kafka Connect.