Halaman ini menunjukkan cara menayangkan API dari domain kustom yang Anda miliki, misalnya, example.com.
Sebagai alternatif untuk menggunakan nama domain Anda sendiri, Anda dapat menggunakan nama domain yang dikelola oleh Google. Lihat Menggunakan domain yang dikelola oleh Google untuk mengetahui informasi selengkapnya.
Sebelum memulai
- Dapatkan nama domain dari registrar nama domain jika Anda belum memiliki nama domain untuk digunakan untuk API Anda.
- Verifikasi kepemilikan domain.
- Beri nama nama host API Anda dengan nama domain Anda.
- Jika Anda menggunakan SSL dengan domain, dapatkan dan upload sertifikat SSL Anda.
- Deploy API dan Extensible Service Proxy (ESP) Anda.
Mengonfigurasi project API untuk menggunakan nama domain Anda
Ikuti petunjuk di tab yang sesuai.
Compute Engine
Cara yang direkomendasikan untuk menayangkan API dari instance Compute Engine adalah menggunakan load balancer di seluruh grup instance. Anda perlu mencadangkan alamat IP eksternal untuk nama domain dan menggunakan alamat IP eksternal tersebut untuk load balancer.
Untuk menayangkan API dari nama domain:
- Cadangkan minimal satu alamat IP eksternal statis di project Anda:
- Tetapkan nama yang Anda inginkan ke alamat IP yang dicadangkan
- Untuk Jenis, klik Global.
- Untuk Ditautkan ke, klik Tidak ada. Anda akan melampirkan alamat IP ke load balancer nanti.
- Buka akun penyedia domain Anda dan edit setelan domain. Anda
harus membuat data A yang berisi nama API, misalnya,
myapi.example.comdengan alamat IP eksternal di kolom datanya - Buat grup instance yang menyertakan instance yang menjalankan API dan
Extensible Service Proxy (ESP:
- Tetapkan nama yang Anda inginkan untuk grup dan tambahkan deskripsi.
- Dari daftar Zona, klik zona yang digunakan oleh instance API Anda.
- Di daftar Instance definition, klik Select existing instances
- Di kolom VM Instances, tambahkan instance VM yang menjalankan API.
- Klik Create.
- Buat dan konfigurasikan load balancer HTTP(S):
- Klik Define a Backend Service > Create or select a backend service.
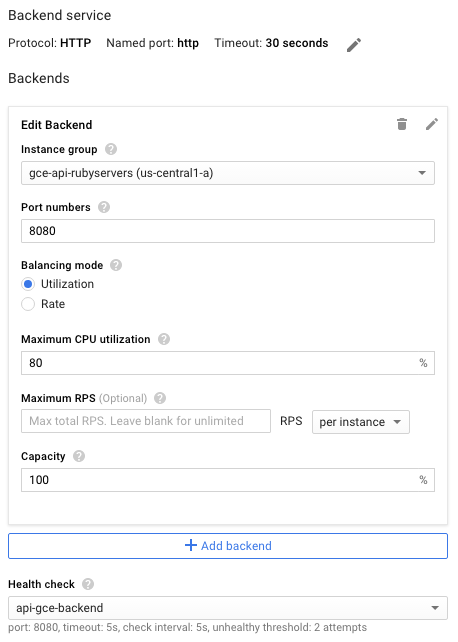
- Tetapkan nama dan deskripsi yang Anda inginkan untuk konfigurasi layanan backend ini.
- Di kolom Protocol, pilih protokol yang ingin Anda dukung melalui load balancer, HTTP atau HTTPS.
- Dalam daftar Instance group, klik grup instance Anda.
- Di kolom Port Numbers, masukkan
8080. - Klik Health check untuk mengonfigurasi health check:
- Masukkan nama untuk konfigurasi health check.
- Tetapkan port
8080. - Untuk menyetujui nilai default yang tersisa, klik Simpan.
- Untuk saat ini, terima setelan default untuk konfigurasi lainnya. Anda dapat melakukan perubahan nanti sesuai kebutuhan, seperti port tambahan.
- Anda tidak perlu menetapkan apa pun di Aturan host dan jalur; Anda
dapat meneruskan semuanya ke API backend menggunakan filter
Semua yang tidak cocok default. Artinya, semua traffic ke load balancer diarahkan ke API di port
8080(port default) seperti yang ditentukan pada langkah sebelumnya. - Klik Frontend configuration.
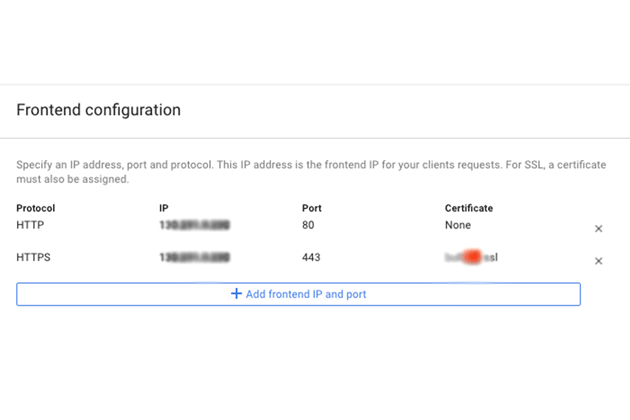
- Di kolom Protocol, pilih protokol yang ingin Anda dukung melalui load balancer, HTTP atau HTTPS.
- Dalam daftar IP, klik alamat IP eksternal yang Anda buat sebelumnya.
- Untuk protokol HTTPS, Anda harus menggunakan SSL. Di daftar Certificate, klik sertifikat yang Anda inginkan.
- Atau, jika Anda ingin mendukung protokol lain, klik Add frontend IP and port, tentukan protokol, alamat IP eksternal yang sama, dan port yang berbeda.
- Untuk membuat load balancer yang dikonfigurasi sepenuhnya, klik Create. Jika tombol Create tidak diaktifkan, periksa komponen yang baru saja Anda konfigurasi: tanda centang akan muncul di samping setiap komponen konfigurasi. Tanda centang yang tidak ada berarti Anda belum menyelesaikan konfigurasi.
- Setelah perubahan DNS diterapkan, permintaan akan dikirim ke API Anda menggunakan load balancer.
GKE
Untuk menayangkan API melalui domain untuk Google Kubernetes Engine (GKE), Anda perlu mengekspos ESP sebagai layanan, dengan menggunakan alamat IP eksternal yang ditampilkan untuk setelan DNS domain Anda. Perhatikan bahwa GKE otomatis melakukan load balancing untuk Anda.
Untuk mengekspos API sebagai layanan:
- Jika belum memilikinya,
Konfigurasi layanan Kubernetes
untuk backend API Anda. Buat file konfigurasi layanan,
service.yaml, dengan konten yang mirip dengan berikut:apiVersion: v1 kind: Service metadata: name: echo spec: ports: - port: 80 targetPort: 8081 protocol: TCP selector: app: echo-app type: LoadBalancer - Ubah label
selectoragar cocok dengan label backend Anda (app: echo-appdalam contoh ini) - Pastikan
targetPortcocok dengan port yang digunakan oleh ESP yang dikonfigurasi di backend API Anda. ESP menggunakan port8081secara default. - Deploy layanan Kubernetes:
kubectl apply -f service.yaml - Lihat alamat IP eksternal yang ditetapkan ke layanan yang diekspos:
kubectl get servicesEXTERNAL-IPyang mirip dengan berikut:
NAME CLUSTER-IP EXTERNAL-IP PORT(S) AGE hello-node 10.X.XXX.202 10X.XXX.XX.123 8080/TCP 1m - Ubah IP eksternal yang dihasilkan dari sementara menjadi statis.
- Pilih alamat IP eksternal Anda dari daftar.
- Di daftar Type, klik Static.
- Buka akun penyedia domain Anda dan edit setelan domain. Anda
harus membuat data A yang berisi nama API, misalnya,
myapi.example.com, dengan alamat IP eksternal di kolom datanya.