Die Zuverlässigkeit und Qualität Ihrer Patroni-Einrichtung mit Hochverfügbarkeit ist entscheidend für die Aufrechterhaltung des kontinuierlichen Datenbankbetriebs und die Minimierung von Ausfallzeiten.
Auf dieser Seite finden Sie eine umfassende Anleitung zum Testen Ihres Patroni-Clusters. Dabei werden verschiedene Fehlerszenarien, die Konsistenz der Replikation und Failover-Mechanismen behandelt.
Patroni-Einrichtung testen
Stellen Sie eine Verbindung zu einer Ihrer Patroni-Instanzen (alloydb-patroni1, alloydb-patroni2 oder alloydb-patroni3) her und rufen Sie den Patroni-Ordner für AlloyDB Omni auf.
cd /alloydb/
Prüfen Sie die Patroni-Logs.
docker compose logs alloydbomni-patroni
Die letzten Einträge sollten Informationen zum Patroni-Knoten enthalten. Die Ausgabe sollte in etwa so aussehen:
alloydbomni-patroni        | 2024-06-12 15:10:29,020 INFO: no action. I am (patroni1), the leader with the lock
alloydbomni-patroni        | 2024-06-12 15:10:39,010 INFO: no action. I am (patroni1), the leader with the lock
alloydbomni-patroni        | 2024-06-12 15:10:49,007 INFO: no action. I am (patroni1), the leader with the lock
Stellen Sie eine Verbindung zu einer beliebigen Instanz her, auf der Linux ausgeführt wird und die eine Netzwerkverbindung zu Ihrer primären Patroni-Instanz alloydb-patroni1 hat, und rufen Sie Informationen zur Instanz ab. Möglicherweise müssen Sie das jq-Tool installieren, indem Sie sudo apt-get install jq -y ausführen.
Wenn Sie den Patroni HTTP API-Endpunkt auf einem Patroni-Knoten aufrufen, werden verschiedene Details zum Status und zur Konfiguration der jeweiligen PostgreSQL-Instanz angezeigt, die von Patroni verwaltet wird. Dazu gehören Informationen zum Clusterstatus, zur Zeitachse, zu WAL und zu Health Checks, die angeben, ob die Knoten und der Cluster ordnungsgemäß ausgeführt werden.
HAProxy-Einrichtung testen
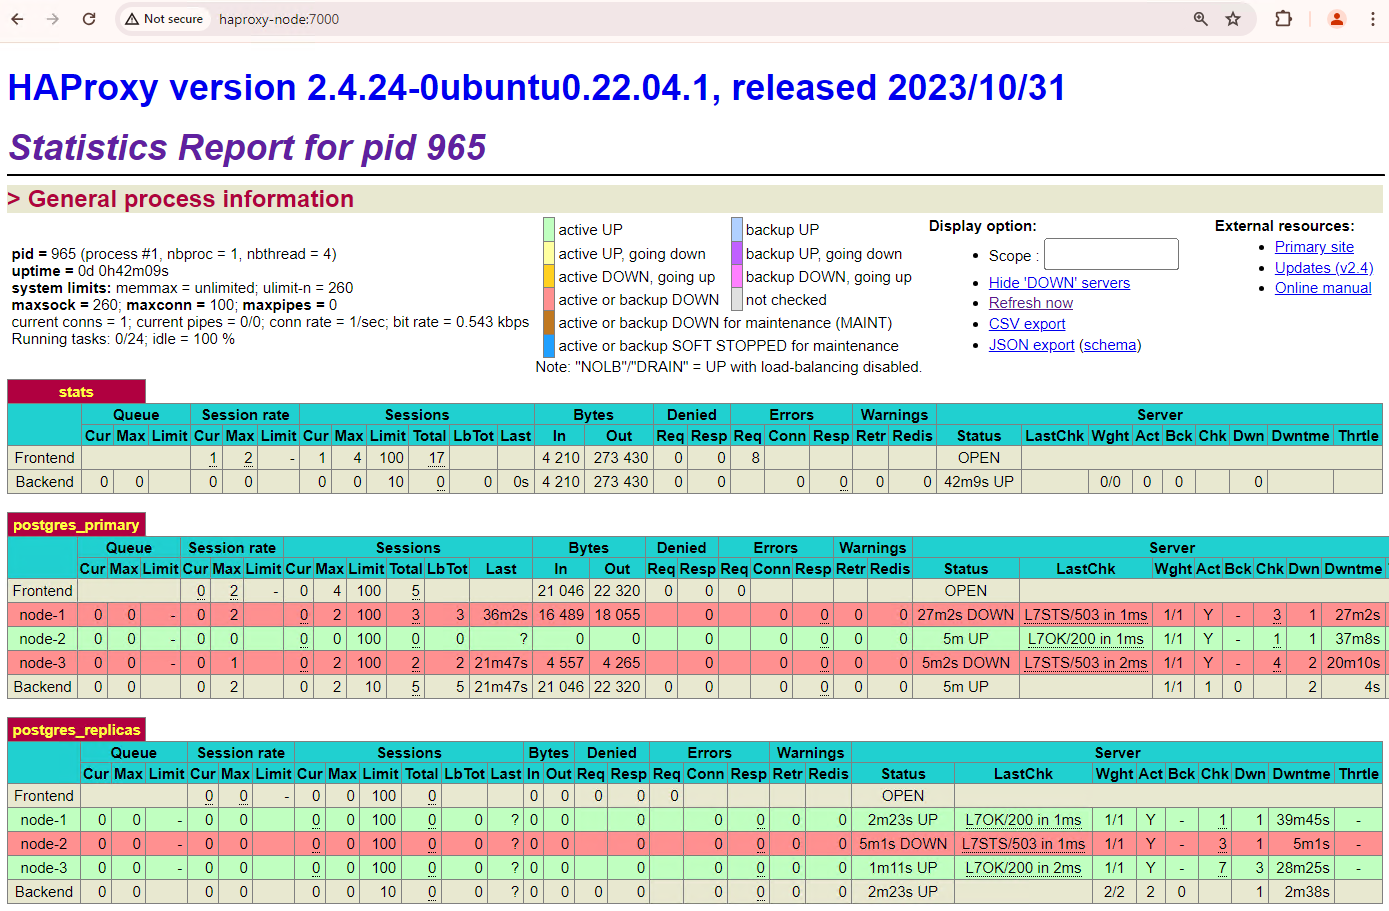
Rufen Sie auf einem Computer mit einem Browser und einer Netzwerkverbindung zu Ihrem HAProxy-Knoten die folgende Adresse auf: http://haproxy:7000. Alternativ können Sie anstelle des Hostnamens die externe IP-Adresse der HAProxy-Instanz verwenden.
Die Ausgabe sollte in etwa so aussehen:
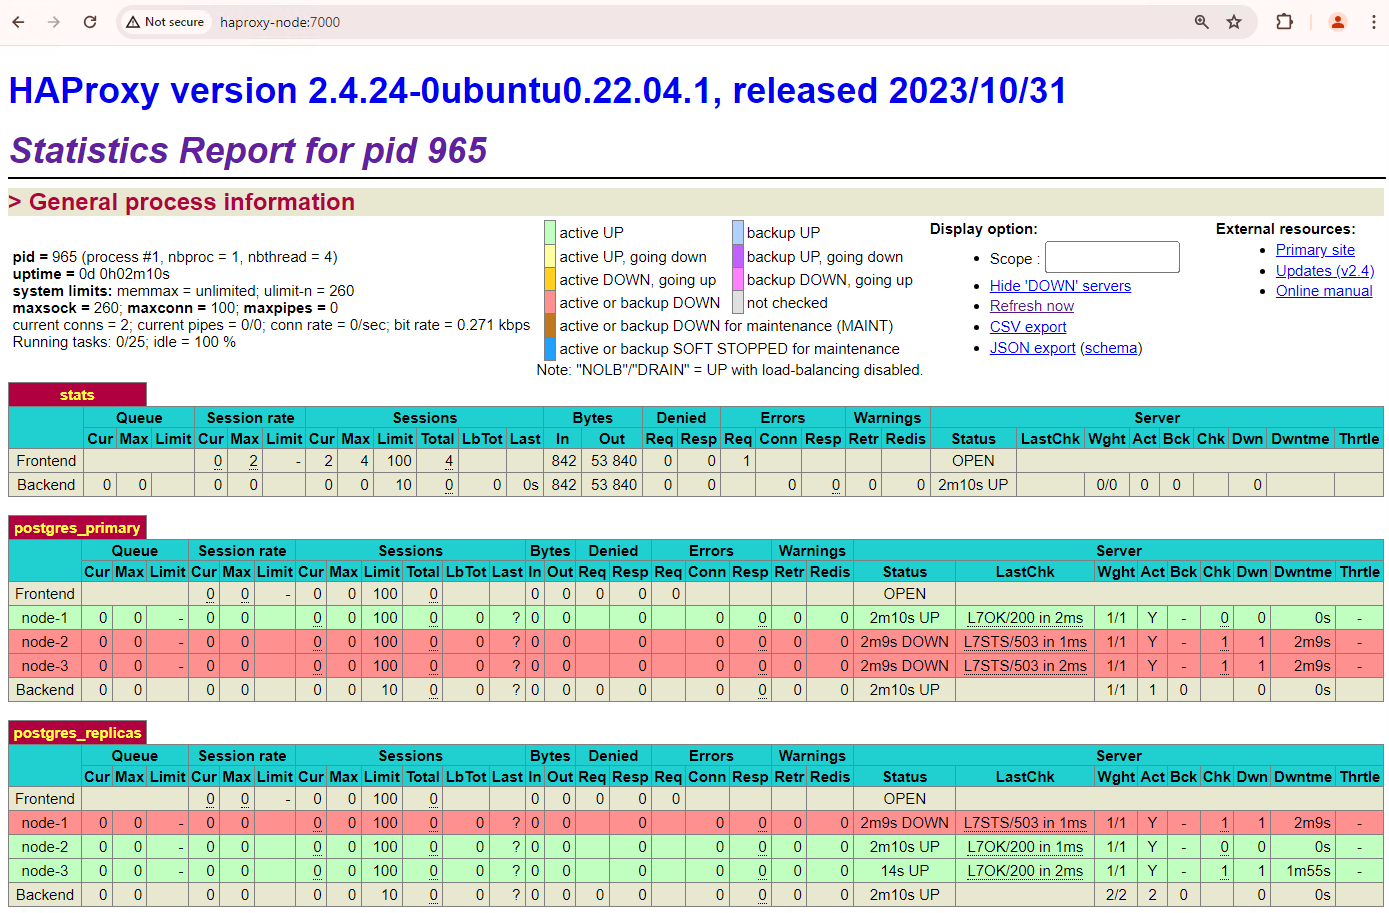
Abbildung 1. HAProxy-Statusseite mit dem Integritätsstatus und der Latenz von Patroni-Knoten.
Im HAProxy-Dashboard sehen Sie den Systemstatus und die Latenz Ihres primären Patroni-Knotens patroni1 sowie der beiden Replikate patroni2 und patroni3.
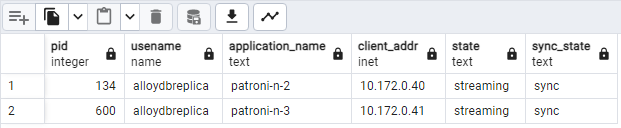
Sie können Abfragen ausführen, um die Replikationsstatistiken in Ihrem Cluster zu prüfen. Stellen Sie über einen Client wie pgAdmin eine Verbindung zu Ihrem primären Datenbankserver über HAProxy her und führen Sie die folgende Abfrage aus.
Es sollte ein Diagramm ähnlich dem folgenden angezeigt werden, das zeigt, dass patroni2 und patroni3 von patroni1 gestreamt werden.
Abbildung 2. Ausgabe von „pg_stat_replication“ mit dem Replikationsstatus der Patroni-Knoten.
Automatisches Failover testen
In diesem Abschnitt simulieren wir in Ihrem Cluster mit drei Knoten einen Ausfall auf dem primären Knoten, indem wir den angehängten laufenden Patroni-Container stoppen. Sie können entweder den Patroni-Dienst auf dem primären Knoten beenden, um einen Ausfall zu simulieren, oder einige Firewallregeln erzwingen, um die Kommunikation mit diesem Knoten zu beenden.
Rufen Sie auf der primären Patroni-Instanz den AlloyDB Omni-Patroni-Ordner auf.
cd /alloydb/
Beenden Sie den Container.
docker compose down
Die Ausgabe sollte in etwa so aussehen. Dadurch sollte bestätigt werden, dass der Container und das Netzwerk beendet wurden.
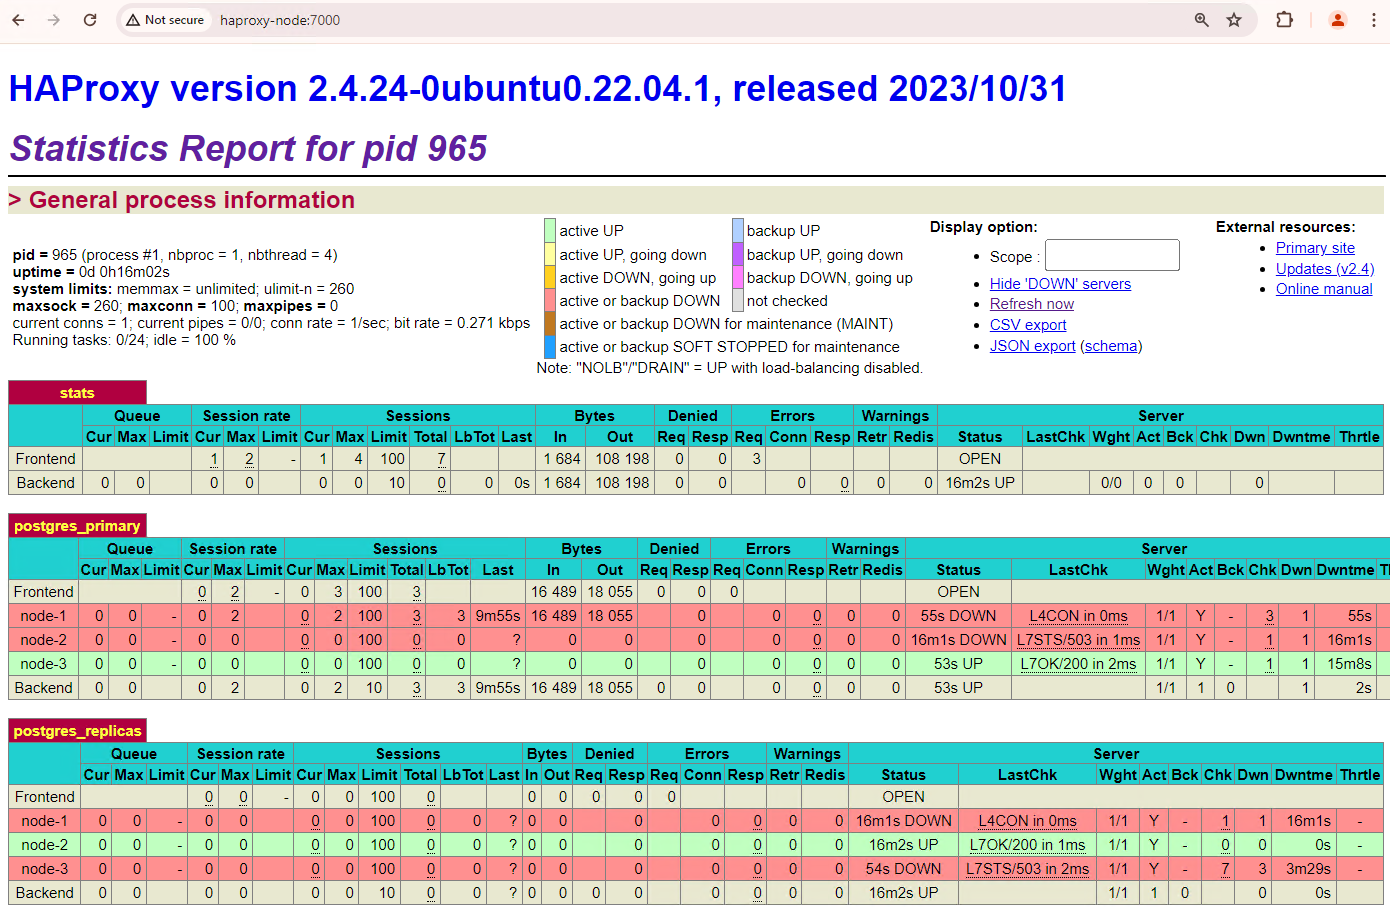
Aktualisieren Sie das HAProxy-Dashboard und sehen Sie sich an, wie das Failover abläuft.
Abbildung 3. HAProxy-Dashboard mit dem Failover vom primären Knoten zum Standby-Knoten.
Die Instanz patroni3 wurde zur neuen primären Instanz und patroni2 ist das einzige verbleibende Replikat. Die vorherige primäre Instanz, patroni1, ist nicht verfügbar und die Systemdiagnosen schlagen fehl.
Patroni führt den Failover durch eine Kombination aus Monitoring, Konsens und automatisierter Orchestrierung durch und verwaltet ihn. Sobald der primäre Knoten sein Lease nicht innerhalb eines bestimmten Zeitlimits verlängert oder einen Fehler meldet, erkennen die anderen Knoten im Cluster diesen Zustand über das Konsenssystem. Die verbleibenden Knoten koordinieren sich, um das am besten geeignete Replikat als neuen primären Knoten auszuwählen. Sobald ein Kandidatenreplikat ausgewählt wurde, stuft Patroni diesen Knoten zum primären Knoten hoch, indem die erforderlichen Änderungen vorgenommen werden, z. B. die PostgreSQL-Konfiguration aktualisiert und alle ausstehenden WAL-Datensätze wiedergegeben werden. Der neue primäre Knoten aktualisiert dann das Konsenssystem mit seinem Status und die anderen Replikate werden neu konfiguriert, um dem neuen primären Knoten zu folgen. Dazu gehört auch, dass sie ihre Replikationsquelle ändern und möglicherweise neue Transaktionen nachholen. HAProxy erkennt den neuen primären Knoten und leitet Clientverbindungen entsprechend weiter, um Unterbrechungen zu minimieren.
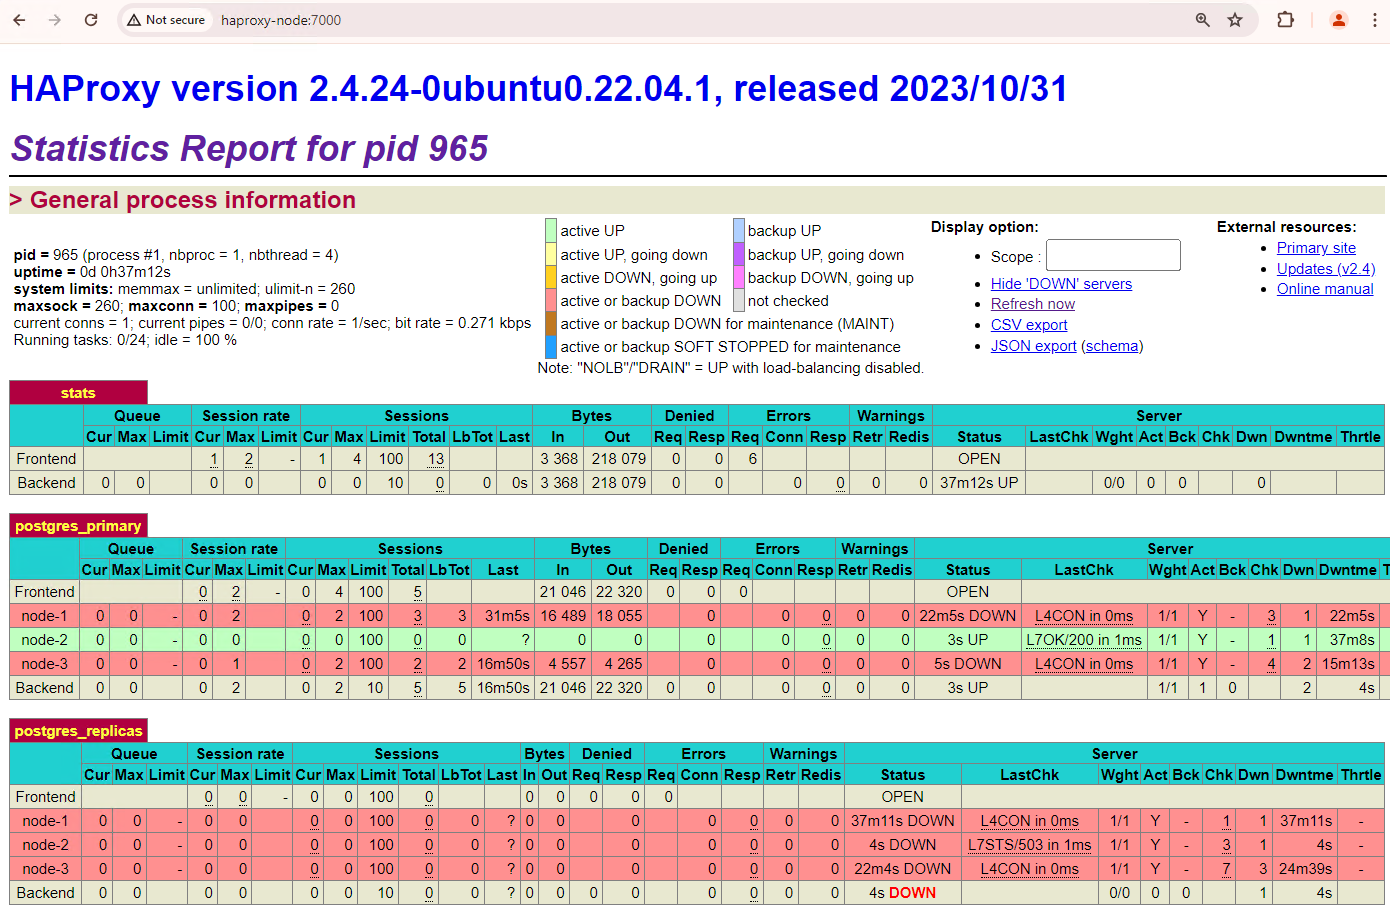
Stellen Sie über einen Client wie pgAdmin eine Verbindung zu Ihrem Datenbankserver über HAProxy her und prüfen Sie die Replikationsstatistiken in Ihrem Cluster nach dem Failover.
Es sollte ein Diagramm ähnlich dem folgenden angezeigt werden, in dem nur patroni2 gestreamt wird.
Abbildung 4. pg_stat_replication-Ausgabe mit dem Replikationsstatus der Patroni-Knoten nach dem Failover.
Ihr Cluster mit drei Knoten kann einen weiteren Ausfall überstehen. Wenn Sie den aktuellen primären Knoten patroni3 beenden, erfolgt ein weiteres Failover.
Abbildung 5. HAProxy-Dashboard mit dem Failover vom primären Knoten patroni3 zum Standby-Knoten patroni2.
Überlegungen zu Fallbacks
Ein Fallback ist der Prozess der Reaktivierung des vorherigen Quellknotens nach einem Failover. Ein automatisches Failback wird in einem Datenbankcluster mit hoher Verfügbarkeit im Allgemeinen nicht empfohlen, da es mehrere kritische Probleme gibt, z. B. unvollständige Wiederherstellung, Risiko von Split-Brain-Szenarien und Replikationsverzögerung.
Wenn Sie in Ihrem Patroni-Cluster die beiden Knoten hochfahren, mit denen Sie einen Ausfall simuliert haben, werden sie dem Cluster als Standby-Replikate wieder beitreten.
Abbildung 6. HAProxy-Dashboard, auf dem die Wiederherstellung von patroni1 und patroni3 als Standby-Knoten angezeigt wird.
patroni1 und patroni3 werden jetzt von der aktuellen primären Instanz patroni2 repliziert.
Abbildung 7. Ausgabe von „pg_stat_replication“ mit dem Replikationsstatus der Patroni-Knoten nach dem Fallback.
Wenn Sie manuell zum ursprünglichen primären Knoten zurückkehren möchten, können Sie das mit der patronictl-Befehlszeile tun. Wenn Sie sich für das manuelle Fallback entscheiden, können Sie einen zuverlässigeren, konsistenteren und gründlich geprüften Wiederherstellungsprozess sicherstellen und so die Integrität und Verfügbarkeit Ihrer Datenbanksysteme aufrechterhalten.
[[["Leicht verständlich","easyToUnderstand","thumb-up"],["Mein Problem wurde gelöst","solvedMyProblem","thumb-up"],["Sonstiges","otherUp","thumb-up"]],[["Schwer verständlich","hardToUnderstand","thumb-down"],["Informationen oder Beispielcode falsch","incorrectInformationOrSampleCode","thumb-down"],["Benötigte Informationen/Beispiele nicht gefunden","missingTheInformationSamplesINeed","thumb-down"],["Problem mit der Übersetzung","translationIssue","thumb-down"],["Sonstiges","otherDown","thumb-down"]],["Zuletzt aktualisiert: 2025-09-05 (UTC)."],[],[],null,["# Test your high availability setup\n\nSelect a documentation version: 16.8.0keyboard_arrow_down\n\n- [Current (16.8.0)](/alloydb/omni/current/docs/high-availability/test)\n- [16.8.0](/alloydb/omni/16.8.0/docs/high-availability/test)\n- [16.3.0](/alloydb/omni/16.3.0/docs/high-availability/test)\n- [15.12.0](/alloydb/omni/15.12.0/docs/high-availability/test)\n- [15.7.1](/alloydb/omni/15.7.1/docs/high-availability/test)\n- [15.7.0](/alloydb/omni/15.7.0/docs/high-availability/test)\n\n\u003cbr /\u003e\n\n| **Note:** Your use of AlloyDB Omni is subject to the agreement between you and Google that governs Google Cloud offerings. If you do not have a Google Cloud account, or have not otherwise entered into an agreement with Google that governs Google Cloud offerings, please do not proceed or download this software until you have done so. To create a Google Cloud account, see [the Google Cloud homepage](/docs/get-started).\n\n\u003cbr /\u003e\n\nEnsuring the reliability and quality of your high availability Patroni setup is\ncrucial for maintaining continuous database operations and minimizing downtime.\nThis page provides a comprehensive guide to testing your Patroni cluster,\ncovering various failure scenarios, replication consistency, and failover\nmechanisms.\n\nTest your Patroni setup\n-----------------------\n\n1. Connect to any of your patroni instances (`alloydb-patroni1`,\n `alloydb-patroni2`, or `alloydb-patroni3`) and navigate to the\n AlloyDB Omni patroni folder.\n\n ```\n cd /alloydb/\n ```\n2. Inspect the Patroni logs.\n\n ```\n docker compose logs alloydbomni-patroni\n ```\n\n The last entries should reflect information about the Patroni node. You\n should see something similar to the following. \n\n alloydbomni-patroni | 2024-06-12 15:10:29,020 INFO: no action. I am (patroni1), the leader with the lock\n alloydbomni-patroni | 2024-06-12 15:10:39,010 INFO: no action. I am (patroni1), the leader with the lock\n alloydbomni-patroni | 2024-06-12 15:10:49,007 INFO: no action. I am (patroni1), the leader with the lock\n\n3. Connect to any instance running Linux that has network connectivity to your\n primary Patroni instance, `alloydb-patroni1`, and get information about the\n instance. You might need to install the `jq` tool by running\n `sudo apt-get install jq -y`.\n\n ```\n curl -s http://alloydb-patroni1:8008/patroni | jq .\n ```\n\n You should see something similar to the following displayed. \n\n {\n \"state\": \"running\",\n \"postmaster_start_time\": \"2024-05-16 14:12:30.031673+00:00\",\n \"role\": \"master\",\n \"server_version\": 150005,\n \"xlog\": {\n \"location\": 83886408\n },\n \"timeline\": 1,\n \"replication\": [\n {\n \"usename\": \"alloydbreplica\",\n \"application_name\": \"patroni2\",\n \"client_addr\": \"10.172.0.40\",\n \"state\": \"streaming\",\n \"sync_state\": \"async\",\n \"sync_priority\": 0\n },\n {\n \"usename\": \"alloydbreplica\",\n \"application_name\": \"patroni3\",\n \"client_addr\": \"10.172.0.41\",\n \"state\": \"streaming\",\n \"sync_state\": \"async\",\n \"sync_priority\": 0\n }\n ],\n \"dcs_last_seen\": 1715870011,\n \"database_system_identifier\": \"7369600155531440151\",\n \"patroni\": {\n \"version\": \"3.3.0\",\n \"scope\": \"my-patroni-cluster\",\n \"name\": \"patroni1\"\n }\n }\n\nCalling the Patroni HTTP API endpoint on a Patroni node exposes various details\nabout the state and configuration of that particular PostgreSQL instance managed\nby Patroni, including cluster state information, timeline, WAL information, and\nhealth checks indicating whether the nodes and cluster are up and running\ncorrectly.\n\nTest your HAProxy setup\n-----------------------\n\n1. On a machine with a browser and network connectivity to your HAProxy node,\n go to the following address: `http://haproxy:7000`. Alternatively, you can\n use the external IP address of the HAProxy instance instead of its hostname.\n\n You should see something similar to the following screenshot.\n\n **Figure 1.** HAProxy status page showing health status and latency of\n Patroni nodes.\n\n In the HAProxy dashboard you can see the health status and latency of your\n primary Patroni node, `patroni1`, and of the two replicas, `patroni2` and\n `patroni3`.\n2. You can perform queries to check the replication stats in your cluster. From\n a client such as pgAdmin, connect to your primary database server through\n HAProxy and run the following query.\n\n SELECT\n pid, usename, application_name, client_addr, state, sync_state\n FROM\n pg_stat_replication;\n\n You should see something similar to the following diagram, showing that\n `patroni2` and `patroni3` are streaming from `patroni1`.\n\n **Figure 2.** pg_stat_replication output showing the replication state of\n the Patroni nodes.\n\nTest automatic failover\n-----------------------\n\nIn this section, in your three node cluster, we simulate an outage on the\nprimary node by stopping the attached running Patroni container. You can either\nstop the Patroni service on the primary to simulate an outage or enforce\nsome firewall rules to stop communication to that node.\n\n1. On the primary Patroni instance, navigate to the AlloyDB Omni\n Patroni folder.\n\n ```\n cd /alloydb/\n ```\n2. Stop the container.\n\n ```\n docker compose down\n ```\n\n You should see something similar to the following output. This should\n validate that the container and network were stopped. \n\n [+] Running 2/2\n ✔ Container alloydb-patroni Removed\n ✔ Network alloydbomni-patroni_default Removed\n\n3. Refresh the HAProxy dashboard and see how failover takes place.\n\n **Figure 3.** HAProxy dashboard showing the failover from the primary node\n to the standby node.\n\n The `patroni3` instance became the new primary, and `patroni2` is the only\n remaining replica. The previous primary, `patroni1`, is down and health\n checks fail for it.\n\n Patroni performs and manages the failover through a combination of\n monitoring, consensus, and automated orchestration. As soon as the primary\n node fails to renew its lease within a specified timeout, or if it reports a\n failure, the other nodes in the cluster recognize this condition through the\n consensus system. The remaining nodes coordinate to select the most suitable\n replica to promote as the new primary. Once a candidate replica is selected,\n Patroni promotes this node to primary by applying the necessary changes,\n such as updating the PostgreSQL configuration and replaying any outstanding\n WAL records. Then, the new primary node updates the consensus system with\n its status and the other replicas reconfigure themselves to follow the new\n primary, including switching their replication source and potentially\n catching up with any new transactions. HAProxy detects the new primary and\n redirects client connections accordingly, ensuring minimal disruption.\n4. From a client such as pgAdmin, connect to your database server through\n HAProxy and check the replication stats in your cluster after failover.\n\n SELECT\n pid, usename, application_name, client_addr, state, sync_state\n FROM\n pg_stat_replication;\n\n You should see something similar to the following diagram, showing that only\n `patroni2` is streaming now.\n\n **Figure 4.** pg_stat_replication output showing the replication state of\n the Patroni nodes after failover.\n5. Your three node cluster can survive one more outage. If you stop the current\n primary node, `patroni3`, another failover takes place.\n\n **Figure 5.** HAProxy dashboard showing the failover from the primary node,\n `patroni3`, to the standby node, `patroni2`.\n\nFallback considerations\n-----------------------\n\nFallback is the process to reinstate the former source node after a failover\nhas occurred. Automatic fallback is generally not recommended in a high\navailability database cluster because of several critical concerns, such as\nincomplete recovery, risk of split-brain scenarios, and replication lag.\n\nIn your Patroni cluster, if you bring up the two nodes that you simulated an\noutage with, they will rejoin the cluster as standby replicas.\n\n**Figure 6.** HAProxy dashboard showing the restoration of `patroni1` and\n`patroni3` as standby nodes.\n\nNow `patroni1` and `patroni3` are replicating from the current primary\n`patroni2`.\n\n**Figure 7.** pg_stat_replication output showing the replication state of the\nPatroni nodes after fallback.\n\nIf you want to manually fall back to your initial primary, you can do that by\nusing the [patronictl](https://patroni.readthedocs.io/en/latest/patronictl.html)\ncommand-line interface. By opting for manual fallback, you can ensure a more\nreliable, consistent, and thoroughly verified recovery process, maintaining the\nintegrity and availability of your database systems."]]