Preserve training progress using Autocheckpoint
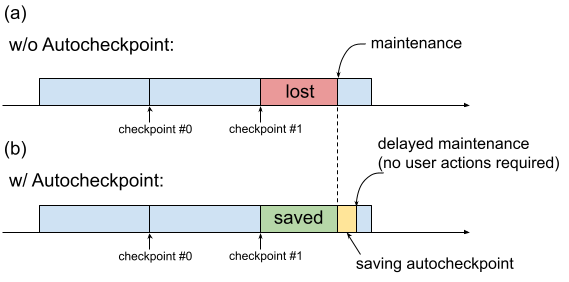
Historically, when a TPU VM requires maintenance, the procedure is initiated immediately, without leaving time for users to perform progress-preserving actions such as saving a checkpoint. This is shown in Figure 1(a).

Fig. 1. Illustration of the Autocheckpoint feature: (a) Without Autocheckpoint, the training progress from the last checkpoint is lost when there is an upcoming maintenance event. (b) With Autocheckpoint, the training progress since the last checkpoint can be preserved when there is an upcoming maintenance event.
You can use Autocheckpoint (Figure 1(b)) to preserve training progress by configuring your code to save a non-scheduled checkpoint when a maintenance event occurs. When a maintenance event occurs, progress since the last checkpoint is automatically saved. The feature works on both single slices and Multislice.
The Autocheckpoint feature works with frameworks that can capture SIGTERM signals and subsequently save a checkpoint. The supported frameworks include:
Using Autocheckpoint
The Autocheckpoint feature is disabled by default. When you create a
TPU or a request a queued resource,
you can enable Autocheckpoint by adding the --autocheckpoint-enabled flag when provisioning
the TPU.
With the feature enabled, Cloud TPU
performs the following steps once it receives notification of a
maintenance event:
- Capture SIGTERM signal sent to the process using the TPU device
- Wait until the process exits, or 5 minutes have elapsed, whichever comes first
- Perform maintenance on the impacted slices
The infrastructure used by Autocheckpoint is ML framework-independent. Any ML framework can support Autocheckpoint if it can capture the SIGTERM signal and initiate a checkpointing process.
In the application code, you need to enable the Autocheckpoint capabilities provided by the ML framework. In Pax, for example, this means enabling command-line flags when launching the training. For more information, see the Autocheckpoint quickstart with Pax. Behind the scenes, the frameworks save a non-scheduled checkpoint when a SIGTERM signal is received, and the impacted TPU VM goes through maintenance when the TPU is no longer in use.
Quickstart: Autocheckpoint with MaxText
MaxText is a high performance, arbitrarily scalable, open source, well-tested LLM written in pure Python/JAX targeting Cloud TPUs. MaxText contains all the necessary setup to use the Autocheckpoint feature.
The MaxText README
file describes
two ways to run MaxText at scale:
- Using
multihost_runner.py, recommended for experimentation - Using
multihost_job.py, recommended for production
When using multihost_runner.py, enable Autocheckpoint by setting
the autocheckpoint-enabled flag when provisioning the queued resource.
When using
multihost_job.py, enable Autocheckpoint by specifying the
ENABLE_AUTOCHECKPOINT=true command line flag when launching the job.
Quickstart: Autocheckpoint with Pax on a single slice
This section provides an example of how to set up and use Autocheckpoint with Pax on a single slice. With the appropriate setup:
- A checkpoint will be saved when a maintenance event occurs.
- Cloud TPU will perform maintenance on the affected TPU VM(s) after the checkpoint is saved.
- When Cloud TPU completes maintenance, you can use the TPU VM as usual.
Use the
autocheckpoint-enabledflag when creating the TPU VM or requesting a queued resource.For example:
Set environment variables:
export PROJECT_ID=your-project-id
export TPU_NAME=your-tpu-name
export ZONE=zone-you-want-to-use
export ACCELERATOR_TYPE=your-accelerator-type
export RUNTIME_VERSION=tpu-ubuntu2204-base
Environment variable descriptions
Variable Description PROJECT_IDYour Google Cloud project ID. Use an existing project or create a new one. TPU_NAMEThe name of the TPU. ZONEThe zone in which to create the TPU VM. For more information about supported zones, see TPU regions and zones. ACCELERATOR_TYPEThe accelerator type specifies the version and size of the Cloud TPU you want to create. For more information about supported accelerator types for each TPU version, see TPU versions. RUNTIME_VERSIONThe Cloud TPU software version. Set your project ID and zone in your active configuration:
gcloud config set project $PROJECT_ID
gcloud config set compute/zone $ZONE
Create a TPU:
gcloud alpha compute tpus tpu-vm create $TPU_NAME \
    --accelerator-type $ACCELERATOR_TYPE \
    --version $RUNTIME_VERSION \
    --autocheckpoint-enabled
Connect to the TPU using SSH:
gcloud compute tpus tpu-vm ssh $TPU_NAMEInstall Pax on a single slice
The Autocheckpoint feature works on Pax versions 1.1.0 and later. On the TPU VM, install
jax[tpu]and the latestpaxml:pip install paxml && pip install jax[tpu] -f https://storage.googleapis.com/jax-releases/libtpu_releases.html
Configure the
LmCloudSpmd2Bmodel. Before running the training script, changeICI_MESH_SHAPEto[1, 8, 1]:@experiment_registry.register class LmCloudSpmd2B(LmCloudSpmd): """SPMD model with 2B params. Global batch size = 2 * 2 * 1 * 32 = 128 """ PERCORE_BATCH_SIZE = 8 NUM_LAYERS = 18 MODEL_DIMS = 3072 HIDDEN_DIMS = MODEL_DIMS * 4 CHECKPOINT_POLICY = layers.AutodiffCheckpointType.SAVE_NOTHING ICI_MESH_SHAPE = [1, 8, 1]
Launch the training with the appropriate configuration.
The following example shows how to configure the
LmCloudSpmd2Bmodel to save checkpoints triggered by Autocheckpoint to a Cloud Storage bucket. Replace your-storage-bucket with the name of an existing bucket, or create a new bucket.export JOB_LOG_DIR=gs://your-storage-bucket { python3 .local/lib/python3.10/site-packages/paxml/main.py \ --jax_fully_async_checkpoint=1 \ --exit_after_ondemand_checkpoint=1 \ --exp=tasks.lm.params.lm_cloud.LmCloudSpmd2B \ --job_log_dir=$JOB_LOG_DIR; } 2>&1 | tee pax_logs.txt
Note the two flags that are passed to the command:
jax_fully_async_checkpoint: With this flag on,orbax.checkpoint.AsyncCheckpointerwill be used. TheAsyncCheckpointerclass automatically saves a checkpoint when the training script receives a SIGTERM signal.exit_after_ondemand_checkpoint: With this flag on, the TPU process exits after the Autocheckpoint is successfully saved, which triggers the maintenance to be performed immediately. If you don't use this flag, the training will continue after the checkpoint is saved and Cloud TPU will wait for a timeout to occur (5 minutes) before performing the required maintenance.
Autocheckpoint with Orbax
The Autocheckpoint feature is not limited to MaxText or Pax. Any framework that can capture the SIGTERM signal and initiate a checkpointing process works with the infrastructure provided by Autocheckpoint. Orbax, a namespace that provides common utility libraries for JAX users, provides these capabilities.
As explained in the Orbax documentation,
these capabilities are enabled by default for users
of orbax.checkpoint.CheckpointManager. The save method
that is called after every step automatically checks whether a maintenance
event is impending, and if so, saves a checkpoint even if the step number
is not a multiple of save_interval_steps.
The GitHub documentation
also illustrates how to make the training exit after saving an
Autocheckpoint, with a modification in the user code.
