This page describes several common database administration and reporting tools that you can use to connect to your Cloud SQL instances.
Overview
Database administration and reporting tools provide varying degrees of support for managing your database. Select a tool based on the type of administration and reporting that you need to do. For example, if you need to connect to one database and issue a few SQL commands, consider using the MySQL client. See Connecting MySQL Client Using IP Addresses. If you need to design or manage many databases simultaneously, then use one of the visual-based tools discussed here.
We discuss a limited number of tools in this page. If your tool is not discussed, it's likely that you can successfully connect by following the steps for a similar tool.
Connect with MySQL Workbench
This section shows how to connect to your Cloud SQL instance database with MySQL Workbench.
- In the MySQL Workbench home view, click New Connection.
- In the Setup new connection form, provide a
Connection Name, Hostname,
Username, and Default Schema, if applicable,
as show in Figure 1.
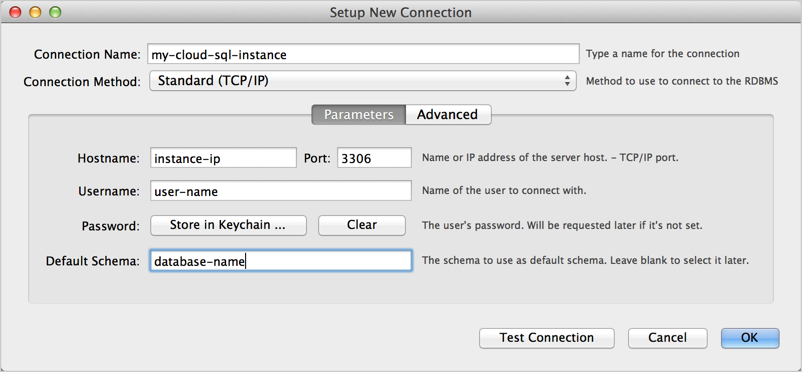
Figure 1: New connection in MySQL Workbench Setup New Connection form. - Click Test Connection. You are prompted for a password.
- Optionally, click Advanced, and fill in the information
for connecting with SSL as shown in Figure 2. Be sure to select
Use SSL if available and specify an SSL CA File,
an SSL CERT File, and an SSL key File.
Learn more about using SSL
certificates with Cloud SQL.
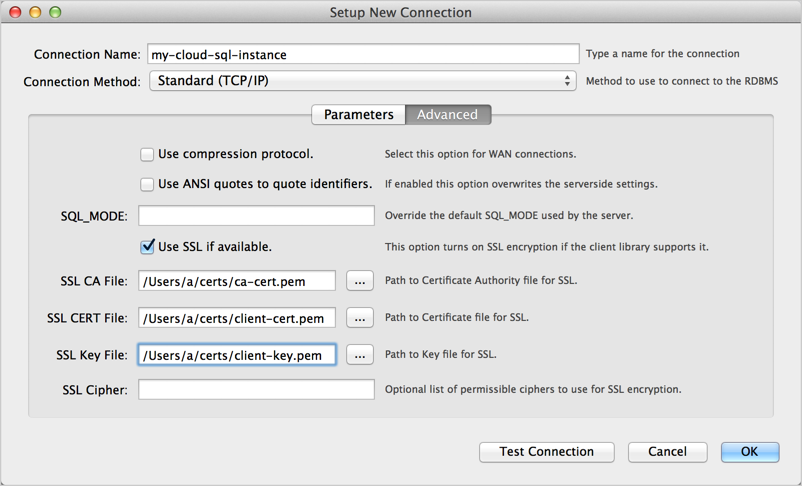
Figure 2: Specifying advanced options in the MySQL Workbench Setup New Connection form. - Click Test Connection to make sure all the advanced parameters are set correctly.
- Click Close.
- Connect with the connection you created.
- Once connected, you can test if you're using SSL by executing the following
SQL statement:
SHOW STATUS like 'ssl_cipher';
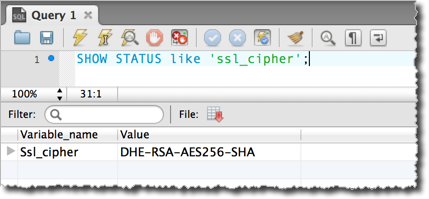
Figure 3: Testing if the MySQL Workbench connection uses SSL.
Connect with Toad for MySQL
This section shows how to connect to your Cloud SQL instance database with Toad for MySQL.
- In Toad for MySQL, create a new connection.
- In the New MySQL Connection form, fill in the
following information:
- User: The name of a user in your MySQL database.
- Password: The password for the specified user.
- Host: The IP address of your instance. For more information, see Configuring Application Access Control. If you've mapped the IP address to the hostname of your local server, you can use that in this field.
- Database: The database instance to connect to.
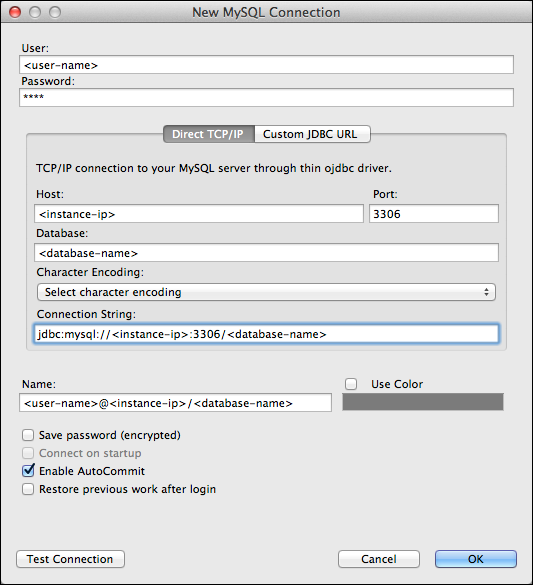
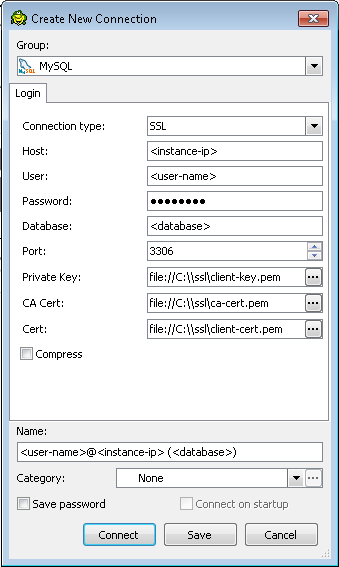
Figure 4: The Create New Connection dialog box in Toad for Mac - Click Test Connection to confirm that the connection information is correct.
- Click OK to start the connection.
- In the Enter Password dialog box, enter the password for the user. This dialog box appears because we did not choose Save password (encrypted) in the Create New Connection dialog box.
Configure Toad to use SSL
In Figure 5, a Create New Connection dialog box is shown with information for connecting with SSL. All versions of Toad might not support connecting with SSL.
Once connected, you can test if you're using SSL by executing the following
SQL statement and verifying that the ssl_cipher value is not empty:
SHOW STATUS like 'ssl_cipher';
Connect with SQuirrel SQL
This section shows how to connect to your Cloud SQL instance database with SQuirrel SQL.
- In the SQuirrel SQL client, select the Aliases panel to make it active.
- In the Aliases menu, select New Alias.
- Fill out the information, as shown in Figure 6. Be sure to select the
MySQL Driver and provide values for <instance-ip>, <database>,
and <user-name>.
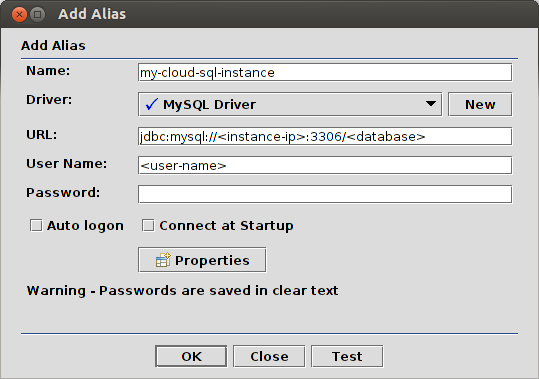
Figure 6: Configuring a SQuirrel SQL connection to MySQL. - Click Test to test the connection. You are prompted for a password.
- Click OK to save the alias.
- In the Aliases panel, right-click the alias you created and select Connect.
Configure SQuirrel SQL to use SSL
This section assumes that you've created an SSL certificate (see Configuring SSL for an instance) and you have three files:
- A CA certificate file, for example, ca-cert.pem.
- A client public key certificate file, for example, client-cert.pem.
- A client private key file, for example, client-key.pem.
Use these files as described in Connecting Securely Using SSL in the MySQL Reference Manual to create keystore and truststore files. You need to specify the keystore and truststore files when you start SQuirrel SQL. One way to do this is to edit the script that launches the SQuirrel SQL application as follows:
$JAVACMD -Djavax.net.ssl.keyStore=<path-to-keystore> \
         -Djavax.net.ssl.keyStorePassword=<keystore-password> \
         -Djavax.net.ssl.trustStore=<path-to-truststore> \
         -Djavax.net.ssl.trustStorePassword=<truststore-password> \
         [existing launch parameters]
After you've started SQuirrel SQL with the valid keystore and truststore information, you can connect with:
jdbc:mysql://<instance-ip>:3306/<database>?verifyServerCertificate=true&useSSL=true&requireSSL=true
Once connected, you can test if you're using SSL by executing the following
SQL statement and verifying that the ssl_cipher value is not empty:
SHOW STATUS like 'ssl_cipher';