Tetap teratur dengan koleksi
Simpan dan kategorikan konten berdasarkan preferensi Anda.
Membuat solusi berbasis Deployment Manager
Saat membuat solusi Katalog Layanan untuk pengguna di organisasi Anda, Anda dapat membuat solusi Deployment Manager (DM), yang diluncurkan pengguna menggunakan template Deployment Manager. Setelah membuat solusi, Anda dapat membagikannya kepada pengguna dengan menambahkannya ke katalog.
Sebelum memulai
Anda harus memiliki peran Admin Katalog
(roles/cloudprivatecatalogproducer.admin) ATAUPengelola Katalog
(roles/cloudprivatecatalogproducer.manager) untuk organisasi Google Cloud
yang terkait dengan project Google Cloud yang mengaktifkan
Service Catalog. Jika Anda tidak memiliki peran ini, hubungi Administrator Organisasi Anda untuk meminta akses.
Enable the Cloud Deployment Manager and Compute Engine APIs.
Untuk membuat solusi Deployment Manager di Service Catalog, Anda harus menyiapkan file zip template Deployment Manager terlebih dahulu untuk diupload, yang harus berisi file berikut:
File template Jinja yang diakhiri dengan ekstensi .jinja atau file template
Python yang diakhiri dengan ekstensi .py.
File skema
yang diakhiri dengan ekstensi .jinja.schema untuk template Jinja atau ekstensi
py.schema untuk template Python.
Nama file zip harus sama dengan nama file skema dan Jinja atau
Python. Misalnya, jika file ZIP diberi nama
android-dev-environment.zip, file skema Jinja di dalam ZIP harus
diberi nama android-dev-environment.jinja.schema dan template Jinja harus
diberi nama android-dev-environment.jinja.
Contoh kode berikut menggambarkan file skema untuk membuat formulir deployment:
info:title:Single Google Compute Engine Machineauthor:Google Inc.description:Creates a virtual machine based on zone and machine type selection.required:-machinetype-zoneproperties:machinetype:title:Machine typetype:stringenum:-n2-standard-2-n2-standard-4-n2-standard-8-n2-highmem-2-n2-highmem-4-n2-highmem-8-n2-highcpu-2-n2-highcpu-4-n2-highcpu-8zone:title:Zonetype:stringenum:-us-central1-a-us-central1-c-us-east1-b-us-east1-c-us-west1-a-us-west1-b-us-west1-c
Contoh kode berikut menggambarkan file Jinja untuk membuat VM persisten:
# Creates a Persistent VMresources:-type:compute.v1.instancename:vm-{{ env["deployment"] }}properties:zone:{{properties["zone"]}}# Note the machineType definition at the end. n2-custom-4-5120 specifies n2 machine family with 4 CPUs and 5GB (5120 MB) of RAM. For custom machine types, refer to https://cloud.google.com/compute/docs/instances/creating-instance-with-custom-machine-typemachineType:https://www.googleapis.com/compute/v1/projects/{{ env["project"] }}/zones/{{ properties["zone"] }}/machineTypes/{{ properties["machinetype"] }}disks:-deviceName:boottype:PERSISTENTboot:trueautoDelete:trueinitializeParams:diskName:disk-{{ env["deployment"] }}sourceImage:https://www.googleapis.com/compute/v1/projects/debian-cloud/global/images/family/debian-9networkInterfaces:-network:https://www.googleapis.com/compute/v1/projects/{{ env["project"] }}/global/networks/default# Access Config required to give the instance a public IP addressaccessConfigs:-name:External NATtype:ONE_TO_ONE_NAT
Membuat solusi di Service Catalog
Untuk membuat solusi berbasis template Deployment Manager:
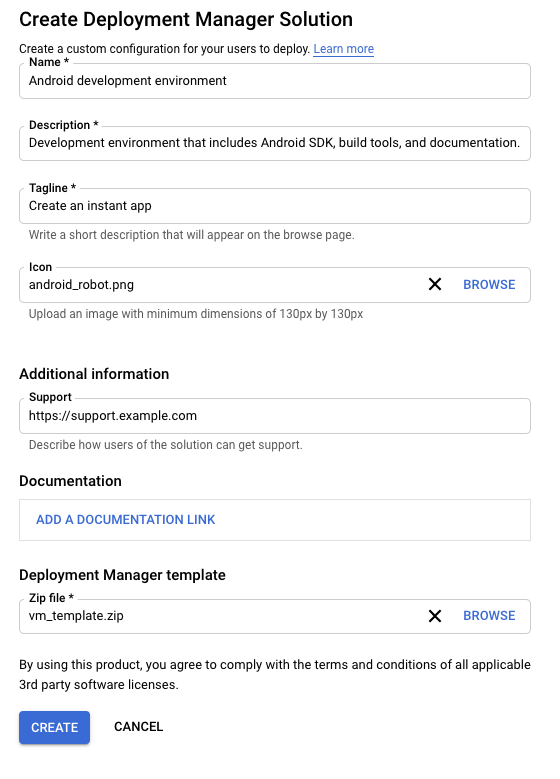
Klik CREATE SOLUTION. Di menu drop-down, pilih Buat solusi DM.
Masukkan nama, deskripsi, dan tagline untuk solusi Anda. Tagline adalah deskripsi singkat solusi yang dilihat pengguna saat menjelajahi Katalog Layanan.
Upload file zip, yang berisi file untuk konfigurasi deployment.
Jika perlu, upload ikon untuk solusi. Dimensi yang direkomendasikan untuk
ikon adalah 80 x 80 piksel.
Jika mau, masukkan link dukungan dan informasi kontak untuk kreator.
Secara opsional, tambahkan link ke dokumentasi untuk solusi.
Klik BUAT.
Screenshot berikut menggambarkan pembuatan solusi berbasis DM:
Langkah berikutnya
Tetapkan solusi ke katalog, sehingga pengguna di
organisasi Anda dapat mengakses dan men-deploy solusi.
[[["Mudah dipahami","easyToUnderstand","thumb-up"],["Memecahkan masalah saya","solvedMyProblem","thumb-up"],["Lainnya","otherUp","thumb-up"]],[["Sulit dipahami","hardToUnderstand","thumb-down"],["Informasi atau kode contoh salah","incorrectInformationOrSampleCode","thumb-down"],["Informasi/contoh yang saya butuhkan tidak ada","missingTheInformationSamplesINeed","thumb-down"],["Masalah terjemahan","translationIssue","thumb-down"],["Lainnya","otherDown","thumb-down"]],["Terakhir diperbarui pada 2025-09-04 UTC."],[],[],null,["# Creating a Deployment Manager-based solution\n============================================\n\nWhen creating Service Catalog solutions for users in your organization, you can\ncreate a Deployment Manager (DM) solution, which users launch\nusing a Deployment Manager template. After you create a solution,\nyou can share it with your users by adding it to [catalogs](/service-catalog/docs/create-catalog).\n| **Note:** We recommend [creating a Terraform configuration](/service-catalog/docs/terraform-configuration) to take advantage of the open-source infrastructure as code software tool.\n\nBefore you begin\n----------------\n\n- You must have the [Catalog Admin](/service-catalog/docs/access-control#instance_admin_role)\n (`roles/cloudprivatecatalogproducer.admin`) *OR*\n [Catalog Manager](/service-catalog/docs/access-control#catalog_manager_role)\n (`roles/cloudprivatecatalogproducer.manager`) role for the Google Cloud\n organization associated with the Google Cloud project which has\n Service Catalog enabled. If you don't have this role, contact your\n Organization Administrator to request access.\n\n\n-\n\n\n Enable the Cloud Deployment Manager and Compute Engine APIs.\n\n\n [Enable the APIs](https://console.cloud.google.com/flows/enableapi?apiid=deploymentmanager,compute_component)\n\nPreparing your deployment template\n----------------------------------\n\nTo create a Deployment Manager solution in Service Catalog,\nyou first prepare a [Deployment Manager template](https://cloud.google.com/deployment-manager/docs/configuration/templates/create-basic-template)\nzip file to upload, which must contain the following files:\n\n- A Jinja template file ending in the `.jinja` extension or a Python template file ending in the `.py` extension.\n- A [schema file](/deployment-manager/docs/configuration/templates/using-schemas) ending in the `.jinja.schema` extension for a Jinja template or the `py.schema` extension for a Python template.\n\nThe name of the zip file must match the names of both the schema and Jinja or\nPython files. For example, if the zip file is named\n`android-dev-environment.zip`, the Jinja schema file inside the zip must be\nnamed `android-dev-environment.jinja.schema` and the Jinja template must be\nnamed `android-dev-environment.jinja`.\n\nThe following code sample illustrates a schema file to create a deployment form: \n\n\n\n info:\n title: Single Google Compute Engine Machine\n author: Google Inc.\n description: Creates a virtual machine based on zone and machine type selection.\n\n required:\n - machinetype\n - zone\n\n properties:\n machinetype:\n title: Machine type\n type: string\n enum:\n - n2-standard-2\n - n2-standard-4\n - n2-standard-8\n - n2-highmem-2\n - n2-highmem-4\n - n2-highmem-8\n - n2-highcpu-2\n - n2-highcpu-4\n - n2-highcpu-8\n zone:\n title: Zone\n type: string\n enum:\n - us-central1-a\n - us-central1-c\n - us-east1-b\n - us-east1-c\n - us-west1-a\n - us-west1-b\n - us-west1-c\n\nThe following code sample illustrates a Jinja file to create a persistent VM: \n\n\n\n # Creates a Persistent VM\n resources:\n - type: compute.v1.instance\n name: vm-{{ env[\"deployment\"] }}\n properties:\n zone: {{ properties[\"zone\"] }}\n # Note the machineType definition at the end. n2-custom-4-5120 specifies n2 machine family with 4 CPUs and 5GB (5120 MB) of RAM. For custom machine types, refer to https://cloud.google.com/compute/docs/instances/creating-instance-with-custom-machine-type\n machineType: https://www.googleapis.com/compute/v1/projects/{{ env[\"project\"] }}/zones/{{ properties[\"zone\"] }}/machineTypes/{{ properties[\"machinetype\"] }}\n disks:\n - deviceName: boot\n type: PERSISTENT\n boot: true\n autoDelete: true\n initializeParams:\n diskName: disk-{{ env[\"deployment\"] }}\n sourceImage: https://www.googleapis.com/compute/v1/projects/debian-cloud/global/images/family/debian-9\n networkInterfaces:\n - network: https://www.googleapis.com/compute/v1/projects/{{ env[\"project\"] }}/global/networks/default\n # Access Config required to give the instance a public IP address\n accessConfigs:\n - name: External NAT\n type: ONE_TO_ONE_NAT\n\nCreating the solution in Service Catalog\n----------------------------------------\n\nTo create a Deployment Manager template-based solution:\n\n1. Go to the Service Catalog Admin [**Solutions** page](https://console.cloud.google.com/catalog/admin/solutions) in the Google Cloud console.\n\n [Go to the Solutions page](https://console.cloud.google.com/catalog/admin/solutions)\n\n2. Click **Select** to choose the Google Cloud project.\n\n3. Click **CREATE SOLUTION** . In the drop-down list, select **Create a DM\n solution**.\n\n4. Enter a name, description, and tagline for your solution. The tagline\n is a short description of a solution that users see as they browse\n Service Catalog.\n\n5. Upload a zip file, containing the files for a deployment\n [configuration](/deployment-manager/docs/configuration).\n\n6. Optionally, upload an icon for the solution. The recommended dimensions for\n an icon are 80 by 80 pixels.\n\n7. Optionally, enter a support link and contact information for the creator.\n\n8. Optionally, add a link to the documentation for the solution.\n\n9. Click **CREATE**.\n\nThe following screenshot illustrates creating a DM-based solution:\n\nNext steps\n----------\n\n- [Assign the solution](/service-catalog/docs/assign-solutions) to a catalog, so that users in your organization can access and deploy the solution."]]