このチュートリアルでは、同期 RPC ではなく、Pub/Sub を介してメッセージを送信することによって通信する、一連のアプリケーションを設定する手順について説明します。アプリケーションを分離することにより、メッセージングには以下のようなメリットがあります。
- アプリケーションの堅牢性が強化されます。
- 開発をシンプルにできる可能性があります。
たとえば、呼び出し元(パブリッシャー)が受信者(サブスクライバー)を起動して稼働状態にする必要がなくなります。パブリッシャーは Pub/Sub にメッセージを送信します。 パブリッシャーが、メッセージを受信する必要があるサブスクライバー アプリケーションの種類と数を把握する必要もありません。そのため 1 つ以上のサブスクライバー アプリケーションが稼働しているときは、サービスは常にサブスクライバー アプリケーションにメッセージを配信できます。
システムの概要
このチュートリアルでは、次の図に示すように、1 対多の通信を使用して 2 つのサブスクライバーに「Hello, World!」メッセージを送信するパブリッシャー アプリケーションを起動します。

2 つのサブスクライバー アプリケーションには同一のコードを使用しますが、起動するタイミングは異なります。このプロセスでは、Pub/Sub で非同期通信を有効にできます。このシステムを構築するには、次の手順を行います。
- アプリケーションが認証に使用する IAM サービス アカウントを作成します。
- IAM 権限を設定します。
- Pub/Sub トピックとサブスクリプションを作成する
- 1 つのパブリッシャーと 2 つのサブスクライバーの合計 3 つの独立したアプリケーションを起動させます。
始める前に
- Sign in to your Google Cloud account. If you're new to Google Cloud, create an account to evaluate how our products perform in real-world scenarios. New customers also get $300 in free credits to run, test, and deploy workloads.
-
Install the Google Cloud CLI.
-
外部 ID プロバイダ(IdP)を使用している場合は、まず連携 ID を使用して gcloud CLI にログインする必要があります。
-
gcloud CLI を初期化するには、次のコマンドを実行します。
gcloud init -
Create or select a Google Cloud project.
Roles required to select or create a project
- Select a project: Selecting a project doesn't require a specific IAM role—you can select any project that you've been granted a role on.
-
Create a project: To create a project, you need the Project Creator
(
roles/resourcemanager.projectCreator), which contains theresourcemanager.projects.createpermission. Learn how to grant roles.
-
Create a Google Cloud project:
gcloud projects create PROJECT_ID
Replace
PROJECT_IDwith a name for the Google Cloud project you are creating. -
Select the Google Cloud project that you created:
gcloud config set project PROJECT_ID
Replace
PROJECT_IDwith your Google Cloud project name.
-
Verify that billing is enabled for your Google Cloud project.
-
Enable the Pub/Sub API:
Roles required to enable APIs
To enable APIs, you need the Service Usage Admin IAM role (
roles/serviceusage.serviceUsageAdmin), which contains theserviceusage.services.enablepermission. Learn how to grant roles.gcloud services enable pubsub.googleapis.com
-
Create local authentication credentials for your user account:
gcloud auth application-default login
If an authentication error is returned, and you are using an external identity provider (IdP), confirm that you have signed in to the gcloud CLI with your federated identity.
-
Grant roles to your user account. Run the following command once for each of the following IAM roles:
roles/pubsub.publisher, roles/pubsub.subscribergcloud projects add-iam-policy-binding PROJECT_ID --member="user:USER_IDENTIFIER" --role=ROLE
Replace the following:
PROJECT_ID: Your project ID.USER_IDENTIFIER: The identifier for your user account. For example,myemail@example.com.ROLE: The IAM role that you grant to your user account.
-
Install the Google Cloud CLI.
-
外部 ID プロバイダ(IdP)を使用している場合は、まず連携 ID を使用して gcloud CLI にログインする必要があります。
-
gcloud CLI を初期化するには、次のコマンドを実行します。
gcloud init -
Create or select a Google Cloud project.
Roles required to select or create a project
- Select a project: Selecting a project doesn't require a specific IAM role—you can select any project that you've been granted a role on.
-
Create a project: To create a project, you need the Project Creator
(
roles/resourcemanager.projectCreator), which contains theresourcemanager.projects.createpermission. Learn how to grant roles.
-
Create a Google Cloud project:
gcloud projects create PROJECT_ID
Replace
PROJECT_IDwith a name for the Google Cloud project you are creating. -
Select the Google Cloud project that you created:
gcloud config set project PROJECT_ID
Replace
PROJECT_IDwith your Google Cloud project name.
-
Verify that billing is enabled for your Google Cloud project.
-
Enable the Pub/Sub API:
Roles required to enable APIs
To enable APIs, you need the Service Usage Admin IAM role (
roles/serviceusage.serviceUsageAdmin), which contains theserviceusage.services.enablepermission. Learn how to grant roles.gcloud services enable pubsub.googleapis.com
-
Create local authentication credentials for your user account:
gcloud auth application-default login
If an authentication error is returned, and you are using an external identity provider (IdP), confirm that you have signed in to the gcloud CLI with your federated identity.
-
Grant roles to your user account. Run the following command once for each of the following IAM roles:
roles/pubsub.publisher, roles/pubsub.subscribergcloud projects add-iam-policy-binding PROJECT_ID --member="user:USER_IDENTIFIER" --role=ROLE
Replace the following:
PROJECT_ID: Your project ID.USER_IDENTIFIER: The identifier for your user account. For example,myemail@example.com.ROLE: The IAM role that you grant to your user account.
このチュートリアルで必要な Pub/Sub Python ファイルをダウンロードします。
git clone https://github.com/googleapis/python-pubsub.git
次の手順に進む前に、開いているターミナルをすべて閉じます。
各チュートリアル アプリケーション(1 つのパブリッシャーと 2 つのサブスクライバー)につき 1 つのターミナルを起動します。便宜上、このチュートリアルではこれらのターミナルを次のように呼びます。
- publisher ターミナル
- sub_one ターミナル
- sub_two ターミナル
パブリッシャーのターミナルで、
pyenv-qsという名前の Python 仮想環境を作成して有効にします。Bash
python -m venv pyenv-qs
source pyenv-qs/bin/activate
PowerShell
py -m venv pyenv-qs
.\pyenv-qs\Scripts\activate
sub_one ターミナルと sub_two ターミナルで、次のコマンドを実行します。
Bash
source pyenv-qs/bin/activate
PowerShell
.\pyenv-qs\Scripts\activate
activate コマンドを実行すると、コマンド プロンプトに
(pyenv-qs) $という値が表示されます。パブリッシャーのターミナルで、
pipを使用して Pub/Sub Python クライアント ライブラリをインストールします。python -m pip install --upgrade google-cloud-pubsub
3 つのターミナルすべてで、現在のプロジェクト ID を使用して環境変数を設定します。この gcloud コマンドは、選択したプロジェクト ID を判別し変数として設定します。
Bash
export PROJECT=`gcloud config get-value project`
PowerShell
$env:PROJECT=$(gcloud config get-value project)
3 つすべてのターミナルで、サンプルコードを含むプロジェクトパスに変更します。
cd python-pubsub/samples/snippets/quickstart/
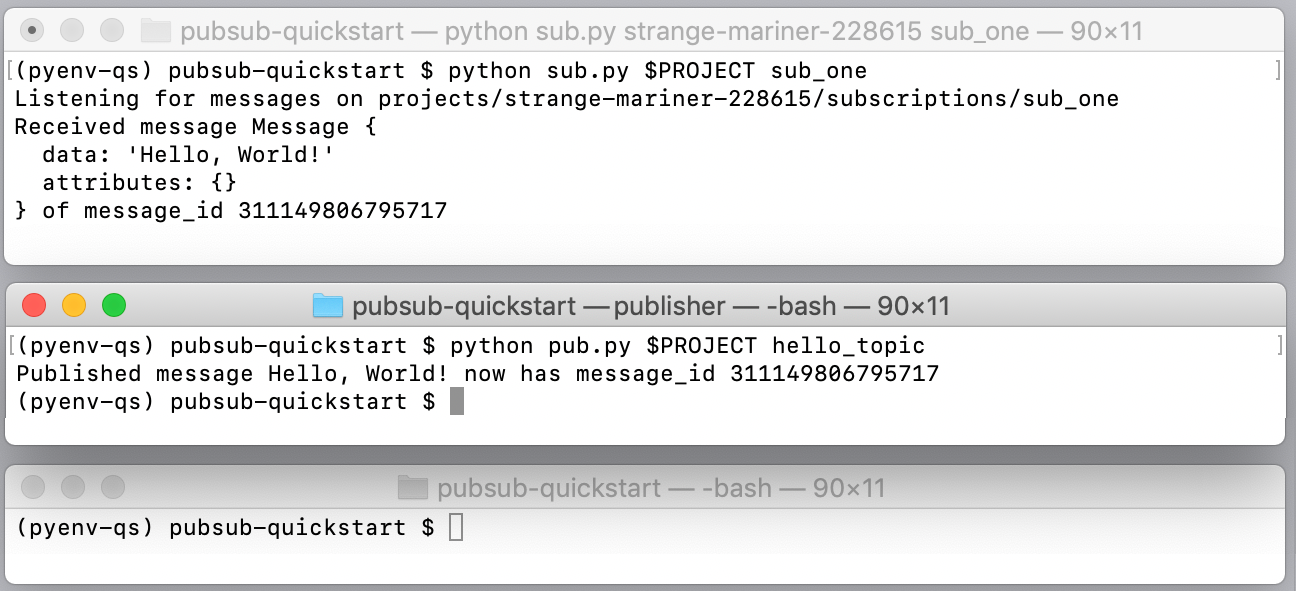
パブリッシャー アプリケーションが「Hello, World!」というメッセージを Pub/Sub に送信します。既存のサブスクリプションにはこれは認識されません。このサーバーはメッセージ ID の割り当ても行います。
サブスクライバー 1 アプリケーションが「Hello World」というメッセージを受信して出力し、確認応答を Pub/Sub に送信します。
パブリッシャー アプリケーションが確認応答を出力します。この確認応答により、メッセージの処理に成功したことと、このサブスクライバーや他の sub_one サブスクライバーに再送信する必要がないことが Pub/Sub に通知されます。
- 実行中のすべてのアプリケーションを停止します。
- ローカル環境からサンプルコード ディレクトリを削除します。
トピックを削除します。
gcloud pubsub topics delete hello_topic
サブスクリプションを削除します。
gcloud pubsub subscriptions delete sub_one
gcloud pubsub subscriptions delete sub_two
Google Cloud コンソールの [IAM と管理] セクションでチュートリアル プロジェクトを終了します。
-
Optional: Revoke the authentication credentials that you created, and delete the local credential file.
gcloud auth application-default revoke
-
Optional: Revoke credentials from the gcloud CLI.
gcloud auth revoke
GitHub でチュートリアルの
pub.pyコードとsub.pyコードを確認し、Pub/Sub の他のサンプルを閲覧できます。演習として、1 秒間隔で現地時間をパブリッシュするバージョンのpub.pyを作成します。メッセージのバッチ処理の方法を学びます。
push サブスクリプションを使用して、App Engine エンドポイントや Cloud Functions をトリガーするメッセージを受信します。
再生を使用して、確認応答済みのメッセージを取得します。デフォルトでは、Pub/Sub はサブスクリプションから確認応答済みのメッセージを削除します。たとえば、このチュートリアルでは
sub.pyを再実行して、「Hello, World!」というメッセージを再度受信することはできません。再生機能を使用すると、メッセージが確認応答された後、そのメッセージを受信するようにサブスクリプションを設定できます。他の言語のクライアント ライブラリを使用します。
Python をインストールする
このチュートリアルでは、Pub/Sub クライアント ライブラリを使用します。これには Python 3.7 以降が必要です。Python をインストールする手順を完了します。
Pub/Sub プロジェクトを設定する
パブリッシュするアプリケーションとサブスクライブするアプリケーション間のメッセージ フローを管理するには、トピックと 2 つの異なるサブスクリプションを作成します。
Pub/Sub トピックの作成
ID hello_topic を含むトピックを作成します。
gcloud pubsub topics create hello_topic
Pub/Sub サブスクリプションの作成
2 つのサブスクリプションを作成して、トピックに接続します。
これらのサブスクリプションは、pull サブスクリプションの一種である StreamingPull サブスクリプションです。
サブスクリプション 1
ID sub_one を含むサブスクリプションを作成し、hello_topic に添付します。
gcloud pubsub subscriptions create sub_one --topic=hello_topic
サブスクリプション 2
ID sub_two を含むサブスクリプションを作成し、hello_topic に添付します。
gcloud pubsub subscriptions create sub_two --topic=hello_topic
1 対多のシステムを構築する
パブリッシャーとサブスクライバーのコードをダウンロードする
3 つのターミナルを設定する
アプリケーションを起動してメッセージ フローを確認する
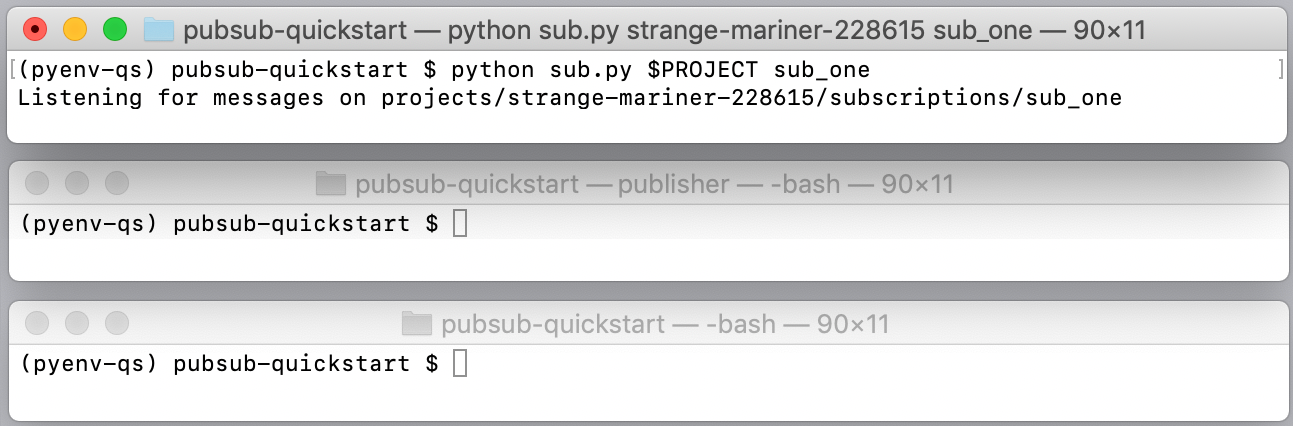
サブスクライバー 1 のアプリケーションを起動する
sub_one ターミナルでサブスクライバー 1 を起動します。
Bash
python sub.py $PROJECT sub_one
PowerShell
py sub.py $env:PROJECT sub_one
起動すると、このアプリケーションはサーバーとの双方向ストリーミング接続を確立します。Pub/Sub は、その接続を介してメッセージを配信します。
パブリッシャー アプリケーションを起動する
publisher ターミナルでパブリッシャー アプリケーションを起動します。
Bash
python pub.py $PROJECT hello_topic
PowerShell
py pub.py $env:PROJECT hello_topic
パブリッシャー アプリケーションが起動すると、Pub/Sub システムが次の処理を行います。
Pub/Sub によりメッセージが sub_one から削除されます。
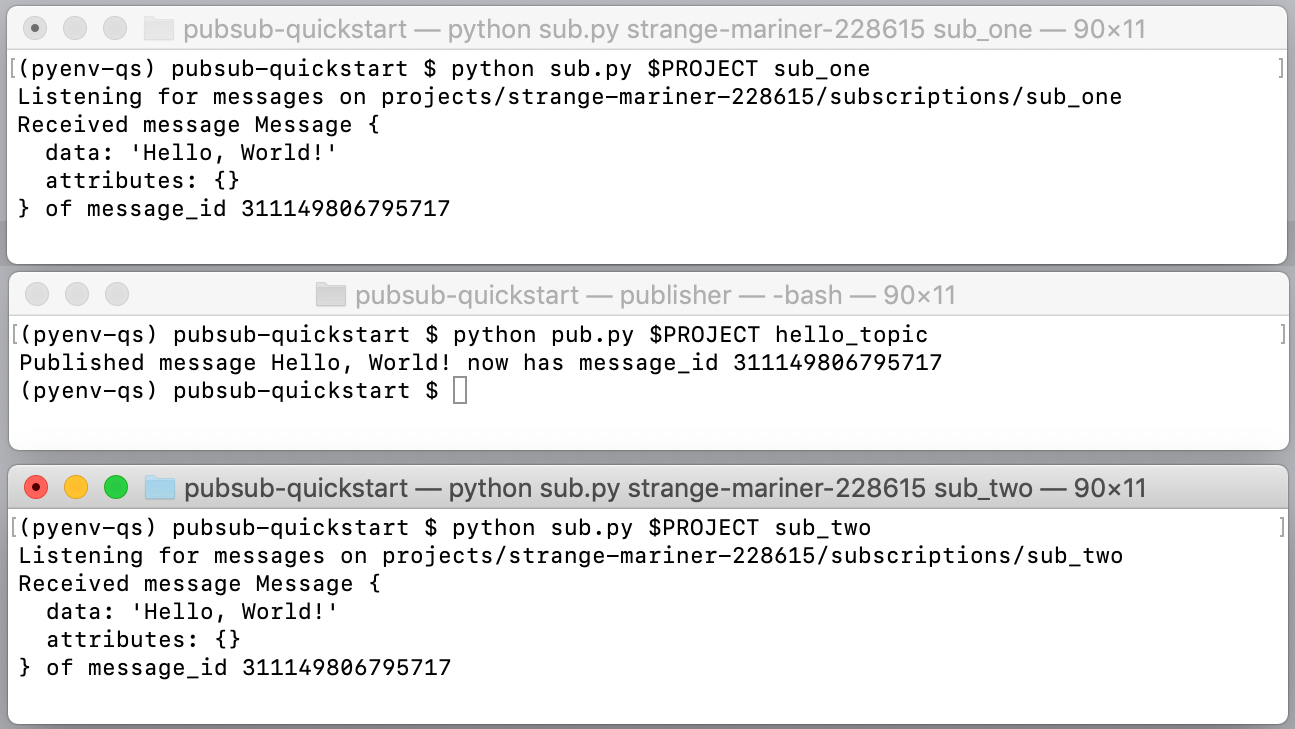
サブスクライバー 2 アプリケーションを起動する
sub_two ターミナルでサブスクライバー 2 を起動します。
Bash
python sub.py $PROJECT sub_two
PowerShell
py sub.py $env:PROJECT sub_two
このサブスクライバーは、sub_two サブスクリプションに配信されたメッセージを受信します。サブスクライバー 2 では sub.py スクリプトが再利用されます。ただし、サブスクライバー 2 はパブリッシャーがトピックとサブスクリプションにメッセージを送信するまで起動されません。パブリッシャーがサブスクライバー 2 を直接呼び出した場合、パブリッシャー アプリケーションはサブスクライバー 2 が起動するまで待機するかタイムアウトする必要があります。Pub/Sub は、サブスクライバー 2 へのメッセージを効率的に保存して管理します。
これで、Pub/Sub を使用して開発を行う準備が整いました。
いかがでしたか
Cloud Pub/Sub のサポートページにその他の参考資料やリンクがありますので、こちらもご利用ください。
クリーンアップ
次のステップ
以下のことができます。