Guide de démarrage rapide pour une diffusion en direct HLS

Cette page vous explique comment créer un job de diffusion en direct HLS de base à l'aide des paramètres par défaut de l'API Live Stream et de curl, PowerShell ou les bibliothèques clientes.

Vous pouvez également suivre ce guide de démarrage rapide directement dans la console Google Cloud dans l'un des langages de programmation suivants :

Avant de commencer

  1. Sign in to your Google Cloud account. If you're new to Google Cloud, create an account to evaluate how our products perform in real-world scenarios. New customers also get $300 in free credits to run, test, and deploy workloads.
  2. Install the Google Cloud CLI.

  3. If you're using an external identity provider (IdP), you must first sign in to the gcloud CLI with your federated identity.

  4. To initialize the gcloud CLI, run the following command:

    gcloud init
  5. Create or select a Google Cloud project.

    • Create a Google Cloud project:

      gcloud projects create PROJECT_ID

      Replace PROJECT_ID with a name for the Google Cloud project you are creating.

    • Select the Google Cloud project that you created:

      gcloud config set project PROJECT_ID

      Replace PROJECT_ID with your Google Cloud project name.

  6. Make sure that billing is enabled for your Google Cloud project.

  7. Enable the Live Stream API:

    gcloud services enable livestream.googleapis.com
  8. Create local authentication credentials for your user account:

    gcloud auth application-default login

    If an authentication error is returned, and you are using an external identity provider (IdP), confirm that you have signed in to the gcloud CLI with your federated identity.

  9. Grant roles to your user account. Run the following command once for each of the following IAM roles: roles/livestream.editor, roles/storage.admin

    gcloud projects add-iam-policy-binding PROJECT_ID --member="user:USER_IDENTIFIER" --role=ROLE
    • Replace PROJECT_ID with your project ID.
    • Replace USER_IDENTIFIER with the identifier for your user account. For example, user:myemail@example.com.

    • Replace ROLE with each individual role.
  10. Install the Google Cloud CLI.

  11. If you're using an external identity provider (IdP), you must first sign in to the gcloud CLI with your federated identity.

  12. To initialize the gcloud CLI, run the following command:

    gcloud init
  13. Create or select a Google Cloud project.

    • Create a Google Cloud project:

      gcloud projects create PROJECT_ID

      Replace PROJECT_ID with a name for the Google Cloud project you are creating.

    • Select the Google Cloud project that you created:

      gcloud config set project PROJECT_ID

      Replace PROJECT_ID with your Google Cloud project name.

  14. Make sure that billing is enabled for your Google Cloud project.

  15. Enable the Live Stream API:

    gcloud services enable livestream.googleapis.com
  16. Create local authentication credentials for your user account:

    gcloud auth application-default login

    If an authentication error is returned, and you are using an external identity provider (IdP), confirm that you have signed in to the gcloud CLI with your federated identity.

  17. Grant roles to your user account. Run the following command once for each of the following IAM roles: roles/livestream.editor, roles/storage.admin

    gcloud projects add-iam-policy-binding PROJECT_ID --member="user:USER_IDENTIFIER" --role=ROLE
    • Replace PROJECT_ID with your project ID.
    • Replace USER_IDENTIFIER with the identifier for your user account. For example, user:myemail@example.com.

    • Replace ROLE with each individual role.
  18. Créer un bucket Cloud Storage

    Créez un bucket Cloud Storage pour stocker le fichier manifeste et les fichiers de segment de la diffusion en direct.

    ConsoleGoogle Cloud

    1. In the Google Cloud console, go to the Cloud Storage Buckets page.

      Go to Buckets

    2. Click Create.
    3. On the Create a bucket page, enter your bucket information. To go to the next step, click Continue.
      1. In the Get started section, do the following:
        • Enter a globally unique name that meets the bucket naming requirements.
        • To add a bucket label, expand the Labels section (), click Add label, and specify a key and a value for your label.
      2. In the Choose where to store your data section, do the following:
        1. Select a Location type.
        2. Choose a location where your bucket's data is permanently stored from the Location type drop-down menu.
        3. To set up cross-bucket replication, select Add cross-bucket replication via Storage Transfer Service and follow these steps:

          Set up cross-bucket replication

          1. In the Bucket menu, select a bucket.
          2. In the Replication settings section, click Configure to configure settings for the replication job.

            The Configure cross-bucket replication pane appears.

            • To filter objects to replicate by object name prefix, enter a prefix that you want to include or exclude objects from, then click Add a prefix.
            • To set a storage class for the replicated objects, select a storage class from the Storage class menu. If you skip this step, the replicated objects will use the destination bucket's storage class by default.
            • Click Done.
      3. In the Choose how to store your data section, do the following:
        1. In the Set a default class section, select the following: Standard.
        2. To enable hierarchical namespace, in the Optimize storage for data-intensive workloads section, select Enable hierarchical namespace on this bucket.
      4. In the Choose how to control access to objects section, select whether or not your bucket enforces public access prevention, and select an access control method for your bucket's objects.
      5. In the Choose how to protect object data section, do the following:
        • Select any of the options under Data protection that you want to set for your bucket.
          • To enable soft delete, click the Soft delete policy (For data recovery) checkbox, and specify the number of days you want to retain objects after deletion.
          • To set Object Versioning, click the Object versioning (For version control) checkbox, and specify the maximum number of versions per object and the number of days after which the noncurrent versions expire.
          • To enable the retention policy on objects and buckets, click the Retention (For compliance) checkbox, and then do the following:
            • To enable Object Retention Lock, click the Enable object retention checkbox.
            • To enable Bucket Lock, click the Set bucket retention policy checkbox, and choose a unit of time and a length of time for your retention period.
        • To choose how your object data will be encrypted, expand the Data encryption section (), and select a Data encryption method.
    4. Click Create.

    Command line

      Create a Cloud Storage bucket:
      gcloud storage buckets create gs://BUCKET_NAME
      Replace BUCKET_NAME with a bucket name that meets the bucket naming requirements.

Installer un encodeur

Pour utiliser l'API, vous avez besoin d'un encodeur permettant de générer des flux d'entrée traités par l'API.

Installez ffmpeg, car cette page explique comment utiliser ffmpeg pour générer des flux d'entrée. Vous pouvez l'installer dans Cloud Shell à l'aide de la commande suivante.

sudo apt install ffmpeg

Créer un point de terminaison d'entrée

Pour lancer un streaming en direct, vous devez d'abord utiliser la méthode projects.locations.inputs.create pour créer un point de terminaison d'entrée. Vous envoyez le flux d'entrée à ce point de terminaison.

REST

Avant d'utiliser les données de requête ci-dessous, effectuez les remplacements suivants :

  • PROJECT_NUMBER : numéro de votre projet Google Cloud . Vous le trouverez dans le champ Numéro du projet de la page Paramètres IAM.
  • LOCATION : emplacement dans lequel créer le point de terminaison d'entrée. Utilisez l'une des régions disponibles.
    Afficher les zones géographiques
    • us-central1
    • us-east1
    • us-east4
    • us-west1
    • us-west2
    • northamerica-northeast1
    • southamerica-east1
    • asia-east1
    • asia-east2
    • asia-south1
    • asia-northeast1
    • asia-southeast1
    • australia-southeast1
    • europe-north1
    • europe-west1
    • europe-west2
    • europe-west3
    • europe-west4
  • INPUT_ID : identifiant défini par l'utilisateur pour le nouveau point de terminaison d'entrée à créer (auquel vous envoyez votre flux d'entrée). Cette valeur doit comporter entre 1 et 63 caractères, commencer et se terminer par [a-z0-9], et peut contenir des tirets (-) entre les caractères. Par exemple, my-input.

Pour envoyer votre requête, développez l'une des options suivantes :

Vous devriez recevoir une réponse JSON de ce type :

{
  "name": "projects/PROJECT_NUMBER/locations/LOCATION/operations/OPERATION_ID",
  "metadata": {
    "@type": "type.googleapis.com/google.cloud.video.livestream.v1.OperationMetadata",
    "createTime": CREATE_TIME,
    "target": "projects/PROJECT_NUMBER/locations/LOCATION/inputs/INPUT_ID",
    "verb": "create",
    "requestedCancellation": false,
    "apiVersion": "v1"
  },
  "done": false
}

C#

Pour savoir comment installer et utiliser la bibliothèque cliente pour l'API Live Stream, consultez la page Bibliothèques clientes de l'API Live Stream. Pour en savoir plus, consultez la documentation de référence de l'API Live Stream pour C#.

Pour vous authentifier auprès de l'API Live Stream, configurez les Identifiants par défaut de l'application. Pour en savoir plus, consultez Configurer l'authentification pour un environnement de développement local.


using Google.Api.Gax.ResourceNames;
using Google.Cloud.Video.LiveStream.V1;
using Google.LongRunning;
using System.Threading.Tasks;

public class CreateInputSample
{
    public async Task<Input> CreateInputAsync(
         string projectId, string locationId, string inputId)
    {
        // Create the client.
        LivestreamServiceClient client = LivestreamServiceClient.Create();

        CreateInputRequest request = new CreateInputRequest
        {
            ParentAsLocationName = LocationName.FromProjectLocation(projectId, locationId),
            InputId = inputId,
            Input = new Input
            {
                Type = Input.Types.Type.RtmpPush
            }
        };

        // Make the request.
        Operation<Input, OperationMetadata> response = await client.CreateInputAsync(request);

        // Poll until the returned long-running operation is complete.
        Operation<Input, OperationMetadata> completedResponse = await response.PollUntilCompletedAsync();

        // Retrieve the operation result.
        return completedResponse.Result;
    }
}

Go

Pour savoir comment installer et utiliser la bibliothèque cliente pour l'API Live Stream, consultez la page Bibliothèques clientes de l'API Live Stream. Pour en savoir plus, consultez la documentation de référence de l'API Live Stream pour Go.

Pour vous authentifier auprès de l'API Live Stream, configurez les Identifiants par défaut de l'application. Pour en savoir plus, consultez Configurer l'authentification pour un environnement de développement local.

import (
	"context"
	"fmt"
	"io"

	livestream "cloud.google.com/go/video/livestream/apiv1"
	"cloud.google.com/go/video/livestream/apiv1/livestreampb"
)

// createInput creates an input endpoint. You send an input video stream to this
// endpoint.
func createInput(w io.Writer, projectID, location, inputID string) error {
	// projectID := "my-project-id"
	// location := "us-central1"
	// inputID := "my-input"
	ctx := context.Background()
	client, err := livestream.NewClient(ctx)
	if err != nil {
		return fmt.Errorf("NewClient: %w", err)
	}
	defer client.Close()

	req := &livestreampb.CreateInputRequest{
		Parent:  fmt.Sprintf("projects/%s/locations/%s", projectID, location),
		InputId: inputID,
		Input: &livestreampb.Input{
			Type: livestreampb.Input_RTMP_PUSH,
		},
	}
	// Creates the input.
	op, err := client.CreateInput(ctx, req)
	if err != nil {
		return fmt.Errorf("CreateInput: %w", err)
	}
	response, err := op.Wait(ctx)
	if err != nil {
		return fmt.Errorf("Wait: %w", err)
	}

	fmt.Fprintf(w, "Input: %v", response.Name)
	return nil
}

Java

Pour savoir comment installer et utiliser la bibliothèque cliente pour l'API Live Stream, consultez la page Bibliothèques clientes de l'API Live Stream. Pour en savoir plus, consultez la documentation de référence de l'API Live Stream pour Java.

Pour vous authentifier auprès de l'API Live Stream, configurez les Identifiants par défaut de l'application. Pour en savoir plus, consultez Configurer l'authentification pour un environnement de développement local.


import com.google.cloud.video.livestream.v1.CreateInputRequest;
import com.google.cloud.video.livestream.v1.Input;
import com.google.cloud.video.livestream.v1.LivestreamServiceClient;
import com.google.cloud.video.livestream.v1.LocationName;
import java.io.IOException;
import java.util.concurrent.ExecutionException;
import java.util.concurrent.TimeUnit;
import java.util.concurrent.TimeoutException;

public class CreateInput {

  public static void main(String[] args) throws Exception {
    // TODO(developer): Replace these variables before running the sample.
    String projectId = "my-project-id";
    String location = "us-central1";
    String inputId = "my-input-id";

    createInput(projectId, location, inputId);
  }

  public static void createInput(String projectId, String location, String inputId)
      throws InterruptedException, ExecutionException, TimeoutException, IOException {
    // Initialize client that will be used to send requests. This client only needs to be created
    // once, and can be reused for multiple requests. After completing all of your requests, call
    // the "close" method on the client to safely clean up any remaining background resources.
    LivestreamServiceClient livestreamServiceClient = LivestreamServiceClient.create();
    var createInputRequest =
        CreateInputRequest.newBuilder()
            .setParent(LocationName.of(projectId, location).toString())
            .setInputId(inputId)
            .setInput(Input.newBuilder().setType(Input.Type.RTMP_PUSH).build())
            .build();
    // First API call in a project can take up to 15 minutes.
    Input result =
        livestreamServiceClient.createInputAsync(createInputRequest).get(15, TimeUnit.MINUTES);
    System.out.println("Input: " + result.getName());
    livestreamServiceClient.close();
  }
}

Node.js

Pour savoir comment installer et utiliser la bibliothèque cliente pour l'API Live Stream, consultez la page Bibliothèques clientes de l'API Live Stream. Pour en savoir plus, consultez la documentation de référence de l'API Live Stream pour Node.js.

Pour vous authentifier auprès de l'API Live Stream, configurez les Identifiants par défaut de l'application. Pour en savoir plus, consultez Configurer l'authentification pour un environnement de développement local.

/**
 * TODO(developer): Uncomment these variables before running the sample.
 */
// projectId = 'my-project-id';
// location = 'us-central1';
// inputId = 'my-input';

// Imports the Livestream library
const {LivestreamServiceClient} = require('@google-cloud/livestream').v1;

// Instantiates a client
const livestreamServiceClient = new LivestreamServiceClient();

async function createInput() {
  // Construct request
  const request = {
    parent: livestreamServiceClient.locationPath(projectId, location),
    inputId: inputId,
    input: {
      type: 'RTMP_PUSH',
    },
  };

  // Run request
  const [operation] = await livestreamServiceClient.createInput(request);
  const response = await operation.promise();
  const [input] = response;
  console.log(`Input: ${input.name}`);
}

createInput();

PHP

Pour savoir comment installer et utiliser la bibliothèque cliente pour l'API Live Stream, consultez la page Bibliothèques clientes de l'API Live Stream. Pour en savoir plus, consultez la documentation de référence de l'API Live Stream pour PHP.

Pour vous authentifier auprès de l'API Live Stream, configurez les Identifiants par défaut de l'application. Pour en savoir plus, consultez Configurer l'authentification pour un environnement de développement local.

use Google\Cloud\Video\LiveStream\V1\Input;
use Google\Cloud\Video\LiveStream\V1\Client\LivestreamServiceClient;
use Google\Cloud\Video\LiveStream\V1\CreateInputRequest;

/**
 * Creates an input. You send an input video stream to this endpoint.
 *
 * @param string  $callingProjectId   The project ID to run the API call under
 * @param string  $location           The location of the input
 * @param string  $inputId            The ID of the input to be created
 */
function create_input(
    string $callingProjectId,
    string $location,
    string $inputId
): void {
    // Instantiate a client.
    $livestreamClient = new LivestreamServiceClient();

    $parent = $livestreamClient->locationName($callingProjectId, $location);
    $input = (new Input())
        ->setType(Input\Type::RTMP_PUSH);

    // Run the input creation request. The response is a long-running operation ID.
    $request = (new CreateInputRequest())
        ->setParent($parent)
        ->setInput($input)
        ->setInputId($inputId);
    $operationResponse = $livestreamClient->createInput($request);
    $operationResponse->pollUntilComplete();
    if ($operationResponse->operationSucceeded()) {
        $result = $operationResponse->getResult();
        // Print results
        printf('Input: %s' . PHP_EOL, $result->getName());
    } else {
        $error = $operationResponse->getError();
        // handleError($error)
    }
}

Python

Pour savoir comment installer et utiliser la bibliothèque cliente pour l'API Live Stream, consultez la page Bibliothèques clientes de l'API Live Stream. Pour en savoir plus, consultez la documentation de référence de l'API Live Stream pour Python.

Pour vous authentifier auprès de l'API Live Stream, configurez les Identifiants par défaut de l'application. Pour en savoir plus, consultez Configurer l'authentification pour un environnement de développement local.


import argparse

from google.cloud.video import live_stream_v1
from google.cloud.video.live_stream_v1.services.livestream_service import (
    LivestreamServiceClient,
)


def create_input(
    project_id: str, location: str, input_id: str
) -> live_stream_v1.types.Input:
    """Creates an input.
    Args:
        project_id: The GCP project ID.
        location: The location in which to create the input.
        input_id: The user-defined input ID."""

    client = LivestreamServiceClient()

    parent = f"projects/{project_id}/locations/{location}"

    input = live_stream_v1.types.Input(
        type_="RTMP_PUSH",
    )
    operation = client.create_input(parent=parent, input=input, input_id=input_id)
    response = operation.result(900)
    print(f"Input: {response.name}")

    return response

Ruby

Pour savoir comment installer et utiliser la bibliothèque cliente pour l'API Live Stream, consultez la page Bibliothèques clientes de l'API Live Stream. Pour en savoir plus, consultez la documentation de référence de l'API Live Stream pour Ruby.

Pour vous authentifier auprès de l'API Live Stream, configurez les Identifiants par défaut de l'application. Pour en savoir plus, consultez Configurer l'authentification pour un environnement de développement local.

require "google/cloud/video/live_stream"

##
# Create an input endpoint
#
# @param project_id [String] Your Google Cloud project (e.g. "my-project")
# @param location [String] The location (e.g. "us-central1")
# @param input_id [String] Your input name (e.g. "my-input")
#
def create_input project_id:, location:, input_id:
  # Create a Live Stream client.
  client = Google::Cloud::Video::LiveStream.livestream_service

  # Build the resource name of the parent.
  parent = client.location_path project: project_id, location: location

  # Set the input fields.
  new_input = {
    type: Google::Cloud::Video::LiveStream::V1::Input::Type::RTMP_PUSH
  }

  operation = client.create_input parent: parent, input: new_input, input_id: input_id

  # The returned object is of type Gapic::Operation. You can use this
  # object to check the status of an operation, cancel it, or wait
  # for results. Here is how to block until completion:
  operation.wait_until_done!

  # Print the input name.
  puts "Input: #{operation.response.name}"
end

Copiez le OPERATION_ID renvoyé pour l'utiliser dans la section suivante.

Vérifier le résultat

Utilisez la méthode projects.locations.operations.get pour vérifier si le point de terminaison d'entrée a été créé. Si la réponse contient "done: false", répétez la commande jusqu'à ce qu'elle contienne "done: true". La création du premier point de terminaison d'entrée dans une région peut prendre jusqu'à 10 minutes.

Avant d'utiliser les données de requête ci-dessous, effectuez les remplacements suivants :

  • PROJECT_NUMBER : numéro de votre projet Google Cloud . Vous le trouverez dans le champ Numéro du projet de la page Paramètres IAM.
  • LOCATION : emplacement de votre point de terminaison d'entrée. Utilisez l'une des régions disponibles.
    Afficher les zones géographiques
    • us-central1
    • us-east1
    • us-east4
    • us-west1
    • us-west2
    • northamerica-northeast1
    • southamerica-east1
    • asia-east1
    • asia-east2
    • asia-south1
    • asia-northeast1
    • asia-southeast1
    • australia-southeast1
    • europe-north1
    • europe-west1
    • europe-west2
    • europe-west3
    • europe-west4
  • OPERATION_ID : identifiant de l'opération

Pour envoyer votre requête, développez l'une des options suivantes :

Vous devriez recevoir une réponse JSON de ce type :

{
  "name": "projects/PROJECT_NUMBER/locations/LOCATION/operations/OPERATION_ID",
  "metadata": {
    "@type": "type.googleapis.com/google.cloud.video.livestream.v1.OperationMetadata",
    "createTime": CREATE_TIME,
    "endTime": END_TIME,
    "target": "projects/PROJECT_NUMBER/locations/LOCATION/inputs/INPUT_ID",
    "verb": "create",
    "requestedCancellation": false,
    "apiVersion": "v1"
  },
  "done": true,
  "response": {
    "@type": "type.googleapis.com/google.cloud.video.livestream.v1.Input",
    "name": "projects/PROJECT_NUMBER/locations/LOCATION/inputs/INPUT_ID",
    "createTime": CREATE_TIME,
    "updateTime": UPDATE_TIME,
    "type": "RTMP_PUSH",
    "uri":  INPUT_STREAM_URI, # For example, "rtmp://1.2.3.4/live/b8ebdd94-c8d9-4d88-a16e-b963c43a953b",
    "tier": "HD"
  }
}

Recherchez le champ uri et copiez le INPUT_STREAM_URI renvoyé pour l'utiliser plus tard dans la section Envoyer le flux d'entrée.

Créer une chaîne

Pour transcoder le flux d'entrée en flux de sortie, vous devez créer une ressource de canal.

Pour créer un canal, utilisez la méthode projects.locations.channels.create. L'exemple suivant crée un canal générant un flux en direct HLS composé d'un seul rendu haute définition (1280x720).

REST

Avant d'utiliser les données de requête ci-dessous, effectuez les remplacements suivants :

  • PROJECT_NUMBER : numéro de votre projet Google Cloud . Vous le trouverez dans le champ Numéro du projet de la page Paramètres IAM.
  • LOCATION : emplacement dans lequel créer le canal ; utilisez l'une des régions disponibles.
    Afficher les zones géographiques
    • us-central1
    • us-east1
    • us-east4
    • us-west1
    • us-west2
    • northamerica-northeast1
    • southamerica-east1
    • asia-east1
    • asia-east2
    • asia-south1
    • asia-northeast1
    • asia-southeast1
    • australia-southeast1
    • europe-north1
    • europe-west1
    • europe-west2
    • europe-west3
    • europe-west4
  • CHANNEL_ID : identifiant défini par l'utilisateur pour le canal à créer. Cette valeur doit comporter entre 1 et 63 caractères, commencer et se terminer par [a-z0-9], et peut contenir des tirets (-) entre les caractères.
  • INPUT_ID : identifiant défini par l'utilisateur pour le point de terminaison d'entrée
  • BUCKET_NAME : nom du bucket Cloud Storage que vous avez créé pour stocker le fichier manifeste et les fichiers de segment du flux en direct

Pour envoyer votre requête, développez l'une des options suivantes :

Vous devriez recevoir une réponse JSON de ce type :

{
  "name": "projects/PROJECT_NUMBER/locations/LOCATION/operations/OPERATION_ID",
  "metadata": {
    "@type": "type.googleapis.com/google.cloud.video.livestream.v1.OperationMetadata",
    "createTime": CREATE_TIME,
    "target": "projects/PROJECT_NUMBER/locations/LOCATION/channels/CHANNEL_ID",
    "verb": "create",
    "requestedCancellation": false,
    "apiVersion": "v1"
  },
  "done": false
}

C#

Pour savoir comment installer et utiliser la bibliothèque cliente pour l'API Live Stream, consultez la page Bibliothèques clientes de l'API Live Stream. Pour en savoir plus, consultez la documentation de référence de l'API Live Stream pour C#.

Pour vous authentifier auprès de l'API Live Stream, configurez les Identifiants par défaut de l'application. Pour en savoir plus, consultez Configurer l'authentification pour un environnement de développement local.


using Google.Api.Gax.ResourceNames;
using Google.Cloud.Video.LiveStream.V1;
using Google.LongRunning;
using System.Threading.Tasks;

public class CreateChannelSample
{
    public async Task<Channel> CreateChannelAsync(
         string projectId, string locationId, string channelId, string inputId, string outputUri)
    {
        // Create the client.
        LivestreamServiceClient client = LivestreamServiceClient.Create();

        InputAttachment inputAttachment = new InputAttachment
        {
            Key = "my-input",
            InputAsInputName = InputName.FromProjectLocationInput(projectId, locationId, inputId)
        };

        VideoStream videoStream = new VideoStream
        {
            H264 = new VideoStream.Types.H264CodecSettings
            {
                Profile = "high",
                BitrateBps = 3000000,
                FrameRate = 30,
                HeightPixels = 720,
                WidthPixels = 1280
            }
        };

        ElementaryStream elementaryStreamVideo = new ElementaryStream
        {
            Key = "es_video",
            VideoStream = videoStream
        };

        AudioStream audioStream = new AudioStream
        {
            Codec = "aac",
            ChannelCount = 2,
            BitrateBps = 160000
        };

        ElementaryStream elementaryStreamAudio = new ElementaryStream
        {
            Key = "es_audio",
            AudioStream = audioStream
        };

        MuxStream muxVideo = new MuxStream
        {
            Key = "mux_video",
            ElementaryStreams = { "es_video" },
            SegmentSettings = new SegmentSettings
            {
                SegmentDuration = new Google.Protobuf.WellKnownTypes.Duration
                {
                    Seconds = 2
                }
            }
        };

        MuxStream muxAudio = new MuxStream
        {
            Key = "mux_audio",
            ElementaryStreams = { "es_audio" },
            SegmentSettings = new SegmentSettings
            {
                SegmentDuration = new Google.Protobuf.WellKnownTypes.Duration
                {
                    Seconds = 2
                }
            }
        };

        CreateChannelRequest request = new CreateChannelRequest
        {
            ParentAsLocationName = LocationName.FromProjectLocation(projectId, locationId),
            ChannelId = channelId,
            Channel = new Channel
            {
                InputAttachments = { inputAttachment },
                Output = new Channel.Types.Output
                {
                    Uri = outputUri
                },
                ElementaryStreams = { elementaryStreamVideo, elementaryStreamAudio },
                MuxStreams = { muxVideo, muxAudio },
                Manifests = {
                    new Manifest {
                        FileName = "manifest.m3u8",
                        Type = Manifest.Types.ManifestType.Hls,
                        MuxStreams = { "mux_video", "mux_audio" },
                        MaxSegmentCount = 5
                    }
                }
            }
        };

        // Make the request.
        Operation<Channel, OperationMetadata> response = await client.CreateChannelAsync(request);

        // Poll until the returned long-running operation is complete.
        Operation<Channel, OperationMetadata> completedResponse = await response.PollUntilCompletedAsync();

        // Retrieve the operation result.
        return completedResponse.Result;
    }
}

Go

Pour savoir comment installer et utiliser la bibliothèque cliente pour l'API Live Stream, consultez la page Bibliothèques clientes de l'API Live Stream. Pour en savoir plus, consultez la documentation de référence de l'API Live Stream pour Go.

Pour vous authentifier auprès de l'API Live Stream, configurez les Identifiants par défaut de l'application. Pour en savoir plus, consultez Configurer l'authentification pour un environnement de développement local.

import (
	"context"
	"fmt"
	"io"

	"github.com/golang/protobuf/ptypes/duration"

	livestream "cloud.google.com/go/video/livestream/apiv1"
	"cloud.google.com/go/video/livestream/apiv1/livestreampb"
)

// createChannel creates a channel.
func createChannel(w io.Writer, projectID, location, channelID, inputID, outputURI string) error {
	// projectID := "my-project-id"
	// location := "us-central1"
	// channelID := "my-channel"
	// inputID := "my-input"
	// outputURI := "gs://my-bucket/my-output-folder/"
	ctx := context.Background()
	client, err := livestream.NewClient(ctx)
	if err != nil {
		return fmt.Errorf("NewClient: %w", err)
	}
	defer client.Close()

	req := &livestreampb.CreateChannelRequest{
		Parent:    fmt.Sprintf("projects/%s/locations/%s", projectID, location),
		ChannelId: channelID,
		Channel: &livestreampb.Channel{
			InputAttachments: []*livestreampb.InputAttachment{
				{
					Key:   "my-input",
					Input: fmt.Sprintf("projects/%s/locations/%s/inputs/%s", projectID, location, inputID),
				},
			},
			Output: &livestreampb.Channel_Output{
				Uri: outputURI,
			},
			ElementaryStreams: []*livestreampb.ElementaryStream{
				{
					Key: "es_video",
					ElementaryStream: &livestreampb.ElementaryStream_VideoStream{
						VideoStream: &livestreampb.VideoStream{
							CodecSettings: &livestreampb.VideoStream_H264{
								H264: &livestreampb.VideoStream_H264CodecSettings{
									Profile:      "high",
									BitrateBps:   3000000,
									FrameRate:    30,
									HeightPixels: 720,
									WidthPixels:  1280,
								},
							},
						},
					},
				},
				{
					Key: "es_audio",
					ElementaryStream: &livestreampb.ElementaryStream_AudioStream{
						AudioStream: &livestreampb.AudioStream{
							Codec:        "aac",
							ChannelCount: 2,
							BitrateBps:   160000,
						},
					},
				},
			},
			MuxStreams: []*livestreampb.MuxStream{
				{
					Key:               "mux_video",
					ElementaryStreams: []string{"es_video"},
					SegmentSettings: &livestreampb.SegmentSettings{
						SegmentDuration: &duration.Duration{
							Seconds: 2,
						},
					},
				},
				{
					Key:               "mux_audio",
					ElementaryStreams: []string{"es_audio"},
					SegmentSettings: &livestreampb.SegmentSettings{
						SegmentDuration: &duration.Duration{
							Seconds: 2,
						},
					},
				},
			},
			Manifests: []*livestreampb.Manifest{
				{
					FileName:        "manifest.m3u8",
					Type:            livestreampb.Manifest_HLS,
					MuxStreams:      []string{"mux_video", "mux_audio"},
					MaxSegmentCount: 5,
				},
			},
		},
	}
	// Creates the channel.
	op, err := client.CreateChannel(ctx, req)
	if err != nil {
		return fmt.Errorf("CreateChannel: %w", err)
	}
	response, err := op.Wait(ctx)
	if err != nil {
		return fmt.Errorf("Wait: %w", err)
	}

	fmt.Fprintf(w, "Channel: %v", response.Name)
	return nil
}

Java

Pour savoir comment installer et utiliser la bibliothèque cliente pour l'API Live Stream, consultez la page Bibliothèques clientes de l'API Live Stream. Pour en savoir plus, consultez la documentation de référence de l'API Live Stream pour Java.

Pour vous authentifier auprès de l'API Live Stream, configurez les Identifiants par défaut de l'application. Pour en savoir plus, consultez Configurer l'authentification pour un environnement de développement local.


import com.google.cloud.video.livestream.v1.AudioStream;
import com.google.cloud.video.livestream.v1.Channel;
import com.google.cloud.video.livestream.v1.Channel.Output;
import com.google.cloud.video.livestream.v1.CreateChannelRequest;
import com.google.cloud.video.livestream.v1.ElementaryStream;
import com.google.cloud.video.livestream.v1.InputAttachment;
import com.google.cloud.video.livestream.v1.InputName;
import com.google.cloud.video.livestream.v1.LivestreamServiceClient;
import com.google.cloud.video.livestream.v1.LocationName;
import com.google.cloud.video.livestream.v1.Manifest;
import com.google.cloud.video.livestream.v1.Manifest.ManifestType;
import com.google.cloud.video.livestream.v1.MuxStream;
import com.google.cloud.video.livestream.v1.SegmentSettings;
import com.google.cloud.video.livestream.v1.VideoStream;
import com.google.cloud.video.livestream.v1.VideoStream.H264CodecSettings;
import com.google.protobuf.Duration;
import java.io.IOException;
import java.util.concurrent.ExecutionException;
import java.util.concurrent.TimeUnit;
import java.util.concurrent.TimeoutException;

public class CreateChannel {

  public static void main(String[] args) throws Exception {
    // TODO(developer): Replace these variables before running the sample.
    String projectId = "my-project-id";
    String location = "us-central1";
    String channelId = "my-channel-id";
    String inputId = "my-input-id";
    String outputUri = "gs://my-bucket/my-output-folder/";

    createChannel(projectId, location, channelId, inputId, outputUri);
  }

  public static void createChannel(
      String projectId, String location, String channelId, String inputId, String outputUri)
      throws InterruptedException, ExecutionException, TimeoutException, IOException {
    // Initialize client that will be used to send requests. This client only needs to be created
    // once, and can be reused for multiple requests. After completing all of your requests, call
    // the "close" method on the client to safely clean up any remaining background resources.
    LivestreamServiceClient livestreamServiceClient = LivestreamServiceClient.create();
    VideoStream videoStream =
        VideoStream.newBuilder()
            .setH264(
                H264CodecSettings.newBuilder()
                    .setProfile("high")
                    .setBitrateBps(3000000)
                    .setFrameRate(30)
                    .setHeightPixels(720)
                    .setWidthPixels(1280))
            .build();

    AudioStream audioStream =
        AudioStream.newBuilder().setCodec("aac").setChannelCount(2).setBitrateBps(160000).build();

    var createChannelRequest =
        CreateChannelRequest.newBuilder()
            .setParent(LocationName.of(projectId, location).toString())
            .setChannelId(channelId)
            .setChannel(
                Channel.newBuilder()
                    .addInputAttachments(
                        0,
                        InputAttachment.newBuilder()
                            .setKey("my-input")
                            .setInput(InputName.of(projectId, location, inputId).toString())
                            .build())
                    .setOutput(Output.newBuilder().setUri(outputUri).build())
                    .addElementaryStreams(
                        ElementaryStream.newBuilder()
                            .setKey("es_video")
                            .setVideoStream(videoStream))
                    .addElementaryStreams(
                        ElementaryStream.newBuilder()
                            .setKey("es_audio")
                            .setAudioStream(audioStream))
                    .addMuxStreams(
                        MuxStream.newBuilder()
                            .setKey("mux_video")
                            .addElementaryStreams("es_video")
                            .setSegmentSettings(
                                SegmentSettings.newBuilder()
                                    .setSegmentDuration(
                                        Duration.newBuilder().setSeconds(2).build())
                                    .build())
                            .build())
                    .addMuxStreams(
                        MuxStream.newBuilder()
                            .setKey("mux_audio")
                            .addElementaryStreams("es_audio")
                            .setSegmentSettings(
                                SegmentSettings.newBuilder()
                                    .setSegmentDuration(
                                        Duration.newBuilder().setSeconds(2).build())
                                    .build())
                            .build())
                    .addManifests(
                        Manifest.newBuilder()
                            .setFileName("manifest.m3u8")
                            .setType(ManifestType.HLS)
                            .addMuxStreams("mux_video")
                            .addMuxStreams("mux_audio")
                            .setMaxSegmentCount(5)
                            .build()))
            .build();
    // First API call in a project can take up to 10 minutes.
    Channel result =
        livestreamServiceClient
            .createChannelAsync(createChannelRequest)
            .get(10, TimeUnit.MINUTES);
    System.out.println("Channel: " + result.getName());
    livestreamServiceClient.close();
  }
}

Node.js

Pour savoir comment installer et utiliser la bibliothèque cliente pour l'API Live Stream, consultez la page Bibliothèques clientes de l'API Live Stream. Pour en savoir plus, consultez la documentation de référence de l'API Live Stream pour Node.js.

Pour vous authentifier auprès de l'API Live Stream, configurez les Identifiants par défaut de l'application. Pour en savoir plus, consultez Configurer l'authentification pour un environnement de développement local.

/**
 * TODO(developer): Uncomment these variables before running the sample.
 */
// projectId = 'my-project-id';
// location = 'us-central1';
// channelId = 'my-channel';
// inputId = 'my-input';
// outputUri = 'gs://my-bucket/my-output-folder/';

// Imports the Livestream library
const {LivestreamServiceClient} = require('@google-cloud/livestream').v1;

// Instantiates a client
const livestreamServiceClient = new LivestreamServiceClient();

async function createChannel() {
  // Construct request
  const request = {
    parent: livestreamServiceClient.locationPath(projectId, location),
    channelId: channelId,
    channel: {
      inputAttachments: [
        {
          key: 'my-input',
          input: livestreamServiceClient.inputPath(
            projectId,
            location,
            inputId
          ),
        },
      ],
      output: {
        uri: outputUri,
      },
      elementaryStreams: [
        {
          key: 'es_video',
          videoStream: {
            h264: {
              profile: 'high',
              heightPixels: 720,
              widthPixels: 1280,
              bitrateBps: 3000000,
              frameRate: 30,
            },
          },
        },
        {
          key: 'es_audio',
          audioStream: {
            codec: 'aac',
            channelCount: 2,
            bitrateBps: 160000,
          },
        },
      ],
      muxStreams: [
        {
          key: 'mux_video',
          elementaryStreams: ['es_video'],
          segmentSettings: {
            seconds: 2,
          },
        },
        {
          key: 'mux_audio',
          elementaryStreams: ['es_audio'],
          segmentSettings: {
            seconds: 2,
          },
        },
      ],
      manifests: [
        {
          fileName: 'manifest.m3u8',
          type: 'HLS',
          muxStreams: ['mux_video', 'mux_audio'],
          maxSegmentCount: 5,
        },
      ],
    },
  };

  // Run request
  const [operation] = await livestreamServiceClient.createChannel(request);
  const response = await operation.promise();
  const [channel] = response;
  console.log(`Channel: ${channel.name}`);
}

createChannel();

PHP

Pour savoir comment installer et utiliser la bibliothèque cliente pour l'API Live Stream, consultez la page Bibliothèques clientes de l'API Live Stream. Pour en savoir plus, consultez la documentation de référence de l'API Live Stream pour PHP.

Pour vous authentifier auprès de l'API Live Stream, configurez les Identifiants par défaut de l'application. Pour en savoir plus, consultez Configurer l'authentification pour un environnement de développement local.

use Google\Cloud\Video\LiveStream\V1\AudioStream;
use Google\Cloud\Video\LiveStream\V1\Channel;
use Google\Cloud\Video\LiveStream\V1\ElementaryStream;
use Google\Cloud\Video\LiveStream\V1\InputAttachment;
use Google\Cloud\Video\LiveStream\V1\Client\LivestreamServiceClient;
use Google\Cloud\Video\LiveStream\V1\CreateChannelRequest;
use Google\Cloud\Video\LiveStream\V1\Manifest;
use Google\Cloud\Video\LiveStream\V1\MuxStream;
use Google\Cloud\Video\LiveStream\V1\SegmentSettings;
use Google\Cloud\Video\LiveStream\V1\VideoStream;
use Google\Protobuf\Duration;

/**
 * Creates a channel.
 *
 * @param string  $callingProjectId   The project ID to run the API call under
 * @param string  $location           The location of the channel
 * @param string  $channelId          The ID of the channel to be created
 * @param string  $inputId            The ID of the input for the channel
 * @param string  $outputUri          Uri of the channel output folder in a
 *                                    Cloud Storage bucket. (e.g.
 *                                    "gs://my-bucket/my-output-folder/")
 */
function create_channel(
    string $callingProjectId,
    string $location,
    string $channelId,
    string $inputId,
    string $outputUri
): void {
    // Instantiate a client.
    $livestreamClient = new LivestreamServiceClient();

    $parent = $livestreamClient->locationName($callingProjectId, $location);
    $channelName = $livestreamClient->channelName($callingProjectId, $location, $channelId);
    $inputName = $livestreamClient->inputName($callingProjectId, $location, $inputId);

    $channel = (new Channel())
        ->setName($channelName)
        ->setInputAttachments([
            new InputAttachment([
                'key' => 'my-input',
                'input' => $inputName
            ])
        ])
        ->setElementaryStreams([
            new ElementaryStream([
                'key' => 'es_video',
                'video_stream' => new VideoStream([
                    'h264' => new VideoStream\H264CodecSettings([
                        'profile' => 'high',
                        'width_pixels' => 1280,
                        'height_pixels' => 720,
                        'bitrate_bps' => 3000000,
                        'frame_rate' => 30
                    ])
                ]),
            ]),
            new ElementaryStream([
                'key' => 'es_audio',
                'audio_stream' => new AudioStream([
                    'codec' => 'aac',
                    'channel_count' => 2,
                    'bitrate_bps' => 160000
                ])
            ])
        ])
        ->setOutput(new Channel\Output(['uri' => $outputUri]))
        ->setMuxStreams([
            new MuxStream([
                'key' => 'mux_video',
                'elementary_streams' => ['es_video'],
                'segment_settings' => new SegmentSettings([
                    'segment_duration' => new Duration(['seconds' => 2])
                ])
            ]),
            new MuxStream([
                'key' => 'mux_audio',
                'elementary_streams' => ['es_audio'],
                'segment_settings' => new SegmentSettings([
                    'segment_duration' => new Duration(['seconds' => 2])
                ])
            ]),
        ])
        ->setManifests([
            new Manifest([
                'file_name' => 'manifest.m3u8',
                'type' => Manifest\ManifestType::HLS,
                'mux_streams' => ['mux_video', 'mux_audio'],
                'max_segment_count' => 5
            ])
        ]);

    // Run the channel creation request. The response is a long-running operation ID.
    $request = (new CreateChannelRequest())
        ->setParent($parent)
        ->setChannel($channel)
        ->setChannelId($channelId);
    $operationResponse = $livestreamClient->createChannel($request);
    $operationResponse->pollUntilComplete();
    if ($operationResponse->operationSucceeded()) {
        $result = $operationResponse->getResult();
        // Print results
        printf('Channel: %s' . PHP_EOL, $result->getName());
    } else {
        $error = $operationResponse->getError();
        // handleError($error)
    }
}

Python

Pour savoir comment installer et utiliser la bibliothèque cliente pour l'API Live Stream, consultez la page Bibliothèques clientes de l'API Live Stream. Pour en savoir plus, consultez la documentation de référence de l'API Live Stream pour Python.

Pour vous authentifier auprès de l'API Live Stream, configurez les Identifiants par défaut de l'application. Pour en savoir plus, consultez Configurer l'authentification pour un environnement de développement local.


import argparse

from google.cloud.video import live_stream_v1
from google.cloud.video.live_stream_v1.services.livestream_service import (
    LivestreamServiceClient,
)
from google.protobuf import duration_pb2 as duration


def create_channel(
    project_id: str, location: str, channel_id: str, input_id: str, output_uri: str
) -> live_stream_v1.types.Channel:
    """Creates a channel.
    Args:
        project_id: The GCP project ID.
        location: The location in which to create the channel.
        channel_id: The user-defined channel ID.
        input_id: The user-defined input ID.
        output_uri: Uri of the channel output folder in a Cloud Storage bucket."""

    client = LivestreamServiceClient()
    parent = f"projects/{project_id}/locations/{location}"
    input = f"projects/{project_id}/locations/{location}/inputs/{input_id}"
    name = f"projects/{project_id}/locations/{location}/channels/{channel_id}"

    channel = live_stream_v1.types.Channel(
        name=name,
        input_attachments=[
            live_stream_v1.types.InputAttachment(
                key="my-input",
                input=input,
            ),
        ],
        output=live_stream_v1.types.Channel.Output(
            uri=output_uri,
        ),
        elementary_streams=[
            live_stream_v1.types.ElementaryStream(
                key="es_video",
                video_stream=live_stream_v1.types.VideoStream(
                    h264=live_stream_v1.types.VideoStream.H264CodecSettings(
                        profile="high",
                        width_pixels=1280,
                        height_pixels=720,
                        bitrate_bps=3000000,
                        frame_rate=30,
                    ),
                ),
            ),
            live_stream_v1.types.ElementaryStream(
                key="es_audio",
                audio_stream=live_stream_v1.types.AudioStream(
                    codec="aac", channel_count=2, bitrate_bps=160000
                ),
            ),
        ],
        mux_streams=[
            live_stream_v1.types.MuxStream(
                key="mux_video",
                elementary_streams=["es_video"],
                segment_settings=live_stream_v1.types.SegmentSettings(
                    segment_duration=duration.Duration(
                        seconds=2,
                    ),
                ),
            ),
            live_stream_v1.types.MuxStream(
                key="mux_audio",
                elementary_streams=["es_audio"],
                segment_settings=live_stream_v1.types.SegmentSettings(
                    segment_duration=duration.Duration(
                        seconds=2,
                    ),
                ),
            ),
        ],
        manifests=[
            live_stream_v1.types.Manifest(
                file_name="manifest.m3u8",
                type_="HLS",
                mux_streams=["mux_video", "mux_audio"],
                max_segment_count=5,
            ),
        ],
    )
    operation = client.create_channel(
        parent=parent, channel=channel, channel_id=channel_id
    )
    response = operation.result(600)
    print(f"Channel: {response.name}")

    return response

Ruby

Pour savoir comment installer et utiliser la bibliothèque cliente pour l'API Live Stream, consultez la page Bibliothèques clientes de l'API Live Stream. Pour en savoir plus, consultez la documentation de référence de l'API Live Stream pour Ruby.

Pour vous authentifier auprès de l'API Live Stream, configurez les Identifiants par défaut de l'application. Pour en savoir plus, consultez Configurer l'authentification pour un environnement de développement local.

require "google/cloud/video/live_stream"

##
# Create a channel
#
# @param project_id [String] Your Google Cloud project (e.g. "my-project")
# @param location [String] The location (e.g. "us-central1")
# @param channel_id [String] Your channel name (e.g. "my-channel")
# @param input_id [String] Your input name (e.g. "my-input")
# @param output_uri [String] Uri of the channel output folder in a Cloud Storage
#     bucket. (e.g. "gs://my-bucket/my-output-folder/";)
#
def create_channel project_id:, location:, channel_id:, input_id:, output_uri:
  # Create a Live Stream client.
  client = Google::Cloud::Video::LiveStream.livestream_service

  # Build the resource name of the parent.
  parent = client.location_path project: project_id, location: location
  # Build the resource name of the input.
  input_path = client.input_path project: project_id, location: location, input: input_id

  # Set the channel fields.
  new_channel = {
    input_attachments: [
      {
        key: "my-input",
        input: input_path
      }
    ],
    output: {
      uri: output_uri
    },
    elementary_streams: [
      {
        key: "es_video",
        video_stream: {
          h264: {
            profile: "high",
            bitrate_bps: 3_000_000,
            frame_rate: 30,
            height_pixels: 720,
            width_pixels: 1280
          }
        }
      },
      {
        key: "es_audio",
        audio_stream: {
          codec: "aac",
          channel_count: 2,
          bitrate_bps: 160_000
        }
      }
    ],
    mux_streams: [
      {
        key: "mux_video",
        elementary_streams: [
          "es_video"
        ],
        segment_settings: {
          segment_duration: {
            seconds: 2
          }
        }
      },
      {
        key: "mux_audio",
        elementary_streams: [
          "es_audio"
        ],
        segment_settings: {
          segment_duration: {
            seconds: 2
          }
        }
      }
    ],
    manifests: [
      {
        file_name: "main.m3u8",
        type: Google::Cloud::Video::LiveStream::V1::Manifest::ManifestType::HLS,
        mux_streams: [
          "mux_video", "mux_audio"
        ],
        max_segment_count: 5
      }
    ]
  }

  operation = client.create_channel parent: parent, channel: new_channel, channel_id: channel_id

  # The returned object is of type Gapic::Operation. You can use this
  # object to check the status of an operation, cancel it, or wait
  # for results. Here is how to block until completion:
  operation.wait_until_done!

  # Print the channel name.
  puts "Channel: #{operation.response.name}"
end

Obtenir la chaîne

Vous pouvez vérifier le résultat de l'opération de création de chaîne à l'aide du nouvel ID d'opération.

Une fois le canal créé, utilisez la méthode projects.locations.channels.get pour interroger l'état du canal.

REST

Avant d'utiliser les données de requête ci-dessous, effectuez les remplacements suivants :

  • PROJECT_NUMBER : numéro de votre projet Google Cloud . Vous le trouverez dans le champ Numéro du projet de la page Paramètres IAM.
  • LOCATION : région où se trouve votre canal. Utilisez l'une des régions disponibles.
    Afficher les zones géographiques
    • us-central1
    • us-east1
    • us-east4
    • us-west1
    • us-west2
    • northamerica-northeast1
    • southamerica-east1
    • asia-east1
    • asia-east2
    • asia-south1
    • asia-northeast1
    • asia-southeast1
    • australia-southeast1
    • europe-north1
    • europe-west1
    • europe-west2
    • europe-west3
    • europe-west4
  • CHANNEL_ID : identifiant défini par l'utilisateur pour le canal

Pour envoyer votre requête, développez l'une des options suivantes :

Vous devriez recevoir une réponse JSON de ce type :

{
  "name": "projects/PROJECT_NUMBER/locations/LOCATION/channels/CHANNEL_ID",
  "createTime": CREATE_TIME,
  "updateTime": UPDATE_TIME,
  "inputAttachments": [
    {
      "key": "INPUT_ID",
      "input": "projects/PROJECT_NUMBER/locations/LOCATION/inputs/INPUT_ID"
    }
  ],
  "activeInput": "INPUT_ID",
  "output": {
    "uri": "gs://BUCKET_NAME"
  },
  "elementaryStreams": [
    {
      "videoStream": {
        "h264": {
          "widthPixels": 1280,
          "heightPixels": 720,
          "frameRate": 30,
          "bitrateBps": 3000000,
          "gopDuration": "2s",
          "vbvSizeBits": 3000000,
          "vbvFullnessBits": 2700000,
          "entropyCoder": "cabac",
          "profile": "high"
        }
      },
      "key": "es_video"
    },
    {
      "audioStream": {
        "codec": "aac",
        "bitrateBps": 160000,
        "channelCount": 2,
        "channelLayout": ["fl", "fr"],
        "sampleRateHertz": 48000
      },
      "key": "es_audio"
    }
  ],
  "muxStreams": [
    {
      "key": "mux_video_ts",
      "container": "ts",
      "elementaryStreams": ["es_video", "es_audio"],
      "segmentSettings": { "segmentDuration": "2s" }
    }
  ],
  "manifests": [
    {
      "key": "manifest_hls",
      "fileName": "main.m3u8",
      "type": "HLS",
      "muxStreams": [
        "mux_video_ts",
      ],
      "maxSegmentCount": 5,
      "segmentKeepDuration": "60s"
    }
  ],
  "streamingState": "STOPPED"
}

C#

Pour savoir comment installer et utiliser la bibliothèque cliente pour l'API Live Stream, consultez la page Bibliothèques clientes de l'API Live Stream. Pour en savoir plus, consultez la documentation de référence de l'API Live Stream pour C#.

Pour vous authentifier auprès de l'API Live Stream, configurez les Identifiants par défaut de l'application. Pour en savoir plus, consultez Configurer l'authentification pour un environnement de développement local.


using Google.Cloud.Video.LiveStream.V1;

public class GetChannelSample
{
    public Channel GetChannel(
         string projectId, string locationId, string channelId)
    {
        // Create the client.
        LivestreamServiceClient client = LivestreamServiceClient.Create();

        GetChannelRequest request = new GetChannelRequest
        {
            ChannelName = ChannelName.FromProjectLocationChannel(projectId, locationId, channelId)
        };

        // Make the request.
        Channel response = client.GetChannel(request);
        return response;
    }
}

Go

Pour savoir comment installer et utiliser la bibliothèque cliente pour l'API Live Stream, consultez la page Bibliothèques clientes de l'API Live Stream. Pour en savoir plus, consultez la documentation de référence de l'API Live Stream pour Go.

Pour vous authentifier auprès de l'API Live Stream, configurez les Identifiants par défaut de l'application. Pour en savoir plus, consultez Configurer l'authentification pour un environnement de développement local.

import (
	"context"
	"fmt"
	"io"

	livestream "cloud.google.com/go/video/livestream/apiv1"
	"cloud.google.com/go/video/livestream/apiv1/livestreampb"
)

// getChannel gets a previously-created channel.
func getChannel(w io.Writer, projectID, location, channelID string) error {
	// projectID := "my-project-id"
	// location := "us-central1"
	// channelID := "my-channel-id"
	ctx := context.Background()
	client, err := livestream.NewClient(ctx)
	if err != nil {
		return fmt.Errorf("NewClient: %w", err)
	}
	defer client.Close()

	req := &livestreampb.GetChannelRequest{
		Name: fmt.Sprintf("projects/%s/locations/%s/channels/%s", projectID, location, channelID),
	}

	response, err := client.GetChannel(ctx, req)
	if err != nil {
		return fmt.Errorf("GetChannel: %w", err)
	}

	fmt.Fprintf(w, "Channel: %v", response.Name)
	return nil
}

Java

Pour savoir comment installer et utiliser la bibliothèque cliente pour l'API Live Stream, consultez la page Bibliothèques clientes de l'API Live Stream. Pour en savoir plus, consultez la documentation de référence de l'API Live Stream pour Java.

Pour vous authentifier auprès de l'API Live Stream, configurez les Identifiants par défaut de l'application. Pour en savoir plus, consultez Configurer l'authentification pour un environnement de développement local.


import com.google.cloud.video.livestream.v1.Channel;
import com.google.cloud.video.livestream.v1.ChannelName;
import com.google.cloud.video.livestream.v1.LivestreamServiceClient;
import java.io.IOException;

public class GetChannel {

  public static void main(String[] args) throws Exception {
    // TODO(developer): Replace these variables before running the sample.
    String projectId = "my-project-id";
    String location = "us-central1";
    String channelId = "my-channel-id";

    getChannel(projectId, location, channelId);
  }

  public static void getChannel(String projectId, String location, String channelId)
      throws IOException {
    // Initialize client that will be used to send requests. This client only needs to be created
    // once, and can be reused for multiple requests. In this example, try-with-resources is used
    // which automatically calls close() on the client to clean up resources.
    try (LivestreamServiceClient livestreamServiceClient = LivestreamServiceClient.create()) {
      ChannelName name = ChannelName.of(projectId, location, channelId);
      Channel response = livestreamServiceClient.getChannel(name);
      System.out.println("Channel: " + response.getName());
    }
  }
}

Node.js

Pour savoir comment installer et utiliser la bibliothèque cliente pour l'API Live Stream, consultez la page Bibliothèques clientes de l'API Live Stream. Pour en savoir plus, consultez la documentation de référence de l'API Live Stream pour Node.js.

Pour vous authentifier auprès de l'API Live Stream, configurez les Identifiants par défaut de l'application. Pour en savoir plus, consultez Configurer l'authentification pour un environnement de développement local.

/**
 * TODO(developer): Uncomment these variables before running the sample.
 */
// projectId = 'my-project-id';
// location = 'us-central1';
// channelId = 'my-channel';

// Imports the Livestream library
const {LivestreamServiceClient} = require('@google-cloud/livestream').v1;

// Instantiates a client
const livestreamServiceClient = new LivestreamServiceClient();

async function getChannel() {
  // Construct request
  const request = {
    name: livestreamServiceClient.channelPath(projectId, location, channelId),
  };
  const [channel] = await livestreamServiceClient.getChannel(request);
  console.log(`Channel: ${channel.name}`);
}

getChannel();

PHP

Pour savoir comment installer et utiliser la bibliothèque cliente pour l'API Live Stream, consultez la page Bibliothèques clientes de l'API Live Stream. Pour en savoir plus, consultez la documentation de référence de l'API Live Stream pour PHP.

Pour vous authentifier auprès de l'API Live Stream, configurez les Identifiants par défaut de l'application. Pour en savoir plus, consultez Configurer l'authentification pour un environnement de développement local.

use Google\Cloud\Video\LiveStream\V1\Client\LivestreamServiceClient;
use Google\Cloud\Video\LiveStream\V1\GetChannelRequest;

/**
 * Gets a channel.
 *
 * @param string  $callingProjectId   The project ID to run the API call under
 * @param string  $location           The location of the channel
 * @param string  $channelId          The ID of the channel
 */
function get_channel(
    string $callingProjectId,
    string $location,
    string $channelId
): void {
    // Instantiate a client.
    $livestreamClient = new LivestreamServiceClient();
    $formattedName = $livestreamClient->channelName($callingProjectId, $location, $channelId);

    // Get the channel.
    $request = (new GetChannelRequest())
        ->setName($formattedName);
    $response = $livestreamClient->getChannel($request);
    // Print results
    printf('Channel: %s' . PHP_EOL, $response->getName());
}

Python

Pour savoir comment installer et utiliser la bibliothèque cliente pour l'API Live Stream, consultez la page Bibliothèques clientes de l'API Live Stream. Pour en savoir plus, consultez la documentation de référence de l'API Live Stream pour Python.

Pour vous authentifier auprès de l'API Live Stream, configurez les Identifiants par défaut de l'application. Pour en savoir plus, consultez Configurer l'authentification pour un environnement de développement local.


import argparse

from google.cloud.video import live_stream_v1
from google.cloud.video.live_stream_v1.services.livestream_service import (
    LivestreamServiceClient,
)


def get_channel(
    project_id: str, location: str, channel_id: str
) -> live_stream_v1.types.Channel:
    """Gets a channel.
    Args:
        project_id: The GCP project ID.
        location: The location of the channel.
        channel_id: The user-defined channel ID."""

    client = LivestreamServiceClient()

    name = f"projects/{project_id}/locations/{location}/channels/{channel_id}"
    response = client.get_channel(name=name)
    print(f"Channel: {response.name}")

    return response

Ruby

Pour savoir comment installer et utiliser la bibliothèque cliente pour l'API Live Stream, consultez la page Bibliothèques clientes de l'API Live Stream. Pour en savoir plus, consultez la documentation de référence de l'API Live Stream pour Ruby.

Pour vous authentifier auprès de l'API Live Stream, configurez les Identifiants par défaut de l'application. Pour en savoir plus, consultez Configurer l'authentification pour un environnement de développement local.

require "google/cloud/video/live_stream"

##
# Get a channel
#
# @param project_id [String] Your Google Cloud project (e.g. "my-project")
# @param location [String] The location (e.g. "us-central1")
# @param channel_id [String] Your channel name (e.g. "my-channel")
#
def get_channel project_id:, location:, channel_id:
  # Create a Live Stream client.
  client = Google::Cloud::Video::LiveStream.livestream_service

  # Build the resource name of the channel.
  name = client.channel_path project: project_id, location: location, channel: channel_id

  # Get the channel.
  channel = client.get_channel name: name

  # Print the channel name.
  puts "Channel: #{channel.name}"
end

La réponse complète contient le champ suivant. (Certains des exemples de code ci-dessus ne renvoient que certains champs de la réponse, mais peuvent être modifiés pour renvoyer la réponse complète.)

{
  ...
  "streamingState": "STOPPED"
  ...
}

Cette réponse indique que vous pouvez maintenant démarrer le canal.

Démarrer la chaîne

Utilisez la méthode projects.locations.channels.start pour démarrer le canal. Un canal doit être démarré avant de pouvoir accepter des flux d'entrée ou générer un flux de sortie.

Le démarrage du premier canal dans une région prend environ 10 minutes.

REST

Avant d'utiliser les données de requête ci-dessous, effectuez les remplacements suivants :

  • PROJECT_NUMBER : numéro de votre projet Google Cloud . Vous le trouverez dans le champ Numéro du projet de la page Paramètres IAM.
  • LOCATION : région où se trouve votre canal. Utilisez l'une des régions disponibles.
    Afficher les zones géographiques
    • us-central1
    • us-east1
    • us-east4
    • us-west1
    • us-west2
    • northamerica-northeast1
    • southamerica-east1
    • asia-east1
    • asia-east2
    • asia-south1
    • asia-northeast1
    • asia-southeast1
    • australia-southeast1
    • europe-north1
    • europe-west1
    • europe-west2
    • europe-west3
    • europe-west4
  • CHANNEL_ID : identifiant défini par l'utilisateur pour le canal

Pour envoyer votre requête, développez l'une des options suivantes :

Vous devriez recevoir une réponse JSON de ce type :

{
  "name": "projects/PROJECT_NUMBER/locations/LOCATION/operations/OPERATION_ID",
  "metadata": {
    "@type": "type.googleapis.com/google.cloud.video.livestream.v1.OperationMetadata",
    "createTime": CREATE_TIME,
    "target": "projects/PROJECT_NUMBER/locations/LOCATION/channels/CHANNEL_ID",
    "verb": "start",
    "requestedCancellation": false,
    "apiVersion": "v1"
  },
  "done": false
}

C#

Pour savoir comment installer et utiliser la bibliothèque cliente pour l'API Live Stream, consultez la page Bibliothèques clientes de l'API Live Stream. Pour en savoir plus, consultez la documentation de référence de l'API Live Stream pour C#.

Pour vous authentifier auprès de l'API Live Stream, configurez les Identifiants par défaut de l'application. Pour en savoir plus, consultez Configurer l'authentification pour un environnement de développement local.


using Google.Cloud.Video.LiveStream.V1;
using Google.LongRunning;
using System.Threading.Tasks;

public class StartChannelSample
{
    public async Task StartChannelAsync(
         string projectId, string locationId, string channelId)
    {
        // Create the client.
        LivestreamServiceClient client = LivestreamServiceClient.Create();

        StartChannelRequest request = new StartChannelRequest
        {
            ChannelName = ChannelName.FromProjectLocationChannel(projectId, locationId, channelId)
        };

        // Make the request.
        Operation<ChannelOperationResponse, OperationMetadata> response = await client.StartChannelAsync(request);

        // Poll until the returned long-running operation is complete.
        await response.PollUntilCompletedAsync();
    }
}

Go

Pour savoir comment installer et utiliser la bibliothèque cliente pour l'API Live Stream, consultez la page Bibliothèques clientes de l'API Live Stream. Pour en savoir plus, consultez la documentation de référence de l'API Live Stream pour Go.

Pour vous authentifier auprès de l'API Live Stream, configurez les Identifiants par défaut de l'application. Pour en savoir plus, consultez Configurer l'authentification pour un environnement de développement local.

import (
	"context"
	"fmt"
	"io"

	livestream "cloud.google.com/go/video/livestream/apiv1"
	"cloud.google.com/go/video/livestream/apiv1/livestreampb"
)

// startChannel starts a channel.
func startChannel(w io.Writer, projectID, location, channelID string) error {
	// projectID := "my-project-id"
	// location := "us-central1"
	// channelID := "my-channel-id"
	ctx := context.Background()
	client, err := livestream.NewClient(ctx)
	if err != nil {
		return fmt.Errorf("NewClient: %w", err)
	}
	defer client.Close()

	req := &livestreampb.StartChannelRequest{
		Name: fmt.Sprintf("projects/%s/locations/%s/channels/%s", projectID, location, channelID),
	}

	op, err := client.StartChannel(ctx, req)
	if err != nil {
		return fmt.Errorf("StartChannel: %w", err)
	}
	_, err = op.Wait(ctx)
	if err != nil {
		return fmt.Errorf("Wait: %w", err)
	}

	fmt.Fprintf(w, "Started channel")
	return nil
}

Java

Pour savoir comment installer et utiliser la bibliothèque cliente pour l'API Live Stream, consultez la page Bibliothèques clientes de l'API Live Stream. Pour en savoir plus, consultez la documentation de référence de l'API Live Stream pour Java.

Pour vous authentifier auprès de l'API Live Stream, configurez les Identifiants par défaut de l'application. Pour en savoir plus, consultez Configurer l'authentification pour un environnement de développement local.


import com.google.cloud.video.livestream.v1.ChannelName;
import com.google.cloud.video.livestream.v1.LivestreamServiceClient;
import java.io.IOException;
import java.util.concurrent.ExecutionException;
import java.util.concurrent.TimeUnit;
import java.util.concurrent.TimeoutException;

public class StartChannel {

  public static void main(String[] args) throws Exception {
    // TODO(developer): Replace these variables before running the sample.
    String projectId = "my-project-id";
    String location = "us-central1";
    String channelId = "my-channel-id";

    startChannel(projectId, location, channelId);
  }

  public static void startChannel(String projectId, String location, String channelId)
      throws InterruptedException, ExecutionException, TimeoutException, IOException {
    // Initialize client that will be used to send requests. This client only needs to be created
    // once, and can be reused for multiple requests. After completing all of your requests, call
    // the "close" method on the client to safely clean up any remaining background resources.
    LivestreamServiceClient livestreamServiceClient = LivestreamServiceClient.create();
    ChannelName name = ChannelName.of(projectId, location, channelId);
    // First API call in a project can take up to 15 minutes.
    livestreamServiceClient.startChannelAsync(name).get(15, TimeUnit.MINUTES);
    System.out.println("Started channel");
    livestreamServiceClient.close();
  }
}

Node.js

Pour savoir comment installer et utiliser la bibliothèque cliente pour l'API Live Stream, consultez la page Bibliothèques clientes de l'API Live Stream. Pour en savoir plus, consultez la documentation de référence de l'API Live Stream pour Node.js.

Pour vous authentifier auprès de l'API Live Stream, configurez les Identifiants par défaut de l'application. Pour en savoir plus, consultez Configurer l'authentification pour un environnement de développement local.

/**
 * TODO(developer): Uncomment these variables before running the sample.
 */
// projectId = 'my-project-id';
// location = 'us-central1';
// channelId = 'my-channel';

// Imports the Livestream library
const {LivestreamServiceClient} = require('@google-cloud/livestream').v1;

// Instantiates a client
const livestreamServiceClient = new LivestreamServiceClient();

async function startChannel() {
  // Construct request
  const request = {
    name: livestreamServiceClient.channelPath(projectId, location, channelId),
  };
  const [operation] = await livestreamServiceClient.startChannel(request);
  await operation.promise();
  console.log('Started channel');
}

startChannel();

PHP

Pour savoir comment installer et utiliser la bibliothèque cliente pour l'API Live Stream, consultez la page Bibliothèques clientes de l'API Live Stream. Pour en savoir plus, consultez la documentation de référence de l'API Live Stream pour PHP.

Pour vous authentifier auprès de l'API Live Stream, configurez les Identifiants par défaut de l'application. Pour en savoir plus, consultez Configurer l'authentification pour un environnement de développement local.

use Google\Cloud\Video\LiveStream\V1\Client\LivestreamServiceClient;
use Google\Cloud\Video\LiveStream\V1\StartChannelRequest;

/**
 * Starts a channel.
 *
 * @param string  $callingProjectId   The project ID to run the API call under
 * @param string  $location           The location of the channel
 * @param string  $channelId          The ID of the channel
 */
function start_channel(
    string $callingProjectId,
    string $location,
    string $channelId
): void {
    // Instantiate a client.
    $livestreamClient = new LivestreamServiceClient();
    $formattedName = $livestreamClient->channelName($callingProjectId, $location, $channelId);

    // Run the channel start request. The response is a long-running operation ID.
    $request = (new StartChannelRequest())
        ->setName($formattedName);
    $operationResponse = $livestreamClient->startChannel($request);
    $operationResponse->pollUntilComplete();
    if ($operationResponse->operationSucceeded()) {
        // Print results
        printf('Started channel' . PHP_EOL);
    } else {
        $error = $operationResponse->getError();
        // handleError($error)
    }
}

Python

Pour savoir comment installer et utiliser la bibliothèque cliente pour l'API Live Stream, consultez la page Bibliothèques clientes de l'API Live Stream. Pour en savoir plus, consultez la documentation de référence de l'API Live Stream pour Python.

Pour vous authentifier auprès de l'API Live Stream, configurez les Identifiants par défaut de l'application. Pour en savoir plus, consultez Configurer l'authentification pour un environnement de développement local.


import argparse

from google.cloud.video import live_stream_v1
from google.cloud.video.live_stream_v1.services.livestream_service import (
    LivestreamServiceClient,
)


def start_channel(
    project_id: str, location: str, channel_id: str
) -> live_stream_v1.types.ChannelOperationResponse:
    """Starts a channel.
    Args:
        project_id: The GCP project ID.
        location: The location of the channel.
        channel_id: The user-defined channel ID."""

    client = LivestreamServiceClient()

    name = f"projects/{project_id}/locations/{location}/channels/{channel_id}"
    operation = client.start_channel(name=name)
    response = operation.result(900)
    print("Started channel")

    return response

Ruby

Pour savoir comment installer et utiliser la bibliothèque cliente pour l'API Live Stream, consultez la page Bibliothèques clientes de l'API Live Stream. Pour en savoir plus, consultez la documentation de référence de l'API Live Stream pour Ruby.

Pour vous authentifier auprès de l'API Live Stream, configurez les Identifiants par défaut de l'application. Pour en savoir plus, consultez Configurer l'authentification pour un environnement de développement local.

require "google/cloud/video/live_stream"

##
# Starts a channel
#
# @param project_id [String] Your Google Cloud project (e.g. "my-project")
# @param location [String] The location (e.g. "us-central1")
# @param channel_id [String] Your channel name (e.g. "my-channel")
#
def start_channel project_id:, location:, channel_id:
  # Create a Live Stream client.
  client = Google::Cloud::Video::LiveStream.livestream_service

  # Build the resource name of the channel.
  name = client.channel_path project: project_id, location: location, channel: channel_id

  # Start the channel.
  operation = client.start_channel name: name

  # The returned object is of type Gapic::Operation. You can use this
  # object to check the status of an operation, cancel it, or wait
  # for results. Here is how to block until completion:
  operation.wait_until_done!

  # Print a success message.
  puts "Started channel"
end

Envoyer le flux d'entrée

Pour déterminer si le canal a démarré, obtenez les informations sur le canal comme précédemment. La réponse doit contenir les éléments suivants :

{
  ...
  "streamingState": "AWAITING_INPUT"
  ...
}

Maintenant que la chaîne est prête, envoyez un flux d'entrée de test au point de terminaison d'entrée pour générer le flux en direct.

Ouvrez une nouvelle fenêtre de terminal. Exécutez la commande suivante en utilisant le INPUT_STREAM_URI de la section Vérifier le résultat :

ffmpeg -re -f lavfi -i "testsrc=size=1280x720 [out0]; sine=frequency=500 [out1]" \
  -acodec aac -vcodec h264 -f flv INPUT_STREAM_URI

Vérifier que la chaîne diffuse du contenu

Pour vérifier l'état de l'opération de streaming en direct, récupérez les informations sur la chaîne comme vous l'avez fait précédemment. La réponse doit contenir les éléments suivants :

{
  ...
  "streamingState": "STREAMING"
  ...
}

Vérifier le contenu du bucket Cloud Storage

Ouvrez le bucket Cloud Storage. Vérifiez qu'il contient les fichiers et répertoires suivants :

  • main.m3u8
  • mux_video_ts/
    • Plusieurs fichiers segment-segment-number.ts
    • Un seul fichier index-1.m3u8

Lire la diffusion en direct générée

Pour lire le fichier multimédia généré dans Shaka Player, procédez comme suit :

  1. Rendez le bucket Cloud Storage que vous avez créé publiquement lisible.
  2. Pour activer le partage des ressources entre origines multiples (CORS) sur un bucket Cloud Storage, procédez comme suit :
    1. Créez un fichier JSON contenant les informations suivantes :
      [
        {
          "origin": ["https://shaka-player-demo.appspot.com/"],
          "responseHeader": ["Content-Type", "Range"],
          "method": ["GET", "HEAD"],
          "maxAgeSeconds": 3600
        }
      ]
    2. Exécutez la commande suivante en remplaçant JSON_FILE_NAME par le nom du fichier JSON que vous avez créé à l'étape précédente :
      gcloud storage buckets update gs://BUCKET_NAME --cors-file=JSON_FILE_NAME.json
  3. Dans le bucket Cloud Storage, recherchez le fichier main.m3u8 généré. Cliquez sur Copier l'URL dans la colonne Accès public du fichier.
  4. Accédez à Shaka Player, un lecteur de diffusion en direct en ligne.
  5. Cliquez sur Contenu personnalisé dans la barre de navigation supérieure.
  6. Cliquez sur le bouton +.
  7. Collez l'URL publique du fichier dans la zone URL du fichier manifeste.

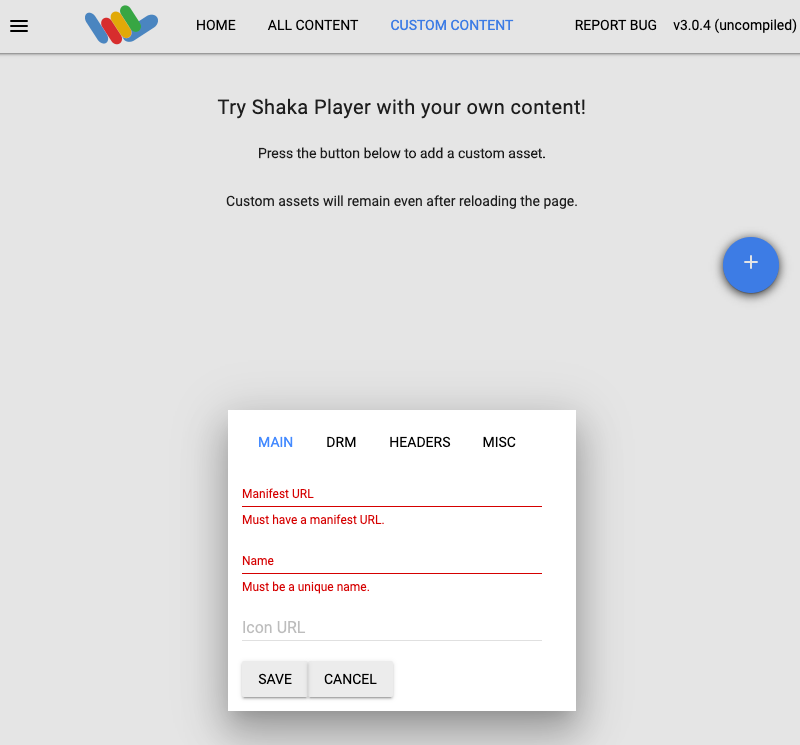
  8. Saisissez un nom dans la zone Nom.

  9. Cliquez sur Enregistrer.

  10. Cliquez sur Lire.

Un modèle de test devrait s'afficher pendant la diffusion en direct.

Vidéo de mire

Ajouter un repère de coupure publicitaire à la diffusion en direct

Utilisez la méthode projects.locations.channels.events.create pour ajouter un repère de coupure publicitaire à la diffusion en direct.

REST

Avant d'utiliser les données de requête ci-dessous, effectuez les remplacements suivants :

  • PROJECT_NUMBER : numéro de votre projet Google Cloud . Vous le trouverez dans le champ Numéro du projet de la page Paramètres IAM.
  • LOCATION : région où se trouve votre canal. Utilisez l'une des régions disponibles.
    Afficher les zones géographiques
    • us-central1
    • us-east1
    • us-east4
    • us-west1
    • us-west2
    • northamerica-northeast1
    • southamerica-east1
    • asia-east1
    • asia-east2
    • asia-south1
    • asia-northeast1
    • asia-southeast1
    • australia-southeast1
    • europe-north1
    • europe-west1
    • europe-west2
    • europe-west3
    • europe-west4
  • CHANNEL_ID : identifiant défini par l'utilisateur pour le canal
  • EVENT_ID : identifiant défini par l'utilisateur pour l'événement

Pour envoyer votre requête, développez l'une des options suivantes :

Vous devriez recevoir une réponse JSON de ce type :

{
  "name": "projects/PROJECT_NUMBER/locations/LOCATION/channels/CHANNEL_ID/events/EVENT_ID",
  "createTime": CREATE_TIME,
  "updateTime": UPDATE_TIME,
  "adBreak": {
    "duration": "100s"
  },
  "executeNow": true,
  "state": "PENDING"
}

C#

Pour savoir comment installer et utiliser la bibliothèque cliente pour l'API Live Stream, consultez la page Bibliothèques clientes de l'API Live Stream. Pour en savoir plus, consultez la documentation de référence de l'API Live Stream pour C#.

Pour vous authentifier auprès de l'API Live Stream, configurez les Identifiants par défaut de l'application. Pour en savoir plus, consultez Configurer l'authentification pour un environnement de développement local.


using Google.Cloud.Video.LiveStream.V1;

public class CreateChannelEventSample
{
    public Event CreateChannelEvent(
         string projectId, string locationId, string channelId, string eventId)
    {
        // Create the client.
        LivestreamServiceClient client = LivestreamServiceClient.Create();

        CreateEventRequest request = new CreateEventRequest
        {
            ParentAsChannelName = ChannelName.FromProjectLocationChannel(projectId, locationId, channelId),
            EventId = eventId,
            Event = new Event
            {
                AdBreak = new Event.Types.AdBreakTask
                {
                    Duration = new Google.Protobuf.WellKnownTypes.Duration
                    {
                        Seconds = 30
                    }
                },
                ExecuteNow = true
            }
        };

        // Make the request.
        Event response = client.CreateEvent(request);
        return response;
    }
}

Go

Pour savoir comment installer et utiliser la bibliothèque cliente pour l'API Live Stream, consultez la page Bibliothèques clientes de l'API Live Stream. Pour en savoir plus, consultez la documentation de référence de l'API Live Stream pour Go.

Pour vous authentifier auprès de l'API Live Stream, configurez les Identifiants par défaut de l'application. Pour en savoir plus, consultez Configurer l'authentification pour un environnement de développement local.

import (
	"context"
	"fmt"
	"io"

	"github.com/golang/protobuf/ptypes/duration"

	livestream "cloud.google.com/go/video/livestream/apiv1"
	"cloud.google.com/go/video/livestream/apiv1/livestreampb"
)

// createChannelEvent creates a channel event. An event is a sub-resource of a
// channel, which can be scheduled by the user to execute operations on a
// channel resource without having to stop the channel. This sample creates an
// ad break event.
func createChannelEvent(w io.Writer, projectID, location, channelID, eventID string) error {
	// projectID := "my-project-id"
	// location := "us-central1"
	// channelID := "my-channel"
	// eventID := "my-channel-event"
	ctx := context.Background()
	client, err := livestream.NewClient(ctx)
	if err != nil {
		return fmt.Errorf("NewClient: %w", err)
	}
	defer client.Close()

	req := &livestreampb.CreateEventRequest{
		Parent:  fmt.Sprintf("projects/%s/locations/%s/channels/%s", projectID, location, channelID),
		EventId: eventID,
		Event: &livestreampb.Event{
			Task: &livestreampb.Event_AdBreak{
				AdBreak: &livestreampb.Event_AdBreakTask{
					Duration: &duration.Duration{
						Seconds: 30,
					},
				},
			},
			ExecuteNow: true,
		},
	}
	// Creates the channel event.
	response, err := client.CreateEvent(ctx, req)
	if err != nil {
		return fmt.Errorf("CreateEvent: %w", err)
	}

	fmt.Fprintf(w, "Channel event: %v", response.Name)
	return nil
}

Java

Pour savoir comment installer et utiliser la bibliothèque cliente pour l'API Live Stream, consultez la page Bibliothèques clientes de l'API Live Stream. Pour en savoir plus, consultez la documentation de référence de l'API Live Stream pour Java.

Pour vous authentifier auprès de l'API Live Stream, configurez les Identifiants par défaut de l'application. Pour en savoir plus, consultez Configurer l'authentification pour un environnement de développement local.


import com.google.cloud.video.livestream.v1.ChannelName;
import com.google.cloud.video.livestream.v1.CreateEventRequest;
import com.google.cloud.video.livestream.v1.Event;
import com.google.cloud.video.livestream.v1.Event.AdBreakTask;
import com.google.cloud.video.livestream.v1.LivestreamServiceClient;
import com.google.protobuf.Duration;
import java.io.IOException;

public class CreateChannelEvent {

  public static void main(String[] args) throws Exception {
    // TODO(developer): Replace these variables before running the sample.
    String projectId = "my-project-id";
    String location = "us-central1";
    String channelId = "my-channel-id";
    String eventId = "my-channel-event-id";

    createChannelEvent(projectId, location, channelId, eventId);
  }

  public static void createChannelEvent(
      String projectId, String location, String channelId, String eventId) throws IOException {
    // Initialize client that will be used to send requests. This client only needs to be created
    // once, and can be reused for multiple requests. In this example, try-with-resources is used
    // which automatically calls close() on the client to clean up resources.
    try (LivestreamServiceClient livestreamServiceClient = LivestreamServiceClient.create()) {
      var createEventRequest =
          CreateEventRequest.newBuilder()
              .setParent(ChannelName.of(projectId, location, channelId).toString())
              .setEventId(eventId)
              .setEvent(
                  Event.newBuilder()
                      .setAdBreak(
                          AdBreakTask.newBuilder()
                              .setDuration(Duration.newBuilder().setSeconds(30).build())
                              .build())
                      .setExecuteNow(true)
                      .build())
              .build();

      Event response = livestreamServiceClient.createEvent(createEventRequest);
      System.out.println("Channel event: " + response.getName());
    }
  }
}

Node.js

Pour savoir comment installer et utiliser la bibliothèque cliente pour l'API Live Stream, consultez la page Bibliothèques clientes de l'API Live Stream. Pour en savoir plus, consultez la documentation de référence de l'API Live Stream pour Node.js.

Pour vous authentifier auprès de l'API Live Stream, configurez les Identifiants par défaut de l'application. Pour en savoir plus, consultez Configurer l'authentification pour un environnement de développement local.

/**
 * TODO(developer): Uncomment these variables before running the sample.
 */
// projectId = 'my-project-id';
// location = 'us-central1';
// channelId = 'my-channel';
// eventId = 'my-channel-event';

// Imports the Livestream library
const {LivestreamServiceClient} = require('@google-cloud/livestream').v1;

// Instantiates a client
const livestreamServiceClient = new LivestreamServiceClient();

async function createChannelEvent() {
  // Construct request
  const request = {
    parent: livestreamServiceClient.channelPath(
      projectId,
      location,
      channelId
    ),
    eventId: eventId,
    event: {
      adBreak: {
        duration: {
          seconds: 30,
        },
      },
      executeNow: true,
    },
  };

  // Run request
  const [event] = await livestreamServiceClient.createEvent(request);
  console.log(`Channel event: ${event.name}`);
}

createChannelEvent();

PHP

Pour savoir comment installer et utiliser la bibliothèque cliente pour l'API Live Stream, consultez la page Bibliothèques clientes de l'API Live Stream. Pour en savoir plus, consultez la documentation de référence de l'API Live Stream pour PHP.

Pour vous authentifier auprès de l'API Live Stream, configurez les Identifiants par défaut de l'application. Pour en savoir plus, consultez Configurer l'authentification pour un environnement de développement local.

use Google\Cloud\Video\LiveStream\V1\Event;
use Google\Cloud\Video\LiveStream\V1\Client\LivestreamServiceClient;
use Google\Cloud\Video\LiveStream\V1\CreateEventRequest;
use Google\Protobuf\Duration;

/**
 * Creates a channel event. This particular sample inserts an ad break marker.
 * Other event types are supported.
 *
 * @param string  $callingProjectId   The project ID to run the API call under
 * @param string  $location           The location of the channel
 * @param string  $channelId          The ID of the channel
 * @param string  $eventId            The ID of the channel event
 */
function create_channel_event(
    string $callingProjectId,
    string $location,
    string $channelId,
    string $eventId
): void {
    // Instantiate a client.
    $livestreamClient = new LivestreamServiceClient();

    $parent = $livestreamClient->channelName($callingProjectId, $location, $channelId);

    $eventAdBreak = (new Event\AdBreakTask())
        ->setDuration(new Duration(['seconds' => 30]));
    $event = (new Event())
        ->setAdBreak($eventAdBreak)
        ->setExecuteNow(true);

    // Run the channel event creation request.
    $request = (new CreateEventRequest())
        ->setParent($parent)
        ->setEvent($event)
        ->setEventId($eventId);
    $response = $livestreamClient->createEvent($request);
    // Print results.
    printf('Channel event: %s' . PHP_EOL, $response->getName());
}

Python

Pour savoir comment installer et utiliser la bibliothèque cliente pour l'API Live Stream, consultez la page Bibliothèques clientes de l'API Live Stream. Pour en savoir plus, consultez la documentation de référence de l'API Live Stream pour Python.

Pour vous authentifier auprès de l'API Live Stream, configurez les Identifiants par défaut de l'application. Pour en savoir plus, consultez Configurer l'authentification pour un environnement de développement local.


import argparse

from google.cloud.video import live_stream_v1
from google.cloud.video.live_stream_v1.services.livestream_service import (
    LivestreamServiceClient,
)
from google.protobuf import duration_pb2 as duration


def create_channel_event(
    project_id: str, location: str, channel_id: str, event_id: str
) -> live_stream_v1.types.Event:
    """Creates a channel event.
    Args:
        project_id: The GCP project ID.
        location: The location of the channel.
        channel_id: The user-defined channel ID.
        event_id: The user-defined event ID."""

    client = LivestreamServiceClient()
    parent = f"projects/{project_id}/locations/{location}/channels/{channel_id}"
    name = f"projects/{project_id}/locations/{location}/channels/{channel_id}/events/{event_id}"

    event = live_stream_v1.types.Event(
        name=name,
        ad_break=live_stream_v1.types.Event.AdBreakTask(
            duration=duration.Duration(
                seconds=30,
            ),
        ),
        execute_now=True,
    )

    response = client.create_event(parent=parent, event=event, event_id=event_id)
    print(f"Channel event: {response.name}")

    return response

Ruby

Pour savoir comment installer et utiliser la bibliothèque cliente pour l'API Live Stream, consultez la page Bibliothèques clientes de l'API Live Stream. Pour en savoir plus, consultez la documentation de référence de l'API Live Stream pour Ruby.

Pour vous authentifier auprès de l'API Live Stream, configurez les Identifiants par défaut de l'application. Pour en savoir plus, consultez Configurer l'authentification pour un environnement de développement local.

require "google/cloud/video/live_stream"

##
# Create a channel event
#
# @param project_id [String] Your Google Cloud project (e.g. "my-project")
# @param location [String] The location (e.g. "us-central1")
# @param channel_id [String] Your channel name (e.g. "my-channel")
# @param event_id [String] Your event name (e.g. "my-event")
#
def create_channel_event project_id:, location:, channel_id:, event_id:
  # Create a Live Stream client.
  client = Google::Cloud::Video::LiveStream.livestream_service

  # Build the resource name of the parent.
  parent = client.channel_path project: project_id, location: location, channel: channel_id

  # Set the event fields.
  new_event = {
    ad_break: {
      duration: {
        seconds: 100
      }
    },
    execute_now: true
  }

  response = client.create_event parent: parent, event: new_event, event_id: event_id

  # Print the channel event name.
  puts "Channel event: #{response.name}"
end

Vérifiez que le repère de coupure publicitaire existe.

Lorsque le repère publicitaire est inséré dans la diffusion en direct, un événement intitulé CUE-OUT s'affiche dans le fichier manifeste HLS pour la durée de l'annonce spécifiée (100 s).

Exécutez la commande suivante pour afficher le contenu du fichier manifeste HLS généré :

gcloud storage cat gs://BUCKET_NAME/mux_video_ts/index-1.m3u8

Vous devrez peut-être exécuter la commande gcloud storage cat plusieurs fois jusqu'à ce que la section CUE-OUT s'affiche :

...
#EXTM3U
#EXT-X-VERSION:7
#EXT-X-TARGETDURATION:4
#EXT-X-MEDIA-SEQUENCE:40
#EXT-X-DISCONTINUITY-SEQUENCE:0
#EXT-X-CUE-OUT:100.000000
#EXT-X-PROGRAM-DATE-TIME:2021-07-13T19:11:49.956Z
#EXTINF:2.000000
segment-0000000040.ts
#EXT-X-CUE-OUT-CONT:ElapsedTime=2.000000,Duration=100.000000
#EXT-X-PROGRAM-DATE-TIME:2021-07-13T19:11:51.956Z
#EXTINF:2.000000
segment-0000000041.ts
#EXT-X-CUE-OUT-CONT:ElapsedTime=4.000000,Duration=100.000000
#EXT-X-PROGRAM-DATE-TIME:2021-07-13T19:11:53.956Z
#EXTINF:2.000000
segment-0000000042.ts
#EXT-X-CUE-OUT-CONT:ElapsedTime=6.000000,Duration=100.000000
#EXT-X-PROGRAM-DATE-TIME:2021-07-13T19:11:55.956Z
#EXTINF:2.000000
segment-0000000043.ts
#EXT-X-CUE-OUT-CONT:ElapsedTime=8.000000,Duration=100.000000
...

Effectuer un nettoyage

Pour éviter que les ressources utilisées sur cette page soient facturées sur votre compte Google Cloud , procédez comme suit :

Arrêter la chaîne

Utilisez la méthode projects.locations.channels.stop pour arrêter le canal. Vous devez arrêter la chaîne avant de pouvoir la supprimer.

REST

Avant d'utiliser les données de requête ci-dessous, effectuez les remplacements suivants :

  • PROJECT_NUMBER : numéro de votre projet Google Cloud . Vous le trouverez dans le champ Numéro du projet de la page Paramètres IAM.
  • LOCATION : région où se trouve votre canal. Utilisez l'une des régions disponibles.
    Afficher les zones géographiques
    • us-central1
    • us-east1
    • us-east4
    • us-west1
    • us-west2
    • northamerica-northeast1
    • southamerica-east1
    • asia-east1
    • asia-east2
    • asia-south1
    • asia-northeast1
    • asia-southeast1
    • australia-southeast1
    • europe-north1
    • europe-west1
    • europe-west2
    • europe-west3
    • europe-west4
  • CHANNEL_ID : identifiant défini par l'utilisateur pour le canal

Pour envoyer votre requête, développez l'une des options suivantes :

Vous devriez recevoir une réponse JSON de ce type :

{
  "name": "projects/PROJECT_NUMBER/locations/LOCATION/operations/OPERATION_ID",
  "metadata": {
    "@type": "type.googleapis.com/google.cloud.video.livestream.v1.OperationMetadata",
    "createTime": CREATE_TIME,
    "target": "projects/PROJECT_NUMBER/locations/LOCATION/channels/CHANNEL_ID",
    "verb": "stop",
    "requestedCancellation": false,
    "apiVersion": "v1"
  },
  "done": false
}

C#

Pour savoir comment installer et utiliser la bibliothèque cliente pour l'API Live Stream, consultez la page Bibliothèques clientes de l'API Live Stream. Pour en savoir plus, consultez la documentation de référence de l'API Live Stream pour C#.

Pour vous authentifier auprès de l'API Live Stream, configurez les Identifiants par défaut de l'application. Pour en savoir plus, consultez Configurer l'authentification pour un environnement de développement local.


using Google.Cloud.Video.LiveStream.V1;
using Google.LongRunning;
using System.Threading.Tasks;

public class StopChannelSample
{
    public async Task StopChannelAsync(
         string projectId, string locationId, string channelId)
    {
        // Create the client.
        LivestreamServiceClient client = LivestreamServiceClient.Create();

        StopChannelRequest request = new StopChannelRequest
        {
            ChannelName = ChannelName.FromProjectLocationChannel(projectId, locationId, channelId)
        };

        // Make the request.
        Operation<ChannelOperationResponse, OperationMetadata> response = await client.StopChannelAsync(request);

        // Poll until the returned long-running operation is complete.
        await response.PollUntilCompletedAsync();
    }
}

Go

Pour savoir comment installer et utiliser la bibliothèque cliente pour l'API Live Stream, consultez la page Bibliothèques clientes de l'API Live Stream. Pour en savoir plus, consultez la documentation de référence de l'API Live Stream pour Go.

Pour vous authentifier auprès de l'API Live Stream, configurez les Identifiants par défaut de l'application. Pour en savoir plus, consultez Configurer l'authentification pour un environnement de développement local.

import (
	"context"
	"fmt"
	"io"

	livestream "cloud.google.com/go/video/livestream/apiv1"
	"cloud.google.com/go/video/livestream/apiv1/livestreampb"
)

// stopChannel stops a channel.
func stopChannel(w io.Writer, projectID, location, channelID string) error {
	// projectID := "my-project-id"
	// location := "us-central1"
	// channelID := "my-channel-id"
	ctx := context.Background()
	client, err := livestream.NewClient(ctx)
	if err != nil {
		return fmt.Errorf("NewClient: %w", err)
	}
	defer client.Close()

	req := &livestreampb.StopChannelRequest{
		Name: fmt.Sprintf("projects/%s/locations/%s/channels/%s", projectID, location, channelID),
	}

	op, err := client.StopChannel(ctx, req)
	if err != nil {
		return fmt.Errorf("StopChannel: %w", err)
	}
	_, err = op.Wait(ctx)
	if err != nil {
		return fmt.Errorf("Wait: %w", err)
	}

	fmt.Fprintf(w, "Stopped channel")
	return nil
}

Java

Pour savoir comment installer et utiliser la bibliothèque cliente pour l'API Live Stream, consultez la page Bibliothèques clientes de l'API Live Stream. Pour en savoir plus, consultez la documentation de référence de l'API Live Stream pour Java.

Pour vous authentifier auprès de l'API Live Stream, configurez les Identifiants par défaut de l'application. Pour en savoir plus, consultez Configurer l'authentification pour un environnement de développement local.


import com.google.cloud.video.livestream.v1.ChannelName;
import com.google.cloud.video.livestream.v1.LivestreamServiceClient;
import java.io.IOException;
import java.util.concurrent.ExecutionException;
import java.util.concurrent.TimeUnit;
import java.util.concurrent.TimeoutException;

public class StopChannel {

  public static void main(String[] args) throws Exception {
    // TODO(developer): Replace these variables before running the sample.
    String projectId = "my-project-id";
    String location = "us-central1";
    String channelId = "my-channel-id";

    stopChannel(projectId, location, channelId);
  }

  public static void stopChannel(String projectId, String location, String channelId)
      throws InterruptedException, ExecutionException, TimeoutException, IOException {
    // Initialize client that will be used to send requests. This client only needs to be created
    // once, and can be reused for multiple requests. After completing all of your requests, call
    // the "close" method on the client to safely clean up any remaining background resources.
    LivestreamServiceClient livestreamServiceClient = LivestreamServiceClient.create();
    ChannelName name = ChannelName.of(projectId, location, channelId);
    // First API call in a project can take up to 10 minutes.
    livestreamServiceClient.stopChannelAsync(name).get(10, TimeUnit.MINUTES);
    System.out.println("Stopped channel");
    livestreamServiceClient.close();
  }
}

Node.js

Pour savoir comment installer et utiliser la bibliothèque cliente pour l'API Live Stream, consultez la page Bibliothèques clientes de l'API Live Stream. Pour en savoir plus, consultez la documentation de référence de l'API Live Stream pour Node.js.

Pour vous authentifier auprès de l'API Live Stream, configurez les Identifiants par défaut de l'application. Pour en savoir plus, consultez Configurer l'authentification pour un environnement de développement local.

/**
 * TODO(developer): Uncomment these variables before running the sample.
 */
// projectId = 'my-project-id';
// location = 'us-central1';
// channelId = 'my-channel';

// Imports the Livestream library
const {LivestreamServiceClient} = require('@google-cloud/livestream').v1;

// Instantiates a client
const livestreamServiceClient = new LivestreamServiceClient();

async function stopChannel() {
  // Construct request
  const request = {
    name: livestreamServiceClient.channelPath(projectId, location, channelId),
  };
  const [operation] = await livestreamServiceClient.stopChannel(request);
  await operation.promise();
  console.log('Stopped channel');
}

stopChannel();

PHP

Pour savoir comment installer et utiliser la bibliothèque cliente pour l'API Live Stream, consultez la page Bibliothèques clientes de l'API Live Stream. Pour en savoir plus, consultez la documentation de référence de l'API Live Stream pour PHP.

Pour vous authentifier auprès de l'API Live Stream, configurez les Identifiants par défaut de l'application. Pour en savoir plus, consultez Configurer l'authentification pour un environnement de développement local.

use Google\Cloud\Video\LiveStream\V1\Client\LivestreamServiceClient;
use Google\Cloud\Video\LiveStream\V1\StopChannelRequest;

/**
 * Stops a channel.
 *
 * @param string  $callingProjectId   The project ID to run the API call under
 * @param string  $location           The location of the channel
 * @param string  $channelId          The ID of the channel
 */
function stop_channel(
    string $callingProjectId,
    string $location,
    string $channelId
): void {
    // Instantiate a client.
    $livestreamClient = new LivestreamServiceClient();
    $formattedName = $livestreamClient->channelName($callingProjectId, $location, $channelId);

    // Run the channel stop request. The response is a long-running operation ID.
    $request = (new StopChannelRequest())
        ->setName($formattedName);
    $operationResponse = $livestreamClient->stopChannel($request);
    $operationResponse->pollUntilComplete();
    if ($operationResponse->operationSucceeded()) {
        // Print results
        printf('Stopped channel' . PHP_EOL);
    } else {
        $error = $operationResponse->getError();
        // handleError($error)
    }
}

Python

Pour savoir comment installer et utiliser la bibliothèque cliente pour l'API Live Stream, consultez la page Bibliothèques clientes de l'API Live Stream. Pour en savoir plus, consultez la documentation de référence de l'API Live Stream pour Python.

Pour vous authentifier auprès de l'API Live Stream, configurez les Identifiants par défaut de l'application. Pour en savoir plus, consultez Configurer l'authentification pour un environnement de développement local.


import argparse

from google.cloud.video import live_stream_v1
from google.cloud.video.live_stream_v1.services.livestream_service import (
    LivestreamServiceClient,
)


def stop_channel(
    project_id: str, location: str, channel_id: str
) -> live_stream_v1.types.ChannelOperationResponse:
    """Stops a channel.
    Args:
        project_id: The GCP project ID.
        location: The location of the channel.
        channel_id: The user-defined channel ID."""

    client = LivestreamServiceClient()

    name = f"projects/{project_id}/locations/{location}/channels/{channel_id}"
    operation = client.stop_channel(name=name)
    response = operation.result(600)
    print("Stopped channel")

    return response

Ruby

Pour savoir comment installer et utiliser la bibliothèque cliente pour l'API Live Stream, consultez la page Bibliothèques clientes de l'API Live Stream. Pour en savoir plus, consultez la documentation de référence de l'API Live Stream pour Ruby.

Pour vous authentifier auprès de l'API Live Stream, configurez les Identifiants par défaut de l'application. Pour en savoir plus, consultez Configurer l'authentification pour un environnement de développement local.

require "google/cloud/video/live_stream"

##
# Stops a channel
#
# @param project_id [String] Your Google Cloud project (e.g. "my-project")
# @param location [String] The location (e.g. "us-central1")
# @param channel_id [String] Your channel name (e.g. "my-channel")
#
def stop_channel project_id:, location:, channel_id:
  # Create a Live Stream client.
  client = Google::Cloud::Video::LiveStream.livestream_service

  # Build the resource name of the channel.
  name = client.channel_path project: project_id, location: location, channel: channel_id

  # Stop the channel.
  operation = client.stop_channel name: name

  # The returned object is of type Gapic::Operation. You can use this
  # object to check the status of an operation, cancel it, or wait
  # for results. Here is how to block until completion:
  operation.wait_until_done!

  # Print a success message.
  puts "Stopped channel"
end

Utilisez OPERATION_ID pour vérifier l'état de l'opération jusqu'à ce que vous obteniez "done":true dans le résultat.

Arrêter le flux d'entrée

Si vous avez utilisé ffmpeg pour envoyer le flux d'entrée, la connexion est automatiquement interrompue après l'arrêt du canal.

Si vous avez utilisé d'autres encodeurs avec des mécanismes de réessai, vous devrez peut-être arrêter manuellement le flux d'entrée.

L'événement est supprimé.

Utilisez la méthode projects.locations.channels.events.delete pour supprimer l'événement d'insertion publicitaire. Vous devez supprimer les événements de la chaîne avant de pouvoir la supprimer.

REST

Avant d'utiliser les données de requête ci-dessous, effectuez les remplacements suivants :

  • PROJECT_NUMBER : numéro de votre projet Google Cloud . Vous le trouverez dans le champ Numéro du projet de la page Paramètres IAM.
  • LOCATION : région où se trouve votre canal. Utilisez l'une des régions disponibles.
    Afficher les zones géographiques
    • us-central1
    • us-east1
    • us-east4
    • us-west1
    • us-west2
    • northamerica-northeast1
    • southamerica-east1
    • asia-east1
    • asia-east2
    • asia-south1
    • asia-northeast1
    • asia-southeast1
    • australia-southeast1
    • europe-north1
    • europe-west1
    • europe-west2
    • europe-west3
    • europe-west4
  • CHANNEL_ID : identifiant défini par l'utilisateur pour le canal
  • EVENT_ID : identifiant défini par l'utilisateur pour l'événement

Pour envoyer votre requête, développez l'une des options suivantes :

Vous devriez recevoir une réponse JSON de ce type :

{}

C#

Pour savoir comment installer et utiliser la bibliothèque cliente pour l'API Live Stream, consultez la page Bibliothèques clientes de l'API Live Stream. Pour en savoir plus, consultez la documentation de référence de l'API Live Stream pour C#.

Pour vous authentifier auprès de l'API Live Stream, configurez les Identifiants par défaut de l'application. Pour en savoir plus, consultez Configurer l'authentification pour un environnement de développement local.


using Google.Cloud.Video.LiveStream.V1;

public class DeleteChannelEventSample
{
    public void DeleteChannelEvent(
         string projectId, string locationId, string channelId, string eventId)
    {
        // Create the client.
        LivestreamServiceClient client = LivestreamServiceClient.Create();

        DeleteEventRequest request = new DeleteEventRequest
        {
            EventName = EventName.FromProjectLocationChannelEvent(projectId, locationId, channelId, eventId),
        };

        // Make the request.
        client.DeleteEvent(request);
    }
}

Go

Pour savoir comment installer et utiliser la bibliothèque cliente pour l'API Live Stream, consultez la page Bibliothèques clientes de l'API Live Stream. Pour en savoir plus, consultez la documentation de référence de l'API Live Stream pour Go.

Pour vous authentifier auprès de l'API Live Stream, configurez les Identifiants par défaut de l'application. Pour en savoir plus, consultez Configurer l'authentification pour un environnement de développement local.

import (
	"context"
	"fmt"
	"io"

	livestream "cloud.google.com/go/video/livestream/apiv1"
	"cloud.google.com/go/video/livestream/apiv1/livestreampb"
)

// deleteChannelEvent deletes a previously-created channel event.
func deleteChannelEvent(w io.Writer, projectID, location, channelID, eventID string) error {
	// projectID := "my-project-id"
	// location := "us-central1"
	// channelID := "my-channel"
	// eventID := "my-channel-event"
	ctx := context.Background()
	client, err := livestream.NewClient(ctx)
	if err != nil {
		return fmt.Errorf("NewClient: %w", err)
	}
	defer client.Close()

	req := &livestreampb.DeleteEventRequest{
		Name: fmt.Sprintf("projects/%s/locations/%s/channels/%s/events/%s", projectID, location, channelID, eventID),
	}

	err = client.DeleteEvent(ctx, req)
	if err != nil {
		return fmt.Errorf("DeleteEvent: %w", err)
	}

	fmt.Fprintf(w, "Deleted channel event")
	return nil
}

Java

Pour savoir comment installer et utiliser la bibliothèque cliente pour l'API Live Stream, consultez la page Bibliothèques clientes de l'API Live Stream. Pour en savoir plus, consultez la documentation de référence de l'API Live Stream pour Java.

Pour vous authentifier auprès de l'API Live Stream, configurez les Identifiants par défaut de l'application. Pour en savoir plus, consultez Configurer l'authentification pour un environnement de développement local.


import com.google.cloud.video.livestream.v1.DeleteEventRequest;
import com.google.cloud.video.livestream.v1.EventName;
import com.google.cloud.video.livestream.v1.LivestreamServiceClient;
import java.io.IOException;

public class DeleteChannelEvent {

  public static void main(String[] args) throws Exception {
    // TODO(developer): Replace these variables before running the sample.
    String projectId = "my-project-id";
    String location = "us-central1";
    String channelId = "my-channel-id";
    String eventId = "my-channel-event-id";

    deleteChannelEvent(projectId, location, channelId, eventId);
  }

  public static void deleteChannelEvent(
      String projectId, String location, String channelId, String eventId) throws IOException {
    // Initialize client that will be used to send requests. This client only needs to be created
    // once, and can be reused for multiple requests. In this example, try-with-resources is used
    // which automatically calls close() on the client to clean up resources.
    try (LivestreamServiceClient livestreamServiceClient = LivestreamServiceClient.create()) {
      var deleteEventRequest =
          DeleteEventRequest.newBuilder()
              .setName(EventName.of(projectId, location, channelId, eventId).toString())
              .build();

      livestreamServiceClient.deleteEvent(deleteEventRequest);
      System.out.println("Deleted channel event");
    }
  }
}

Node.js

Pour savoir comment installer et utiliser la bibliothèque cliente pour l'API Live Stream, consultez la page Bibliothèques clientes de l'API Live Stream. Pour en savoir plus, consultez la documentation de référence de l'API Live Stream pour Node.js.

Pour vous authentifier auprès de l'API Live Stream, configurez les Identifiants par défaut de l'application. Pour en savoir plus, consultez Configurer l'authentification pour un environnement de développement local.

/**
 * TODO(developer): Uncomment these variables before running the sample.
 */
// projectId = 'my-project-id';
// location = 'us-central1';
// channelId = 'my-channel';
// eventId = 'my-channel-event';

// Imports the Livestream library
const {LivestreamServiceClient} = require('@google-cloud/livestream').v1;

// Instantiates a client
const livestreamServiceClient = new LivestreamServiceClient();

async function deleteChannelEvent() {
  // Construct request
  const request = {
    name: livestreamServiceClient.eventPath(
      projectId,
      location,
      channelId,
      eventId
    ),
  };

  // Run request
  await livestreamServiceClient.deleteEvent(request);
  console.log('Deleted channel event');
}

deleteChannelEvent();

PHP

Pour savoir comment installer et utiliser la bibliothèque cliente pour l'API Live Stream, consultez la page Bibliothèques clientes de l'API Live Stream. Pour en savoir plus, consultez la documentation de référence de l'API Live Stream pour PHP.

Pour vous authentifier auprès de l'API Live Stream, configurez les Identifiants par défaut de l'application. Pour en savoir plus, consultez Configurer l'authentification pour un environnement de développement local.

use Google\Cloud\Video\LiveStream\V1\Client\LivestreamServiceClient;
use Google\Cloud\Video\LiveStream\V1\DeleteEventRequest;

/**
 * Deletes a channel event.
 *
 * @param string  $callingProjectId   The project ID to run the API call under
 * @param string  $location           The location of the channel
 * @param string  $channelId          The ID of the channel
 * @param string  $eventId            The ID of the channel event to be deleted
 */
function delete_channel_event(
    string $callingProjectId,
    string $location,
    string $channelId,
    string $eventId
): void {
    // Instantiate a client.
    $livestreamClient = new LivestreamServiceClient();
    $formattedName = $livestreamClient->eventName($callingProjectId, $location, $channelId, $eventId);

    // Run the channel event deletion request.
    $request = (new DeleteEventRequest())
        ->setName($formattedName);
    $livestreamClient->deleteEvent($request);
    printf('Deleted channel event %s' . PHP_EOL, $eventId);
}

Python

Pour savoir comment installer et utiliser la bibliothèque cliente pour l'API Live Stream, consultez la page Bibliothèques clientes de l'API Live Stream. Pour en savoir plus, consultez la documentation de référence de l'API Live Stream pour Python.

Pour vous authentifier auprès de l'API Live Stream, configurez les Identifiants par défaut de l'application. Pour en savoir plus, consultez Configurer l'authentification pour un environnement de développement local.


import argparse

from google.cloud.video.live_stream_v1.services.livestream_service import (
    LivestreamServiceClient,
)


def delete_channel_event(
    project_id: str, location: str, channel_id: str, event_id: str
) -> None:
    """Deletes a channel event.
    Args:
        project_id: The GCP project ID.
        location: The location of the channel.
        channel_id: The user-defined channel ID.
        event_id: The user-defined event ID."""

    client = LivestreamServiceClient()

    name = f"projects/{project_id}/locations/{location}/channels/{channel_id}/events/{event_id}"
    response = client.delete_event(name=name)
    print("Deleted channel event")

    return response

Ruby

Pour savoir comment installer et utiliser la bibliothèque cliente pour l'API Live Stream, consultez la page Bibliothèques clientes de l'API Live Stream. Pour en savoir plus, consultez la documentation de référence de l'API Live Stream pour Ruby.

Pour vous authentifier auprès de l'API Live Stream, configurez les Identifiants par défaut de l'application. Pour en savoir plus, consultez Configurer l'authentification pour un environnement de développement local.

require "google/cloud/video/live_stream"

##
# Delete a channel event
#
# @param project_id [String] Your Google Cloud project (e.g. "my-project")
# @param location [String] The location (e.g. "us-central1")
# @param channel_id [String] Your channel name (e.g. "my-channel")
# @param event_id [String] Your event name (e.g. "my-event")
#
def delete_channel_event project_id:, location:, channel_id:, event_id:
  # Create a Live Stream client.
  client = Google::Cloud::Video::LiveStream.livestream_service

  # Build the resource name of the channel event.
  name = client.event_path project: project_id, location: location, channel: channel_id, event: event_id

  # Delete the channel event.
  client.delete_event name: name

  # Print a success message.
  puts "Deleted channel event"
end

Supprimer la chaîne

Utilisez la méthode projects.locations.channels.delete pour supprimer le canal. Vous devez supprimer le canal avant de pouvoir supprimer le point de terminaison d'entrée utilisé par le canal.

REST

Avant d'utiliser les données de requête ci-dessous, effectuez les remplacements suivants :

  • PROJECT_NUMBER : numéro de votre projet Google Cloud . Vous le trouverez dans le champ Numéro du projet de la page Paramètres IAM.
  • LOCATION : région où se trouve votre canal. Utilisez l'une des régions disponibles.
    Afficher les zones géographiques
    • us-central1
    • us-east1
    • us-east4
    • us-west1
    • us-west2
    • northamerica-northeast1
    • southamerica-east1
    • asia-east1
    • asia-east2
    • asia-south1
    • asia-northeast1
    • asia-southeast1
    • australia-southeast1
    • europe-north1
    • europe-west1
    • europe-west2
    • europe-west3
    • europe-west4
  • CHANNEL_ID : identifiant défini par l'utilisateur pour le canal

Pour envoyer votre requête, développez l'une des options suivantes :

Vous devriez recevoir une réponse JSON de ce type :

{
  "name": "projects/PROJECT_NUMBER/locations/LOCATION/operations/OPERATION_ID",
  "metadata": {
    "@type": "type.googleapis.com/google.cloud.video.livestream.v1.OperationMetadata",
    "createTime": CREATE_TIME,
    "target": "projects/PROJECT_NUMBER/locations/LOCATION/channels/CHANNEL_ID",
    "verb": "delete",
    "requestedCancellation": false,
    "apiVersion": "v1"
  },
  "done": false
}

C#

Pour savoir comment installer et utiliser la bibliothèque cliente pour l'API Live Stream, consultez la page Bibliothèques clientes de l'API Live Stream. Pour en savoir plus, consultez la documentation de référence de l'API Live Stream pour C#.

Pour vous authentifier auprès de l'API Live Stream, configurez les Identifiants par défaut de l'application. Pour en savoir plus, consultez Configurer l'authentification pour un environnement de développement local.


using Google.Cloud.Video.LiveStream.V1;
using Google.LongRunning;
using Google.Protobuf.WellKnownTypes;
using System.Threading.Tasks;

public class DeleteChannelSample
{
    public async Task DeleteChannelAsync(
         string projectId, string locationId, string channelId)
    {
        // Create the client.
        LivestreamServiceClient client = LivestreamServiceClient.Create();

        DeleteChannelRequest request = new DeleteChannelRequest
        {
            ChannelName = ChannelName.FromProjectLocationChannel(projectId, locationId, channelId)
        };

        // Make the request.
        Operation<Empty, OperationMetadata> response = await client.DeleteChannelAsync(request);

        // Poll until the returned long-running operation is complete.
        await response.PollUntilCompletedAsync();
    }
}

Go

Pour savoir comment installer et utiliser la bibliothèque cliente pour l'API Live Stream, consultez la page Bibliothèques clientes de l'API Live Stream. Pour en savoir plus, consultez la documentation de référence de l'API Live Stream pour Go.

Pour vous authentifier auprès de l'API Live Stream, configurez les Identifiants par défaut de l'application. Pour en savoir plus, consultez Configurer l'authentification pour un environnement de développement local.

import (
	"context"
	"fmt"
	"io"

	livestream "cloud.google.com/go/video/livestream/apiv1"
	"cloud.google.com/go/video/livestream/apiv1/livestreampb"
)

// deleteChannel deletes a previously-created channel.
func deleteChannel(w io.Writer, projectID, location, channelID string) error {
	// projectID := "my-project-id"
	// location := "us-central1"
	// channelID := "my-channel"
	ctx := context.Background()
	client, err := livestream.NewClient(ctx)
	if err != nil {
		return fmt.Errorf("NewClient: %w", err)
	}
	defer client.Close()

	req := &livestreampb.DeleteChannelRequest{
		Name: fmt.Sprintf("projects/%s/locations/%s/channels/%s", projectID, location, channelID),
	}

	op, err := client.DeleteChannel(ctx, req)
	if err != nil {
		return fmt.Errorf("DeleteChannel: %w", err)
	}
	err = op.Wait(ctx)
	if err != nil {
		return fmt.Errorf("Wait: %w", err)
	}

	fmt.Fprintf(w, "Deleted channel")
	return nil
}

Java

Pour savoir comment installer et utiliser la bibliothèque cliente pour l'API Live Stream, consultez la page Bibliothèques clientes de l'API Live Stream. Pour en savoir plus, consultez la documentation de référence de l'API Live Stream pour Java.

Pour vous authentifier auprès de l'API Live Stream, configurez les Identifiants par défaut de l'application. Pour en savoir plus, consultez Configurer l'authentification pour un environnement de développement local.


import com.google.cloud.video.livestream.v1.ChannelName;
import com.google.cloud.video.livestream.v1.DeleteChannelRequest;
import com.google.cloud.video.livestream.v1.LivestreamServiceClient;
import java.io.IOException;
import java.util.concurrent.ExecutionException;
import java.util.concurrent.TimeUnit;
import java.util.concurrent.TimeoutException;

public class DeleteChannel {

  public static void main(String[] args) throws Exception {
    // TODO(developer): Replace these variables before running the sample.
    String projectId = "my-project-id";
    String location = "us-central1";
    String channelId = "my-channel-id";

    deleteChannel(projectId, location, channelId);
  }

  public static void deleteChannel(String projectId, String location, String channelId)
      throws InterruptedException, ExecutionException, TimeoutException, IOException {
    // Initialize client that will be used to send requests. This client only needs to be created
    // once, and can be reused for multiple requests. After completing all of your requests, call
    // the "close" method on the client to safely clean up any remaining background resources.
    LivestreamServiceClient livestreamServiceClient = LivestreamServiceClient.create();
    var deleteChannelRequest =
        DeleteChannelRequest.newBuilder()
            .setName(ChannelName.of(projectId, location, channelId).toString())
            .build();
    // First API call in a project can take up to 10 minutes.
    livestreamServiceClient.deleteChannelAsync(deleteChannelRequest).get(10, TimeUnit.MINUTES);
    System.out.println("Deleted channel");
    livestreamServiceClient.close();
  }
}

Node.js

Pour savoir comment installer et utiliser la bibliothèque cliente pour l'API Live Stream, consultez la page Bibliothèques clientes de l'API Live Stream. Pour en savoir plus, consultez la documentation de référence de l'API Live Stream pour Node.js.

Pour vous authentifier auprès de l'API Live Stream, configurez les Identifiants par défaut de l'application. Pour en savoir plus, consultez Configurer l'authentification pour un environnement de développement local.

/**
 * TODO(developer): Uncomment these variables before running the sample.
 */
// projectId = 'my-project-id';
// location = 'us-central1';
// channelId = 'my-channel';

// Imports the Livestream library
const {LivestreamServiceClient} = require('@google-cloud/livestream').v1;

// Instantiates a client
const livestreamServiceClient = new LivestreamServiceClient();

async function deleteChannel() {
  // Construct request
  const request = {
    name: livestreamServiceClient.channelPath(projectId, location, channelId),
  };

  // Run request
  const [operation] = await livestreamServiceClient.deleteChannel(request);
  await operation.promise();
  console.log('Deleted channel');
}

deleteChannel();

PHP

Pour savoir comment installer et utiliser la bibliothèque cliente pour l'API Live Stream, consultez la page Bibliothèques clientes de l'API Live Stream. Pour en savoir plus, consultez la documentation de référence de l'API Live Stream pour PHP.

Pour vous authentifier auprès de l'API Live Stream, configurez les Identifiants par défaut de l'application. Pour en savoir plus, consultez Configurer l'authentification pour un environnement de développement local.

use Google\Cloud\Video\LiveStream\V1\Client\LivestreamServiceClient;
use Google\Cloud\Video\LiveStream\V1\DeleteChannelRequest;

/**
 * Deletes a channel.
 *
 * @param string  $callingProjectId   The project ID to run the API call under
 * @param string  $location           The location of the channel
 * @param string  $channelId          The ID of the channel to be deleted
 */
function delete_channel(
    string $callingProjectId,
    string $location,
    string $channelId
): void {
    // Instantiate a client.
    $livestreamClient = new LivestreamServiceClient();
    $formattedName = $livestreamClient->channelName($callingProjectId, $location, $channelId);

    // Run the channel deletion request. The response is a long-running operation ID.
    $request = (new DeleteChannelRequest())
        ->setName($formattedName);
    $operationResponse = $livestreamClient->deleteChannel($request);
    $operationResponse->pollUntilComplete();
    if ($operationResponse->operationSucceeded()) {
        // Print status
        printf('Deleted channel %s' . PHP_EOL, $channelId);
    } else {
        $error = $operationResponse->getError();
        // handleError($error)
    }
}

Python

Pour savoir comment installer et utiliser la bibliothèque cliente pour l'API Live Stream, consultez la page Bibliothèques clientes de l'API Live Stream. Pour en savoir plus, consultez la documentation de référence de l'API Live Stream pour Python.

Pour vous authentifier auprès de l'API Live Stream, configurez les Identifiants par défaut de l'application. Pour en savoir plus, consultez Configurer l'authentification pour un environnement de développement local.


import argparse

from google.cloud.video.live_stream_v1.services.livestream_service import (
    LivestreamServiceClient,
)
from google.protobuf import empty_pb2 as empty


def delete_channel(project_id: str, location: str, channel_id: str) -> empty.Empty:
    """Deletes a channel.
    Args:
        project_id: The GCP project ID.
        location: The location of the channel.
        channel_id: The user-defined channel ID."""

    client = LivestreamServiceClient()

    name = f"projects/{project_id}/locations/{location}/channels/{channel_id}"
    operation = client.delete_channel(name=name)
    response = operation.result(600)
    print("Deleted channel")

    return response

Ruby

Pour savoir comment installer et utiliser la bibliothèque cliente pour l'API Live Stream, consultez la page Bibliothèques clientes de l'API Live Stream. Pour en savoir plus, consultez la documentation de référence de l'API Live Stream pour Ruby.

Pour vous authentifier auprès de l'API Live Stream, configurez les Identifiants par défaut de l'application. Pour en savoir plus, consultez Configurer l'authentification pour un environnement de développement local.

require "google/cloud/video/live_stream"

##
# Delete a channel
#
# @param project_id [String] Your Google Cloud project (e.g. "my-project")
# @param location [String] The location (e.g. "us-central1")
# @param channel_id [String] Your channel name (e.g. "my-channel")
#
def delete_channel project_id:, location:, channel_id:
  # Create a Live Stream client.
  client = Google::Cloud::Video::LiveStream.livestream_service

  # Build the resource name of the channel.
  name = client.channel_path project: project_id, location: location, channel: channel_id

  # Delete the channel.
  operation = client.delete_channel name: name

  # The returned object is of type Gapic::Operation. You can use this
  # object to check the status of an operation, cancel it, or wait
  # for results. Here is how to block until completion:
  operation.wait_until_done!

  # Print a success message.
  puts "Deleted channel"
end

Utilisez OPERATION_ID pour vérifier l'état de l'opération jusqu'à ce que vous obteniez "done":true dans le résultat.

Supprimer le point de terminaison d'entrée

Utilisez la méthode projects.locations.inputs.delete pour supprimer le point de terminaison d'entrée.

REST

Avant d'utiliser les données de requête ci-dessous, effectuez les remplacements suivants :

  • PROJECT_NUMBER : numéro de votre projet Google Cloud . Vous le trouverez dans le champ Numéro du projet de la page Paramètres IAM.
  • LOCATION : emplacement de votre point de terminaison d'entrée. Utilisez l'une des régions disponibles.
    Afficher les zones géographiques
    • us-central1
    • us-east1
    • us-east4
    • us-west1
    • us-west2
    • northamerica-northeast1
    • southamerica-east1
    • asia-east1
    • asia-east2
    • asia-south1
    • asia-northeast1
    • asia-southeast1
    • australia-southeast1
    • europe-north1
    • europe-west1
    • europe-west2
    • europe-west3
    • europe-west4
  • INPUT_ID : identifiant défini par l'utilisateur pour le point de terminaison d'entrée

Pour envoyer votre requête, développez l'une des options suivantes :

Vous devriez recevoir une réponse JSON de ce type :

{
  "name": "projects/PROJECT_NUMBER/locations/LOCATION/operations/OPERATION_ID",
  "metadata": {
    "@type": "type.googleapis.com/google.cloud.video.livestream.v1.OperationMetadata",
    "createTime": CREATE_TIME,
    "target": "projects/PROJECT_NUMBER/locations/LOCATION/inputs/INPUT_ID",
    "verb": "delete",
    "requestedCancellation": false,
    "apiVersion": "v1"
  },
  "done": false
}

C#

Pour savoir comment installer et utiliser la bibliothèque cliente pour l'API Live Stream, consultez la page Bibliothèques clientes de l'API Live Stream. Pour en savoir plus, consultez la documentation de référence de l'API Live Stream pour C#.

Pour vous authentifier auprès de l'API Live Stream, configurez les Identifiants par défaut de l'application. Pour en savoir plus, consultez Configurer l'authentification pour un environnement de développement local.


using Google.Cloud.Video.LiveStream.V1;
using Google.LongRunning;
using Google.Protobuf.WellKnownTypes;
using System.Threading.Tasks;

public class DeleteInputSample
{
    public async Task DeleteInputAsync(
         string projectId, string locationId, string inputId)
    {
        // Create the client.
        LivestreamServiceClient client = LivestreamServiceClient.Create();

        DeleteInputRequest request = new DeleteInputRequest
        {
            InputName = InputName.FromProjectLocationInput(projectId, locationId, inputId)
        };

        // Make the request.
        Operation<Empty, OperationMetadata> response = await client.DeleteInputAsync(request);

        // Poll until the returned long-running operation is complete.
        await response.PollUntilCompletedAsync();
    }
}

Go

Pour savoir comment installer et utiliser la bibliothèque cliente pour l'API Live Stream, consultez la page Bibliothèques clientes de l'API Live Stream. Pour en savoir plus, consultez la documentation de référence de l'API Live Stream pour Go.

Pour vous authentifier auprès de l'API Live Stream, configurez les Identifiants par défaut de l'application. Pour en savoir plus, consultez Configurer l'authentification pour un environnement de développement local.

import (
	"context"
	"fmt"
	"io"

	livestream "cloud.google.com/go/video/livestream/apiv1"
	"cloud.google.com/go/video/livestream/apiv1/livestreampb"
)

// deleteInput deletes a previously-created input endpoint.
func deleteInput(w io.Writer, projectID, location, inputID string) error {
	// projectID := "my-project-id"
	// location := "us-central1"
	// inputID := "my-input"
	ctx := context.Background()
	client, err := livestream.NewClient(ctx)
	if err != nil {
		return fmt.Errorf("NewClient: %w", err)
	}
	defer client.Close()

	req := &livestreampb.DeleteInputRequest{
		Name: fmt.Sprintf("projects/%s/locations/%s/inputs/%s", projectID, location, inputID),
	}

	op, err := client.DeleteInput(ctx, req)
	if err != nil {
		return fmt.Errorf("DeleteInput: %w", err)
	}
	err = op.Wait(ctx)
	if err != nil {
		return fmt.Errorf("Wait: %w", err)
	}

	fmt.Fprintf(w, "Deleted input")
	return nil
}

Java

Pour savoir comment installer et utiliser la bibliothèque cliente pour l'API Live Stream, consultez la page Bibliothèques clientes de l'API Live Stream. Pour en savoir plus, consultez la documentation de référence de l'API Live Stream pour Java.

Pour vous authentifier auprès de l'API Live Stream, configurez les Identifiants par défaut de l'application. Pour en savoir plus, consultez Configurer l'authentification pour un environnement de développement local.


import com.google.cloud.video.livestream.v1.DeleteInputRequest;
import com.google.cloud.video.livestream.v1.InputName;
import com.google.cloud.video.livestream.v1.LivestreamServiceClient;
import java.io.IOException;
import java.util.concurrent.ExecutionException;
import java.util.concurrent.TimeUnit;
import java.util.concurrent.TimeoutException;

public class DeleteInput {

  public static void main(String[] args) throws Exception {
    // TODO(developer): Replace these variables before running the sample.
    String projectId = "my-project-id";
    String location = "us-central1";
    String inputId = "my-input-id";

    deleteInput(projectId, location, inputId);
  }

  public static void deleteInput(String projectId, String location, String inputId)
      throws InterruptedException, ExecutionException, TimeoutException, IOException {
    // Initialize client that will be used to send requests. This client only needs to be created
    // once, and can be reused for multiple requests. After completing all of your requests, call
    // the "close" method on the client to safely clean up any remaining background resources.
    LivestreamServiceClient livestreamServiceClient = LivestreamServiceClient.create();
    var deleteInputRequest =
        DeleteInputRequest.newBuilder()
            .setName(InputName.of(projectId, location, inputId).toString())
            .build();
    // First API call in a project can take up to 10 minutes.
    livestreamServiceClient.deleteInputAsync(deleteInputRequest).get(10, TimeUnit.MINUTES);
    System.out.println("Deleted input");
    livestreamServiceClient.close();
  }
}

Node.js

Pour savoir comment installer et utiliser la bibliothèque cliente pour l'API Live Stream, consultez la page Bibliothèques clientes de l'API Live Stream. Pour en savoir plus, consultez la documentation de référence de l'API Live Stream pour Node.js.

Pour vous authentifier auprès de l'API Live Stream, configurez les Identifiants par défaut de l'application. Pour en savoir plus, consultez Configurer l'authentification pour un environnement de développement local.

/**
 * TODO(developer): Uncomment these variables before running the sample.
 */
// projectId = 'my-project-id';
// location = 'us-central1';
// inputId = 'my-input';

// Imports the Livestream library
const {LivestreamServiceClient} = require('@google-cloud/livestream').v1;

// Instantiates a client
const livestreamServiceClient = new LivestreamServiceClient();

async function deleteInput() {
  // Construct request
  const request = {
    name: livestreamServiceClient.inputPath(projectId, location, inputId),
  };

  // Run request
  const [operation] = await livestreamServiceClient.deleteInput(request);
  await operation.promise();
  console.log('Deleted input');
}

deleteInput();

PHP

Pour savoir comment installer et utiliser la bibliothèque cliente pour l'API Live Stream, consultez la page Bibliothèques clientes de l'API Live Stream. Pour en savoir plus, consultez la documentation de référence de l'API Live Stream pour PHP.

Pour vous authentifier auprès de l'API Live Stream, configurez les Identifiants par défaut de l'application. Pour en savoir plus, consultez Configurer l'authentification pour un environnement de développement local.

use Google\Cloud\Video\LiveStream\V1\Client\LivestreamServiceClient;
use Google\Cloud\Video\LiveStream\V1\DeleteInputRequest;

/**
 * Deletes an input.
 *
 * @param string  $callingProjectId   The project ID to run the API call under
 * @param string  $location           The location of the input
 * @param string  $inputId            The ID of the input to be deleted
 */
function delete_input(
    string $callingProjectId,
    string $location,
    string $inputId
): void {
    // Instantiate a client.
    $livestreamClient = new LivestreamServiceClient();
    $formattedName = $livestreamClient->inputName($callingProjectId, $location, $inputId);

    // Run the input deletion request. The response is a long-running operation ID.
    $request = (new DeleteInputRequest())
        ->setName($formattedName);
    $operationResponse = $livestreamClient->deleteInput($request);
    $operationResponse->pollUntilComplete();
    if ($operationResponse->operationSucceeded()) {
        // Print status
        printf('Deleted input %s' . PHP_EOL, $inputId);
    } else {
        $error = $operationResponse->getError();
        // handleError($error)
    }
}

Python

Pour savoir comment installer et utiliser la bibliothèque cliente pour l'API Live Stream, consultez la page Bibliothèques clientes de l'API Live Stream. Pour en savoir plus, consultez la documentation de référence de l'API Live Stream pour Python.

Pour vous authentifier auprès de l'API Live Stream, configurez les Identifiants par défaut de l'application. Pour en savoir plus, consultez Configurer l'authentification pour un environnement de développement local.


import argparse

from google.cloud.video.live_stream_v1.services.livestream_service import (
    LivestreamServiceClient,
)
from google.protobuf import empty_pb2 as empty


def delete_input(project_id: str, location: str, input_id: str) -> empty.Empty:
    """Deletes an input.
    Args:
        project_id: The GCP project ID.
        location: The location of the input.
        input_id: The user-defined input ID."""

    client = LivestreamServiceClient()

    name = f"projects/{project_id}/locations/{location}/inputs/{input_id}"
    operation = client.delete_input(name=name)
    response = operation.result(600)
    print("Deleted input")

    return response

Ruby

Pour savoir comment installer et utiliser la bibliothèque cliente pour l'API Live Stream, consultez la page Bibliothèques clientes de l'API Live Stream. Pour en savoir plus, consultez la documentation de référence de l'API Live Stream pour Ruby.

Pour vous authentifier auprès de l'API Live Stream, configurez les Identifiants par défaut de l'application. Pour en savoir plus, consultez Configurer l'authentification pour un environnement de développement local.

require "google/cloud/video/live_stream"

##
# Delete an input endpoint
#
# @param project_id [String] Your Google Cloud project (e.g. "my-project")
# @param location [String] The location (e.g. "us-central1")
# @param input_id [String] Your input name (e.g. "my-input")
#
def delete_input project_id:, location:, input_id:
  # Create a Live Stream client.
  client = Google::Cloud::Video::LiveStream.livestream_service

  # Build the resource name of the input.
  name = client.input_path project: project_id, location: location, input: input_id

  # Delete the input.
  operation = client.delete_input name: name

  # The returned object is of type Gapic::Operation. You can use this
  # object to check the status of an operation, cancel it, or wait
  # for results. Here is how to block until completion:
  operation.wait_until_done!

  # Print a success message.
  puts "Deleted input"
end

Supprimer le bucket Cloud Storage

Notez que tous les fichiers et dossiers du bucket généré par l'API Live Stream sont supprimés une fois le canal arrêté.

  1. Dans la console Google Cloud , accédez à la page du navigateur Cloud Storage.

    Accéder à la page du navigateur Cloud Storage

  2. Cochez la case à côté du bucket que vous avez créé.

  3. Cliquez sur Supprimer.

  4. Dans la fenêtre pop-up qui apparaît, cliquez sur Supprimer pour supprimer définitivement le bucket et son contenu.

Révoquer vos identifiants

  1. Optional: Revoke the authentication credentials that you created, and delete the local credential file.

    gcloud auth application-default revoke
  2. Optional: Revoke credentials from the gcloud CLI.

    gcloud auth revoke

Étapes suivantes