Train and test models designed to detect money laundering
This quickstart guides you through an end-to-end implementation of a model to detect money laundering using the Anti Money Laundering AI (AML AI) API. In this guide, you learn how to train and test models to detect money laundering through the following steps:
- Prepare your Cloud environment and create an AML AI instance.
- Provide synthetic transaction data in the form of BigQuery tables.
- Train and backtest a model with input data.
- Register parties and make model predictions.
After creating prediction results, this guide analyzes a single case of an example party that is laundering money by structuring funds.
Before you begin
This section describes how to set up a Google Cloud account, enable the required Google Cloud services, and grant the required permissions to run the quickstart.
If you are going to use an existing project that you don't own, you may need your administrator to grant you certain permissions to access the existing project. For more information, see Creating and managing projects.
- Sign in to your Google Cloud account. If you're new to Google Cloud, create an account to evaluate how our products perform in real-world scenarios. New customers also get $300 in free credits to run, test, and deploy workloads.
-
Install the Google Cloud CLI.
-
If you're using an external identity provider (IdP), you must first sign in to the gcloud CLI with your federated identity.
-
To initialize the gcloud CLI, run the following command:
gcloud init -
Create or select a Google Cloud project.
Roles required to select or create a project
- Select a project: Selecting a project doesn't require a specific IAM role—you can select any project that you've been granted a role on.
-
Create a project: To create a project, you need the Project Creator
(
roles/resourcemanager.projectCreator), which contains theresourcemanager.projects.createpermission. Learn how to grant roles.
-
Create a Google Cloud project:
gcloud projects create PROJECT_ID
Replace
PROJECT_IDwith a name for the Google Cloud project you are creating. -
Select the Google Cloud project that you created:
gcloud config set project PROJECT_ID
Replace
PROJECT_IDwith your Google Cloud project name.
-
Verify that billing is enabled for your Google Cloud project.
-
Enable the required APIs:
Roles required to enable APIs
To enable APIs, you need the Service Usage Admin IAM role (
roles/serviceusage.serviceUsageAdmin), which contains theserviceusage.services.enablepermission. Learn how to grant roles.gcloud services enable financialservices.googleapis.com
bigquery.googleapis.com cloudkms.googleapis.com bigquerydatatransfer.googleapis.com -
If you're using a local shell, then create local authentication credentials for your user account:
gcloud auth application-default login
You don't need to do this if you're using Cloud Shell.
If an authentication error is returned, and you are using an external identity provider (IdP), confirm that you have signed in to the gcloud CLI with your federated identity.
-
Grant roles to your user account. Run the following command once for each of the following IAM roles:
roles/financialservices.admin, roles/cloudkms.admin, roles/bigquery.admingcloud projects add-iam-policy-binding PROJECT_ID --member="user:USER_IDENTIFIER" --role=ROLE
Replace the following:
PROJECT_ID: Your project ID.USER_IDENTIFIER: The identifier for your user account. For example,myemail@example.com.ROLE: The IAM role that you grant to your user account.
-
Install the Google Cloud CLI.
-
If you're using an external identity provider (IdP), you must first sign in to the gcloud CLI with your federated identity.
-
To initialize the gcloud CLI, run the following command:
gcloud init -
Create or select a Google Cloud project.
Roles required to select or create a project
- Select a project: Selecting a project doesn't require a specific IAM role—you can select any project that you've been granted a role on.
-
Create a project: To create a project, you need the Project Creator
(
roles/resourcemanager.projectCreator), which contains theresourcemanager.projects.createpermission. Learn how to grant roles.
-
Create a Google Cloud project:
gcloud projects create PROJECT_ID
Replace
PROJECT_IDwith a name for the Google Cloud project you are creating. -
Select the Google Cloud project that you created:
gcloud config set project PROJECT_ID
Replace
PROJECT_IDwith your Google Cloud project name.
-
Verify that billing is enabled for your Google Cloud project.
-
Enable the required APIs:
Roles required to enable APIs
To enable APIs, you need the Service Usage Admin IAM role (
roles/serviceusage.serviceUsageAdmin), which contains theserviceusage.services.enablepermission. Learn how to grant roles.gcloud services enable financialservices.googleapis.com
bigquery.googleapis.com cloudkms.googleapis.com bigquerydatatransfer.googleapis.com -
If you're using a local shell, then create local authentication credentials for your user account:
gcloud auth application-default login
You don't need to do this if you're using Cloud Shell.
If an authentication error is returned, and you are using an external identity provider (IdP), confirm that you have signed in to the gcloud CLI with your federated identity.
-
Grant roles to your user account. Run the following command once for each of the following IAM roles:
roles/financialservices.admin, roles/cloudkms.admin, roles/bigquery.admingcloud projects add-iam-policy-binding PROJECT_ID --member="user:USER_IDENTIFIER" --role=ROLE
Replace the following:
PROJECT_ID: Your project ID.USER_IDENTIFIER: The identifier for your user account. For example,myemail@example.com.ROLE: The IAM role that you grant to your user account.
- The API requests in this guide use the same Google Cloud project and location
and hard-coded resource IDs to make the guide easier to complete. The resource
IDs follow the pattern
my-resource-type (for example,my-key-ringandmy-model).Make sure the following replacements are defined for this guide:
PROJECT_ID: your Google Cloud project ID listed in the IAM SettingsPROJECT_NUMBER: the project number associated withPROJECT_ID. You can find the project number on the IAM Settings page.LOCATION: the location of the API resources; use one of the supported regionsShow locationsus-central1us-east1asia-south1europe-west1europe-west2europe-west4northamerica-northeast1southamerica-east1australia-southeast1
Required permissions
The following permissions are required to complete this quickstart:
| Permission | Description |
|---|---|
resourcemanager.projects.get | Get a Google Cloud project |
resourcemanager.projects.list | List Google Cloud projects |
cloudkms.keyRings.create | Create a Cloud KMS key ring |
cloudkms.cryptoKeys.create | Create a Cloud KMS key |
financialservices.v1instances.create | Create an AML AI instance |
financialservices.operations.get | Get an AML AI operation |
cloudkms.cryptoKeys.getIamPolicy | Get the IAM policy on a Cloud KMS key |
cloudkms.cryptoKeys.setIamPolicy | Set the IAM policy on a Cloud KMS key |
bigquery.datasets.create | Create a BigQuery dataset |
bigquery.datasets.get | Get a BigQuery dataset |
bigquery.transfers.get | Get a BigQuery Data Transfer Service transfer |
bigquery.transfers.update | Create or delete a BigQuery Data Transfer Service transfer |
bigquery.datasets.setIamPolicy | Set the IAM policy on a BigQuery dataset |
bigquery.datasets.update | Update a BigQuery dataset |
financialservices.v1datasets.create | Create an AML AI dataset |
financialservices.v1engineconfigs.create | Create an AML AI engine config |
financialservices.v1models.create | Create an AML AI model |
financialservices.v1backtests.create | Create an AML AI backtest result |
financialservices.v1backtests.exportMetadata | Export metadata from an AML AI backtest result |
financialservices.v1instances.importRegisteredParties | Import registered parties into an AML AI instance |
financialservices.v1predictions.create | Create an AML AI prediction result |
bigquery.jobs.create | Create a BigQuery job |
bigquery.tables.getData | Get data from a BigQuery table |
financialservices.v1predictions.delete | Delete an AML AI prediction result |
financialservices.v1backtests.delete | Delete an AML AI backtest result |
financialservices.v1models.delete | Delete an AML AI model |
financialservices.v1engineconfigs.delete | Delete an AML AI engine config |
financialservices.v1datasets.delete | Delete an AML AI dataset |
financialservices.v1instances.delete | Delete an AML AI instance |
bigquery.datasets.delete | Delete a BigQuery dataset |
Create an instance
This section describes how to create an instance. The AML AI instance sits at the root of all other AML AI resources. Each instance requires a single associated customer-managed encryption key (CMEK) which is used to encrypt any data created by AML AI.
Create a key ring
To create a key ring, use the
projects.locations.keyRings.create
method.
REST
To send your request, choose one of these options:
curl
Execute the following command:
curl -X POST \
     -H "Authorization: Bearer $(gcloud auth print-access-token)" \
     -H "Content-Type: application/json; charset=utf-8" \
     -d "" \
     "https://cloudkms.googleapis.com/v1/projects/PROJECT_ID/locations/LOCATION/keyRings?key_ring_id=my-key-ring"
PowerShell
Execute the following command:
$cred = gcloud auth print-access-token
$headers = @{ "Authorization" = "Bearer $cred" }

Invoke-WebRequest `
    -Method POST `
    -Headers $headers `
    -Uri "https://cloudkms.googleapis.com/v1/projects/PROJECT_ID/locations/LOCATION/keyRings?key_ring_id=my-key-ring" | Select-Object -Expand Content
You should receive a JSON response similar to the following:
{
  "name": "projects/PROJECT_ID/locations/LOCATION/keyRings/my-key-ring",
  "createTime": CREATE_TIME
}
gcloud
Execute the following command:
Linux, macOS, or Cloud Shell
gcloud kms keyrings create my-key-ring \
  --location LOCATION
Windows (PowerShell)
gcloud kms keyrings create my-key-ring `
  --location LOCATION
Windows (cmd.exe)
gcloud kms keyrings create my-key-ring ^
  --location LOCATION
$
Create a key
To create a key, use the
projects.locations.keyRings.cryptoKeys
method.
REST
Request JSON body:
{
  "purpose": "ENCRYPT_DECRYPT"
}
To send your request, choose one of these options:
curl
Save the request body in a file named request.json.
Run the following command in the terminal to create or overwrite
this file in the current directory:
cat > request.json << 'EOF'
{
  "purpose": "ENCRYPT_DECRYPT"
}
EOF
Then execute the following command to send your REST request:
curl -X POST \
     -H "Authorization: Bearer $(gcloud auth print-access-token)" \
     -H "Content-Type: application/json; charset=utf-8" \
     -d @request.json \
     "https://cloudkms.googleapis.com/v1/projects/PROJECT_ID/locations/LOCATION/keyRings/my-key-ring/cryptoKeys?crypto_key_id=my-key"
PowerShell
Save the request body in a file named request.json.
Run the following command in the terminal to create or overwrite
this file in the current directory:
@'
{
  "purpose": "ENCRYPT_DECRYPT"
}
'@  | Out-File -FilePath request.json -Encoding utf8
Then execute the following command to send your REST request:
$cred = gcloud auth print-access-token
$headers = @{ "Authorization" = "Bearer $cred" }

Invoke-WebRequest `
    -Method POST `
    -Headers $headers `
    -ContentType: "application/json; charset=utf-8" `
    -InFile request.json `
    -Uri "https://cloudkms.googleapis.com/v1/projects/PROJECT_ID/locations/LOCATION/keyRings/my-key-ring/cryptoKeys?crypto_key_id=my-key" | Select-Object -Expand Content
You should receive a JSON response similar to the following:
{
  "name": "projects/PROJECT_ID/locations/LOCATION/keyRings/my-key-ring/cryptoKeys/my-key",
  "primary": {
    "name": "projects/PROJECT_ID/locations/LOCATION/keyRings/my-key-ring/cryptoKeys/my-key/cryptoKeyVersions/1",
    "state": "ENABLED",
    "createTime": CREATE_TIME,
    "protectionLevel": "SOFTWARE",
    "algorithm": "GOOGLE_SYMMETRIC_ENCRYPTION",
    "generateTime": GENERATE_TIME
  },
  "purpose": "ENCRYPT_DECRYPT",
  "createTime": CREATE_TIME,
  "versionTemplate": {
    "protectionLevel": "SOFTWARE",
    "algorithm": "GOOGLE_SYMMETRIC_ENCRYPTION"
  },
  "destroyScheduledDuration": "86400s"
}
gcloud
Before using any of the command data below, make the following replacements:
LOCATION: the location of the key ring; use one of the supported regionsShow locationsus-central1us-east1asia-south1europe-west1europe-west2europe-west4northamerica-northeast1southamerica-east1australia-southeast1
Execute the following command:
Linux, macOS, or Cloud Shell
gcloud kms keys create my-key \
  --keyring my-key-ring \
  --location LOCATION \
  --purpose "encryption"
Windows (PowerShell)
gcloud kms keys create my-key `
  --keyring my-key-ring `
  --location LOCATION `
  --purpose "encryption"
Windows (cmd.exe)
gcloud kms keys create my-key ^
  --keyring my-key-ring ^
  --location LOCATION ^
  --purpose "encryption"
$
Create the instance using the API
To create an instance, use the
projects.locations.instances.create
method.
Request JSON body:
{
  "kmsKey": "projects/PROJECT_ID/locations/LOCATION/keyRings/my-key-ring/cryptoKeys/my-key"
}
To send your request, choose one of these options:
curl
Save the request body in a file named request.json.
Run the following command in the terminal to create or overwrite
this file in the current directory:
cat > request.json << 'EOF'
{
  "kmsKey": "projects/PROJECT_ID/locations/LOCATION/keyRings/my-key-ring/cryptoKeys/my-key"
}
EOF
Then execute the following command to send your REST request:
curl -X POST \
     -H "Authorization: Bearer $(gcloud auth print-access-token)" \
     -H "Content-Type: application/json; charset=utf-8" \
     -d @request.json \
     "https://financialservices.googleapis.com/v1/projects/PROJECT_ID/locations/LOCATION/instances?instance_id=my-instance"
PowerShell
Save the request body in a file named request.json.
Run the following command in the terminal to create or overwrite
this file in the current directory:
@'
{
  "kmsKey": "projects/PROJECT_ID/locations/LOCATION/keyRings/my-key-ring/cryptoKeys/my-key"
}
'@  | Out-File -FilePath request.json -Encoding utf8
Then execute the following command to send your REST request:
$cred = gcloud auth print-access-token
$headers = @{ "Authorization" = "Bearer $cred" }

Invoke-WebRequest `
    -Method POST `
    -Headers $headers `
    -ContentType: "application/json; charset=utf-8" `
    -InFile request.json `
    -Uri "https://financialservices.googleapis.com/v1/projects/PROJECT_ID/locations/LOCATION/instances?instance_id=my-instance" | Select-Object -Expand Content
You should receive a JSON response similar to the following:
{
  "name": "projects/PROJECT_ID/locations/LOCATION/operations/OPERATION_ID",
  "metadata": {
    "@type": "type.googleapis.com/google.cloud.financialservices.v1.OperationMetadata",
    "createTime": CREATE_TIME,
    "target": "projects/PROJECT_ID/locations/LOCATION/instances/my-instance",
    "verb": "create",
    "requestedCancellation": false,
    "apiVersion": "v1"
  },
  "done": false
}
If successful, the response body contains a
long-running operation
that contains an ID which can be used to retrieve the ongoing status of the
asynchronous operation. Copy the returned
OPERATION_ID to use in the next
section.
Check for the result
Use the
projects.locations.operations.get
method to check if the instance has been created. If the response contains
"done": false, repeat the command until the response contains "done": true.
Operations in this guide can take a few minutes to several hours to complete. You must wait until an operation completes before moving forward in this guide because the API uses the output of some methods as input to other methods.
Before using any of the request data, make the following replacements:
OPERATION_ID: the identifier for the operation
To send your request, choose one of these options:
curl
Execute the following command:
curl -X GET \
     -H "Authorization: Bearer $(gcloud auth print-access-token)" \
     "https://financialservices.googleapis.com/v1/projects/PROJECT_ID/locations/LOCATION/operations/OPERATION_ID"
PowerShell
Execute the following command:
$cred = gcloud auth print-access-token
$headers = @{ "Authorization" = "Bearer $cred" }

Invoke-WebRequest `
    -Method GET `
    -Headers $headers `
    -Uri "https://financialservices.googleapis.com/v1/projects/PROJECT_ID/locations/LOCATION/operations/OPERATION_ID" | Select-Object -Expand Content
You should receive a JSON response similar to the following:
{
  "name": "projects/PROJECT_ID/locations/LOCATION/operations/OPERATION_ID",
  "metadata": {
    "@type": "type.googleapis.com/google.cloud.financialservices.v1.OperationMetadata",
    "createTime": CREATE_TIME,
    "endTime": END_TIME,
    "target": "projects/PROJECT_ID/locations/LOCATION/instances/my-instance",
    "verb": "create",
    "requestedCancellation": false,
    "apiVersion": "v1"
  },
  "done": true,
  "response": {
    "@type": "type.googleapis.com/google.cloud.financialservices.v1.Instance",
    "name": "projects/PROJECT_ID/locations/LOCATION/instances/my-instance",
    "createTime": CREATE_TIME,
    "updateTime": UPDATE_TIME,
    "kmsKey": "projects/KMS_PROJECT_ID/locations/LOCATION/keyRings/my-key-ring/cryptoKeys/my-key",
    "state": "ACTIVE"
  }
}
Grant access to the CMEK key
The API automatically creates a service account in your project. The service account needs access to the CMEK key so it can use the key to encrypt and decrypt the underlying data. Grant access to the key.
gcloud kms keys add-iam-policy-binding "projects/PROJECT_ID/locations/LOCATION/keyRings/my-key-ring/cryptoKeys/my-key" \
  --keyring "projects/PROJECT_ID/locations/LOCATION/keyRings/my-key-ring" \
  --location "LOCATION" \
  --member "serviceAccount:service-PROJECT_NUMBER@gcp-sa-financialservices.iam.gserviceaccount.com" \
  --role="roles/cloudkms.cryptoKeyEncrypterDecrypter" \
  --project="PROJECT_ID"
Create BigQuery datasets
This section describes how to create input and output BigQuery datasets, and then copy sample banking data into the input dataset.
Create an output dataset
Create a dataset to be used to send the AML pipeline outputs to.
Bash
bq mk \
  --location=LOCATION \
  --project_id=PROJECT_ID \
  my_bq_output_dataset
PowerShell
bq mk `
  --location=LOCATION `
  --project_id=PROJECT_ID `
  my_bq_output_dataset
Create an input dataset
Create a dataset to copy the sample banking tables into.
Bash
bq mk \
  --location=LOCATION \
  --project_id=PROJECT_ID \
  my_bq_input_dataset
PowerShell
bq mk `
  --location=LOCATION `
  --project_id=PROJECT_ID `
  my_bq_input_dataset
Copy the sample dataset
Sample banking data is provided as a BigQuery dataset in Google's shared dataset project. You must have access to the AML AI API for this dataset to be accessible. Key features of this dataset include the following:
- 100,000 parties
- A time period from January 1, 2020 to January 1, 2023
- 300 negative and 20 positive risk cases per month
- Risk cases with the following attributes:
- Half of the positive risk cases are for structuring activity which
occurred in the two months preceding the
AML_PROCESS_STARTevent - The other half covers parties with the highest amount of received money
in the two months preceding the
AML_PROCESS_STARTevent - Negative cases are randomly generated
- A 0.1% chance for the risk case to be generated in the opposite state (for example, a random party that is positive, or a party that has structuring activity or the highest income and is reported negative)
- Half of the positive risk cases are for structuring activity which
occurred in the two months preceding the
- The AML schema is defined in the AML input data model.
Copy the sample banking data into the input dataset you created.
Bash
bq mk --transfer_config \
  --project_id=PROJECT_ID \
  --data_source=cross_region_copy \
  --target_dataset="my_bq_input_dataset" \
  --display_name="Copy the AML sample dataset." \
  --schedule=None \
  --params='{
    "source_project_id":"bigquery-public-data",
    "source_dataset_id":"aml_ai_input_dataset",
    "overwrite_destination_table":"true"
  }'
PowerShell
bq mk --transfer_config `
--project_id=PROJECT_ID `
--data_source=cross_region_copy `
--target_dataset="my_bq_input_dataset" `
--display_name="Copy the AML sample dataset." `
--schedule=None `
--params='{\"source_project_id\":\"bigquery-public-data\",\"source_dataset_id\":\"aml_ai_input_dataset\",\"overwrite_destination_table\":\"true\"}'
Monitor the data transfer job.
Bash
bq ls --transfer_config \
--transfer_location=LOCATION \
--project_id=PROJECT_ID \
--filter="dataSourceIds:cross_region_copy"
PowerShell
bq ls --transfer_config `
--transfer_location=LOCATION `
--project_id=PROJECT_ID `
--filter="dataSourceIds:cross_region_copy"
After the transfer completes, a data transfer job with the display name
Copy the AML sample datasetis created.You can also check the status of the transfer using the Google Cloud console.
You should see something like the following output.
                     name                           displayName         dataSourceId       state
-------------------------------------------  -----------------------  -----------------  ---------
projects/294024168771/locations/us-central1  Copy AML sample dataset  cross_region_copy  SUCCEEDED
Grant access to the BigQuery datasets
The API automatically creates a service account in your project. The service account needs access to the BigQuery input and output datasets.
Grant read access to the input dataset and its tables.
Bash
bq query --project_id=PROJECT_ID --use_legacy_sql=false \
  'GRANT `roles/bigquery.dataViewer` ON SCHEMA `PROJECT_ID.my_bq_input_dataset` TO "serviceAccount:service-PROJECT_NUMBER@gcp-sa-financialservices.iam.gserviceaccount.com"'
PowerShell
bq query --project_id=PROJECT_ID --use_legacy_sql=false "GRANT ``roles/bigquery.dataViewer`` ON SCHEMA ``PROJECT_ID.my_bq_input_dataset`` TO 'serviceAccount:service-PROJECT_NUMBER@gcp-sa-financialservices.iam.gserviceaccount.com'"Grant write access to the output dataset.
Bash
bq query --project_id=PROJECT_ID --use_legacy_sql=false \
  'GRANT `roles/bigquery.dataEditor` ON SCHEMA `PROJECT_ID.my_bq_output_dataset` TO "serviceAccount:service-PROJECT_NUMBER@gcp-sa-financialservices.iam.gserviceaccount.com"'
PowerShell
bq query --project_id=PROJECT_ID --use_legacy_sql=false "GRANT ``roles/bigquery.dataEditor`` ON SCHEMA ``PROJECT_ID.my_bq_output_dataset`` TO 'serviceAccount:service-PROJECT_NUMBER@gcp-sa-financialservices.iam.gserviceaccount.com'"
Create an AML AI dataset
Create an AML AI dataset to specify the input BigQuery dataset tables and the time range to use.
To create a dataset, use the
projects.locations.instances.datasets.create
method.
Request JSON body:
{
  "tableSpecs": {
    "party": "bq://PROJECT_ID.my_bq_input_dataset.party",
    "account_party_link": "bq://PROJECT_ID.my_bq_input_dataset.account_party_link",
    "transaction": "bq://PROJECT_ID.my_bq_input_dataset.transaction",
    "risk_case_event": "bq://PROJECT_ID.my_bq_input_dataset.risk_case_event",
    "party_supplementary_data": "bq://PROJECT_ID.my_bq_input_dataset.party_supplementary_data"
  },
  "dateRange": {
    "startTime": "2020-01-01T00:00:0.00Z",
    "endTime": "2023-01-01T00:00:0.00Z"
  },
  "timeZone": {
    "id": "UTC"
  }
}
To send your request, choose one of these options:
curl
Save the request body in a file named request.json.
Run the following command in the terminal to create or overwrite
this file in the current directory:
cat > request.json << 'EOF'
{
  "tableSpecs": {
    "party": "bq://PROJECT_ID.my_bq_input_dataset.party",
    "account_party_link": "bq://PROJECT_ID.my_bq_input_dataset.account_party_link",
    "transaction": "bq://PROJECT_ID.my_bq_input_dataset.transaction",
    "risk_case_event": "bq://PROJECT_ID.my_bq_input_dataset.risk_case_event",
    "party_supplementary_data": "bq://PROJECT_ID.my_bq_input_dataset.party_supplementary_data"
  },
  "dateRange": {
    "startTime": "2020-01-01T00:00:0.00Z",
    "endTime": "2023-01-01T00:00:0.00Z"
  },
  "timeZone": {
    "id": "UTC"
  }
}
EOF
Then execute the following command to send your REST request:
curl -X POST \
     -H "Authorization: Bearer $(gcloud auth print-access-token)" \
     -H "Content-Type: application/json; charset=utf-8" \
     -d @request.json \
     "https://financialservices.googleapis.com/v1/projects/PROJECT_ID/locations/LOCATION/instances/my-instance/datasets?dataset_id=my-dataset"
PowerShell
Save the request body in a file named request.json.
Run the following command in the terminal to create or overwrite
this file in the current directory:
@'
{
  "tableSpecs": {
    "party": "bq://PROJECT_ID.my_bq_input_dataset.party",
    "account_party_link": "bq://PROJECT_ID.my_bq_input_dataset.account_party_link",
    "transaction": "bq://PROJECT_ID.my_bq_input_dataset.transaction",
    "risk_case_event": "bq://PROJECT_ID.my_bq_input_dataset.risk_case_event",
    "party_supplementary_data": "bq://PROJECT_ID.my_bq_input_dataset.party_supplementary_data"
  },
  "dateRange": {
    "startTime": "2020-01-01T00:00:0.00Z",
    "endTime": "2023-01-01T00:00:0.00Z"
  },
  "timeZone": {
    "id": "UTC"
  }
}
'@  | Out-File -FilePath request.json -Encoding utf8
Then execute the following command to send your REST request:
$cred = gcloud auth print-access-token
$headers = @{ "Authorization" = "Bearer $cred" }

Invoke-WebRequest `
    -Method POST `
    -Headers $headers `
    -ContentType: "application/json; charset=utf-8" `
    -InFile request.json `
    -Uri "https://financialservices.googleapis.com/v1/projects/PROJECT_ID/locations/LOCATION/instances/my-instance/datasets?dataset_id=my-dataset" | Select-Object -Expand Content
You should receive a JSON response similar to the following:
{
  "name": "projects/PROJECT_ID/locations/LOCATION/operations/OPERATION_ID",
  "metadata": {
    "@type": "type.googleapis.com/google.cloud.financialservices.v1.OperationMetadata",
    "createTime": CREATE_TIME,
    "target": "projects/PROJECT_ID/locations/LOCATION/instances/my-instance/datasets/my-dataset",
    "verb": "create",
    "requestedCancellation": false,
    "apiVersion": "v1"
  },
  "done": false
}
You can check for the result of the operation using the new operation ID. (You can do this for the remaining API requests used in this guide.)
Create an engine config
Create an AML AI engine config to automatically tune hyperparameters based on a given engine version and the data provided. Engine versions are released periodically and correspond to different model logic (for example, targeting a retail line of business versus a commercial one).
To create an engine config, use the
projects.locations.instances.engineConfigs.create
method.
This stage involves hyperparameter tuning which can take some time to process. Provided your data does not change substantially, this step can be used to create and test many models.
Request JSON body:
{
  "engineVersion": "projects/PROJECT_ID/locations/LOCATION/instances/my-instance/engineVersions/aml-commercial.default.v004.008.202411-001",
  "tuning": {
    "primaryDataset": "projects/PROJECT_ID/locations/LOCATION/instances/my-instance/datasets/my-dataset",
    "endTime": "2021-07-01T00:00:00Z"
  },
  "performanceTarget": {
    "partyInvestigationsPerPeriodHint": "30"
  }
}
To send your request, choose one of these options:
curl
Save the request body in a file named request.json.
Run the following command in the terminal to create or overwrite
this file in the current directory:
cat > request.json << 'EOF'
{
  "engineVersion": "projects/PROJECT_ID/locations/LOCATION/instances/my-instance/engineVersions/aml-commercial.default.v004.008.202411-001",
  "tuning": {
    "primaryDataset": "projects/PROJECT_ID/locations/LOCATION/instances/my-instance/datasets/my-dataset",
    "endTime": "2021-07-01T00:00:00Z"
  },
  "performanceTarget": {
    "partyInvestigationsPerPeriodHint": "30"
  }
}
EOF
Then execute the following command to send your REST request:
curl -X POST \
     -H "Authorization: Bearer $(gcloud auth print-access-token)" \
     -H "Content-Type: application/json; charset=utf-8" \
     -d @request.json \
     "https://financialservices.googleapis.com/v1/projects/PROJECT_ID/locations/LOCATION/instances/my-instance/engineConfigs?engine_config_id=my-engine-config"
PowerShell
Save the request body in a file named request.json.
Run the following command in the terminal to create or overwrite
this file in the current directory:
@'
{
  "engineVersion": "projects/PROJECT_ID/locations/LOCATION/instances/my-instance/engineVersions/aml-commercial.default.v004.008.202411-001",
  "tuning": {
    "primaryDataset": "projects/PROJECT_ID/locations/LOCATION/instances/my-instance/datasets/my-dataset",
    "endTime": "2021-07-01T00:00:00Z"
  },
  "performanceTarget": {
    "partyInvestigationsPerPeriodHint": "30"
  }
}
'@  | Out-File -FilePath request.json -Encoding utf8
Then execute the following command to send your REST request:
$cred = gcloud auth print-access-token
$headers = @{ "Authorization" = "Bearer $cred" }

Invoke-WebRequest `
    -Method POST `
    -Headers $headers `
    -ContentType: "application/json; charset=utf-8" `
    -InFile request.json `
    -Uri "https://financialservices.googleapis.com/v1/projects/PROJECT_ID/locations/LOCATION/instances/my-instance/engineConfigs?engine_config_id=my-engine-config" | Select-Object -Expand Content
You should receive a JSON response similar to the following:
{
  "name": "projects/PROJECT_ID/locations/LOCATION/operations/OPERATION_ID",
  "metadata": {
    "@type": "type.googleapis.com/google.cloud.financialservices.v1.OperationMetadata",
    "createTime": CREATE_TIME,
    "target": "projects/PROJECT_ID/locations/LOCATION/instances/my-instance/engineConfigs/my-engine-config",
    "verb": "create",
    "requestedCancellation": false,
    "apiVersion": "v1"
  },
  "done": false
}
Create a model
In this step, you train an AML AI model by using 12 months of data leading up to 2021-07-01.
To create a model, use the
projects.locations.instances.models.create
method.
Request JSON body:
{
    "engineConfig": "projects/PROJECT_ID/locations/LOCATION/instances/my-instance/engineConfigs/my-engine-config",
    "primaryDataset": "projects/PROJECT_ID/locations/LOCATION/instances/my-instance/datasets/my-dataset",
    "endTime": "2021-07-01T00:00:00Z"
}
To send your request, choose one of these options:
curl
Save the request body in a file named request.json.
Run the following command in the terminal to create or overwrite
this file in the current directory:
cat > request.json << 'EOF'
{
    "engineConfig": "projects/PROJECT_ID/locations/LOCATION/instances/my-instance/engineConfigs/my-engine-config",
    "primaryDataset": "projects/PROJECT_ID/locations/LOCATION/instances/my-instance/datasets/my-dataset",
    "endTime": "2021-07-01T00:00:00Z"
}
EOF
Then execute the following command to send your REST request:
curl -X POST \
     -H "Authorization: Bearer $(gcloud auth print-access-token)" \
     -H "Content-Type: application/json; charset=utf-8" \
     -d @request.json \
     "https://financialservices.googleapis.com/v1/projects/PROJECT_ID/locations/LOCATION/instances/my-instance/models?model_id=my-model"
PowerShell
Save the request body in a file named request.json.
Run the following command in the terminal to create or overwrite
this file in the current directory:
@'
{
    "engineConfig": "projects/PROJECT_ID/locations/LOCATION/instances/my-instance/engineConfigs/my-engine-config",
    "primaryDataset": "projects/PROJECT_ID/locations/LOCATION/instances/my-instance/datasets/my-dataset",
    "endTime": "2021-07-01T00:00:00Z"
}
'@  | Out-File -FilePath request.json -Encoding utf8
Then execute the following command to send your REST request:
$cred = gcloud auth print-access-token
$headers = @{ "Authorization" = "Bearer $cred" }

Invoke-WebRequest `
    -Method POST `
    -Headers $headers `
    -ContentType: "application/json; charset=utf-8" `
    -InFile request.json `
    -Uri "https://financialservices.googleapis.com/v1/projects/PROJECT_ID/locations/LOCATION/instances/my-instance/models?model_id=my-model" | Select-Object -Expand Content
You should receive a JSON response similar to the following:
{
  "name": "projects/PROJECT_ID/locations/LOCATION/operations/OPERATION_ID",
  "metadata": {
    "@type": "type.googleapis.com/google.cloud.financialservices.v1.OperationMetadata",
    "createTime": CREATE_TIME,
    "target": "projects/PROJECT_ID/locations/LOCATION/instances/my-instance/models/my-model",
    "verb": "create",
    "requestedCancellation": false,
    "apiVersion": "v1"
  },
  "done": false
}
Create a backtest result
Backtest prediction uses the trained model on existing historical data. Create a backtest result on the 12 months of data leading up to January 2023, which were not used in training. These months are used to determine how many cases we might need to work had we used the model trained to July 2021 in production during January to December 2022.
To create a backtest result, use the
projects.locations.instances.backtestResults.create
method.
Request JSON body:
{
    "model": "projects/PROJECT_ID/locations/LOCATION/instances/my-instance/models/my-model",
    "dataset": "projects/PROJECT_ID/locations/LOCATION/instances/my-instance/datasets/my-dataset",
    "endTime": "2023-01-01T00:00:00Z",
    "backtestPeriods": 12,
    "performanceTarget": {
      "partyInvestigationsPerPeriodHint": "150"
    }
}
To send your request, choose one of these options:
curl
Save the request body in a file named request.json.
Run the following command in the terminal to create or overwrite
this file in the current directory:
cat > request.json << 'EOF'
{
    "model": "projects/PROJECT_ID/locations/LOCATION/instances/my-instance/models/my-model",
    "dataset": "projects/PROJECT_ID/locations/LOCATION/instances/my-instance/datasets/my-dataset",
    "endTime": "2023-01-01T00:00:00Z",
    "backtestPeriods": 12,
    "performanceTarget": {
      "partyInvestigationsPerPeriodHint": "150"
    }
}
EOF
Then execute the following command to send your REST request:
curl -X POST \
     -H "Authorization: Bearer $(gcloud auth print-access-token)" \
     -H "Content-Type: application/json; charset=utf-8" \
     -d @request.json \
     "https://financialservices.googleapis.com/v1/projects/PROJECT_ID/locations/LOCATION/instances/my-instance/backtestResults?backtest_result_id=my-backtest-results"
PowerShell
Save the request body in a file named request.json.
Run the following command in the terminal to create or overwrite
this file in the current directory:
@'
{
    "model": "projects/PROJECT_ID/locations/LOCATION/instances/my-instance/models/my-model",
    "dataset": "projects/PROJECT_ID/locations/LOCATION/instances/my-instance/datasets/my-dataset",
    "endTime": "2023-01-01T00:00:00Z",
    "backtestPeriods": 12,
    "performanceTarget": {
      "partyInvestigationsPerPeriodHint": "150"
    }
}
'@  | Out-File -FilePath request.json -Encoding utf8
Then execute the following command to send your REST request:
$cred = gcloud auth print-access-token
$headers = @{ "Authorization" = "Bearer $cred" }

Invoke-WebRequest `
    -Method POST `
    -Headers $headers `
    -ContentType: "application/json; charset=utf-8" `
    -InFile request.json `
    -Uri "https://financialservices.googleapis.com/v1/projects/PROJECT_ID/locations/LOCATION/instances/my-instance/backtestResults?backtest_result_id=my-backtest-results" | Select-Object -Expand Content
You should receive a JSON response similar to the following:
{
  "name": "projects/PROJECT_ID/locations/LOCATION/operations/OPERATION_ID",
  "metadata": {
    "@type": "type.googleapis.com/google.cloud.financialservices.v1.OperationMetadata",
    "createTime": CREATE_TIME,
    "target": "projects/PROJECT_ID/locations/LOCATION/instances/my-instance/backtestResults/my-backtest-results",
    "verb": "create",
    "requestedCancellation": false,
    "apiVersion": "v1"
  },
  "done": false
}
Export backtest results metadata
Once a backtest has been run, you need to export its results to
BigQuery to view them. To export metadata from the backtest
result, use the
projects.locations.instances.backtestResults.exportMetadata
method.
Request JSON body:
{
  "structuredMetadataDestination": {
    "tableUri": "bq://PROJECT_ID.my_bq_output_dataset.my_backtest_results_metadata",
    "writeDisposition": "WRITE_TRUNCATE"
  }
}
To send your request, choose one of these options:
curl
Save the request body in a file named request.json.
Run the following command in the terminal to create or overwrite
this file in the current directory:
cat > request.json << 'EOF'
{
  "structuredMetadataDestination": {
    "tableUri": "bq://PROJECT_ID.my_bq_output_dataset.my_backtest_results_metadata",
    "writeDisposition": "WRITE_TRUNCATE"
  }
}
EOF
Then execute the following command to send your REST request:
curl -X POST \
     -H "Authorization: Bearer $(gcloud auth print-access-token)" \
     -H "Content-Type: application/json; charset=utf-8" \
     -d @request.json \
     "https://financialservices.googleapis.com/v1/projects/PROJECT_ID/locations/LOCATION/instances/my-instance/backtestResults/my-backtest-results:exportMetadata"
PowerShell
Save the request body in a file named request.json.
Run the following command in the terminal to create or overwrite
this file in the current directory:
@'
{
  "structuredMetadataDestination": {
    "tableUri": "bq://PROJECT_ID.my_bq_output_dataset.my_backtest_results_metadata",
    "writeDisposition": "WRITE_TRUNCATE"
  }
}
'@  | Out-File -FilePath request.json -Encoding utf8
Then execute the following command to send your REST request:
$cred = gcloud auth print-access-token
$headers = @{ "Authorization" = "Bearer $cred" }

Invoke-WebRequest `
    -Method POST `
    -Headers $headers `
    -ContentType: "application/json; charset=utf-8" `
    -InFile request.json `
    -Uri "https://financialservices.googleapis.com/v1/projects/PROJECT_ID/locations/LOCATION/instances/my-instance/backtestResults/my-backtest-results:exportMetadata" | Select-Object -Expand Content
You should receive a JSON response similar to the following:
{
  "name": "projects/PROJECT_ID/locations/LOCATION/operations/OPERATION_ID",
  "metadata": {
    "@type": "type.googleapis.com/google.cloud.financialservices.v1.OperationMetadata",
    "createTime": CREATE_TIME,
    "target": "projects/PROJECT_ID/locations/LOCATION/instances/my-instance/backtestResults/my-backtest-results",
    "verb": "exportMetadata",
    "requestedCancellation": false,
    "apiVersion": "v1"
  },
  "done": false
}
Once the operation has completed, do the following:
Open BigQuery in the Google Cloud console.
In the Explorer pane, find and expand your project.
Expand my_bq_output_dataset and click my_backtest_results_metadata.
On the menu bar, click Preview.
In the name column, find the row with ObservedRecallValues.

Assume that your capacity for investigations is 120 per month. Find the recall value object with
"partyInvestigationsPerPeriod": "120"`. For the following sample values, if you limit investigations to parties with risk scores greater than 0.53, then you can expect to investigate 120 new parties each month. Over the backtesting period, the year 2022, you would identify 86% of cases that the previous system identified (and possibly others, which were not identified by your current processes).{ "recallValues": [ ... { "partyInvestigationsPerPeriod": "105", "recallValue": 0.8142077, "scoreThreshold": 0.6071321 }, { "partyInvestigationsPerPeriod": "120", "recallValue": 0.863388, "scoreThreshold": 0.5339603 }, { "partyInvestigationsPerPeriod": "135", "recallValue": 0.89071035, "scoreThreshold": 0.4739899 }, ... ] }
See more about the other fields in the backtest results.
By changing the partyInvestigationsPerPeriodHint field, you can modify the
number of investigations a backtest produces. To obtain scores to
investigate, register parties and produce predictions against them.
Import registered parties
Before creating prediction results, you need to import registered parties (that is, customers in the dataset).
To import registered parties, use the
projects.locations.instances.importRegisteredParties
method.
Request JSON body:
{
  "partyTables": [
     "bq://PROJECT_ID.my_bq_input_dataset.party_registration"
  ],
  "mode": "REPLACE",
  "lineOfBusiness": "COMMERCIAL"
}
To send your request, choose one of these options:
curl
Save the request body in a file named request.json.
Run the following command in the terminal to create or overwrite
this file in the current directory:
cat > request.json << 'EOF'
{
  "partyTables": [
     "bq://PROJECT_ID.my_bq_input_dataset.party_registration"
  ],
  "mode": "REPLACE",
  "lineOfBusiness": "COMMERCIAL"
}
EOF
Then execute the following command to send your REST request:
curl -X POST \
     -H "Authorization: Bearer $(gcloud auth print-access-token)" \
     -H "Content-Type: application/json; charset=utf-8" \
     -d @request.json \
     "https://financialservices.googleapis.com/v1/projects/PROJECT_ID/locations/LOCATION/instances/my-instance:importRegisteredParties"
PowerShell
Save the request body in a file named request.json.
Run the following command in the terminal to create or overwrite
this file in the current directory:
@'
{
  "partyTables": [
     "bq://PROJECT_ID.my_bq_input_dataset.party_registration"
  ],
  "mode": "REPLACE",
  "lineOfBusiness": "COMMERCIAL"
}
'@  | Out-File -FilePath request.json -Encoding utf8
Then execute the following command to send your REST request:
$cred = gcloud auth print-access-token
$headers = @{ "Authorization" = "Bearer $cred" }

Invoke-WebRequest `
    -Method POST `
    -Headers $headers `
    -ContentType: "application/json; charset=utf-8" `
    -InFile request.json `
    -Uri "https://financialservices.googleapis.com/v1/projects/PROJECT_ID/locations/LOCATION/instances/my-instance:importRegisteredParties" | Select-Object -Expand Content
You should receive a JSON response similar to the following:
{
  "name": "projects/PROJECT_ID/locations/LOCATION/operations/OPERATION_ID",
  "metadata": {
    "@type": "type.googleapis.com/google.cloud.financialservices.v1.OperationMetadata",
    "createTime": CREATE_TIME,
    "target": "projects/PROJECT_ID/locations/LOCATION/instances/my-instance",
    "verb": "importRegisteredParties",
    "requestedCancellation": false,
    "apiVersion": "v1"
  },
  "done": false
}
Keep checking for the result of that operation until it completes. When it completes, you should see that 10,000 parties were registered in the JSON output.
Create a prediction result
Create a prediction result on the last 12 months in the dataset; these months were not used during training. Creating prediction results creates scores for each party in each month across all the prediction periods.
To create a prediction result, use the
projects.locations.instances.predictionResults.create
method.
Request JSON body:
{
    "model": "projects/PROJECT_ID/locations/LOCATION/instances/my-instance/models/my-model",
    "dataset": "projects/PROJECT_ID/locations/LOCATION/instances/my-instance/datasets/my-dataset",
    "endTime": "2023-01-01T00:00:00Z",
    "predictionPeriods": "12",
    "outputs": {
      "predictionDestination": {
        "tableUri": "bq://PROJECT_ID.my_bq_output_dataset.my_prediction_results",
        "writeDisposition": "WRITE_TRUNCATE"
      },
      "explainabilityDestination": {
        "tableUri": "bq://PROJECT_ID.my_bq_output_dataset.my_prediction_results_explainability",
        "writeDisposition": "WRITE_TRUNCATE"
      }
    }
}
To send your request, choose one of these options:
curl
Save the request body in a file named request.json.
Run the following command in the terminal to create or overwrite
this file in the current directory:
cat > request.json << 'EOF'
{
    "model": "projects/PROJECT_ID/locations/LOCATION/instances/my-instance/models/my-model",
    "dataset": "projects/PROJECT_ID/locations/LOCATION/instances/my-instance/datasets/my-dataset",
    "endTime": "2023-01-01T00:00:00Z",
    "predictionPeriods": "12",
    "outputs": {
      "predictionDestination": {
        "tableUri": "bq://PROJECT_ID.my_bq_output_dataset.my_prediction_results",
        "writeDisposition": "WRITE_TRUNCATE"
      },
      "explainabilityDestination": {
        "tableUri": "bq://PROJECT_ID.my_bq_output_dataset.my_prediction_results_explainability",
        "writeDisposition": "WRITE_TRUNCATE"
      }
    }
}
EOF
Then execute the following command to send your REST request:
curl -X POST \
     -H "Authorization: Bearer $(gcloud auth print-access-token)" \
     -H "Content-Type: application/json; charset=utf-8" \
     -d @request.json \
     "https://financialservices.googleapis.com/v1/projects/PROJECT_ID/locations/LOCATION/instances/my-instance/predictionResults?prediction_result_id=my-prediction-results"
PowerShell
Save the request body in a file named request.json.
Run the following command in the terminal to create or overwrite
this file in the current directory:
@'
{
    "model": "projects/PROJECT_ID/locations/LOCATION/instances/my-instance/models/my-model",
    "dataset": "projects/PROJECT_ID/locations/LOCATION/instances/my-instance/datasets/my-dataset",
    "endTime": "2023-01-01T00:00:00Z",
    "predictionPeriods": "12",
    "outputs": {
      "predictionDestination": {
        "tableUri": "bq://PROJECT_ID.my_bq_output_dataset.my_prediction_results",
        "writeDisposition": "WRITE_TRUNCATE"
      },
      "explainabilityDestination": {
        "tableUri": "bq://PROJECT_ID.my_bq_output_dataset.my_prediction_results_explainability",
        "writeDisposition": "WRITE_TRUNCATE"
      }
    }
}
'@  | Out-File -FilePath request.json -Encoding utf8
Then execute the following command to send your REST request:
$cred = gcloud auth print-access-token
$headers = @{ "Authorization" = "Bearer $cred" }

Invoke-WebRequest `
    -Method POST `
    -Headers $headers `
    -ContentType: "application/json; charset=utf-8" `
    -InFile request.json `
    -Uri "https://financialservices.googleapis.com/v1/projects/PROJECT_ID/locations/LOCATION/instances/my-instance/predictionResults?prediction_result_id=my-prediction-results" | Select-Object -Expand Content
You should receive a JSON response similar to the following:
{
  "name": "projects/PROJECT_ID/locations/LOCATION/operations/OPERATION_ID",
  "metadata": {
    "@type": "type.googleapis.com/google.cloud.financialservices.v1.OperationMetadata",
    "createTime": CREATE_TIME,
    "target": "projects/PROJECT_ID/locations/LOCATION/instances/my-instance/predictionResults/my-prediction-results",
    "verb": "create",
    "requestedCancellation": false,
    "apiVersion": "v1"
  },
  "done": false
}
Analyze a single structuring case in the Google Cloud console
Open BigQuery in the Google Cloud console.
In the details pane, click the Untitled Query tab to see the editor.
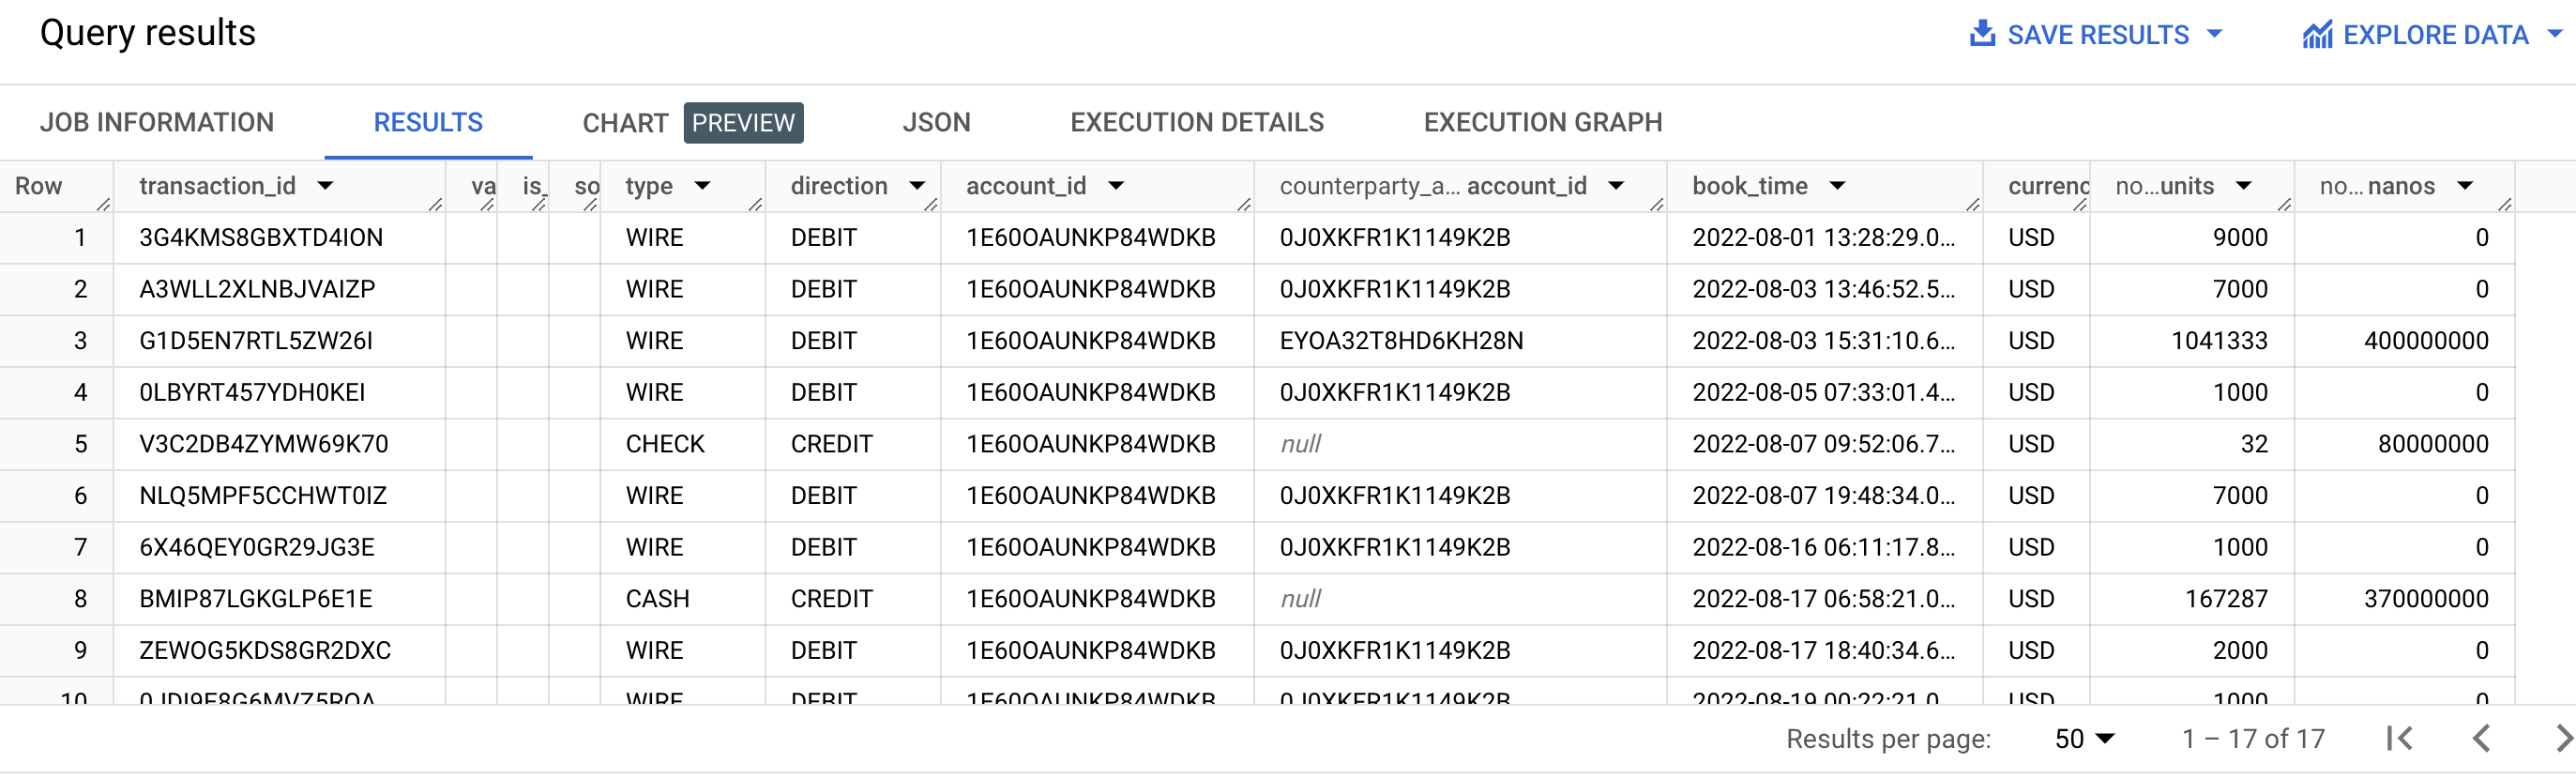
Copy the following SQL statement into the editor and click Run.
SELECT *
FROM `PROJECT_ID.my_bq_input_dataset.transaction`
WHERE account_id = '1E60OAUNKP84WDKB' AND DATE_TRUNC(book_time, MONTH) = "2022-08-01"
ORDER by book_time
This statement checks account ID
1E60OAUNKP84WDKBin August 2022. This account is linked to party IDEGS4NJD38JZ8NTL8. You can find the party ID for a given account ID by using the AccountPartyLink table.The transaction data shows frequent round transactions targeted at a single account shortly after a large cash deposit, which looks suspicious. These transactions could be indicative of smurfing (that is, breaking up a large transaction of money into smaller transaction amounts) or structuring.
Copy the following SQL statement into the editor and click Run.
SELECT *
FROM `PROJECT_ID.my_bq_input_dataset.risk_case_event`
WHERE party_id = 'EGS4NJD38JZ8NTL8'
This statement shows that there was a risk case leading to the exit of this party. The risk case started two months after the suspicious activity.

Copy the following SQL statement into the editor and click Run.
SELECT *
FROM `PROJECT_ID.my_bq_output_dataset.my_prediction_results`
WHERE party_id = 'EGS4NJD38JZ8NTL8'
ORDER BY risk_period_end_time
By checking the prediction results, you can see that the party's risk score jumps from nearly zero (note the exponent value) to high values in the months following the suspicious activity. Your results may vary from the results shown.
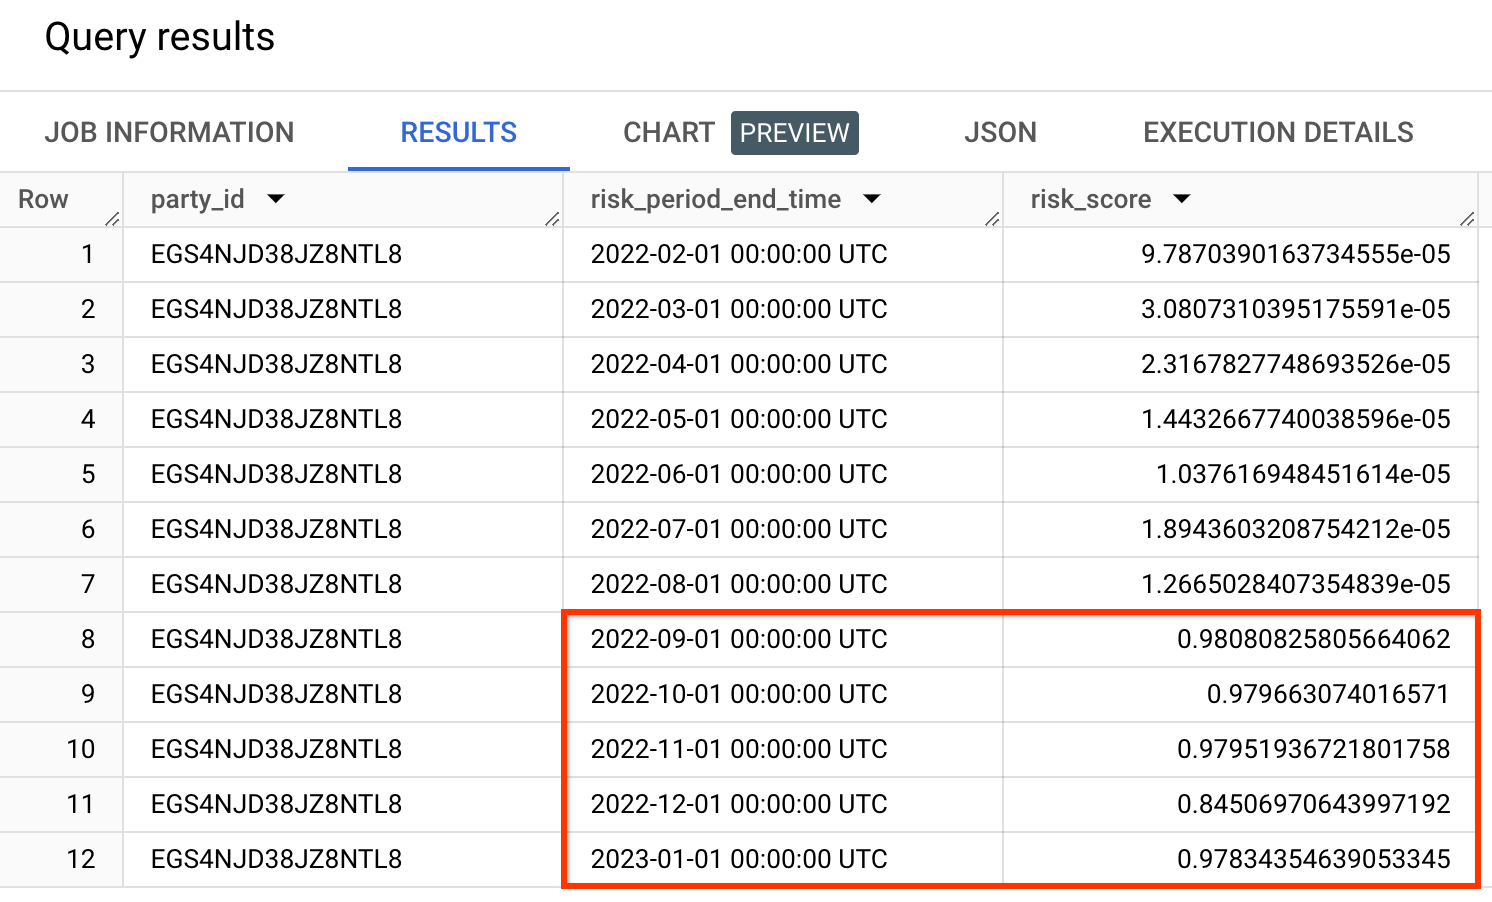
The risk score is not a probability. A risk score should always be evaluated relative to other risk scores. For example, a seemly small value can be considered positive in cases where the other risk scores are lower.
Copy the following SQL statement into the editor and click Run.
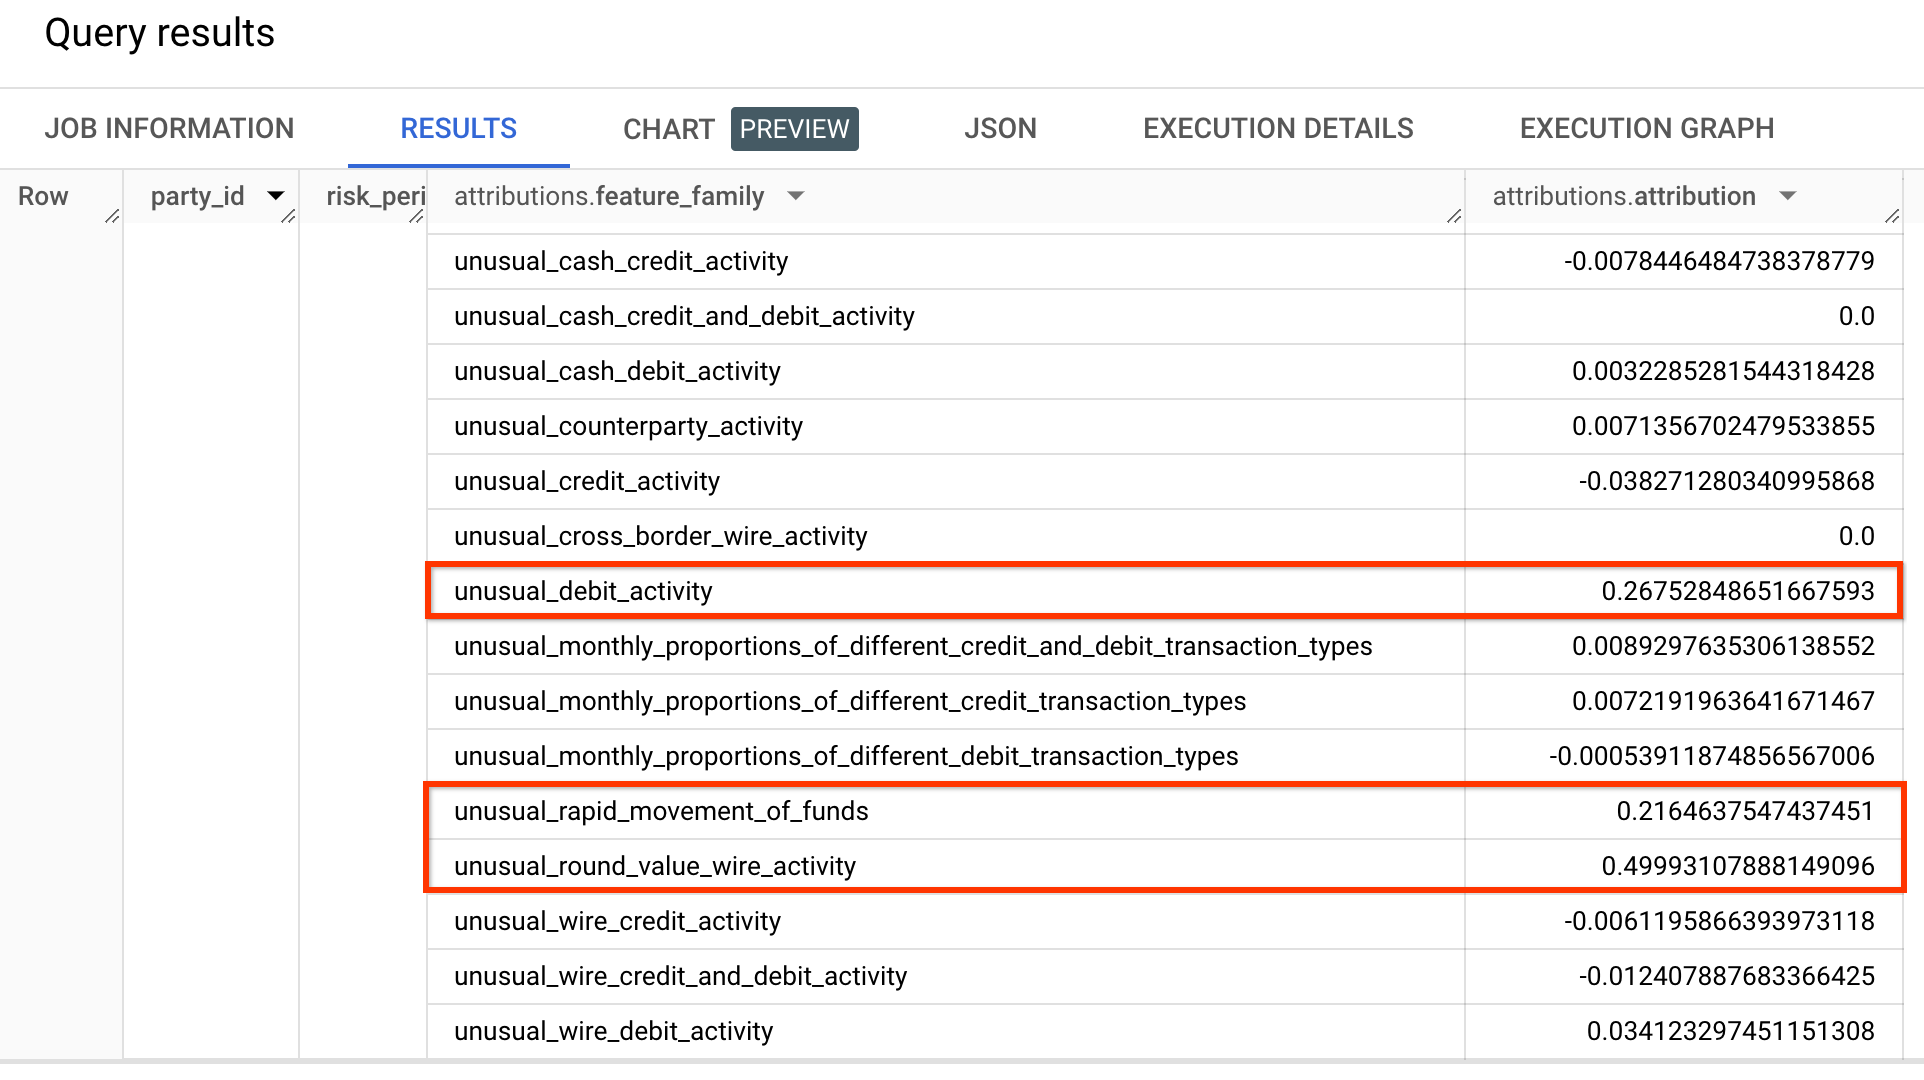
SELECT *
FROM `PROJECT_ID.my_bq_output_dataset.my_prediction_results_explainability`
WHERE party_id = 'EGS4NJD38JZ8NTL8'
AND risk_period_end_time = '2022-10-01'
By checking the explainability results, you can see that the correct feature families score the highest values.
Clean up
To avoid incurring charges to your Google Cloud account for the resources used on this page, delete the Google Cloud project with the resources.
Delete the prediction result
To delete a prediction result, use the
projects.locations.instances.predictionResults.delete
method.
To send your request, choose one of these options:
curl
Execute the following command:
curl -X DELETE \
     -H "Authorization: Bearer $(gcloud auth print-access-token)" \
     "https://financialservices.googleapis.com/v1/projects/PROJECT_ID/locations/LOCATION/instances/my-instance/predictionResults/my-prediction-results"
PowerShell
Execute the following command:
$cred = gcloud auth print-access-token
$headers = @{ "Authorization" = "Bearer $cred" }

Invoke-WebRequest `
    -Method DELETE `
    -Headers $headers `
    -Uri "https://financialservices.googleapis.com/v1/projects/PROJECT_ID/locations/LOCATION/instances/my-instance/predictionResults/my-prediction-results" | Select-Object -Expand Content
You should receive a JSON response similar to the following:
{
  "name": "projects/PROJECT_ID/locations/LOCATION/operations/OPERATION_ID",
  "metadata": {
    "@type": "type.googleapis.com/google.cloud.financialservices.v1.OperationMetadata",
    "createTime": CREATE_TIME,
    "target": "projects/PROJECT_ID/locations/LOCATION/instances/my-instance/predictionResults/my-prediction-results",
    "verb": "delete",
    "requestedCancellation": false,
    "apiVersion": "v1"
  },
  "done": false
}
Delete the backtest result
To delete a backtest result, use the
projects.locations.instances.backtestResults.delete
method.
To send your request, choose one of these options:
curl
Execute the following command:
curl -X DELETE \
     -H "Authorization: Bearer $(gcloud auth print-access-token)" \
     "https://financialservices.googleapis.com/v1/projects/PROJECT_ID/locations/LOCATION/instances/my-instance/backtestResults/my-backtest-results"
PowerShell
Execute the following command:
$cred = gcloud auth print-access-token
$headers = @{ "Authorization" = "Bearer $cred" }

Invoke-WebRequest `
    -Method DELETE `
    -Headers $headers `
    -Uri "https://financialservices.googleapis.com/v1/projects/PROJECT_ID/locations/LOCATION/instances/my-instance/backtestResults/my-backtest-results" | Select-Object -Expand Content
You should receive a JSON response similar to the following:
{
  "name": "projects/PROJECT_ID/locations/LOCATION/operations/OPERATION_ID",
  "metadata": {
    "@type": "type.googleapis.com/google.cloud.financialservices.v1.OperationMetadata",
    "createTime": CREATE_TIME,
    "target": "projects/PROJECT_ID/locations/LOCATION/instances/my-instance/backtestResults/my-backtest-results",
    "verb": "delete",
    "requestedCancellation": false,
    "apiVersion": "v1"
  },
  "done": false
}
Delete the model
To delete a model, use the
projects.locations.instances.models.delete
method.
To send your request, choose one of these options:
curl
Execute the following command:
curl -X DELETE \
     -H "Authorization: Bearer $(gcloud auth print-access-token)" \
     "https://financialservices.googleapis.com/v1/projects/PROJECT_ID/locations/LOCATION/instances/my-instance/models/my-model"
PowerShell
Execute the following command:
$cred = gcloud auth print-access-token
$headers = @{ "Authorization" = "Bearer $cred" }

Invoke-WebRequest `
    -Method DELETE `
    -Headers $headers `
    -Uri "https://financialservices.googleapis.com/v1/projects/PROJECT_ID/locations/LOCATION/instances/my-instance/models/my-model" | Select-Object -Expand Content
You should receive a JSON response similar to the following:
{
  "name": "projects/PROJECT_ID/locations/LOCATION/operations/OPERATION_ID",
  "metadata": {
    "@type": "type.googleapis.com/google.cloud.financialservices.v1.OperationMetadata",
    "createTime": CREATE_TIME,
    "target": "projects/PROJECT_ID/locations/LOCATION/instances/my-instance/models/my-model",
    "verb": "delete",
    "requestedCancellation": false,
    "apiVersion": "v1"
  },
  "done": false
}
Delete the engine config
To delete an engine config, use the
projects.locations.instances.engineConfigs.delete
method.
To send your request, choose one of these options:
curl
Execute the following command:
curl -X DELETE \
     -H "Authorization: Bearer $(gcloud auth print-access-token)" \
     "https://financialservices.googleapis.com/v1/projects/PROJECT_ID/locations/LOCATION/instances/my-instance/engineConfigs/my-engine-config"
PowerShell
Execute the following command:
$cred = gcloud auth print-access-token
$headers = @{ "Authorization" = "Bearer $cred" }

Invoke-WebRequest `
    -Method DELETE `
    -Headers $headers `
    -Uri "https://financialservices.googleapis.com/v1/projects/PROJECT_ID/locations/LOCATION/instances/my-instance/engineConfigs/my-engine-config" | Select-Object -Expand Content
You should receive a JSON response similar to the following:
{
  "name": "projects/PROJECT_ID/locations/LOCATION/operations/OPERATION_ID",
  "metadata": {
    "@type": "type.googleapis.com/google.cloud.financialservices.v1.OperationMetadata",
    "createTime": CREATE_TIME,
    "target": "projects/PROJECT_ID/locations/LOCATION/instances/my-instance/engineConfigs/my-engine-config",
    "verb": "delete",
    "requestedCancellation": false,
    "apiVersion": "v1"
  },
  "done": false
}
Delete the dataset
To delete a dataset, use the
projects.locations.instances.datasets.delete
method.
To send your request, choose one of these options:
curl
Execute the following command:
curl -X DELETE \
     -H "Authorization: Bearer $(gcloud auth print-access-token)" \
     "https://financialservices.googleapis.com/v1/projects/PROJECT_ID/locations/LOCATION/instances/my-instance/datasets/my-dataset"
PowerShell
Execute the following command:
$cred = gcloud auth print-access-token
$headers = @{ "Authorization" = "Bearer $cred" }

Invoke-WebRequest `
    -Method DELETE `
    -Headers $headers `
    -Uri "https://financialservices.googleapis.com/v1/projects/PROJECT_ID/locations/LOCATION/instances/my-instance/datasets/my-dataset" | Select-Object -Expand Content
You should receive a JSON response similar to the following:
{
  "name": "projects/PROJECT_ID/locations/LOCATION/operations/OPERATION_ID",
  "metadata": {
    "@type": "type.googleapis.com/google.cloud.financialservices.v1.OperationMetadata",
    "createTime": CREATE_TIME,
    "target": "projects/PROJECT_ID/locations/LOCATION/instances/my-instance/datasets/my-dataset",
    "verb": "delete",
    "requestedCancellation": false,
    "apiVersion": "v1"
  },
  "done": false
}
Delete the instance
To delete an instance, use the
projects.locations.instances.delete
method.
To send your request, choose one of these options:
curl
Execute the following command:
curl -X DELETE \
     -H "Authorization: Bearer $(gcloud auth print-access-token)" \
     "https://financialservices.googleapis.com/v1/projects/PROJECT_ID/locations/LOCATION/instances/my-instance"
PowerShell
Execute the following command:
$cred = gcloud auth print-access-token
$headers = @{ "Authorization" = "Bearer $cred" }

Invoke-WebRequest `
    -Method DELETE `
    -Headers $headers `
    -Uri "https://financialservices.googleapis.com/v1/projects/PROJECT_ID/locations/LOCATION/instances/my-instance" | Select-Object -Expand Content
You should receive a JSON response similar to the following:
{
  "name": "projects/PROJECT_ID/locations/LOCATION/operations/OPERATION_ID",
  "metadata": {
    "@type": "type.googleapis.com/google.cloud.financialservices.v1.OperationMetadata",
    "createTime": CREATE_TIME,
    "target": "projects/PROJECT_ID/locations/LOCATION/instances/my-instance",
    "verb": "delete",
    "requestedCancellation": false,
    "apiVersion": "v1"
  },
  "done": false
}
Delete the BigQuery datasets
bq rm -r -f -d PROJECT_ID:my_bq_input_dataset
bq rm -r -f -d PROJECT_ID:my_bq_output_dataset
Delete the transfer job configuration
List the transfer jobs in the project.
Bash
bq ls --transfer_config \
  --transfer_location=LOCATION \
  --project_id=PROJECT_ID  \
  --filter="dataSourceIds:cross_region_copy"
PowerShell
bq ls --transfer_config `
  --transfer_location=LOCATION `
  --project_id=PROJECT_ID `
  --filter="dataSourceIds:cross_region_copy"
Output similar to the following should be returned.
name                                                                                       displayName                    dataSourceId       state
------------------------------------------------------------------------------------------------------------------------------------------------------------------------------
projects/PROJECT_NUMBER/locations/LOCATION/transferConfigs/TRANSFER_CONFIG_ID    Copy the AML sample dataset.   cross_region_copy   SUCCEEDED
Copy the entire name, starting with
projects/and ending in theTRANSFER_CONFIG_ID.Delete the transfer config.
Bash
bq rm --transfer_config TRANSFER_CONFIG_NAMEPowerShell
bq rm --transfer_config TRANSFER_CONFIG_NAME
What's next
- Read about key concepts in the overview
- View the reference documentation