Auf dieser Seite wird gezeigt, wie eine API von einer benutzerdefinierten Domain geliefert wird, die Ihnen gehört, z. B. example.com.
Anstelle des eigenen Domainnamens können Sie auch einen von Google verwalteten Domainnamen verwenden. Weitere Informationen finden Sie unter Von Google verwaltete Domain verwenden.
Vorbereitung
- Fordern Sie bei einem Domainnamenregistrator einen Domainnamen an, wenn Sie noch keinen Domainnamen haben, der für Ihre API genutzt werden kann.
- Bestätigen Sie die Domaininhaberschaft.
- Benennen Sie den API-Host mit Ihrem Domainnamen.
- Wenn Sie mit Ihrer Domain SSL verwenden, beziehen Sie Ihr SSL-Zertifikat und laden Sie es hoch.
- Stellen Sie die API und den Extensible Service Proxy (ESP) bereit.
API-Projekt für die Verwendung meines Domainnamens konfigurieren
Folgen Sie der Anleitung auf dem entsprechenden Tab.
Compute Engine
Zum Bereitstellen einer API aus Compute Engine-Instanzen wird die Verwendung eines Load-Balancer in einer Instanzgruppe empfohlen. Sie müssen eine externe IP-Adresse für den Domainnamen reservieren und diese externe IP-Adresse für den Load-Balancer verwenden.
API über einen Domainnamen bereitstellen:
- Reservieren Sie in Ihrem Projekt mindestens eine statische externe IP-Adresse:
- Weisen Sie der reservierten IP-Adresse einen beliebigen Namen zu.
- Klicken Sie unter Type (Typ) auf Global.
- Klicken Sie unter Attached to (Zugeordnet zu) auf None (Keine). Sie fügen die IP-Adresse später zu einem Load-Balancer hinzu.
- Bearbeiten Sie Ihre Domaineinstellungen in Ihrem Domainanbieterkonto. Sie müssen einen A-Datensatz erstellen, der Ihren API-Namen enthält, z. B.
myapi.example.commit der externen IP-Adresse im Datenfeld - Erstellen Sie eine Instanzgruppe mit den Instanzen, die Ihre API und den Extensible Service Proxy (ESP) ausführen:
Zur Seite "Create New Instance group" (Neue Instanzgruppe erstellen)
- Weisen Sie der Gruppe einen beliebigen Namen zu und geben Sie eine Beschreibung ein.
- Klicken Sie in der Liste Zone auf die Zone, die von Ihrer API-Instanz verwendet wird.
- Klicken Sie in der Liste Instance definition (Instanzdefinition) auf Select existing instances (Vorhandene Instanzen auswählen).
- Geben Sie im Feld VM Instances (VM-Instanzen) die Instanz ein, auf der die API ausgeführt wird.
- Klicken Sie auf Create (Erstellen).
- Erstellen und konfigurieren Sie einen HTTP(S)-Load-Balancer:
Zur Seite "Create a New HTTP(S) load balancer" (Neuen HTTP(S)-Load-Balancer erstellen)
- Klicken Sie auf Back-End-Dienst definieren > Back-End-Dienst erstellen oder auswählen.
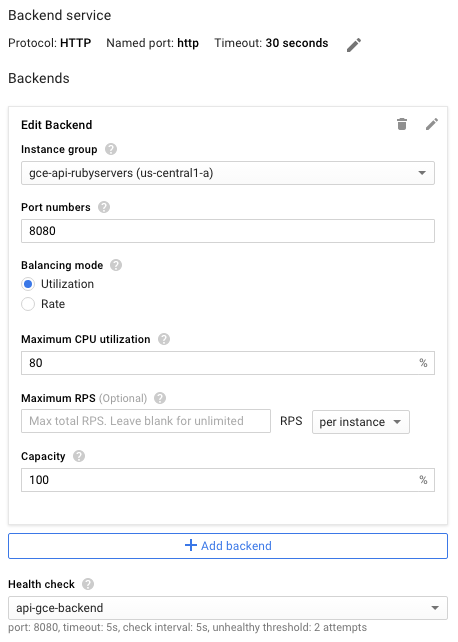
- Geben Sie einen beliebigen Namen und eine Beschreibung für diese Back-End-Dienstkonfiguration an.
- Wählen Sie im Feld Protokoll das Protokoll aus, das Sie über den Load-Balancer HTTP oder HTTPS unterstützen möchten.
- Klicken Sie in der Liste Instance group (Instanzgruppe) auf die Instanzgruppe.
- Geben Sie im Feld Port Numbers (Portnummern) den Wert
8080ein. - Klicken Sie auf Systemdiagnose, um Systemdiagnosen zu konfigurieren:
- Geben Sie eine Bezeichnung für die Konfiguration der Systemdiagnose ein.
- Weisen Sie den Port
8080zu. - Klicken Sie zum Übernehmen der verbleibenden Standardwerte auf Save (Speichern).
- Akzeptieren Sie für die restliche Konfiguration vorerst die Standardeinstellungen. Sie können Änderungen später bei Bedarf vornehmen und beispielsweise zusätzliche Ports hinzufügen.
- Im Feld Host and path rules (Host- und Pfadregeln) müssen Sie keinen Wert eingeben. Sie können alles an Ihre Back-End API weiterleiten, indem Sie die Standardfilter Any unmatched (Alle nicht zugeordneten Pfade) verwenden. Auf diese Weise wird der gesamte im Load-Balancer eingehende Traffic über den Standardport
8080an die API weitergeleitet (siehe oben). - Klicken Sie auf Frontend-Konfiguration.
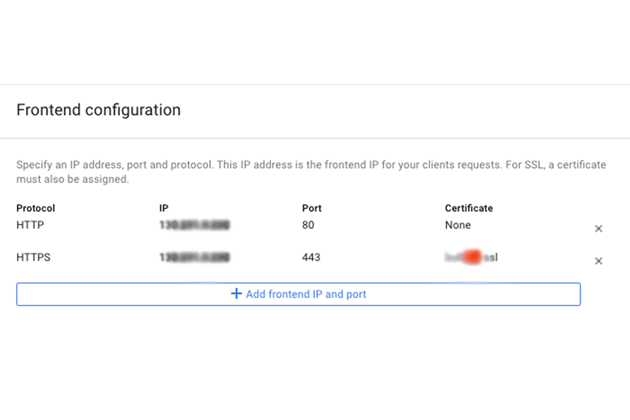
- Wählen Sie im Feld Protokoll das Protokoll aus, das Sie über den Load-Balancer HTTP oder HTTPS unterstützen möchten.
- Klicken Sie in der Liste IP auf die zuvor erstellte externe IP-Adresse.
- Für das HTTPS-Protokoll müssen Sie SSL verwenden. Klicken Sie in der Liste Certificate (Zertifikat) auf das gewünschte Zertifikat.
- Wenn Sie ein anderes Protokoll unterstützen möchten, klicken Sie optional auf Add frontend IP and port (Frontend-IP und Port hinzufügen) und geben Sie das Protokoll, die gleiche externe IP-Adresse und einen anderen Port an.
- Zum Erstellen des vollständig konfigurierten Load-Balancers klicken Sie auf Create (Erstellen). Wenn die Schaltfläche Create (Erstellen) deaktiviert ist, prüfen Sie die zuvor konfigurierten Komponenten: Neben jeder Konfigurationskomponente sollte ein Häkchen angezeigt werden. Ein fehlendes Häkchen weist darauf hin, dass die Konfiguration nicht abgeschlossen ist.
- Sobald die DNS-Änderungen verteilt wurden, werden Anfragen über den Load-Balancer an die API gesendet.
GKE
Zum Bereitstellen einer API über eine Domain für Google Kubernetes Engine (GKE) müssen Sie den ESP als Dienst freigeben. Verwenden Sie dazu die zurückgegebene externe IP-Adresse für die DNS-Einstellungen Ihrer Domain. Beachten Sie, dass GKE automatisch Load-Balancing ausführt.
API als Dienst bereitstellen:
- Konfigurieren Sie einen Kubernetes-Dienst für Ihre API-Back-Ends, sofern noch nicht geschehen. Erstellen Sie die Dienstkonfigurationsdatei
service.yamlmit folgendem Inhalt:apiVersion: v1 kind: Service metadata: name: echo spec: ports: - port: 80 targetPort: 8081 protocol: TCP selector: app: echo-app type: LoadBalancer - Ändern Sie das Label
selectorentsprechend Ihren Back-End-Labels (in diesem Beispielapp: echo-app). - Prüfen Sie, ob der
targetPortmit dem vom ESP verwendeten Port übereinstimmt, der in den API-Back-Ends konfiguriert ist. Der ESP verwendet standardmäßig Port8081. - Stellen Sie den Kubernetes-Dienst bereit:
kubectl apply -f service.yaml - Rufen Sie die externe IP-Adresse auf, die dem freigegebenen Dienst zugewiesen ist:
kubectl get servicesEXTERNAL-IP-Adresse an, die in etwa so aussieht:
NAME CLUSTER-IP EXTERNAL-IP PORT(S) AGE hello-node 10.X.XXX.202 10X.XXX.XX.123 8080/TCP 1m - Ändern Sie die generierte externe IP-Adresse von sitzungsspezifisch in statisch.
- Wählen Sie die externe IP-Adresse aus der Liste aus.
- Klicken Sie in der Liste Type (Typ) auf Static (Statisch).
- Bearbeiten Sie Ihre Domaineinstellungen in Ihrem Domainanbieterkonto. Sie müssen einen A-Datensatz erstellen, der Ihren API-Namen enthält, z. B.
myapi.example.com, wobei die externe IP-Adresse im Datenfeld enthalten ist.