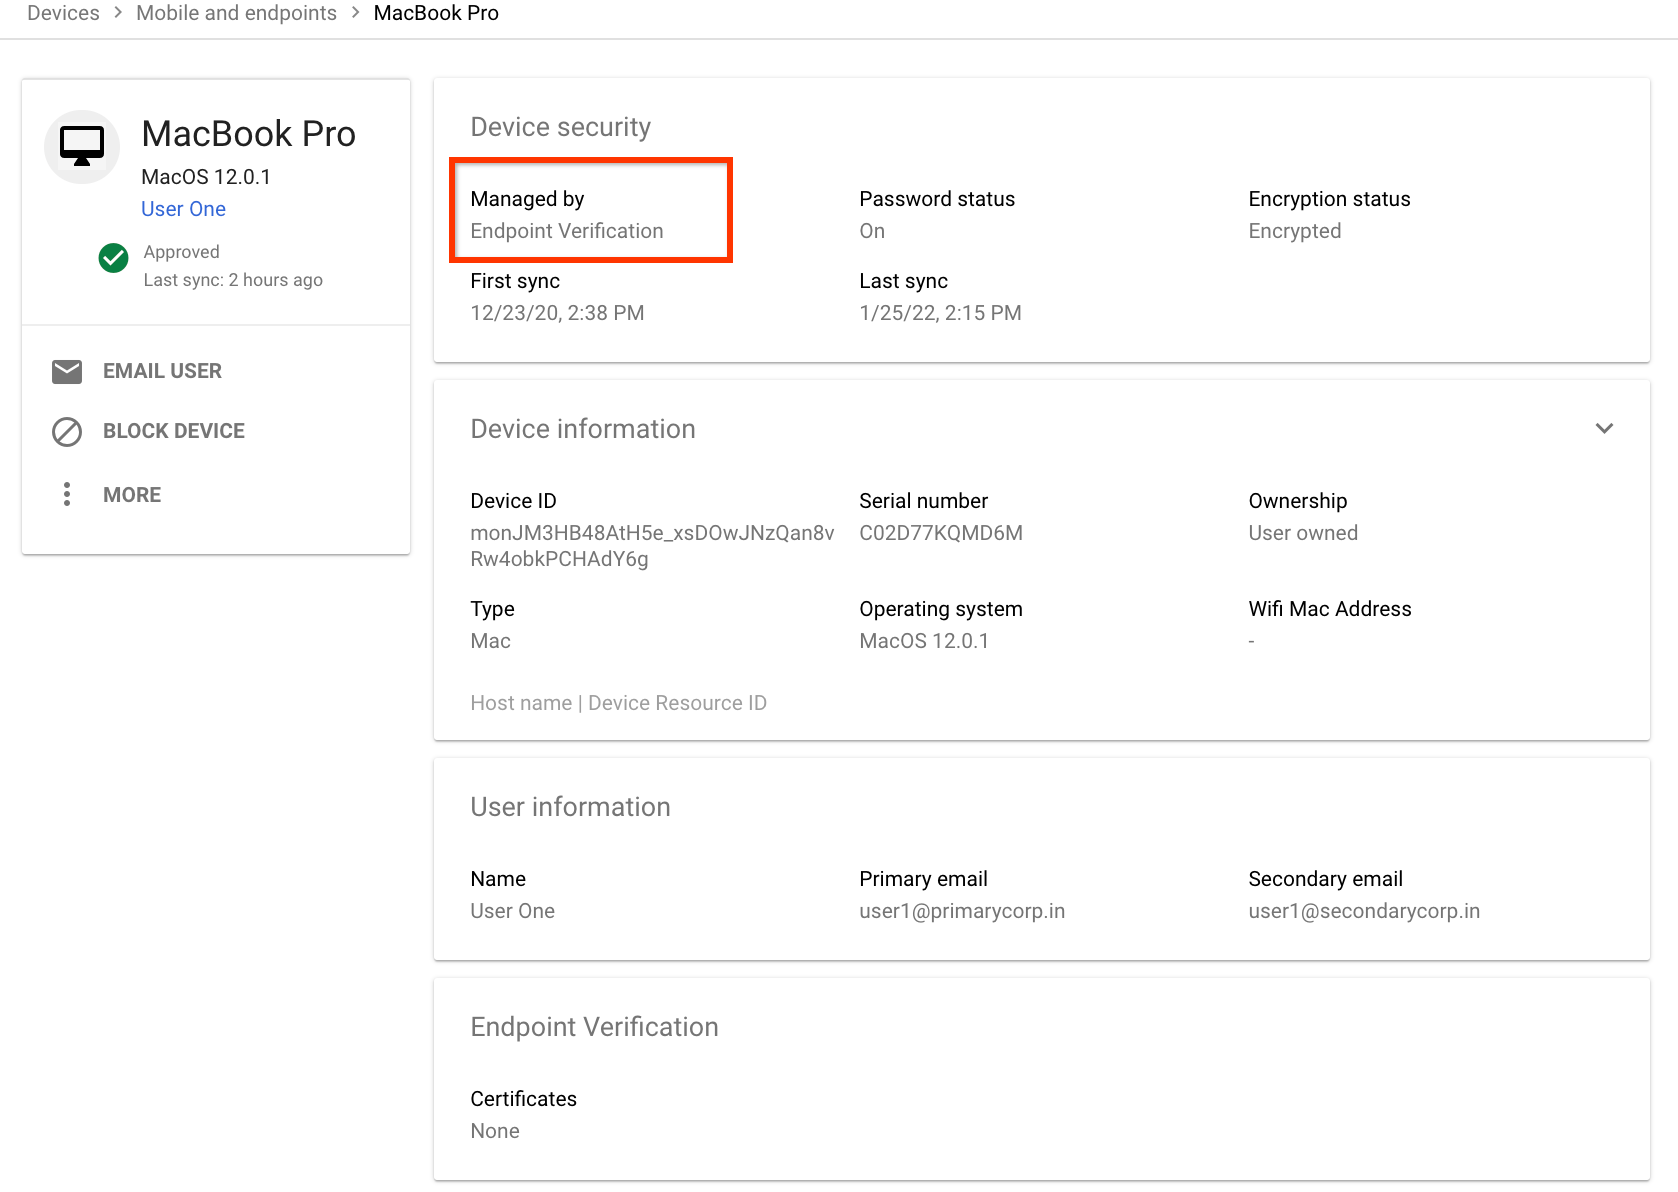
Você precisa ter uma unidade organizacional com pelo menos um dispositivo que execute um dos seguintes sistemas operacionais:
ChromeOS
Apple® Mac® OS X® El Capitan (10.11) ou mais recente
Microsoft® Windows® 10 e 11
Linux® Debian® e Ubuntu®
Use o Chrome 110 ou mais recente. Embora seja possível instalar a Verificação de endpoints em qualquer navegador baseado no Chromium, ela só é compatível com o navegador Chrome.
Ativar a Verificação de endpoints
Para coletar informações sobre os dispositivos que acessam os recursos da sua organização,
a Verificação de endpoints precisa estar ativada na sua unidade organizacional. Por padrão, a Verificação de endpoint
está ativada.
Para confirmar se a Verificação de endpoints está ativada, faça o seguinte:
Na página inicial do Admin Console, acesse Dispositivos.
No menu de navegação, clique em Dispositivos móveis e endpoints > Configurações > Configurações universais.
Clique em Acesso a dados > Verificação de endpoints.
No painel Unidades organizacionais, selecione sua unidade.
Verifique se a caixa de seleção Monitorar os dispositivos que acessam os dados da organização
está marcada.
Clique em Salvar. Se você tiver configurado uma unidade organizacional filha, talvez possa
herdar ou substituir as configurações de uma unidade organizacional mãe.
Instalar a Verificação de endpoints nos seus dispositivos
Na página inicial do Admin Console, acesse Dispositivos.
No menu de navegação, clique em Chrome > Apps e extensões > Usuários e navegadores.
No painel Unidades organizacionais, selecione a unidade organizacional em que você quer instalar a extensão de Verificação de endpoints.
Coloque o ponteiro sobre Adicionar e clique em Adicionar da Chrome Web Store.
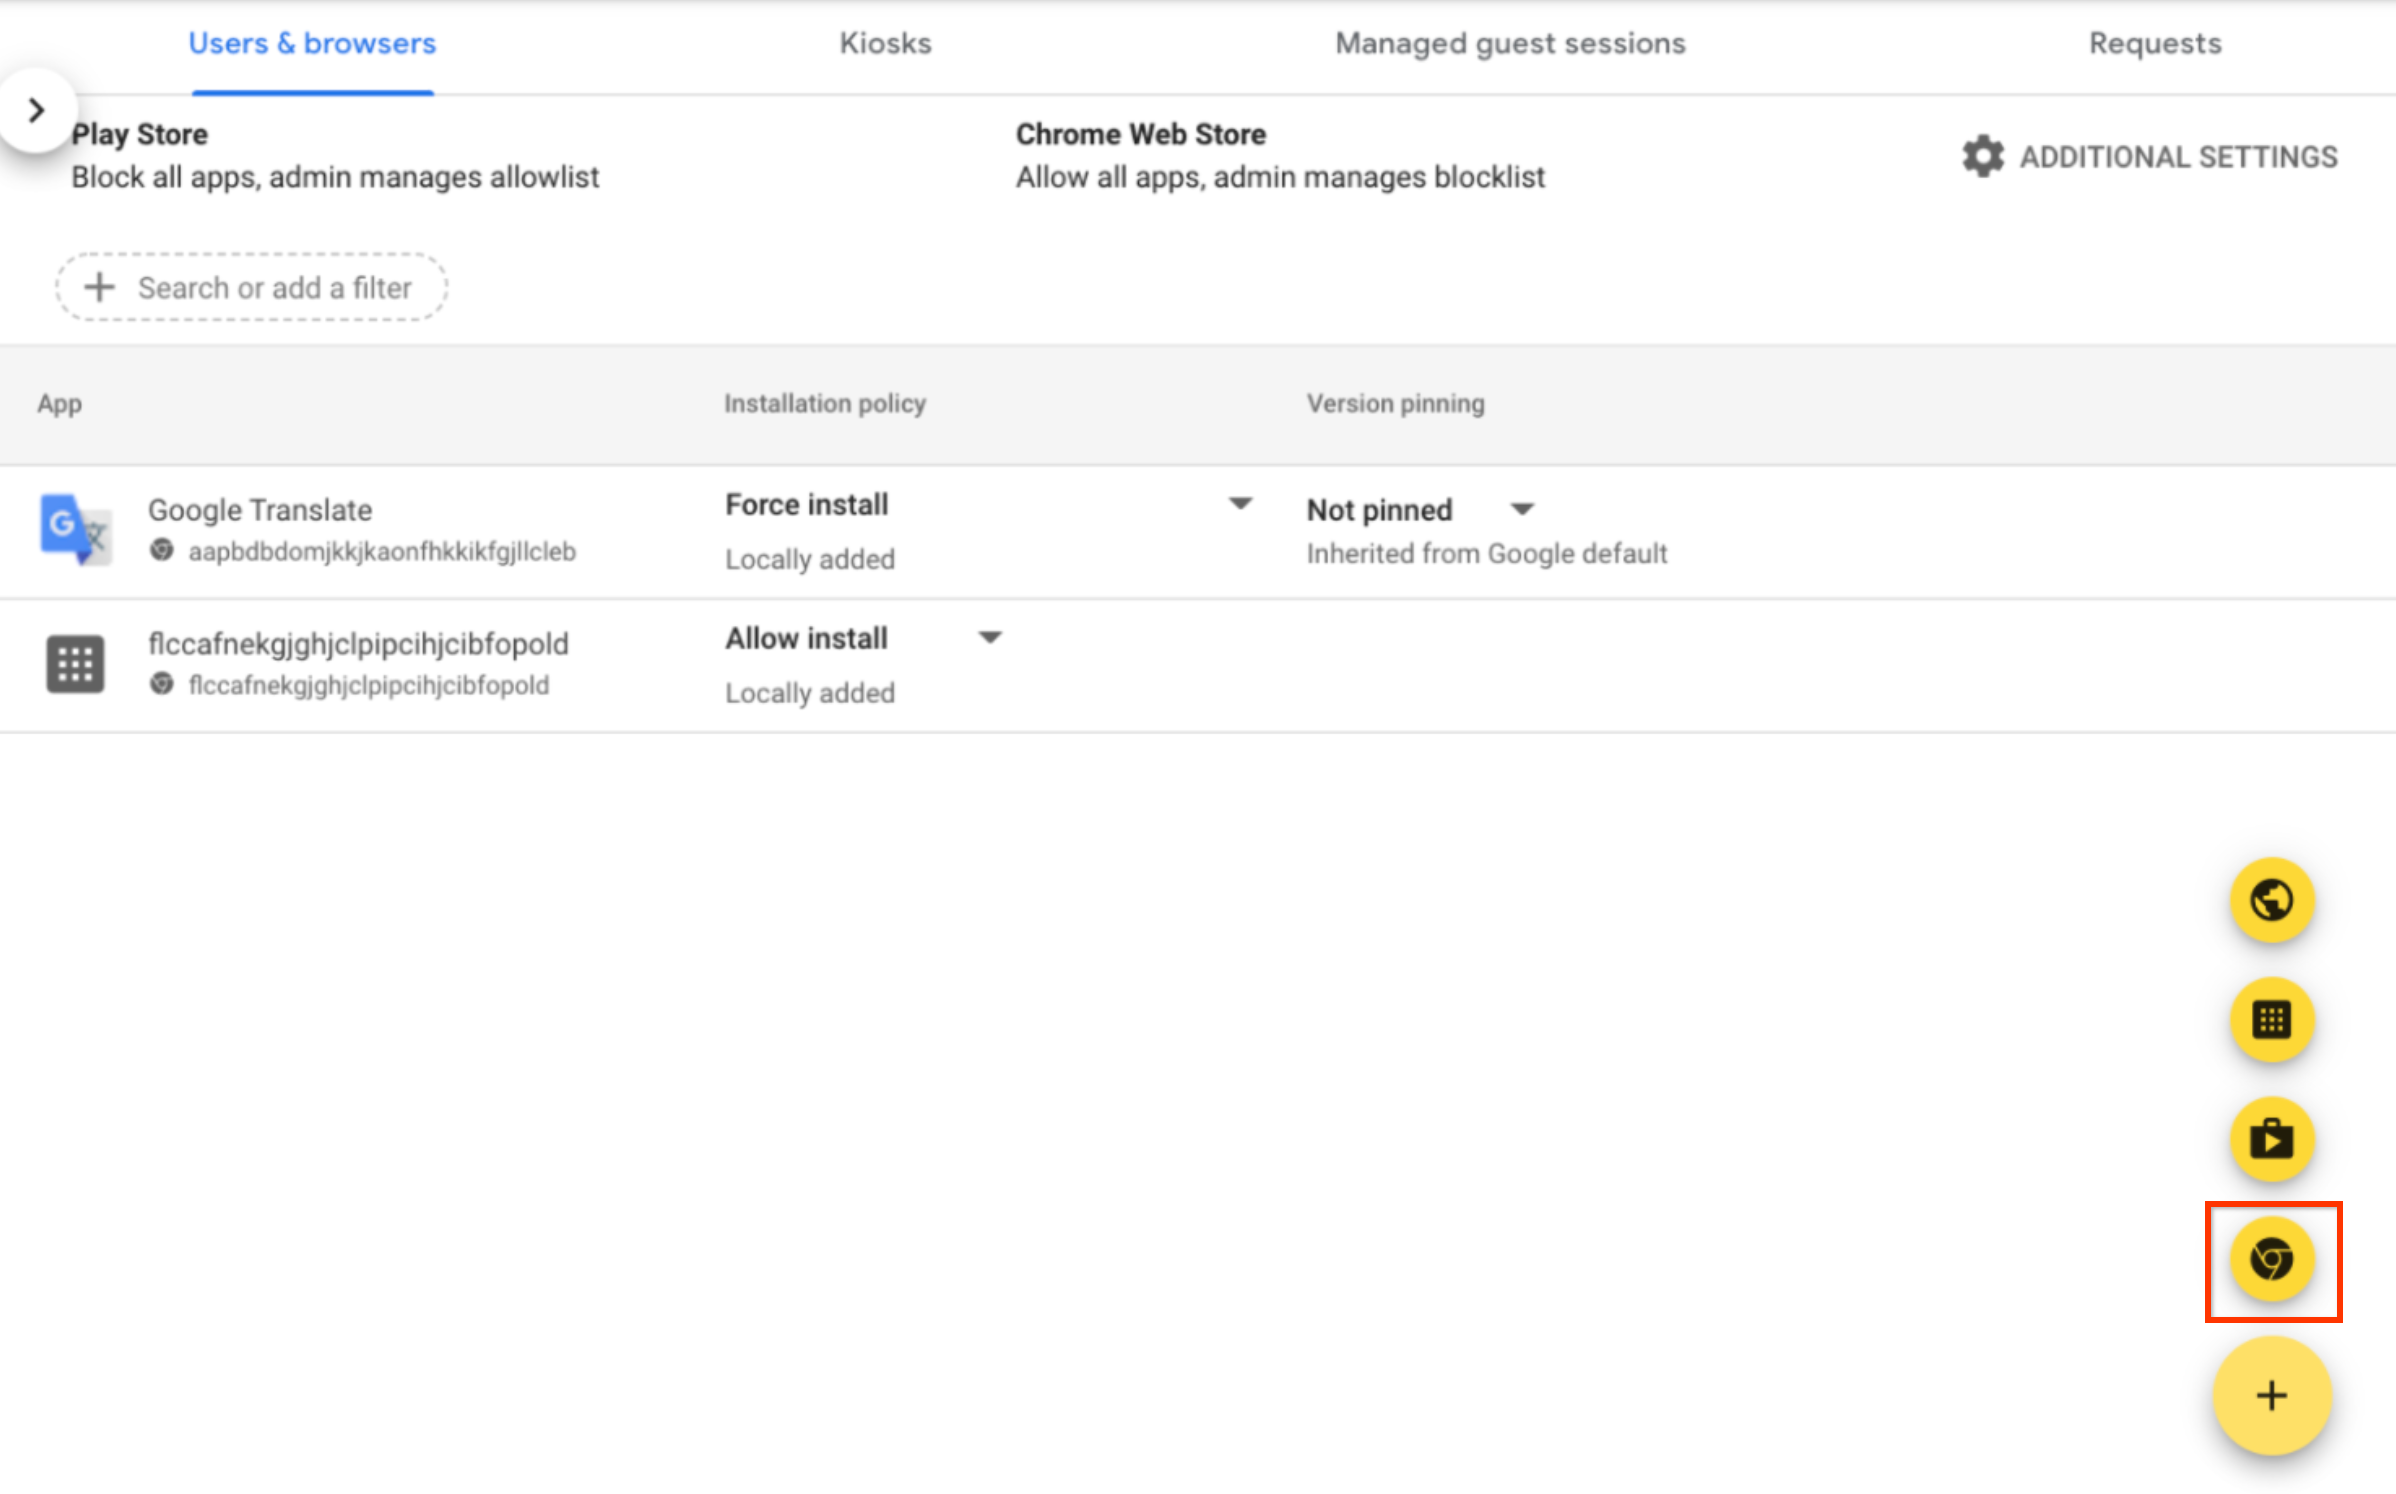
No campo Pesquisar na loja, digite Verificação de endpoints.
Clique em Verificação de endpoints e em Selecionar.
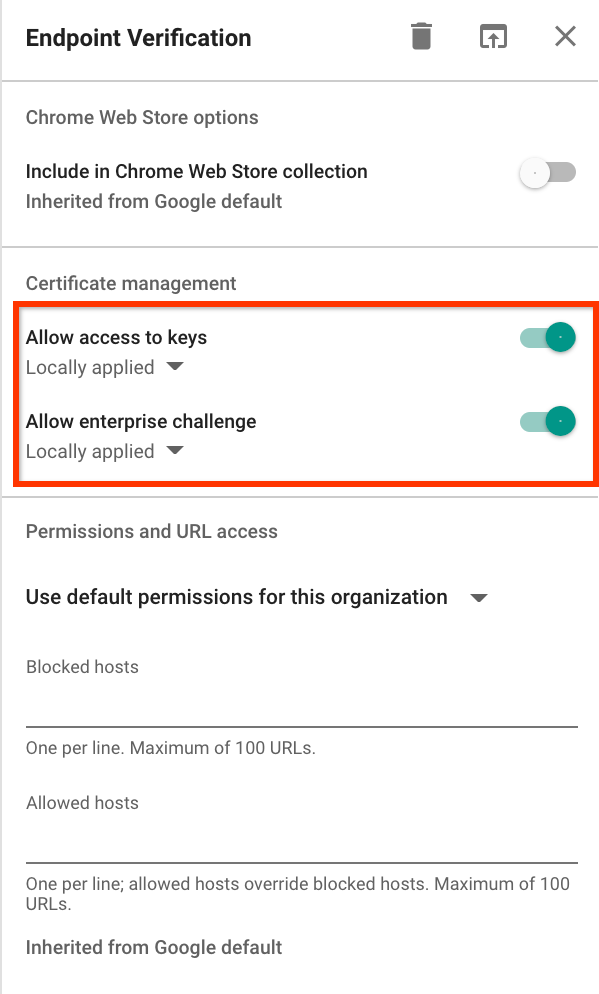
Na caixa de diálogo Verificação de endpoint, verifique se as opções Permitir acesso às chaves
e Permitir desafio empresarial estão ativadas.
Permitir o acesso a chaves: permite que a extensão Verificação de endpoints acesse
certificados e chaves do cliente no ChromeOS.
Permitir desafio empresarial: permite que a extensão Verificação de endpoints use o
recurso Acesso verificado no ChromeOS. Para mais informações, consulte Visão geral do acesso verificado do Chrome.
Clique no menu suspenso Política de instalação da Verificação de endpoints e selecione
Forçar a instalação.
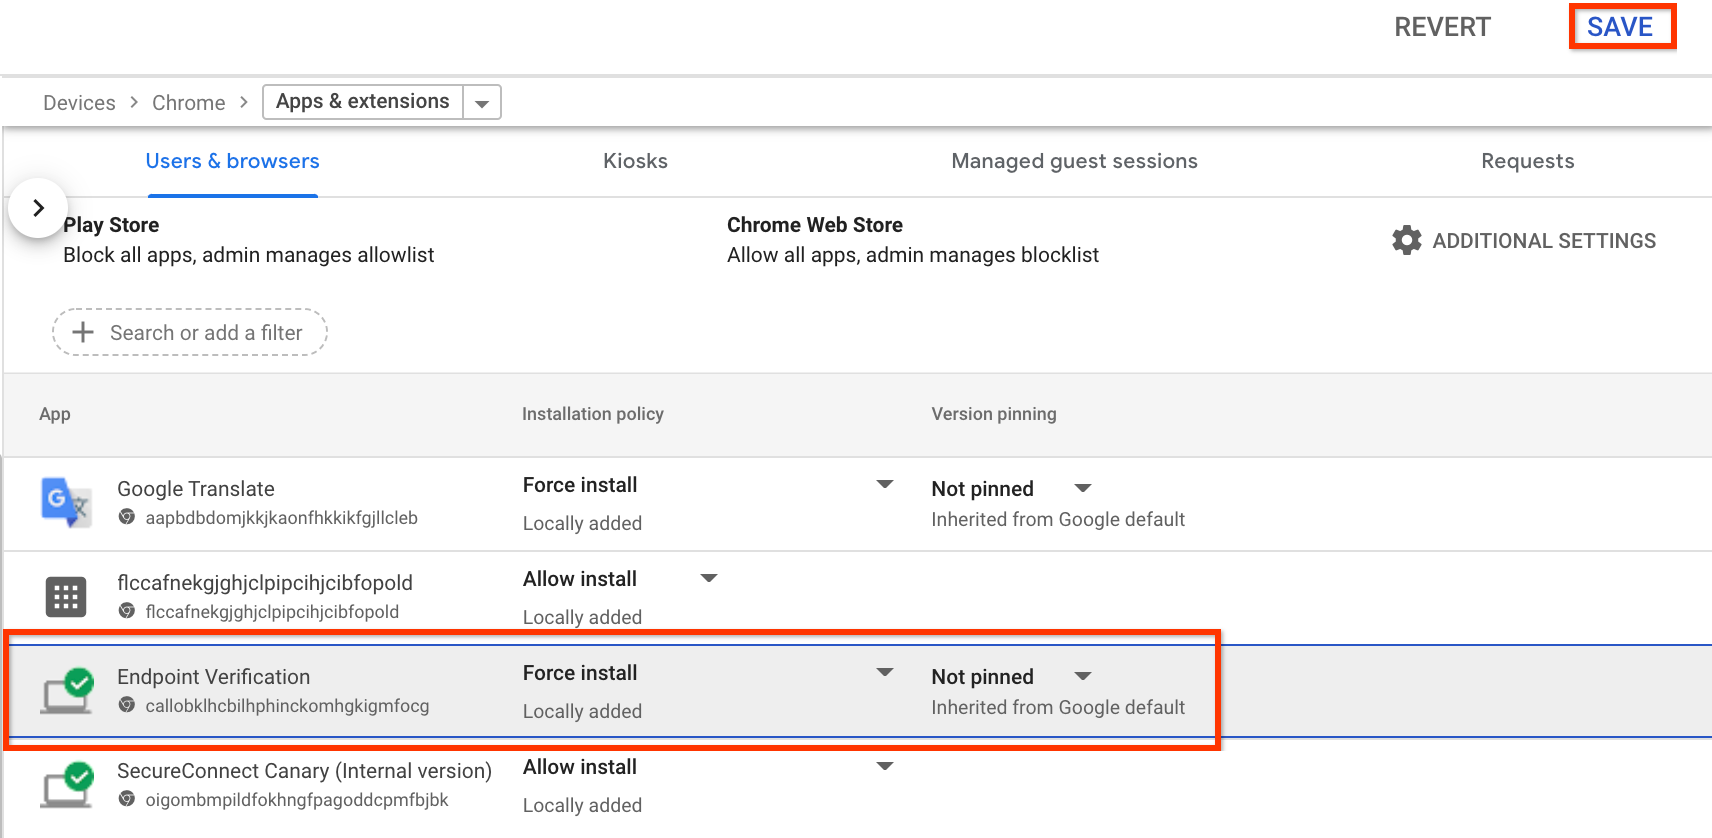
Clique em Salvar.
Conferir as informações dos seus dispositivos
Na página inicial do Admin Console, acesse Dispositivos > Visão geral.
[[["Fácil de entender","easyToUnderstand","thumb-up"],["Meu problema foi resolvido","solvedMyProblem","thumb-up"],["Outro","otherUp","thumb-up"]],[["Difícil de entender","hardToUnderstand","thumb-down"],["Informações incorretas ou exemplo de código","incorrectInformationOrSampleCode","thumb-down"],["Não contém as informações/amostras de que eu preciso","missingTheInformationSamplesINeed","thumb-down"],["Problema na tradução","translationIssue","thumb-down"],["Outro","otherDown","thumb-down"]],["Última atualização 2025-08-19 UTC."],[[["\u003cp\u003eEndpoint Verification is used to understand the security posture of devices accessing your organization's resources and must be turned on for your organizational unit.\u003c/p\u003e\n"],["\u003cp\u003eTo set up Endpoint Verification, you must have a Google Workspace administrator account, an organization unit with supported devices, and use Chrome 110 or later.\u003c/p\u003e\n"],["\u003cp\u003eThe installation process for Endpoint Verification involves adding the extension from the Chrome Web Store within the Google Admin console, ensuring key access and enterprise challenge features are enabled, with a forced installation policy.\u003c/p\u003e\n"],["\u003cp\u003eYou can view device information managed by Endpoint Verification through the Devices overview in the Google Admin console, including specific details for individual devices.\u003c/p\u003e\n"],["\u003cp\u003eIf you no longer want Endpoint Verification to manage your devices, you must clear the "Monitor which devices access organization data" checkbox in the Google Admin Console settings.\u003c/p\u003e\n"]]],[],null,["# Set up Endpoint Verification on your devices\n============================================\n\nThis quickstart document guides you how to set up Endpoint Verification on your\ndevices to understand the security posture of your devices.\n\nBefore you begin\n----------------\n\n\n1. You must have a Google Workspace administrator account with the [Service Settings](https://support.google.com/a/answer/1219251) privilege.\n2. Log in to the **Google Admin console** by using your Google Workspace\n administrator account.\n\n [Log in to Google Admin console](https://admin.google.com/ac/devices/list)\n3. You must have an organization unit with at least one device running one of the following operating systems:\n\n - ChromeOS\n - Apple® Mac® OS X® El Capitan (10.11) or later\n - Microsoft® Windows® 10 and 11\n - Linux® Debian® and Ubuntu®\n4. You must use Chrome 110 or later. While you can install Endpoint Verification on any Chromium-based browser, it's supported only on Chrome browser.\n\n\u003cbr /\u003e\n\n\nTurn on Endpoint Verification\n-----------------------------\n\nTo collect information about the devices accessing the resources of your organization,\nEndpoint Verification must be turned on for your organizational unit. By default, Endpoint Verification\nis turned on.\n\nTo confirm if Endpoint Verification is turned on, do the following:\n\n1. From the Admin console Home page, go to **Devices**.\n\n [Go to Devices](https://admin.google.com/ac/devices/list)\n2. In the navigation menu, click **Mobile \\& endpoints \\\u003e Settings \\\u003e Universal settings**.\n3. Click **Data Access \\\u003e Endpoint Verification**.\n4. From the **Organizational Units** pane, select your organization unit.\n5. Ensure that the **Monitor which devices access organization data** checkbox is selected.\n6. Click **Save**. If you configured a child organizational unit, you might be able to inherit or override the settings of a parent organizational unit.\n\n\u003cbr /\u003e\n\n\nInstall Endpoint Verification on your devices\n---------------------------------------------\n\n1. From the Admin console Home page, go to **Devices**.\n\n [Go to Devices](https://admin.google.com/ac/devices/list)\n2. In the navigation menu, click **Chrome \\\u003e Apps \\& extensions \\\u003e Users \\& browsers**.\n3. From the **Organizational Units** pane, select your organization unit for which you want to install the Endpoint Verification extension.\n4. Hold the pointer over **Add** , and click **Add from Chrome Web Store**.\n\n5. In the **Search the store** field, enter **Endpoint Verification**.\n6. Click **Endpoint Verification** and then click **Select**.\n7. In the **Endpoint Verification** dialog, ensure that **Allow access to keys** and **Allow enterprise challenge** are enabled.\n - **Allow access to keys**: allows the Endpoint Verification extension to access client certificates and keys on ChromeOS.\n - **Allow enterprise challenge** : allows the Endpoint Verification extension to use the Verified Access feature on ChromeOS. For more information, see [Chrome Verified Access Overview](https://developers.google.com/chrome/verified-access/overview).\n\n8. Click the **Installation policy** drop-down for Endpoint Verification, and select\n **Force install**.\n\n9. Click **Save**.\n\n\u003cbr /\u003e\n\nView your devices information\n-----------------------------\n\n1. From the Admin console Home page, go to **Devices \\\u003e Overview** .\n\n [Go to Devices overview](https://admin.google.com/u/1/ac/dm)\n\n2. Click **Endpoints** .\n\n The list of devices in your organization is displayed.\n3.\n\n To get more information about a specific device, click the device.\n The device information is displayed for that specific device.\n\n\n The device details show that the device is managed by Endpoint Verification.\n\n \u003cbr /\u003e\n\nClean up\n--------\n\nIf you don't want Endpoint Verification to manage your devices,\ndo the following:\n\n1. From the Admin console Home page, go to **Devices**.\n\n [Go to Devices](https://admin.google.com/ac/devices/list)\n2. In the navigation menu, click **Mobile \\& endpoints \\\u003e Settings \\\u003e Universal settings**.\n3. Click **Data Access \\\u003e Endpoint Verification**.\n4. From the **Organizational Units** pane, select your organization unit.\n5. Clear the **Monitor which devices access organization data** checkbox.\n6. Click **Save**.\n\nWhat's next\n-----------\n\n- [Endpoint Verification overview](/endpoint-verification/docs/overview)\n\n- [Device attributes collected by Endpoint Verification](/endpoint-verification/docs/device-information)"]]