Customize Looker Blocks
This page provides an overview of best practices and examples on how to adapt the following Cortex Framework Looker Blocks to your specific business requirements:
Installation
You can install the Cortex Framework Looker Blocks in a few ways, as detailed in the Deploy Looker Blocks documentation. However, we recommend forking the repository as the simplest method for customizing blocks to fit your business needs.
The Cortex Framework Looker Blocks have been created in a layered approach where each layer adds an incremental piece of logic onto the previous layer:
- Base Layer: Machine-generated LookML views referencing source tables.
- Core Layer: Handwritten changes that add new fields or modify base layer fields.
- Logical Layer: Explore definitions and joins across different views.
Use of refinements is key to this layered approach and for customization. And to follow the DRY (Do Not Repeat Yourself) principle, extends and constants are leveraged. Dynamic content for labels, SQL statements, html and link properties are generated using the Liquid templating language.
General Google Best practices:
File and folder organization
Within the Looker Block, each folder represents a collection of object types (such as views, Explores, dashboards, and others). And each individual object is defined in a separate file. The project root contains the following key files:
.modelfile- Manifest file
- README and other Markdown files
- Marketplace files (if the block is also available on Looker marketplace)
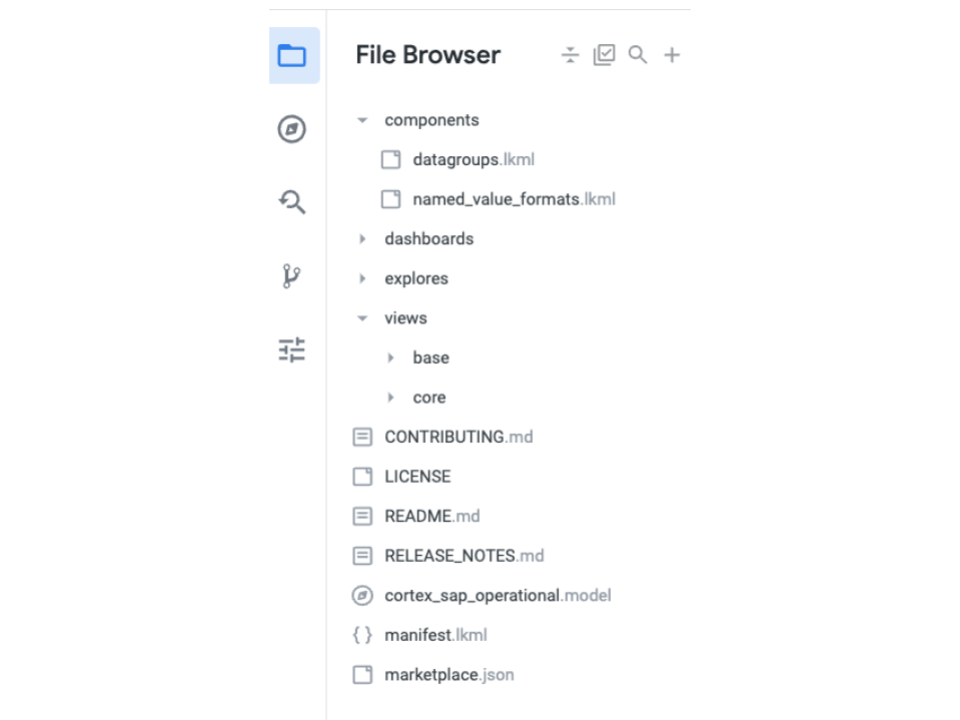
Model
Modular file management makes the project's model file lean with the following
parameters:
- connection
-
The type of files included are the following:
- Components (datagroups,
named_value_formatswhen relevant) - Explores (explores are not defined in the model file)
- Dashboards
- Components (datagroups,
The include statements for the views utilized in the Block are defined within
each individual Explore file, rather than in this location as the following
example shows:
connection: "@{CONNECTION_NAME}"

include: "/components/**/*.lkml"
include: "/explores/**/*.explore"
include: "/dashboards/**/*.dashboard"
Manifest
The Manifest file specifies the constants that are referenced throughout a project. Some examples of the constants used for our blocks are the following:
- Connection Name
- Project ID
- Reporting Dataset
Cortex Framework Looker Blocks also use constants to define the following:
- View labels
- Field labels
- HTML formats
- URL links
- Dashboard names
Review the constants defined for the Looker Block and modify any of the values to match your needs. Changes apply anywhere the constant is referenced.
User Attributes
Some of the Looker Blocks require user attributes to be defined in the Looker instance by an administrator. These user attributes for default language or currency allow you to customize how dashboards are displayed per user or group. See the overview for each block for more information about the required user attributes.
Views
Views found in the Base folder are those automatically generated using Create View from Table. These files have been changed minimally:
- Replaced Project ID and Dataset name with constants.
- Moved views based on Nested Records into separate files.
- Removed any unnecessary drill field definitions.
Significant modifications to these views like labels, new dimensions and measures have been created in the Core folder using refinements, extends or derived tables.
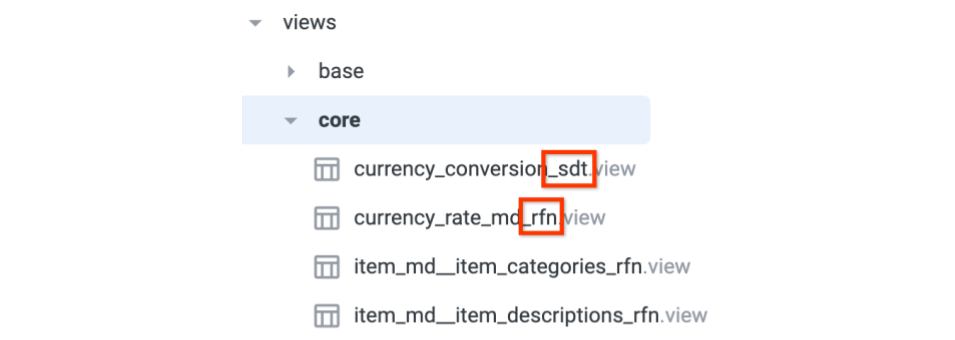
Within the core folder, views are named with a suffix indicating the type of view it is:
_rfnfor refinement._extfor view requiring extension._sdtfor SQL-based derived table._ndtfor Native derived table._pdtfor Persistent derived table._xvwfor view referencing fields from multiple views.
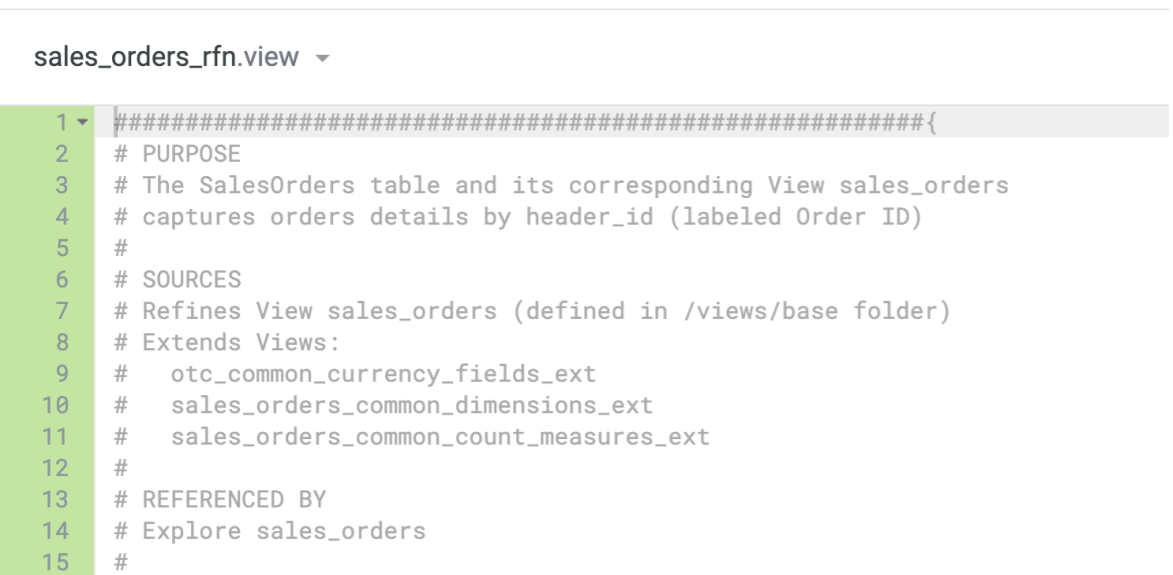
Each view definition begins with annotations that furnish background information, including descriptions, sources, references, extended fields, and other relevant notes.
Nested repeated records
For underlying tables containing nested repeated records, Looker
creates separate views to unnest these records. For example,
in the Oracle EBS Looker Block, the sales_orders table has a nested
repeated struct named lines. Looker treats these as two distinct
views: sales_orders and sales_orders__lines.
To join these unnested records within the Explore, you must define the join
using the sql property in conjunction with the UNNEST command.

For more information see How to Model Nested BigQuery Data in Looker.
Navigating and understanding Looker Block code
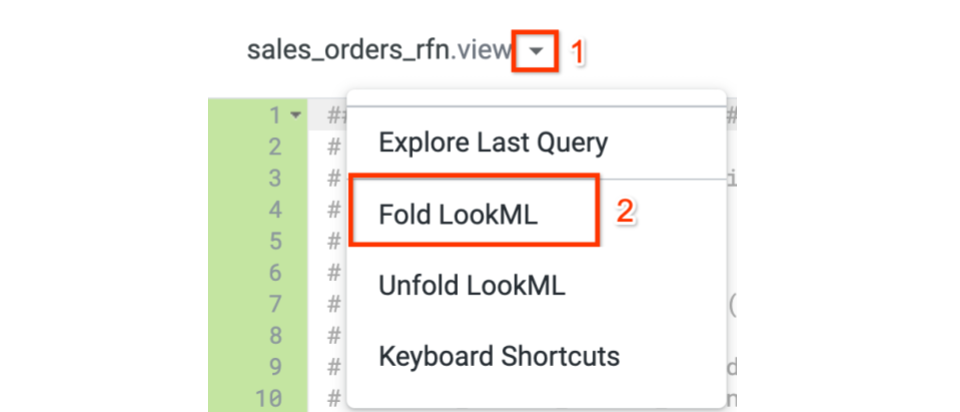
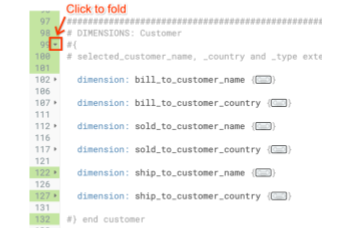
The Cortex Framework Looker Blocks contain extensive comments in the views and other objects. To enhance code navigation and comprehension, it is recommended to use the Fold LookML option available in the LookML development environment.

Fields
The term field refers to objects like
dimension, measure, filter or parameter. Within these newer
blocks, we followed these principles:
- Dimensions are named using snake_case (lowercase and underscore between
words). For example:
customer_name. - Column names from underlying tables are used to name dimensions. Labels can
be applied to dimensions to provide them with a business-friendly name.
For example, a dimension named
division_hdr_spartmay be labeled as "Division ID". - For tables with many columns, fields are hidden by default. Using a
refinement of the view, set the
hiddenproperty to "no" for the subset of fields to display in an Explore. Should a field not appear as anticipated, editing this field property can resolve the issue. View_labelandgroup_labelproperties are used to organize fields within an Explore, where applicable.- For fields utilized in multiple views, properties such as label are established within a "common" view, which is subsequently extended into other views. This approach centralizes the definition of the property, promoting reusability. Any necessary modifications are managed within the "common" view, ensuring that changes are reflected in all views where the "common" view is extended.
- Parameters that are used in multiple Explores or fields that reference
multiple views are defined in a field-only view with
_xvwsuffix. For more information, see Avoiding Inconsistencies across Explores.
Editing examples
This section provides examples of common customizations.
Unhiding a field
The base view encompasses all dimensions from an underlying table. When most of
the dimensions don't need to be visible, a refinement is used to hide all the
fields by default. This is accomplished by setting the fields_hidden_by_default
property to "yes". The subset of fields relevant for the included LookML
dashboards have been unhidden. The following example, considers a base view named
sales_orders with a dimension called item_posnr.
view: sales_order {
  sql_table_name: reporting.sales_order ;;

  dimension: item_posnr {
    type: string
    sql: ${TABLE}.Item_POSNR
  }
}
The refinement of this view is defined in file with _rfn suffix. The refinement
sets the view property fields_hidden_by_default to "yes" meaning all fields are
initially hidden. To show the field item_posnr in the view, set the hidden
property to "no".
view: +sales_order {
   fields_hidden_by_default: yes

   dimension: item_posnr {
     hidden: no
   }
}
Changing the label of the parameters view
Several Looker Blocks use a shared set of parameters defined within
a standalone file. For example, the Oracle EBS Block uses the
otc_common_parameters_xvw file. This view displays the label "🔍 Filters," which
is defined as a constant within the Manifest file.
To modify this label:
- Locate the
label_view_for_filtersconstant in the Manifest file. - Edit the constant's value to your chosen label.
- Save the Manifest file.
The change will be automatically reflected wherever the
label_view_for_filtersconstant is referenced.
Manifest

constant: label_view_for_filters {
  value: "My Filters"
}
Alternatively, navigate to the view otc_common_parameters_xvw and edit the
"label" property to chosen value.
view: otc_common_parameters_xvw {
  label: "My Filters"
}
Adding a new measure
New measures can be added directly to the relevant refinement. The following example shows a new measure added to the sales orders refinement:
view: +sales_orders {

  measure: customer_count {
    type: count_distinct
    sql: ${customer_id}
   }
}
Adding a second refinement layer
New refinements can be built upon existing refinements. Consider the refinement
of sales_orders in the file sales_orders_rfn.view which creates the
measure average_sales as the following example:
include: "/views/base/sales_orders"
view: +sales_orders {
  measure: average_sales {
    type: average
    sql: ${order_value}
  }
}
To create a second refinement file:
- Create a new refinement file: Name it
sales_orders_rfn2.view. - Include the first refinement file: This will incorporate all definitions
from
sales_orders_rfnintosales_orders_rfn2. - Edit the label property: Change the
labelproperty ofaverage_salesto "average spend" or any other chosen label. Add a new dimension: Include the code for the new dimension within the
sales_orders_rfn2.viewfile.include: "/views/core/sales_orders_rfn.view" view: +sales_orders { measure: average_sales { label: "Average Spend" } dimension: customer_name_with_id { type: string sql: CONCAT(${customer_id},' ',${customer_name}) } }Include second refinement file in Explore: This will incorporate all definitions and enhancements from
sales_orders_rfn2in the Explore.include: "/views/core/sales_orders_rfn2.view" explore: sales_orders { }
Creating a new refinement layer
The refinement of any base view defined within the Cortex Framework
Looker Block can be replaced if it doesn't meet your specific
requirements. The _rfn file can be directly edited to remove unnecessary
field definitions or add new ones.
Alternatively, create a new refinement file:
- Create a new refinement file: Name it
sales_invoices_rfnand save it. - Include the base view: This will incorporate all definitions from the
base view
sales_invoicesintosales_invoices_rfn. Add the chosen customizations: Be sure to also define a dimension as a primary key.
include: "/views/base/sales_invoices.view"

view: +sales_invoices {

  fields_hidden_by_default: yes

  dimension: invoice_id {
    hidden: no
    primary_key: yes
    value_format_name: id
  }

  dimension: business_unit_name {
    hidden: no
    sql: CONCAT(${business_unit_id}, ":",${TABLE}.BUSINESS_UNIT_NAME) ;;
  }
}
Include the new refinement in the Explore: Use the new file in the
includeproperty instead of the refinement provided in the Cortex Framework Looker Block.include: "/views/my_customizations/sales_invoices_rfn.view" explore: sales_invoices { }
Editing LookML dashboard filters
The common set of dashboard filters used across multiple LookML dashboards are
defined in a dashboard named with _template suffix and extended into each
dashboard. Once extended, the filter objects can be modified as necessary for a
specific dashboard.
Editing for all dashboards
To change the filter type for all dashboards, locate the template file that
defines the filter. Edit the ui_config type and display properties to the
chosen settings. This change will apply to all dashboards that extend the
template. The following is a otc_template.dashboard example:
- dashboard: otc_template
  extension: required

  filters:
  - name: customer_country
    title: "Sold to Customer: Country"
    type: field_filter
    default_value: ''
    allow_multiple_values: true
    required: false
    ui_config:
      type: dropdown_menu
      display: popover
    explore: countries_md
    field: countries_md.country_name_landx
Editing for a specific dashboard
To modify a filter on a specific dashboard, locate the dashboard file and
include the filter name along with the select properties that require
modification. This change will be limited to the single dashboard. For example,
to change the title and the UI type and display of the customer_country
filter for the otc_order_status.dashboard, only these properties would be
included in the dashboard file. The remaining properties would be inherited
from the extended template.
- dashboard: otc_order_status
  title: Order Status
  extends: otc_template

  filters:
  - name: customer_country
    title: "Customer Country"
    ui_config:
      type: dropdown_menu
      display: inline
For more information on creating and modifying LookML dashboards, see Building LookML Dashboards.
