- 排定自動增加和減少「快速啟動集區大小」。
- 依排程自動啟動工作站。
本教學課程將說明如何配合一般營業時間,增加及減少快速啟動集區大小。
準備環境
設定下列環境變數,這些變數會用於稍後建立的自動化指令碼。
設定要使用的
PROJECT_ID和REGION變數:PROJECT_ID=$PROJECT_ID REGION=$REGION將 $REGION 替換為您打算使用的區域名稱,例如
us-central1。如要進一步瞭解可用區域,請參閱「Cloud Workstations 服務據點」。
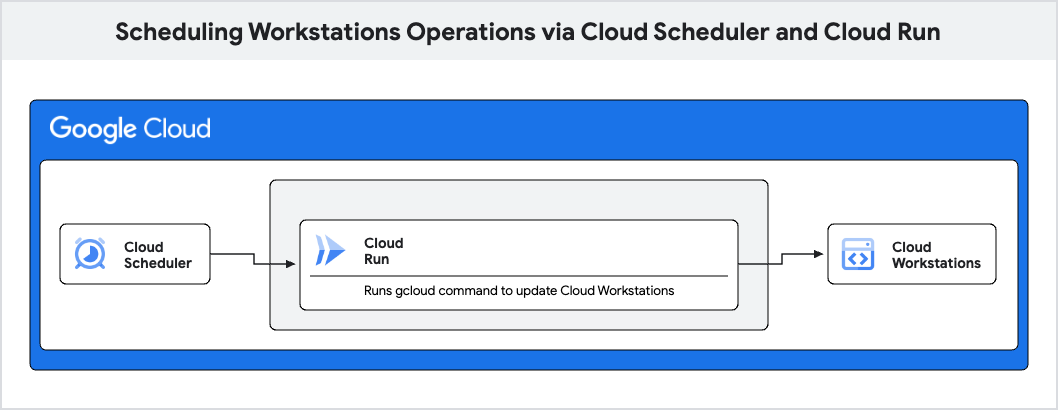
應用程式架構
本解決方案包含下列 Google Cloud 元件:
- Cloud Run,更新
WorkstationConfig的「快速啟動集區大小」。 - Cloud Scheduler 工作:依照設定的排程進行呼叫,以更新
WorkstationConfig。
建立 Cloud Run 服務
第一步是設定簡易網路伺服器,監聽通訊埠 8080 收到的 HTTP 要求。由於應用程式已容器化,因此您可以使用任何語言編寫伺服器。
如要以 Python 編寫網頁伺服器接聽應用程式,請按照下列步驟操作:
建立名為
workstation-config-updater的新目錄,然後將目錄變更為該目錄:mkdir workstation-config-updater cd workstation-config-updater建立名為
app.py的檔案,將下列程式碼貼入其中:import os, subprocess from flask import Flask, request, abort app = Flask(__name__) @app.route("/", methods=["POST"]) def update(): app.logger.info("Update request received.") data = request.json cluster = data["cluster"] region = data["region"] pool_size = data["pool-size"] path = os.path.join(app.root_path, "update_config.sh") o = subprocess.run( [path, cluster, region, pool_size], stdout=subprocess.PIPE, stderr=subprocess.STDOUT, text=True ) app.logger.info("Sending response:", o.stdout) return o.stdout if __name__ == "__main__": app.run(host="0.0.0.0", port=8080, debug=True)這段程式碼會建立基本的網路伺服器,用於監聽
PORT環境變數定義的通訊埠,並執行update_config.sh指令碼。建立名為
update_config.sh的檔案,將下列程式碼貼入其中:#!/bin/bash set -e if [ $# -ne 3 ] then echo "Usage: update_config.sh CLUSTER REGION POOL_SIZE" exit 1 fi CLUSTER=$1 REGION=$2 POOL_SIZE=$3 # list workstation configs echo "Attempting to list workstation configs in cluster $CLUSTER and region $REGION ..." for CONFIG in $(gcloud workstations configs list --cluster $CLUSTER --region $REGION --format="value(NAME)"); do echo "Attempting to update Quick Pool Size to $POOL_SIZE for config $CONFIG ..." # update the workstation config pool-size RET=$(gcloud workstations configs update $CONFIG --cluster $CLUSTER --region $REGION --pool-size=$POOL_SIZE) if [[ $RET -eq 0 ]]; then echo "Workstation config $CONFIG updated." else echo "Workstation config $CONFIG update failed." fi done這個指令碼會使用
gcloud指令列出指定叢集中的所有WorkstationConfig,並將「快速入門集區大小」更新為POOL_SIZE。建立名為
Dockerfile的檔案,將下列程式碼貼入其中:FROM google/cloud-sdk RUN apt-get update && apt-get install -y python3-pip python3 # Copy local code to the container image. ENV APP_HOME /app WORKDIR $APP_HOME COPY . ./ RUN /bin/bash -c 'ls -la; chmod +x ./update_config.sh' # Install production dependencies. RUN pip3 install Flask gunicorn # Run the web service on container startup CMD exec gunicorn --bind :8080 --workers 1 --threads 8 app:app這段程式碼會將應用程式容器化,以便部署至 Cloud Run。
部署至 Cloud Run
如要部署至 Cloud Run,請執行下列指令:
gcloud run deploy --source . --project $PROJECT_ID --region $REGION系統提示您輸入服務名稱時,請按下「Enter」鍵,接受預設名稱
workstation-config-updater。如果系統提示您啟用 Artifact Registry API 或允許建立 Artifact Registry 存放區,請按下 y。
系統提示允許未經驗證的叫用時,請按下 n。
等待部署作業完成。
如果服務網址顯示的格式如下,請複製該網址:
SERVICE_URL=$SERVICE_URL
設定服務帳戶來叫用 Cloud Run
您部署的 workstation-config-updater 服務不允許未經驗證的叫用。
Cloud Scheduler 需要具備適當憑證的服務帳戶,才能呼叫 workstation-config-updater 服務。
設定服務帳戶
如果您還沒有要用於 Cloud Scheduler 工作的服務帳戶,請建立新的服務帳戶。
gcloud iam service-accounts create $SERVICE_ACCOUNT_NAME \
    --description="$DESCRIPTION" \
    --display-name="$DISPLAY_NAME"
新增必要的 IAM 角色繫結,允許服務帳戶叫用 Cloud Run。
gcloud run services add-iam-policy-binding workstation-config-updater \
    --member=serviceAccount:$SERVICE_ACCOUNT_NAME@$PROJECT_ID.iam.gserviceaccount.com \
    --region $REGION \
    --role=roles/run.invoker
建立具有驗證機制的 Cloud Scheduler 設定
建立工作,並指定從「Deploy to Cloud Run」(部署至 Cloud Run) 複製的
URL:gcloud scheduler jobs create http workstation-pool-increaser-cron \ --http-method=POST \ --location=us-central1 \ --schedule="0 9 * * 1-5" \ --time-zone="America/Los_Angeles" \ --headers "Content-Type=application/json" \ --message-body='{"cluster":"$CLUSTER", "region":"$REGION", "pool-size": "2"}' \ --uri=$SERVICE_URL \ --oidc-service-account-email=$SERVICE_ACCOUNT_NAME@$PROJECT_ID.iam.gserviceaccount.com這項指令會排定工作,在
WorkstationCluster$CLUSTER 中,將所有WorkstationConfigs的「快速入門集區大小」從週一到週五的太平洋標準時間上午 9 點,增加至 2。詳情請參閱設定工作時間表一文。
同樣地,如要在工作日結束時將工作站設定的集區大小縮減為 0,請執行下列指令:
gcloud scheduler jobs create http workstation-pool-decreaser-cron \
    --http-method=POST \
    --location=$REGION \
    --schedule="0 17 * * 1-5" \
    --time-zone="America/Los_Angeles" \
    --headers "Content-Type=application/json" \
    --message-body='{"cluster":"$CLUSTER", "region":"$REGION", "pool-size": "0"}' \
    --uri=$SERVICE_URL \
    --oidc-service-account-email=$SERVICE-ACCOUNT@$PROJECT_ID.iam.gserviceaccount.com
選用:驗證工作
如要確保工作正常運作,可以驗證工作。
前往 Google Cloud 控制台的「Cloud Scheduler」頁面。
workstation-pool-increaser-cron應該會顯示在工作清單中。在
workstation-pool-increaser-cron工作的資料列中,依序按一下「 Actions」(動作) >「Force a job run」(強制執行工作)。在專案中建立的第一項工作可能需要幾分鐘的時間才能執行。
如果在「Status of last execution」(上次執行狀態) 欄中看到
Success狀態,表示工作執行成功。
如要確認工作站設定已更新,請按照下列步驟操作: