Cloud Workstations 可讓您建立及使用工作站的自訂映像檔。使用自訂映像檔後,建議自動重建自訂映像檔,以便從基本映像檔中提取修正和更新。
在本教學課程中,您將瞭解如何建構自動化管道,確保自訂工作站映像檔包含安全性更新和修補程式。
準備環境
請務必先設定下列環境變數,再繼續操作。
設定要使用的雲端專案的專案 ID:
PROJECT_ID=$PROJECT_ID設定要儲存存放區的 GitHub 使用者名稱:
GITHUB_USER=$GITHUB_ID設定要在程序中使用的
PROJECT_NUMBER和REGION變數:PROJECT_NUMBER=$(gcloud projects describe $PROJECT_ID \ --format='value(projectNumber)') REGION=$REGION在先前的範例中,請將 $REGION 替換為您打算使用的區域名稱,例如
us-central1。如要進一步瞭解可用區域,請參閱「Cloud Workstations 服務據點」。
建立 Artifact Registry 存放區
在本教學課程中,您將使用 Artifact Registry 儲存及掃描映像檔。
使用下列指令建立存放區:
gcloud artifacts repositories create custom-images \
      --repository-format=docker \
      --location=$REGION \
      --description="Docker repository"
將 $REGION 替換成您打算使用的區域名稱。
將 Docker 設定為存取 Artifact Registry 時使用
gcloudCLI 憑證。gcloud auth configure-docker $REGION-docker.pkg.dev如要關閉構件分析功能,請執行下列指令:
gcloud services disable containerscanning.googleapis.com
設定 GitHub 存放區
在實務上,您會將自訂映像檔的 Dockerfile 保存在 Git 存放區中。自動化程序會在建構程序期間存取該存放區,以提取相關設定和 Dockerfile。
為範例存放區建立分支
如要分叉提供容器定義的範例存放區,請按照下列步驟操作:
- 按一下這個連結,即可建立
software-delivery-workshop存放區的新分叉。 - 如果系統提示,請登入 GitHub。
- 選取您的 GitHub 使用者名稱做為擁有者。存放區名稱會顯示為「
software-delivery-workshop」。 - 按一下「建立分叉」,然後等待幾秒鐘,讓程序完成。
將 Cloud Build 連線至 GitHub
接著,使用內建的 GitHub 連線功能,將該存放區連結至 Cloud Build。按一下 GitHub 存放區的連結,然後按照操作說明完成程序。您不需要在精靈的最後一個步驟中建立觸發程序,而且可以略過最後幾個步驟,因為您稍後可以從指令列執行這項操作。
如果您使用其他 Git 存放區解決方案,也可以按照將 Cloud Build 連結至 GitLab 或 Bitbucket 的操作說明進行。
建立 Cloud Build 觸發條件
範例存放區包含容器定義和 Cloud Build 設定,用於建構容器映像檔。在這個步驟中,您會建立 Cloud Build 觸發條件,執行 labs/cloudbuild-scheduled-jobs/code-oss-java 資料夾中的 cloudbuild.yaml 檔案內的操作說明。
gcloud builds triggers create manual \
    --name=custom-image-trigger \
    --repo=$GITHUB_USER/software-delivery-workshop \
    --repo-type=GITHUB \
    --branch=main \
    --build-config=labs/cloudbuild-scheduled-jobs/code-oss-java/cloudbuild.yaml \
    --substitutions=_REGION=$REGION,_AR_REPO_NAME=custom-images,_AR_IMAGE_NAME=code-oss-java,_IMAGE_DIR=labs/cloudbuild-scheduled-jobs/code-oss-java

TRIGGER_ID=$(gcloud builds triggers list \
    --filter=name="custom-image-trigger" --format="value(id)")
這個範例會設定下列項目:
gcloudCLI 指令會在 Cloud Build 中建立名為custom-image-trigger的手動觸發程序,如第二行的name標記所示。- 接下來的三行包含與來源 GitHub 存放區相關的標記:
- 存放區路徑
- 存放區類型
- 要建構的 Git 分支版本
build-config標記表示 Git 存放區中 Cloud Build 檔案的路徑。如要讓工作成為動態工作,請使用
substitutions旗標。這項作業的指令會傳遞下列變數:- 區域,
$_REGION - Artifact Registry 存放區名稱,
$_AR_REPO_NAME - 容器映像檔名稱,
$_AR_IMAGE_NAME - 要建構的 Dockerfile 位置,
$_IMAGE_DIR
查看 cloudbuild.yaml 檔案,瞭解程序中如何使用這些變數。
- 區域,
建立觸發程序後,系統會擷取觸發程序的專屬名稱,並儲存在
$TRIGGER_ID環境變數中,以供日後使用。
設定 Cloud Scheduler
為確保映像檔能取得最新更新和修補程式,請使用 Cloud Scheduler 以固定頻率執行 Cloud Build 觸發程序。在本教學課程中,這項工作每天都會執行。實務上,請根據貴機構的需求設定頻率,確保一律納入最新更新。
將必要角色授予預設服務帳戶,以叫用 Cloud Build 觸發條件:
gcloud projects add-iam-policy-binding $PROJECT_ID \
    --member="serviceAccount:$PROJECT_NUMBER-compute@developer.gserviceaccount.com" \
    --role="roles/cloudbuild.builds.editor"
將必要角色授予 Cloud Build 服務帳戶,以便將映像檔上傳至 Artifact Registry:
gcloud projects add-iam-policy-binding $PROJECT_ID \
    --member=serviceAccount:$PROJECT_NUMBER@cloudbuild.gserviceaccount.com \
    --role="roles/artifactregistry.admin"
使用下列指令建立 Cloud Scheduler 工作:
gcloud scheduler jobs create http run-build \
    --schedule='0 1 * * *' \
    --uri=https://cloudbuild.googleapis.com/v1/projects/$PROJECT_ID/locations/global/triggers/$TRIGGER_ID:run \
    --location=us-central1 \
    --oauth-service-account-email=$PROJECT_NUMBER-compute@developer.gserviceaccount.com \
    --oauth-token-scope=https://www.googleapis.com/auth/cloud-platform
這項工作設定為每天執行一次,但如要立即測試這項功能,請從 Cloud Scheduler 手動執行工作:
- 在「Cloud Scheduler」頁面中,找出您剛建立的項目,名為「run-build」。
- 在「動作」欄中,按一下該列的「更多」more_vert選項選單。
- 按一下「強制執行工作」手動測試系統。
指令順利執行後,請切換至 Cloud Build 歷史記錄頁面,查看進度:
查看結果
由於您在設定過程中啟用了 Container Scanning API,Artifact Registry 會自動掃描映像檔,找出安全漏洞。
如要查看安全漏洞,請按照下列步驟操作:
開啟 Artifact Registry 存放區頁面:
在存放區清單中,按一下存放區。
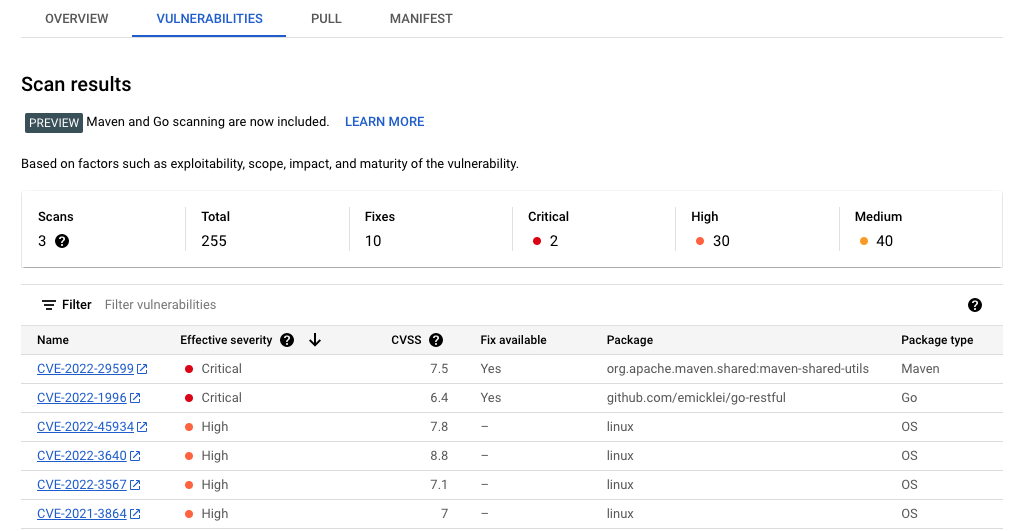
按一下圖片名稱。每個映像檔摘要的安全漏洞總數會顯示在「Vulnerabilities」(安全漏洞) 資料欄中。

如要查看映像檔的安全漏洞清單,請按一下「Vulnerabilities」(安全漏洞) 資料欄中的連結。安全漏洞清單會顯示嚴重性、修正可用性以及內含安全漏洞的套件名稱。