コマンドラインを使用して画像内のラベルを検出する
このページでは、REST インターフェースと curl コマンドを使用して、Vision API に 3 つの特徴検出リクエストとアノテーション リクエストを送信する方法について説明します。
Vision API を使用すると、Google の視覚認識技術をデベロッパーのアプリケーションに簡単に統合できます。Vision API に画像データと目的特徴タイプを送信すると、目的の画像属性に基づく対応するレスポンスが返されます。利用可能な特徴タイプの詳細については、Vision API のすべての機能の一覧をご覧ください。
始める前に
- Sign in to your Google Cloud account. If you're new to Google Cloud, create an account to evaluate how our products perform in real-world scenarios. New customers also get $300 in free credits to run, test, and deploy workloads.
-
Install the Google Cloud CLI.
-
外部 ID プロバイダ(IdP)を使用している場合は、まず連携 ID を使用して gcloud CLI にログインする必要があります。
-
gcloud CLI を初期化するには、次のコマンドを実行します。
gcloud init -
Create or select a Google Cloud project.
-
Create a Google Cloud project:
gcloud projects create PROJECT_ID
Replace
PROJECT_IDwith a name for the Google Cloud project you are creating. -
Select the Google Cloud project that you created:
gcloud config set project PROJECT_ID
Replace
PROJECT_IDwith your Google Cloud project name.
-
-
Verify that billing is enabled for your Google Cloud project.
-
Enable the Vision API:
gcloud services enable vision.googleapis.com
-
Grant roles to your user account. Run the following command once for each of the following IAM roles:
roles/storage.objectViewergcloud projects add-iam-policy-binding PROJECT_ID --member="user:USER_IDENTIFIER" --role=ROLE
Replace the following:
PROJECT_ID: your project ID.USER_IDENTIFIER: the identifier for your user account—for example,myemail@example.com.ROLE: the IAM role that you grant to your user account.
-
Install the Google Cloud CLI.
-
外部 ID プロバイダ(IdP)を使用している場合は、まず連携 ID を使用して gcloud CLI にログインする必要があります。
-
gcloud CLI を初期化するには、次のコマンドを実行します。
gcloud init -
Create or select a Google Cloud project.
-
Create a Google Cloud project:
gcloud projects create PROJECT_ID
Replace
PROJECT_IDwith a name for the Google Cloud project you are creating. -
Select the Google Cloud project that you created:
gcloud config set project PROJECT_ID
Replace
PROJECT_IDwith your Google Cloud project name.
-
-
Verify that billing is enabled for your Google Cloud project.
-
Enable the Vision API:
gcloud services enable vision.googleapis.com
-
Grant roles to your user account. Run the following command once for each of the following IAM roles:
roles/storage.objectViewergcloud projects add-iam-policy-binding PROJECT_ID --member="user:USER_IDENTIFIER" --role=ROLE
Replace the following:
PROJECT_ID: your project ID.USER_IDENTIFIER: the identifier for your user account—for example,myemail@example.com.ROLE: the IAM role that you grant to your user account.
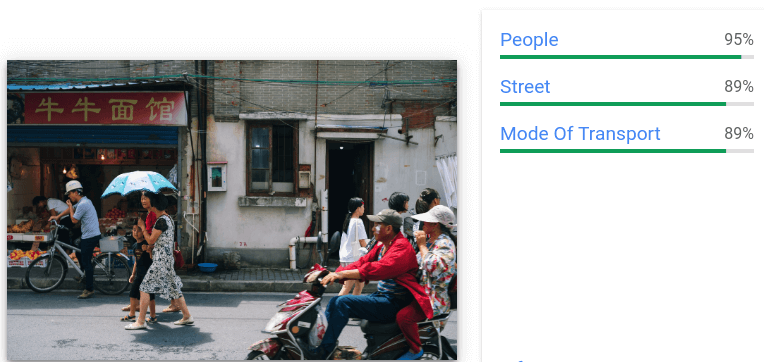
- 3 つの
labelAnnotationsの結果 - 1 つの
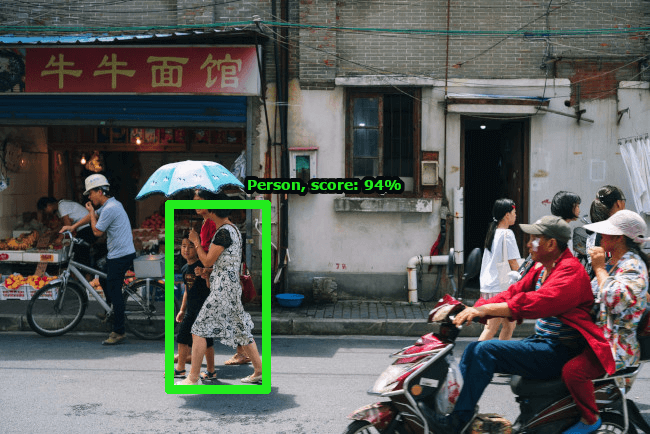
textAnnotationsの結果(わかりやすくするため短縮しています) - 1 つの
localizedObjectAnnotationsの結果 - 説明: 「人物」、スコア: 0.950
- 説明: 「通り」、スコア: 0.891
- 説明: 「交通手段」、スコア: 0.890
- テキスト: 牛牛面馆\n
- 頂点: (x: 159、y: 212)、(x: 947、y: 212)、(x: 947、y: 354)、(x: 159、y: 354)
- 名前: 「人物」、スコア: 0.944
- 正規化された頂点: (x: 0.260、y: 0.468)、(x: 0.407、y: 0.468)、(x: 0.407、y: 0.895)、(x: 0.260、y: 0.895)
-
Optional: Revoke credentials from the gcloud CLI.
gcloud auth revoke
画像アノテーション リクエストを作成する
始める前にの手順を完了すると、Vision API を使用して画像ファイルにアノテーションを付けられるようになります。
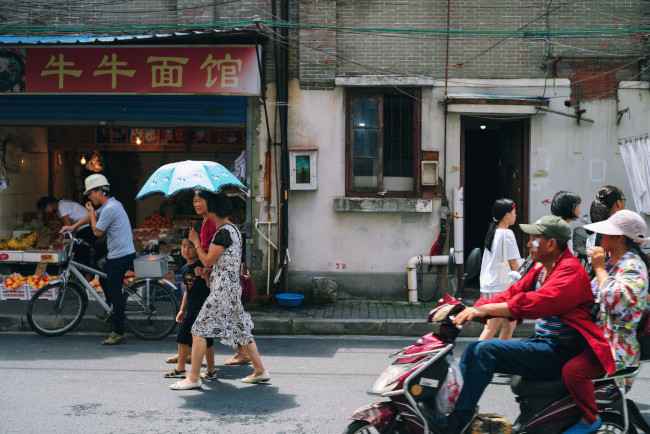
この例では、次の画像で curl を使用して Vision API にリクエストを送信します。
Cloud Storage URI:
gs://cloud-samples-data/vision/using_curl/shanghai.jpeg
HTTPS URL:
https://console.cloud.google.com/storage/browser/cloud-samples-data/vision/using_curl/shanghai.jpeg
JSON リクエストを作成する
次の request.json ファイルでは、3 つの images:annotate 機能をリクエストする方法と、レスポンスの結果を制限する方法について説明します。
次のテキストを含む JSON リクエスト ファイルを作成し、作業ディレクトリに request.json 書式なしテキスト ファイルとして保存します。
request.json
{
  "requests": [
    {
      "image": {
        "source": {
          "imageUri": "gs://cloud-samples-data/vision/using_curl/shanghai.jpeg"
        }
      },
      "features": [
        {
          "type": "LABEL_DETECTION",
          "maxResults": 3
        },
        {
          "type": "OBJECT_LOCALIZATION",
          "maxResults": 1
        },
        {
          "type": "TEXT_DETECTION",
          "maxResults": 1,
          "model": "builtin/latest"
        }
      ]
    }
  ]
}
リクエストを送信する
request.json の curl と本文のコンテンツを使用して、リクエストを Vision API に送信します。コマンドラインで次のように入力します。
curl -X POST \
    -H "Authorization: Bearer $(gcloud auth print-access-token)" \
    -H "x-goog-user-project: PROJECT_ID" \
    -H "Content-Type: application/json; charset=utf-8" \
    https://vision.googleapis.com/v1/images:annotate -d @request.json
レスポンスを解釈する
以下のような JSON レスポンスが表示されます。
各アノテーション型に maxResults が指定された JSON 本文のリクエスト。したがって、レスポンスの JSON には次のようになります。
ラベル検出の結果
テキスト検出の結果

オブジェクト検出の結果
これで完了です。Vision API への最初のリクエストを送信しました。
クリーンアップ
このページで使用したリソースについて、 Google Cloud アカウントに課金されないようにするには、リソースを含む Google Cloud プロジェクトを削除します。