Vertex AI Vision は、動画 データの取り込み、分析、保存に使用できる AI を活用したプラットフォームです。Vertex AI Vision を使用すると、AI アプリケーションを構築してデプロイできます。Vertex AI Vision の他のプロダクト コンポーネントとの統合を活用して、エンドツーエンドの Vertex AI Vision ソリューションを構築できます。
Vertex AI Vision プラットフォームを使用してソリューションの実装を開始するには、次の Vertex AI Vision のコンセプトとコンポーネントを確認してください。
ストリーム: ソリューションの動画ストリーミング レイヤを表します。ストリーム ソースは、ライブ動画(IP カメラなど)または動画ファイル(MP4 ファイルなど)にできます。
アプリケーション: ストリームと AI プロセッサ間の接続を有効にして、動画に対して ML オペレーションを実行します。たとえば、カメラ ストリームを、カメラの前を通り過ぎる人の数をカウントする AI モデルに接続できます。
メディア ウェアハウス: ストリームによって取り込まれた動画をGoogle Cloud ストレージに保存します。この宛先にデータを保存すると、取り込まれたストリームのデータで使用される AI プロセッサから分析出力とメタデータをクエリできます。
ストリームの作成
ストリーミング動画分析アプリを作成するには、まずストリーム リソースを作成して登録する必要があります。ユーザーから動画データを受信するリソースとして、Vertex AI Vision を使用して構築するシナリオではストリームが必要です。コンソール
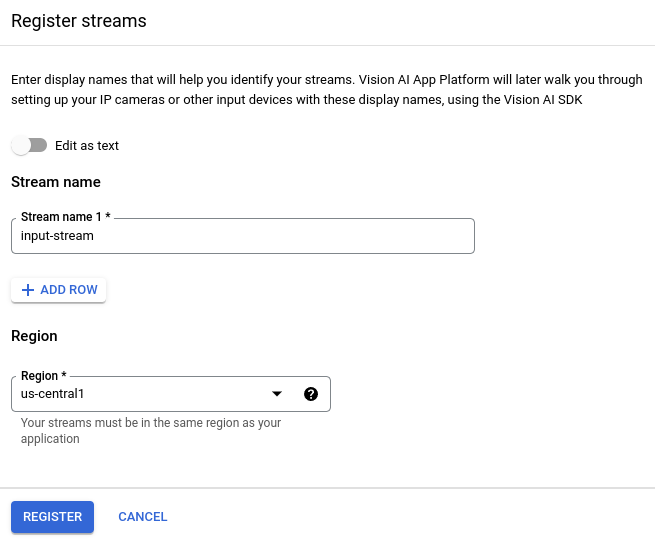
Google Cloud コンソールで新しいストリームを作成する手順は次のとおりです。
Vertex AI Vision ダッシュボードの [ストリーム] タブを開きます。
[登録] をクリックします。
ストリーム名として
input-streamを入力し、ストリームを作成するリージョンを選択します。[登録] をクリックして、1 つ以上のストリームを作成します。
動画をストリームに取り込む
ストリーム リソースを作成したら、vaictl コマンドライン ツールを使用して動画データをストリームに送信できます。
IP カメラ
ライブ IP カメラを使用してテストする場合は、カメラの IP アドレスを取得する必要があります。この情報は、他の変数置換とともにリクエストで指定する必要があります。
- PROJECT_ID: 実際の Google Cloud プロジェクト ID。
- LOCATION_ID: ロケーション ID。例:
us-central1。詳細については、クラウドのロケーションをご覧ください。 - RTSP_ADDRESS: リアルタイム ストリーミング プロトコル(RTSP)フィードのアドレス。例:
rtsp://192.168.1.180:540。
このコマンドは、RTSP フィードをストリームに送信します。このコマンドは、RTSP フィードに直接アクセスできるネットワークで実行する必要があります。
vaictl -p PROJECT_ID \
       -l LOCATION_ID \
       -c application-cluster-0 \
       --service-endpoint visionai.googleapis.com \
send rtsp to streams input-stream --rtsp-uri RTSP_ADDRESS
コマンドが正常に実行されると、次の出力が表示されます。
[...]
Waiting for long running operation projects/your-project/locations/us-central1/operations/operation-1651364156981-5dde82db7e4a9-dfb17ca5-1051eb20 ⠙
I20220430 21:16:28.024988 211449 gstvaisink.cc:417] cluster-id=application-cluster-0
I20220430 21:16:28.025032 211449 gstvaisink.cc:418] cluster-endpoint=c8khq35ftg78mn61ef50.us-central1.visionai.goog
I20220430 21:16:28.025040 211449 gstvaisink.cc:419] event-id=ev-1651364114183255223
I20220430 21:16:28.025048 211449 gstvaisink.cc:420] stream-id=input-stream
I20220430 21:16:28.025053 211449 gstvaisink.cc:421] series-id=ev-1651364114183255223--input-stream
I20220430 21:16:28.025060 211449 gstvaisink.cc:422] Sending data
ローカル動画ファイル
ライブ動画フィードではなく、ストリームに動画ファイルデータを送信することもできます。このオプションは、IP カメラにアクセスできない場合に便利です。
このオプションの唯一の違いは、vaictl コマンド パラメータです。IP カメラの情報を渡す代わりに、ローカル動画ファイルのパスを渡します。次の変数を置き換えます。
- PROJECT_ID: 実際の Google Cloud プロジェクト ID。
- LOCATION_ID: ロケーション ID。例:
us-central1。詳細 - LOCAL_FILE.EXT: ローカル動画ファイルのファイル名。例:
my-video.mp4 --loopフラグ: 省略可。ファイルデータをループしてストリーミングをシミュレートします。
このコマンドは、動画ファイルをストリームにストリーミングします。--loop フラグを使用すると、コマンドを停止するまで動画がストリームにループされます。
vaictl -p PROJECT_ID \
       -l LOCATION_ID \
       -c application-cluster-0 \
       --service-endpoint visionai.googleapis.com \
send video-file to streams 'input-stream' --file-path LOCAL_FILE.EXT --loop
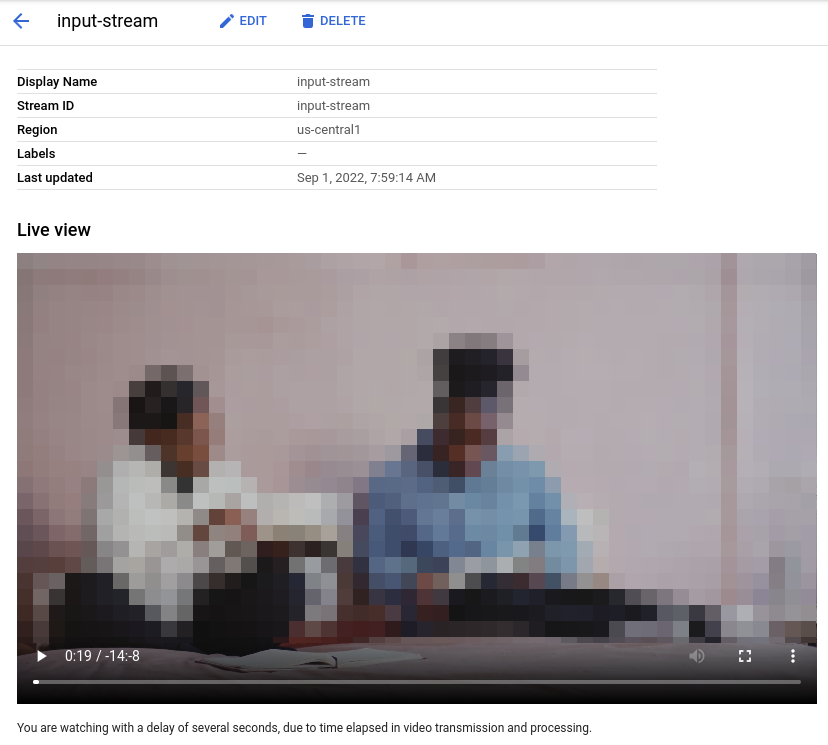
vaictl 取り込みオペレーションの開始から動画がダッシュボードに表示されるまで、約 100 秒かかることがあります。
ストリームの取り込みが完了すると、Vertex AI Vision ダッシュボードの [ストリーム] タブで input-stream ストリームを選択して、動画フィードを確認できます。
顔のぼかしアプリを作成する
ストリームを作成してストリームにデータを取り込んだら、データを処理する Vertex AI Vision アプリを作成します。アプリは、次のものを接続する自動化されたパイプラインと考えることができます。
- データの取り込み: 動画フィードがストリームに取り込まれます。
- データ分析: 取り込み後に AI モデルを追加できます。取り込まれた動画情報に対して、任意のコンピュータ ビジョン オペレーションを実行できます。
- データ ストレージ: 2 つのバージョンの動画フィード(元のストリームと AI モデルで処理されたストリーム)をメディア ウェアハウスに保存できます。
Google Cloud コンソールでは、アプリはグラフとして表されます。また、Vertex AI Vision では、アプリグラフに少なくとも 2 つのノード(動画ソースノード(ストリーム)と、少なくとも 1 つのノード(処理モデルまたは出力先))が必要です。
空のアプリケーションを作成する
アプリグラフにデータを入力する前に、まず空のアプリを作成する必要があります。コンソール
Google Cloud コンソールでアプリを作成します。
Vertex AI Vision ダッシュボードの [アプリケーション] タブを開きます。
[作成] ボタンをクリックします。
アプリ名として「
person-blur-app」と入力し、地域を選択します。[作成] をクリックします。
![UI の [新しいアプリを作成] ダイアログ](https://cloud-dot-devsite-v2-prod.appspot.com/static/vision-ai/docs/images/create-empty-app.png?hl=ja)
アプリ コンポーネント ノードを追加する
空のアプリケーションを作成したら、次の 3 つのノードをアプリグラフに追加できます。
- 取り込みノード: データをすでに取り込んでいるストリーム リソース。
- 処理ノード: 取り込まれたデータに対して動作する人物ぼかしモデル。
- ストレージ ノード: 処理済みの動画を保存し、メタデータ ストアとしても機能するメディア ウェアハウス。このウェアハウスでは、取り込まれた動画データに関する分析情報を生成できるほか、AI モデルによってデータについて推論された情報も保存できます。
コンソール
コンソールでアプリにコンポーネント ノードを追加します。
Vertex AI Vision ダッシュボードの [アプリケーション] タブを開きます。
person-blur-app行で、グラフを表示を選択します。これで、処理パイプラインのグラフ ビジュアリゼーションが表示されます。
データ取り込みノードを追加する
入力ストリーム ノードを追加するには、サイドメニューの [コネクタ] セクションで [ストリーム] オプションを選択します。
[ストリーム] メニューの [ソース] セクションで、[ストリームを追加] を選択します。
[ストリームを追加] メニューで、 [既存のストリームから選択] を選択し、ストリーム リソースのリストから
person-blur-appを選択します。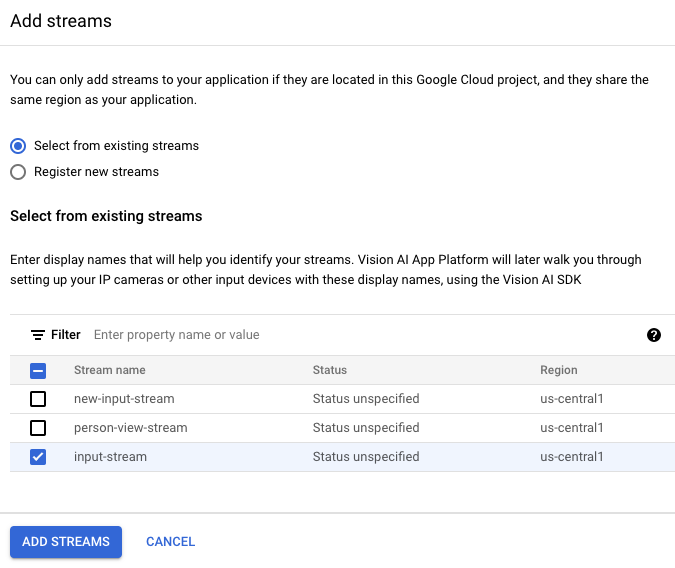
ストリームをアプリグラフに追加するには、[ストリームを追加] をクリックします。
データ処理ノードを追加する
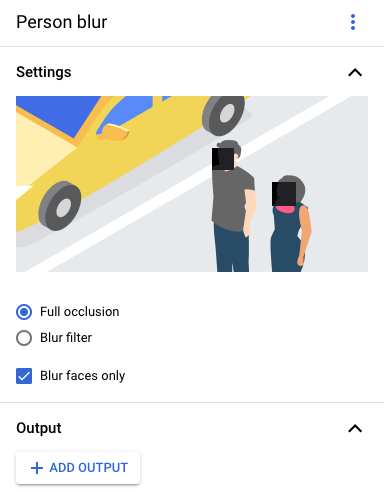
人物ぼかしモデルノードを追加するには、サイドメニューの [一般的なプロセッサ] セクションで [人物ぼかし] オプションを選択します。
表示された [人物のぼかし] オプション メニューで、完全なオクルージョンをオンのままにして、顔のみをぼかすオプションを有効にします。
データ ストレージ ノードを追加する
出力先(ストレージ)ノードを追加するには、サイドメニューの [コネクタ] セクションで [Vertex AI Vision の Media Warehouse] オプションを選択します。
[Vertex AI Vision のメディア ウェアハウス] メニューで、[ウェアハウスを接続] をクリックします。
[ウェアハウスを接続] メニューで、[新しいウェアハウスを作成] を選択します。ウェアハウスに
person-blur-appという名前を付け、TTL の期間を 14 日のままにします。ウェアハウスを追加するには、[作成] をクリックします。

アプリケーションのデプロイ
必要なコンポーネントをすべて使用してエンドツーエンドのアプリを構築したら、アプリを使用するための最後のステップとして、アプリをデプロイします。コンソール
Vertex AI Vision ダッシュボードの [アプリケーション] タブを開きます。
リスト内の
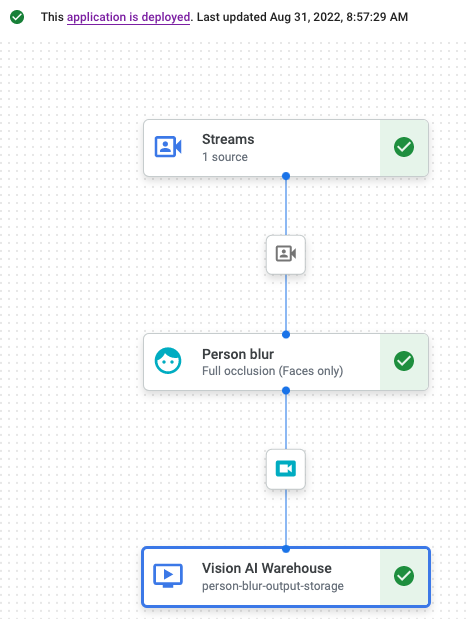
person-blur-appアプリの横にある [グラフを表示] を選択します。アプリケーション グラフ ビルダーのページで、 [デプロイ] ボタンをクリックします。
次の確認ダイアログで、[デプロイ] を選択します。
デプロイ オペレーションが完了するまでに数分かかることがあります。デプロイが完了すると、ノードの横に緑色のチェックマークが表示されます。
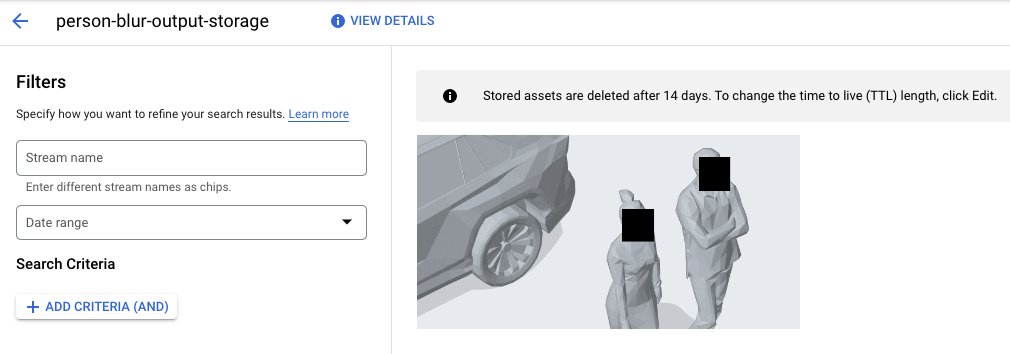
処理された出力データを表示する
コンソール
Vertex AI Vision ダッシュボードの [ウェアハウス] タブを開きます。
リストで
person-blur-output-storageウェアハウスを見つけて、アセットを表示をクリックします。