App in der Console erstellen
Hier erfahren Sie, wie Sie eine einfache Vertex AI Vision-Anwendung zur Objekterkennung in derGoogle Cloud Console erstellen.
Eine detaillierte Anleitung dazu finden Sie direkt in der Google Cloud Console. Klicken Sie dazu einfach auf Anleitung:
Hinweise
- Sign in to your Google Cloud account. If you're new to Google Cloud, create an account to evaluate how our products perform in real-world scenarios. New customers also get $300 in free credits to run, test, and deploy workloads.
-
In the Google Cloud console, on the project selector page, select or create a Google Cloud project.
Roles required to select or create a project
- Select a project: Selecting a project doesn't require a specific IAM role—you can select any project that you've been granted a role on.
-
Create a project: To create a project, you need the Project Creator
(
roles/resourcemanager.projectCreator), which contains theresourcemanager.projects.createpermission. Learn how to grant roles.
-
Verify that billing is enabled for your Google Cloud project.
-
Enable the Vision AI API.
Roles required to enable APIs
To enable APIs, you need the Service Usage Admin IAM role (
roles/serviceusage.serviceUsageAdmin), which contains theserviceusage.services.enablepermission. Learn how to grant roles. -
In the Google Cloud console, on the project selector page, select or create a Google Cloud project.
Roles required to select or create a project
- Select a project: Selecting a project doesn't require a specific IAM role—you can select any project that you've been granted a role on.
-
Create a project: To create a project, you need the Project Creator
(
roles/resourcemanager.projectCreator), which contains theresourcemanager.projects.createpermission. Learn how to grant roles.
-
Verify that billing is enabled for your Google Cloud project.
-
Enable the Vision AI API.
Roles required to enable APIs
To enable APIs, you need the Service Usage Admin IAM role (
roles/serviceusage.serviceUsageAdmin), which contains theserviceusage.services.enablepermission. Learn how to grant roles. Öffnen Sie den Tab Anwendungen des Vertex AI Vision-Dashboards.
Klicken Sie auf die Schaltfläche Erstellen.
Geben Sie
quickstart-appals App-Namen ein und wählen Sie Ihre Region aus.Klicken Sie auf Erstellen.
Öffnen Sie den Tab Anwendungen des Vertex AI Vision-Dashboards.
Wählen Sie in der Zeile
quickstart-appdie Option Diagramm ansehen aus. Sie gelangen dann zur grafischen Darstellung der Verarbeitungspipeline.Wenn Sie einen Knoten für den Eingabestream hinzufügen möchten, wählen Sie im seitlichen Menü im Abschnitt Connectors die Option Streams aus.
Wählen Sie im Abschnitt Quelle des sich öffnenden Menüs Stream die Option Streams hinzufügen aus.
Wählen Sie im Menü Streams hinzufügen die Option Neue Streams registrieren aus und fügen Sie
quickstart-streamals Streamname hinzu.Klicken Sie auf Streams hinzufügen, um den Stream dem App-Diagramm hinzuzufügen.
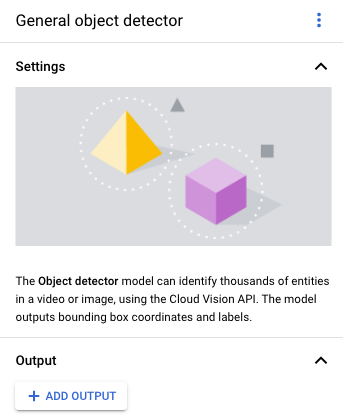
Wenn Sie den Modellknoten für den Objektdetektor hinzufügen möchten, wählen Sie im seitlichen Menü im Abschnitt Vortrainierte Modelle die Option Objektdetektor aus.
Wählen Sie im Abschnitt Connectors des seitlichen Menüs die Option Media Warehouse von Vertex AI Vision aus, um den Knoten für den Ausgabespeicherort (Speicher) hinzuzufügen.
Klicken Sie im Menü Media Warehouse von Vertex AI Vision auf Warehouse verbinden.
Wählen Sie im Menü Warehouse verbinden die Option Neues Warehouse erstellen aus. Geben Sie dem Warehouse den Namen
quickstart-warehouseund belassen Sie die TTL-Dauer bei 14 Tagen.Klicken Sie auf die Schaltfläche Erstellen, um das Warehouse hinzuzufügen.
Öffnen Sie den Tab Anwendungen des Vertex AI Vision-Dashboards.
Wählen Sie in der Liste neben der
quickstart-appApp Grafik ansehen aus.Klicken Sie auf der Seite „Application Graph Builder“ (Tool zum Erstellen von Anwendungsdiagrammen) auf die Schaltfläche Deploy (Bereitstellen).
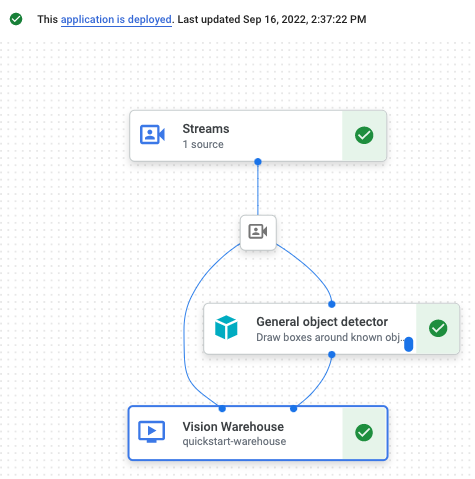
Wählen Sie im Bestätigungsdialogfeld Bereitstellen aus.
Die Bereitstellung kann mehrere Minuten dauern. Nach Abschluss der Bereitstellung werden neben den Knoten grüne Häkchen angezeigt.
- In the Google Cloud console, go to the Manage resources page.
- In the project list, select the project that you want to delete, and then click Delete.
- In the dialog, type the project ID, and then click Shut down to delete the project.
- In the Google Cloud console, go to the Warehouses page.
-
Locate
your
quickstart-warehousewarehouse. - To delete the warehouse, click Actions, click Delete warehouse, and then follow the instructions.
- In the Google Cloud console, go to the Streams page.
-
Locate
your
quickstart-streamstream. - To delete the stream, click Actions, click Delete stream, and then follow the instructions.
- In the Google Cloud console, go to the Applications page.
-
Locate
your
quickstart-appapp. - To delete the app, click Actions, click Delete application, and then follow the instructions.
- Lesen Sie Projekt und Entwicklungsumgebung einrichten, bevor Sie die Befehlszeilentools verwenden.
- Weitere Informationen zum Aufnehmen von Daten in Ihre neue Anwendung und zu anderen Komponenten, die Sie unter Anwendung erstellen hinzufügen können.
- Weitere Informationen zu anderen Ausgabespeicher- und Verarbeitungsoptionen finden Sie unter Anwendungsausgabe mit einem Datenziel verbinden.
- Informationen zum Suchen von Warehouse-Daten in der Konsole
- Weitere Informationen zu Verantwortungsbewusste KI-Praktiken.
Anwendung zur Objekterkennung erstellen
Nachdem Sie Ihre Umgebung eingerichtet haben, können Sie Ihre App erstellen.
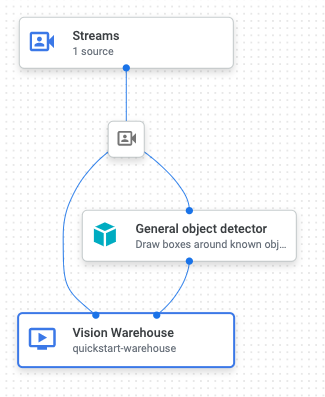
In der Google Cloud -Konsole wird eine App als Diagramm dargestellt. Außerdem muss ein App-Diagramm in Vertex AI Vision mindestens zwei Knoten haben: einen Videobronnenknoten (Stream) und mindestens einen weiteren Knoten (ein Verarbeitungsmodell oder ein Ausgabeziel).
Leere Anwendung erstellen
Bevor Sie den App-Graphen mit Daten füllen können, müssen Sie zuerst eine leere App erstellen.
Konsole
Erstellen Sie eine App in der Google Cloud Console.
Knoten für Anwendungskomponenten hinzufügen
Nachdem Sie die leere Anwendung erstellt haben, können Sie dem App-Diagramm die drei Knoten hinzufügen: den Aufnahmeknoten, der Streamdaten empfangen kann, den Verarbeitungsknoten, der eine Aufgabe für Computerbilder für Daten ausführt, und einen Datensenkenknoten, in diesem Beispiel ein Warehouse-Speicherziel.
Konsole
Fügen Sie Ihrer App in der Konsole Knoten für Komponenten hinzu.
Knoten für die Datenaufnahme hinzufügen
Knoten zur Datenverarbeitung hinzufügen
Datenspeicherknoten hinzufügen
Anwendung zur Verwendung bereitstellen
Nachdem Sie Ihre End-to-End-App mit allen erforderlichen Komponenten erstellt haben, müssen Sie sie nur noch bereitstellen, um sie verwenden zu können.Konsole
Glückwunsch! Sie haben gerade Ihre erste Vertex AI Vision-App erstellt und bereitgestellt. Das Erstellen und Bereitstellen einer App sind die ersten Schritte zum Aufnehmen und Verwenden verarbeiteter Mediendaten mit Vertex AI Vision.
Bereinigen
Damit Ihrem Google Cloud-Konto die in dieser Kurzanleitung verwendeten Ressourcen nicht in Rechnung gestellt werden, können Sie entweder das Projekt löschen, das die Ressourcen enthält, oder das Projekt beibehalten und die einzelnen Ressourcen löschen.