AutoML Translation API is deprecated and will no longer be available on Google Cloud after September 30, 2025. The functionality and management of custom models is available through Cloud Translate API - Advanced (v3).
Stay organized with collections
Save and categorize content based on your preferences.
Create a custom translation model
This page shows you how to train and use a custom AutoML
translation model by using the Google Cloud console. The following example trains a
custom English-to-Spanish translation model by using technology-oriented
sentence pairs from software localization.
Before you begin
Go to the AutoML Translation page
and select your project from the drop-down list. You must have at least
roles/editor access to the project. The AutoML
documentation walks you through
setting up a project and granting the necessary permissions.
Create a translation dataset and import sentence pairs
Download the archive
file containing the sample data for training the model, and extract the file
en-es.tsv.
Select the project for which you enabled AutoML Translation.
Click the Create Dataset button.
On the Create dataset page, enter a name for the dataset and
select the source and target languages.
When you select English as the Translate from language, the available Translate to languages
appear. Select Spanish.
Click Create.
On the Import tab for your dataset, do the following:
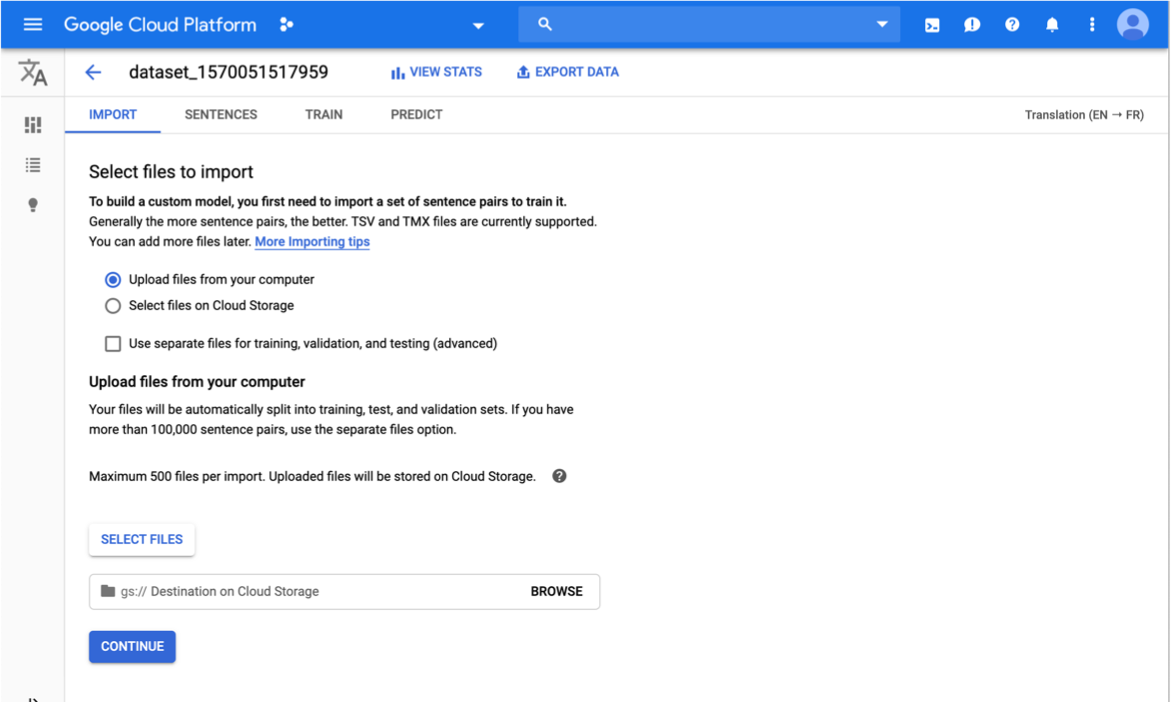
Select Upload files from your computer,
click Select Files, and choose the en-es.tsv file you
downloaded previously.
When choosing files from local, you must specify the
Cloud Storage path
where the uploaded files are to be stored. The Cloud Storage
bucket region must be us-central1.
Click Continue.
You're returned to the Datasets page; your dataset will show an in progress
animation while your documents are being imported. When your dataset has been
successfully uploaded, you will receive a message at the email address that you
used to sign up for the program.
Review the dataset.
After your data has been successfully imported, select the dataset from the
dataset listing page (or click the link in the email notification) to see
the details about the dataset. The name of the
selected dataset appears in the title bar, and the page lists the sentence pairs
and which stage of processing they will be used for (TRAIN, VALIDATION, TEST).
Train an AutoML translation model
To begin training your custom model, click the Train tab just below the
title bar, then the Start Training button.
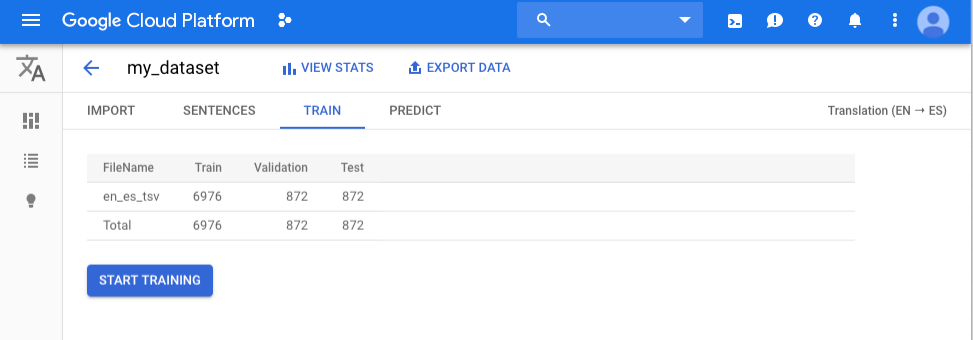
Training a model can take several hours to complete. After the model is
successfully trained, you will receive a message at the email address you used
to sign up for the program.
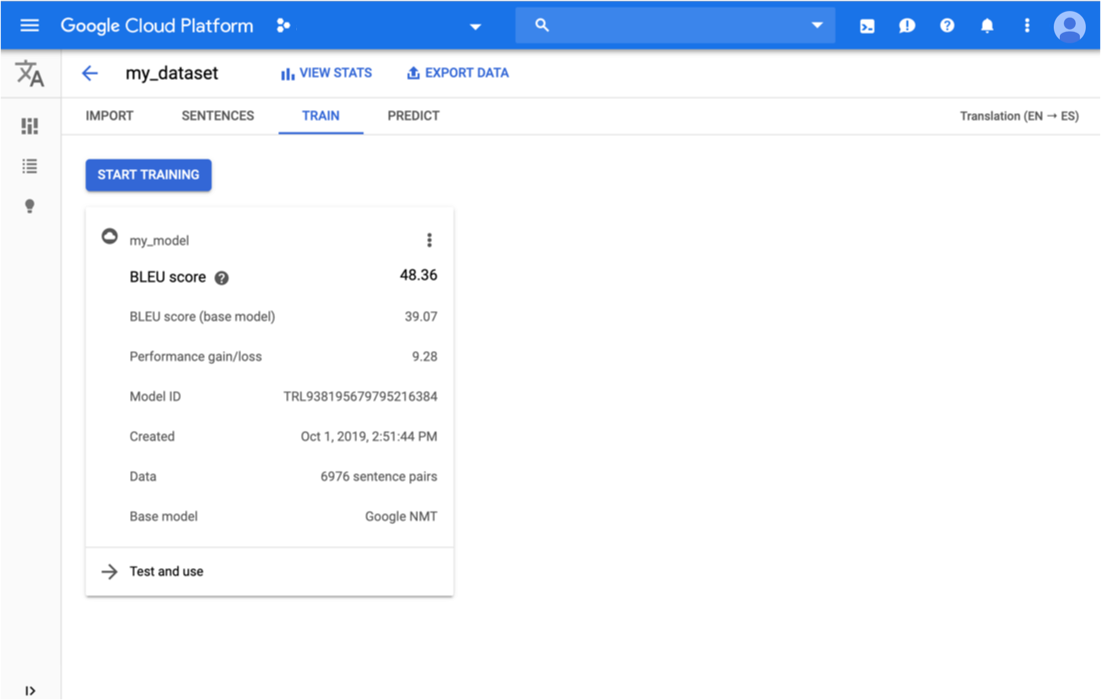
When you receive notification that training is complete, open the email message
and click the link to go to the Google Cloud console. The Train
page shows high-level metrics for the model, most notably its BLEU score. The
BLEU (Bilingual Evaluation Understudy)
score indicates how similar the candidate text is to the reference
texts, with values closer to one representing more similar texts.
Use the AutoML translation model
Click the Predict tab just below the title bar or the Test and use link
below the model information. Enter some text to translate and click the
Translate button. You can compare the results from your custom model to the
Google NMT model.
Clean up
To avoid incurring charges to your Google Cloud account for
the resources used on this page, follow these steps.
To avoid unnecessary Google Cloud charges, use the
Google Cloud console to delete your project if you do not need it.
[[["Easy to understand","easyToUnderstand","thumb-up"],["Solved my problem","solvedMyProblem","thumb-up"],["Other","otherUp","thumb-up"]],[["Hard to understand","hardToUnderstand","thumb-down"],["Incorrect information or sample code","incorrectInformationOrSampleCode","thumb-down"],["Missing the information/samples I need","missingTheInformationSamplesINeed","thumb-down"],["Other","otherDown","thumb-down"]],["Last updated 2025-08-28 UTC."],[],[],null,["# Quickstart: Create a custom translation model\n\nCreate a custom translation model\n=================================\n\n\n| **Note** : AutoML Translation capabilities are offered by both the AutoML API and the Cloud Translation - Advanced API. We recommend that you use the Cloud Translation - Advanced API to create datasets and models because future enhancements apply only to the Cloud Translation - Advanced API. For more information, see [Upgrade AutoML\n| resources](/translate/docs/advanced/automl-upgrade).\n\n\u003cbr /\u003e\n\nThis page shows you how to train and use a custom AutoML\ntranslation model by using the Google Cloud console. The following example trains a\ncustom English-to-Spanish translation model by using technology-oriented\nsentence pairs from software localization.\n\nBefore you begin\n----------------\n\nGo to the [AutoML Translation](https://console.cloud.google.com/translation) page\nand select your project from the drop-down list. You must have at least\n**roles/editor** access to the project. The AutoML\n[documentation](/translate/automl/docs/before-you-begin) walks you through\nsetting up a project and granting the necessary permissions.\n\nCreate a translation dataset and import sentence pairs\n------------------------------------------------------\n\n1. [Download](/static/translate/automl/docs/sample/automl-translation-data.zip) the archive\n file containing the sample data for training the model, and extract the file\n `en-es.tsv`.\n\n2. Go to the [AutoML Translation](https://console.cloud.google.com/translation) console page.\n\n3. Select the project for which you enabled AutoML Translation.\n\n4. Click the **Create Dataset** button.\n\n5. On the **Create dataset** page, enter a name for the dataset and\n select the source and target languages.\n\n When you select **English** as the **Translate from** language, the available **Translate to** languages\n appear. Select **Spanish**.\n6. Click **Create**.\n\n7. On the **Import** tab for your dataset, do the following:\n\n - Select **Upload files from your computer** , click **Select Files** , and choose the `en-es.tsv` file you downloaded previously.\n - When choosing files from local, you must specify the Cloud Storage path where the uploaded files are to be stored. The Cloud Storage bucket region must be `us-central1.`\n8. Click **Continue**.\n\n You're returned to the **Datasets** page; your dataset will show an in progress\n animation while your documents are being imported. When your dataset has been\n successfully uploaded, you will receive a message at the email address that you\n used to sign up for the program.\n9. Review the dataset.\n\n After your data has been successfully imported, select the dataset from the\n dataset listing page (or click the link in the email notification) to see\n the details about the dataset. The name of the\n selected dataset appears in the title bar, and the page lists the sentence pairs\n and which stage of processing they will be used for (**TRAIN, VALIDATION, TEST**).\n\nTrain an AutoML translation model\n---------------------------------\n\nTo begin training your custom model, click the **Train** tab just below the\ntitle bar, then the **Start Training** button.\n\nTraining a model can take several hours to complete. After the model is\nsuccessfully trained, you will receive a message at the email address you used\nto sign up for the program.\n\nWhen you receive notification that training is complete, open the email message\nand click the link to go to the Google Cloud console. The **Train**\npage shows high-level metrics for the model, most notably its BLEU score. The\n[BLEU (Bilingual Evaluation Understudy)](/translate/automl/docs/evaluate#bleu)\nscore indicates how similar the candidate text is to the reference\ntexts, with values closer to one representing more similar texts.\n\nUse the AutoML translation model\n--------------------------------\n\nClick the **Predict** tab just below the title bar or the **Test and use** link\nbelow the model information. Enter some text to translate and click the\n**Translate** button. You can compare the results from your custom model to the\nGoogle NMT model.\n\nClean up\n--------\n\n\nTo avoid incurring charges to your Google Cloud account for\nthe resources used on this page, follow these steps.\n\nTo avoid unnecessary Google Cloud charges, use the\n[Google Cloud console](https://console.cloud.google.com/) to delete your project if you do not need it.\n\nWhat's next\n-----------\n\n- When you're ready to create your own dataset to create an AutoML Translation model, [read the instructions on how to prepare your data](/translate/automl/docs/prepare)."]]