Mit Sammlungen den Überblick behalten
Sie können Inhalte basierend auf Ihren Einstellungen speichern und kategorisieren.
Deployment Manager-basierte Lösung erstellen
Beim Erstellen von Service Catalog-Lösungen für Nutzer in Ihrer Organisation können Sie eine Lösung für Deployment Manager (DM) erstellen, die Nutzer mit einer Deployment Manager-Vorlage starten. Nachdem Sie eine Lösung erstellt haben, können Sie sie für Ihre Nutzer freigeben, indem Sie sie Katalogen hinzufügen.
Hinweise
Sie benötigen die Rolle Katalogadministrator (roles/cloudprivatecatalogproducer.admin) ODERKatalogverwaltung (roles/cloudprivatecatalogproducer.manager) für die Google CloudOrganisation, die mit dem Google Cloud Projekt verknüpft ist, für das Service Catalog aktiviert ist. Wenn Sie diese Rolle nicht haben, wenden Sie sich an den Organisationsadministrator, um Zugriff anzufordern.
Enable the Cloud Deployment Manager and Compute Engine APIs.
Zum Erstellen einer Deployment Manager-Lösung in Service Catalog müssen Sie zuerst eine ZIP-Datei der Deployment Manager-Vorlage erstellen. Diese muss folgende Dateien enthalten:
Eine Jinja-Vorlagendateiendung in der Erweiterung .jinja oder eine Python-Vorlagendateiendung in der Erweiterung .py.
Eine Schemadatei mit der Erweiterung .jinja.schema für eine Jinja-Vorlage oder der Erweiterung py.schema für eine Python-Vorlage.
Der Name der ZIP-Datei muss mit den Namen der Schema- und Jinja- oder Python-Dateien übereinstimmen. Wenn die ZIP-Datei beispielsweise den Namen android-dev-environment.zip hat, muss die Jinja-Schemadatei innerhalb der ZIP-Datei den Namen android-dev-environment.jinja.schema und die Jinja-Vorlage den Namen android-dev-environment.jinja haben.
Im folgenden Codebeispiel ist eine Schemadatei zum Erstellen eines Bereitstellungsformulars zu sehen:
info:title:Single Google Compute Engine Machineauthor:Google Inc.description:Creates a virtual machine based on zone and machine type selection.required:-machinetype-zoneproperties:machinetype:title:Machine typetype:stringenum:-n2-standard-2-n2-standard-4-n2-standard-8-n2-highmem-2-n2-highmem-4-n2-highmem-8-n2-highcpu-2-n2-highcpu-4-n2-highcpu-8zone:title:Zonetype:stringenum:-us-central1-a-us-central1-c-us-east1-b-us-east1-c-us-west1-a-us-west1-b-us-west1-c
Im folgenden Codebeispiel wird eine Jinja-Datei zum Erstellen einer nichtflüchtigen VM dargestellt:
# Creates a Persistent VMresources:-type:compute.v1.instancename:vm-{{ env["deployment"] }}properties:zone:{{properties["zone"]}}# Note the machineType definition at the end. n2-custom-4-5120 specifies n2 machine family with 4 CPUs and 5GB (5120 MB) of RAM. For custom machine types, refer to https://cloud.google.com/compute/docs/instances/creating-instance-with-custom-machine-typemachineType:https://www.googleapis.com/compute/v1/projects/{{ env["project"] }}/zones/{{ properties["zone"] }}/machineTypes/{{ properties["machinetype"] }}disks:-deviceName:boottype:PERSISTENTboot:trueautoDelete:trueinitializeParams:diskName:disk-{{ env["deployment"] }}sourceImage:https://www.googleapis.com/compute/v1/projects/debian-cloud/global/images/family/debian-9networkInterfaces:-network:https://www.googleapis.com/compute/v1/projects/{{ env["project"] }}/global/networks/default# Access Config required to give the instance a public IP addressaccessConfigs:-name:External NATtype:ONE_TO_ONE_NAT
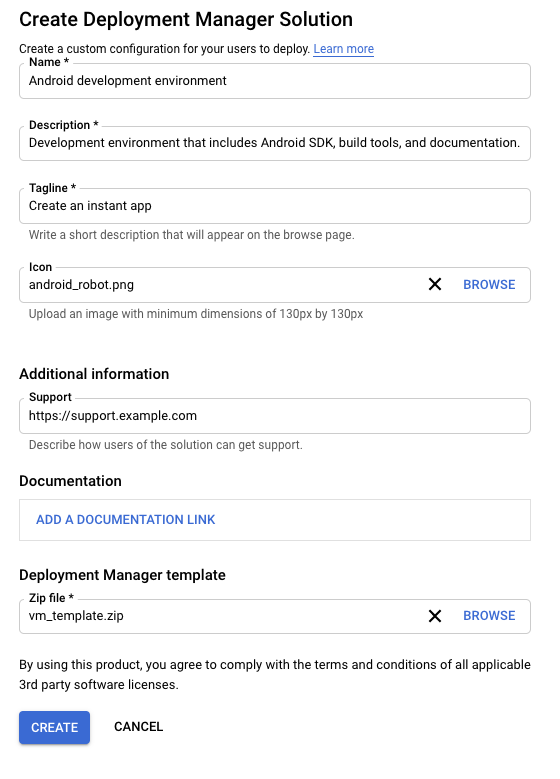
Lösung in Service Catalog erstellen
So erstellen Sie eine auf Deployment Manager basierende Lösung:
Klicken Sie auf Auswählen, um das Google Cloud Projekt auszuwählen.
Klicken Sie auf Lösung erstellen. Wählen Sie in der Drop-down-Liste DM-Lösung erstellen aus.
Geben Sie einen Namen, eine Beschreibung und eine Kurzbeschreibung ein. Die Kurzinfo ist eine kurze Beschreibung einer Lösung, die Nutzer beim Suchen in Service Catalog sehen.
[[["Leicht verständlich","easyToUnderstand","thumb-up"],["Mein Problem wurde gelöst","solvedMyProblem","thumb-up"],["Sonstiges","otherUp","thumb-up"]],[["Schwer verständlich","hardToUnderstand","thumb-down"],["Informationen oder Beispielcode falsch","incorrectInformationOrSampleCode","thumb-down"],["Benötigte Informationen/Beispiele nicht gefunden","missingTheInformationSamplesINeed","thumb-down"],["Problem mit der Übersetzung","translationIssue","thumb-down"],["Sonstiges","otherDown","thumb-down"]],["Zuletzt aktualisiert: 2025-09-04 (UTC)."],[],[],null,["# Creating a Deployment Manager-based solution\n============================================\n\nWhen creating Service Catalog solutions for users in your organization, you can\ncreate a Deployment Manager (DM) solution, which users launch\nusing a Deployment Manager template. After you create a solution,\nyou can share it with your users by adding it to [catalogs](/service-catalog/docs/create-catalog).\n| **Note:** We recommend [creating a Terraform configuration](/service-catalog/docs/terraform-configuration) to take advantage of the open-source infrastructure as code software tool.\n\nBefore you begin\n----------------\n\n- You must have the [Catalog Admin](/service-catalog/docs/access-control#instance_admin_role)\n (`roles/cloudprivatecatalogproducer.admin`) *OR*\n [Catalog Manager](/service-catalog/docs/access-control#catalog_manager_role)\n (`roles/cloudprivatecatalogproducer.manager`) role for the Google Cloud\n organization associated with the Google Cloud project which has\n Service Catalog enabled. If you don't have this role, contact your\n Organization Administrator to request access.\n\n\n-\n\n\n Enable the Cloud Deployment Manager and Compute Engine APIs.\n\n\n [Enable the APIs](https://console.cloud.google.com/flows/enableapi?apiid=deploymentmanager,compute_component)\n\nPreparing your deployment template\n----------------------------------\n\nTo create a Deployment Manager solution in Service Catalog,\nyou first prepare a [Deployment Manager template](https://cloud.google.com/deployment-manager/docs/configuration/templates/create-basic-template)\nzip file to upload, which must contain the following files:\n\n- A Jinja template file ending in the `.jinja` extension or a Python template file ending in the `.py` extension.\n- A [schema file](/deployment-manager/docs/configuration/templates/using-schemas) ending in the `.jinja.schema` extension for a Jinja template or the `py.schema` extension for a Python template.\n\nThe name of the zip file must match the names of both the schema and Jinja or\nPython files. For example, if the zip file is named\n`android-dev-environment.zip`, the Jinja schema file inside the zip must be\nnamed `android-dev-environment.jinja.schema` and the Jinja template must be\nnamed `android-dev-environment.jinja`.\n\nThe following code sample illustrates a schema file to create a deployment form: \n\n\n\n info:\n title: Single Google Compute Engine Machine\n author: Google Inc.\n description: Creates a virtual machine based on zone and machine type selection.\n\n required:\n - machinetype\n - zone\n\n properties:\n machinetype:\n title: Machine type\n type: string\n enum:\n - n2-standard-2\n - n2-standard-4\n - n2-standard-8\n - n2-highmem-2\n - n2-highmem-4\n - n2-highmem-8\n - n2-highcpu-2\n - n2-highcpu-4\n - n2-highcpu-8\n zone:\n title: Zone\n type: string\n enum:\n - us-central1-a\n - us-central1-c\n - us-east1-b\n - us-east1-c\n - us-west1-a\n - us-west1-b\n - us-west1-c\n\nThe following code sample illustrates a Jinja file to create a persistent VM: \n\n\n\n # Creates a Persistent VM\n resources:\n - type: compute.v1.instance\n name: vm-{{ env[\"deployment\"] }}\n properties:\n zone: {{ properties[\"zone\"] }}\n # Note the machineType definition at the end. n2-custom-4-5120 specifies n2 machine family with 4 CPUs and 5GB (5120 MB) of RAM. For custom machine types, refer to https://cloud.google.com/compute/docs/instances/creating-instance-with-custom-machine-type\n machineType: https://www.googleapis.com/compute/v1/projects/{{ env[\"project\"] }}/zones/{{ properties[\"zone\"] }}/machineTypes/{{ properties[\"machinetype\"] }}\n disks:\n - deviceName: boot\n type: PERSISTENT\n boot: true\n autoDelete: true\n initializeParams:\n diskName: disk-{{ env[\"deployment\"] }}\n sourceImage: https://www.googleapis.com/compute/v1/projects/debian-cloud/global/images/family/debian-9\n networkInterfaces:\n - network: https://www.googleapis.com/compute/v1/projects/{{ env[\"project\"] }}/global/networks/default\n # Access Config required to give the instance a public IP address\n accessConfigs:\n - name: External NAT\n type: ONE_TO_ONE_NAT\n\nCreating the solution in Service Catalog\n----------------------------------------\n\nTo create a Deployment Manager template-based solution:\n\n1. Go to the Service Catalog Admin [**Solutions** page](https://console.cloud.google.com/catalog/admin/solutions) in the Google Cloud console.\n\n [Go to the Solutions page](https://console.cloud.google.com/catalog/admin/solutions)\n\n2. Click **Select** to choose the Google Cloud project.\n\n3. Click **CREATE SOLUTION** . In the drop-down list, select **Create a DM\n solution**.\n\n4. Enter a name, description, and tagline for your solution. The tagline\n is a short description of a solution that users see as they browse\n Service Catalog.\n\n5. Upload a zip file, containing the files for a deployment\n [configuration](/deployment-manager/docs/configuration).\n\n6. Optionally, upload an icon for the solution. The recommended dimensions for\n an icon are 80 by 80 pixels.\n\n7. Optionally, enter a support link and contact information for the creator.\n\n8. Optionally, add a link to the documentation for the solution.\n\n9. Click **CREATE**.\n\nThe following screenshot illustrates creating a DM-based solution:\n\nNext steps\n----------\n\n- [Assign the solution](/service-catalog/docs/assign-solutions) to a catalog, so that users in your organization can access and deploy the solution."]]