您可以使用 Cloud Data Loss Prevention API 偵測圖片中的機密文字和物件,然後取得遮蓋後的圖片。在傳回的圖片中,系統會以不透明的矩形遮蓋偵測到的機密資料元素。您可以使用 infoType 偵測工具,指定要偵測及遮蓋的資訊類型。
根據預設,Sensitive Data Protection 會使用黑色矩形遮蓋已遮蓋的內容,但您可以在圖片遮蓋設定中,為每個 infoType 指定顏色。
遮蓋文字
Sensitive Data Protection 會使用物件字元辨識 (OCR) 技術偵測圖片中的文字。您可以在圖片中遮蓋下列內容:
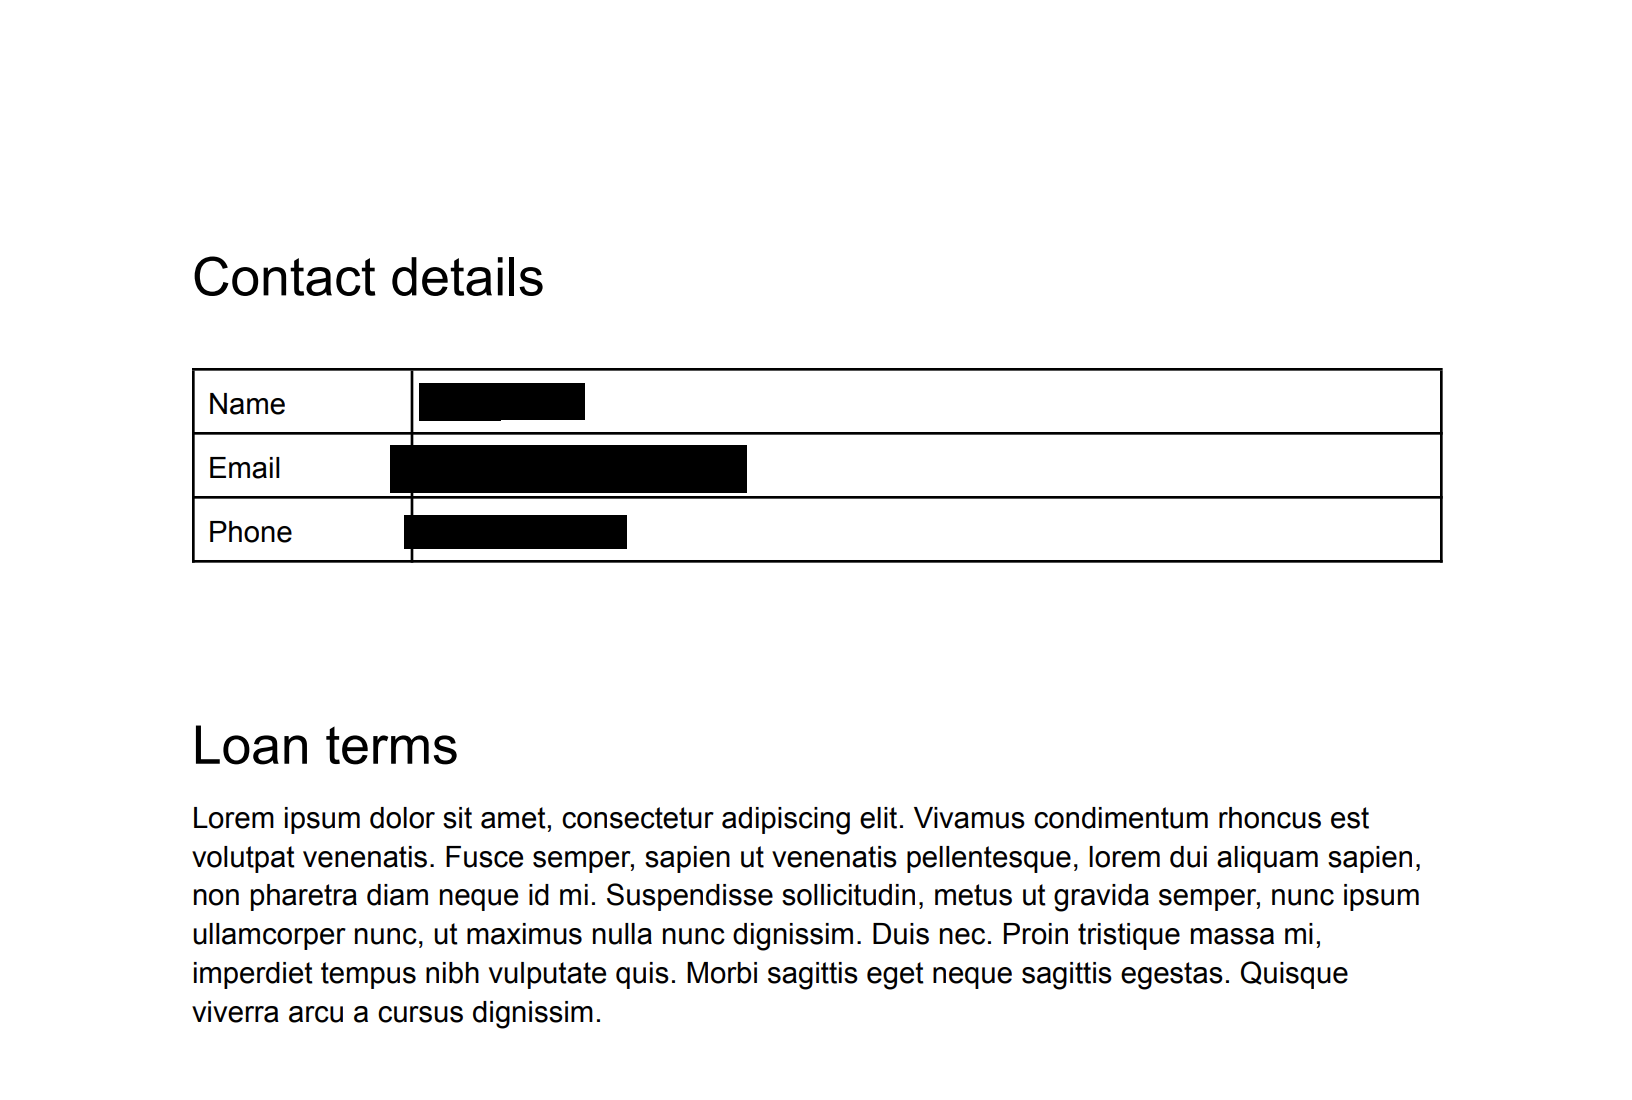
舉例來說,請參考以下圖片。原始圖片是含有聯絡資訊的文件。在本範例中,Sensitive Data Protection 已設定為遮蓋符合 PERSON_NAME、EMAIL_ADDRESS 和 PHONE_NUMBER infoType 的任何文字。產生的圖片會以黑色矩形遮蓋偵測到的機密文字。

物件遮蓋
您可以設定 Sensitive Data Protection,遮蓋通常含有私密/機密資訊的物件。
舉例來說,請參考以下圖片。原始圖片是 AI 生成的圖片,包含條碼、車牌和白板。在本範例中,Sensitive Data Protection 已設定為遮蓋符合 OBJECT_TYPE/BARCODE、OBJECT_TYPE/LICENSE_PLATE 和 OBJECT_TYPE/WHITEBOARD infoType 的物件。系統會以彩色矩形遮蓋偵測到的敏感物件,系統會為每個 infoType 指派一種顏色。
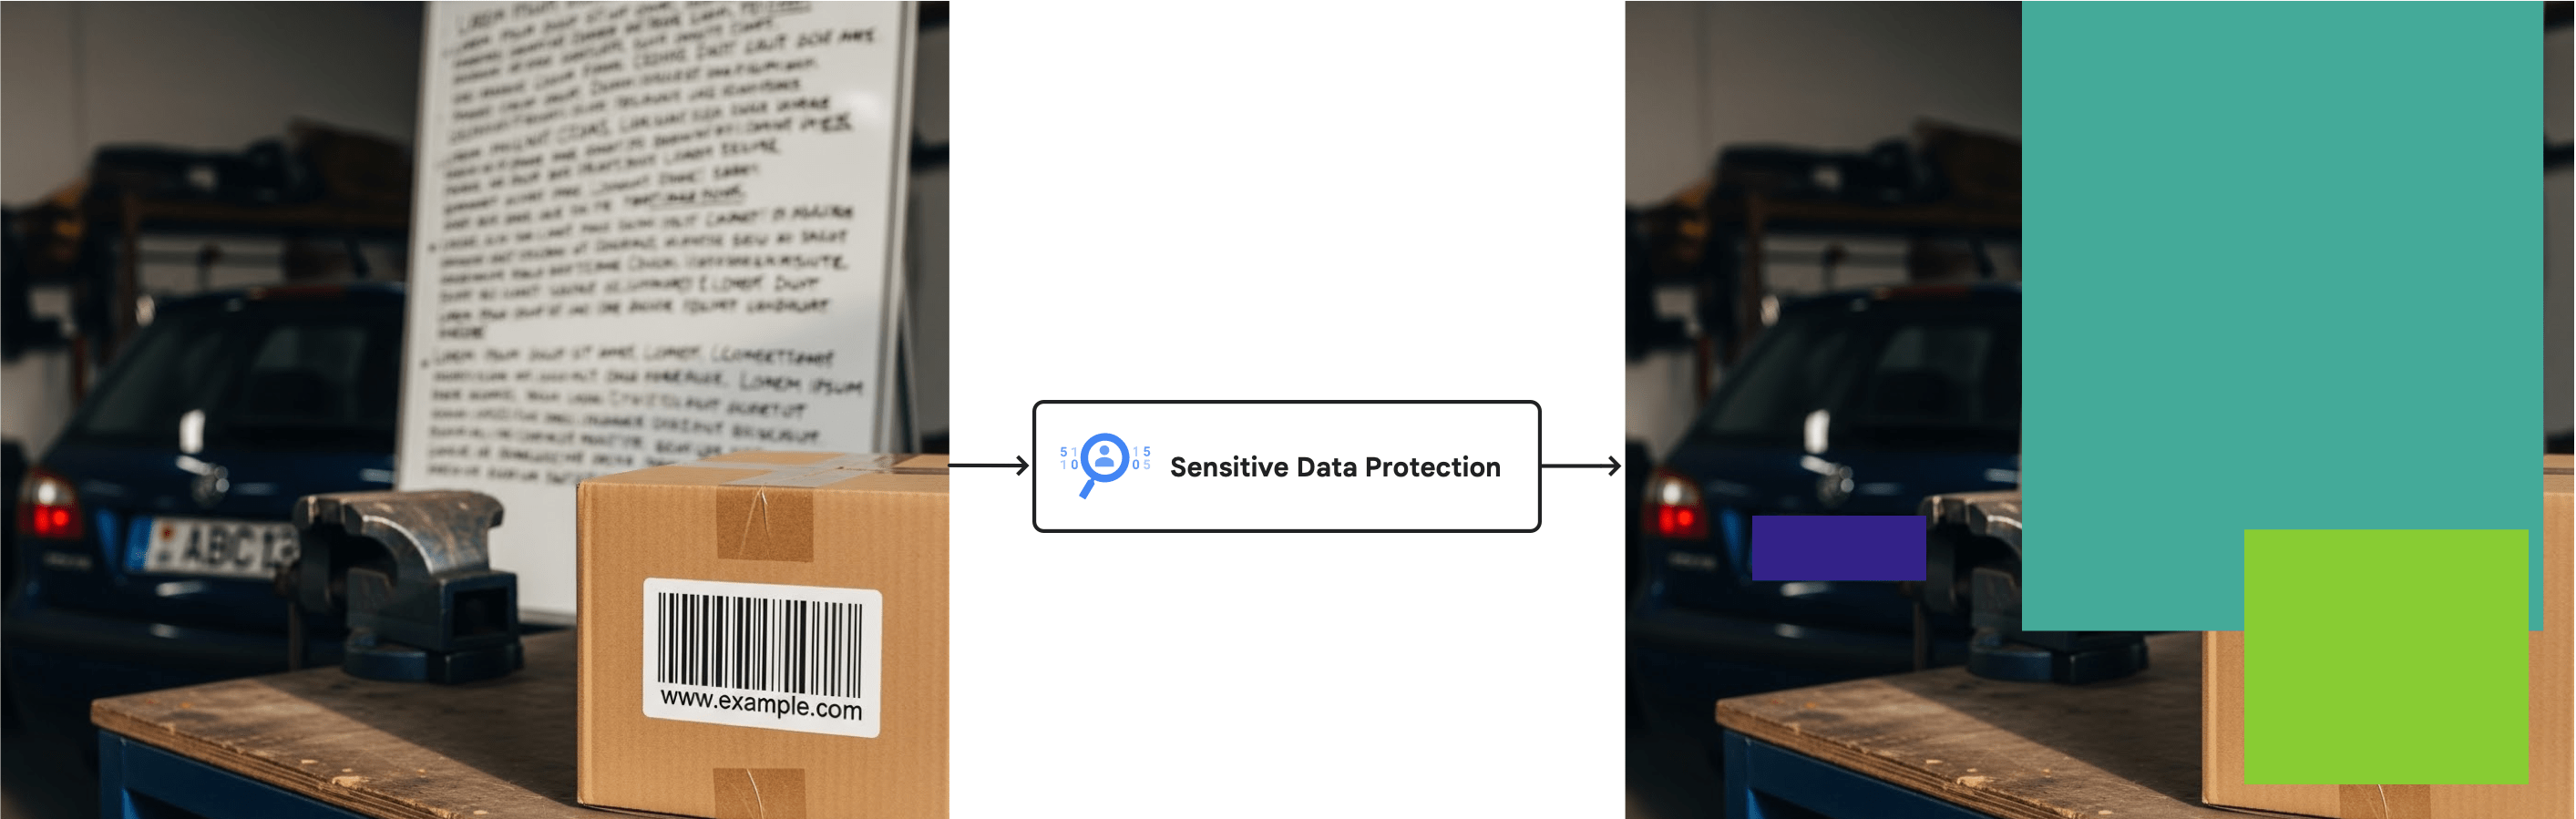
如需可用的物件 infoType 偵測工具完整清單,請參閱「圖像中的物件」。
限制和注意事項
從圖片中遮蓋內容時,請注意下列事項。
支援的檔案類型
Sensitive Data Protection 可以遮蓋多種圖片類型中的機密資料,包括 JPEG、BMP 和 PNG。詳情請參閱「支援的檔案類型」。
內容遮蓋功能不支援 SVG、PDF、XLSX、PPTX 或 DOCX 檔案。
檢查設定限制
從圖片中遮蓋資料時,您無法在檢查設定中加入 limits。如果設定限制,系統可能只會遮蓋部分資料,導致結果與預期不符或不一致。如果您在要求中設定 limits 欄位,Sensitive Data Protection 會產生錯誤。
事前準備
開始執行本頁面的工作前,請先設定驗證機制並取得必要的 IAM 權限。您可以使用 Google Cloud使用者帳戶或服務帳戶。無論是哪種情況,請務必確認您使用的帳戶具有serviceusage.services.use權限的角色,例如 DLP 管理員 (roles/dlp.admin)、DLP 使用者 (roles/dlp.user) 或自訂角色。
-
Select the tab for how you plan to use the samples on this page:
C#
如要在本機開發環境中使用本頁的 .NET 範例,請安裝並初始化 gcloud CLI,然後使用使用者憑證設定應用程式預設憑證。
安裝 Google Cloud CLI。
如果您使用外部識別資訊提供者 (IdP),請先 使用聯合身分登入 gcloud CLI。
If you're using a local shell, then create local authentication credentials for your user account:
gcloud auth application-default login
You don't need to do this if you're using Cloud Shell.
If an authentication error is returned, and you are using an external identity provider (IdP), confirm that you have signed in to the gcloud CLI with your federated identity.
詳情請參閱 Google Cloud 驗證說明文件中的「 為本機開發環境設定 ADC」。
Go
如要在本機開發環境中使用本頁的 Go 範例,請安裝並初始化 gcloud CLI,然後使用使用者憑證設定應用程式預設憑證。
安裝 Google Cloud CLI。
如果您使用外部識別資訊提供者 (IdP),請先 使用聯合身分登入 gcloud CLI。
If you're using a local shell, then create local authentication credentials for your user account:
gcloud auth application-default login
You don't need to do this if you're using Cloud Shell.
If an authentication error is returned, and you are using an external identity provider (IdP), confirm that you have signed in to the gcloud CLI with your federated identity.
詳情請參閱 Google Cloud 驗證說明文件中的「 為本機開發環境設定 ADC」。
Java
如要在本機開發環境中使用本頁的 Java 範例,請安裝並初始化 gcloud CLI,然後使用使用者憑證設定應用程式預設憑證。
安裝 Google Cloud CLI。
如果您使用外部識別資訊提供者 (IdP),請先 使用聯合身分登入 gcloud CLI。
If you're using a local shell, then create local authentication credentials for your user account:
gcloud auth application-default login
You don't need to do this if you're using Cloud Shell.
If an authentication error is returned, and you are using an external identity provider (IdP), confirm that you have signed in to the gcloud CLI with your federated identity.
詳情請參閱 Google Cloud 驗證說明文件中的「 為本機開發環境設定 ADC」。
Node.js
如要在本機開發環境中使用本頁的 Node.js 範例,請安裝並初始化 gcloud CLI,然後使用使用者憑證設定應用程式預設憑證。
安裝 Google Cloud CLI。
如果您使用外部識別資訊提供者 (IdP),請先 使用聯合身分登入 gcloud CLI。
If you're using a local shell, then create local authentication credentials for your user account:
gcloud auth application-default login
You don't need to do this if you're using Cloud Shell.
If an authentication error is returned, and you are using an external identity provider (IdP), confirm that you have signed in to the gcloud CLI with your federated identity.
詳情請參閱 Google Cloud 驗證說明文件中的「 為本機開發環境設定 ADC」。
PHP
如要在本機開發環境中使用本頁的 PHP 範例,請安裝並初始化 gcloud CLI,然後使用使用者憑證設定應用程式預設憑證。
安裝 Google Cloud CLI。
如果您使用外部識別資訊提供者 (IdP),請先 使用聯合身分登入 gcloud CLI。
If you're using a local shell, then create local authentication credentials for your user account:
gcloud auth application-default login
You don't need to do this if you're using Cloud Shell.
If an authentication error is returned, and you are using an external identity provider (IdP), confirm that you have signed in to the gcloud CLI with your federated identity.
詳情請參閱 Google Cloud 驗證說明文件中的「 為本機開發環境設定 ADC」。
Python
如要在本機開發環境中使用本頁的 Python 範例,請安裝並初始化 gcloud CLI,然後使用使用者憑證設定應用程式預設憑證。
安裝 Google Cloud CLI。
如果您使用外部識別資訊提供者 (IdP),請先 使用聯合身分登入 gcloud CLI。
If you're using a local shell, then create local authentication credentials for your user account:
gcloud auth application-default login
You don't need to do this if you're using Cloud Shell.
If an authentication error is returned, and you are using an external identity provider (IdP), confirm that you have signed in to the gcloud CLI with your federated identity.
詳情請參閱 Google Cloud 驗證說明文件中的「 為本機開發環境設定 ADC」。
REST
如要在本機開發環境中使用本頁的 REST API 範例,請使用您提供給 gcloud CLI 的憑證。
安裝 Google Cloud CLI。
如果您使用外部識別資訊提供者 (IdP),請先 使用聯合身分登入 gcloud CLI。
詳情請參閱 Google Cloud 驗證說明文件中的「Authenticate for using REST」。
image.redact方法也支援 API 金鑰。 如要使用 API 金鑰進行驗證,不必設定本機應用程式預設憑證檔案。詳情請參閱 請參閱 Google Cloud 驗證說明文件,建立 API 金鑰。如要瞭解如何為正式版環境設定驗證,請參閱 Google Cloud 驗證說明文件中的 Set up Application Default Credentials for code running on Google Cloud。
如要取得檢查、遮蓋及去識別化內容所需的權限,請要求管理員授予專案的 DLP 使用者 (
roles/dlp.user) IAM 角色。如要進一步瞭解如何授予角色,請參閱「管理專案、資料夾和機構的存取權」。遮蓋圖片中的所有預設 infoType
如要遮蓋圖片中的機密資料,請將圖片提交至 DLP API 的
image.redact方法。除非您指定要搜尋的特定資訊類型 (infoTypes),否則 Sensitive Data Protection 會搜尋最常見的 infoType。預設 infoType 不包含圖片中的物件。
如要遮蓋圖片中的預設 infoType,請按照下列步驟操作:
將圖片編碼為 Base64 字串。
如果打算使用其中一個 Sensitive Data Protection 用戶端程式庫執行這項工作,請略過這個步驟。
向
image.redact方法提出要求。如要遮蓋預設的 infoType,要求只需要 base64 編碼的圖片。
舉例來說,請參考以下文件圖片。

原始未編輯圖片 (按一下即可放大)。 如要從這張圖片中遮蓋預設 infoType,請將下列要求傳送至 DLP API 的
image.redact方法:C#
如要瞭解如何安裝及使用 Sensitive Data Protection 的用戶端程式庫,請參閱這篇文章。
如要驗證 Sensitive Data Protection,請設定應用程式預設憑證。 詳情請參閱「為本機開發環境設定驗證」。
Go
如要瞭解如何安裝及使用 Sensitive Data Protection 的用戶端程式庫,請參閱這篇文章。
如要驗證 Sensitive Data Protection,請設定應用程式預設憑證。 詳情請參閱「為本機開發環境設定驗證」。
Java
如要瞭解如何安裝及使用 Sensitive Data Protection 的用戶端程式庫,請參閱這篇文章。
如要驗證 Sensitive Data Protection,請設定應用程式預設憑證。 詳情請參閱「為本機開發環境設定驗證」。
Node.js
如要瞭解如何安裝及使用 Sensitive Data Protection 的用戶端程式庫,請參閱這篇文章。
如要驗證 Sensitive Data Protection,請設定應用程式預設憑證。 詳情請參閱「為本機開發環境設定驗證」。
PHP
如要瞭解如何安裝及使用 Sensitive Data Protection 的用戶端程式庫,請參閱這篇文章。
如要驗證 Sensitive Data Protection,請設定應用程式預設憑證。 詳情請參閱「為本機開發環境設定驗證」。
Python
如要瞭解如何安裝及使用 Sensitive Data Protection 的用戶端程式庫,請參閱這篇文章。
如要驗證 Sensitive Data Protection,請設定應用程式預設憑證。 詳情請參閱「為本機開發環境設定驗證」。
REST
{
  "byteItem": {
    "data": "[BASE64-ENCODED-IMAGE]",
    "type": "IMAGE_PNG"
  }
}
Sensitive Data Protection 會傳回下列項目:
    {
      "redactedImage": "[BASE64-ENCODED-IMAGE]"
    }
解碼 Base64 編碼的圖片。
產生的圖片如下所示:

已遮蓋的圖片,所有 infoType (按一下即可放大)。 請注意,除了遮蓋手寫的身分證字號、電子郵件地址和電話號碼,Sensitive Data Protection 也會遮蓋年份。下一節將示範如何只遮蓋特定 infoType。
遮蓋圖片中的特定 infoType
如要只遮蓋圖片中的特定機密資料,請指定對應的內建 infoType。
如要從圖片中遮蓋特定 infoType,請向 DLP API 的
image.redact方法提交要求。要求必須包含下列資訊:- 圖片。
- 一或多個 infoType 偵測工具。
請參考上一節的原始圖片。如要只遮蓋美國社會安全號碼、電子郵件地址和電話號碼,請將下列 JSON 傳送至 DLP API 的
image.redact方法:C#
如要瞭解如何安裝及使用 Sensitive Data Protection 的用戶端程式庫,請參閱這篇文章。
如要驗證 Sensitive Data Protection,請設定應用程式預設憑證。 詳情請參閱「為本機開發環境設定驗證」。
Go
如要瞭解如何安裝及使用 Sensitive Data Protection 的用戶端程式庫,請參閱這篇文章。
如要驗證 Sensitive Data Protection,請設定應用程式預設憑證。 詳情請參閱「為本機開發環境設定驗證」。
Java
如要瞭解如何安裝及使用 Sensitive Data Protection 的用戶端程式庫,請參閱這篇文章。
如要驗證 Sensitive Data Protection,請設定應用程式預設憑證。 詳情請參閱「為本機開發環境設定驗證」。
Node.js
如要瞭解如何安裝及使用 Sensitive Data Protection 的用戶端程式庫,請參閱這篇文章。
如要驗證 Sensitive Data Protection,請設定應用程式預設憑證。 詳情請參閱「為本機開發環境設定驗證」。
PHP
如要瞭解如何安裝及使用 Sensitive Data Protection 的用戶端程式庫,請參閱這篇文章。
如要驗證 Sensitive Data Protection,請設定應用程式預設憑證。 詳情請參閱「為本機開發環境設定驗證」。
Python
如要瞭解如何安裝及使用 Sensitive Data Protection 的用戶端程式庫,請參閱這篇文章。
如要驗證 Sensitive Data Protection,請設定應用程式預設憑證。 詳情請參閱「為本機開發環境設定驗證」。
REST
    {
      "byteItem": {
        "data": "[BASE64-ENCODED-IMAGE]",
        "type": "IMAGE_PNG"
      },
      "imageRedactionConfigs": [
        {
          "infoType": {
            "name": "PERSON_NAME"
          }
        },
        {
          "infoType": {
            "name": "EMAIL_ADDRESS"
          }
        },
        {
          "infoType": {
            "name": "PHONE_NUMBER"
          }
        }
      ]
    }
Sensitive Data Protection 會傳回下列項目:
    {
      "redactedImage": "[BASE64-ENCODED-IMAGE]"
    }
解碼 Base64 編碼的圖片。
產生的圖片如下所示:
已遮蓋的圖片,三個 infoType (按一下即可放大)。 如要快速瞭解哪些資訊經過遮蓋,可以根據 infoType 為遮蓋資訊設定顏色。詳情請參閱下節。
使用顏色代碼遮蓋圖片中的 infoType
如要依 infoType 為遮蓋資訊加上顏色代碼,請將 infoType 偵測工具與 RGB 色域值配對。
如要使用不同顏色遮蓋圖片中的 infoType,請將要求提交至 DLP API 的
image.redact方法。要求必須包含下列資訊:- 圖片。
- 一或多個 infoType 偵測工具,每個工具都使用 RGB 色域值指派顏色。
請參考第一節中的原始圖片。如要以紫色方塊遮蓋美國身分證字號、以綠色方塊遮蓋電子郵件地址,並以橘色方塊遮蓋電話號碼,請將下列 JSON 傳送至 DLP API 的
image.redact方法:C#
如要瞭解如何安裝及使用 Sensitive Data Protection 的用戶端程式庫,請參閱這篇文章。
如要驗證 Sensitive Data Protection,請設定應用程式預設憑證。 詳情請參閱「為本機開發環境設定驗證」。
Go
如要瞭解如何安裝及使用 Sensitive Data Protection 的用戶端程式庫,請參閱這篇文章。
如要驗證 Sensitive Data Protection,請設定應用程式預設憑證。 詳情請參閱「為本機開發環境設定驗證」。
Java
如要瞭解如何安裝及使用 Sensitive Data Protection 的用戶端程式庫,請參閱這篇文章。
如要驗證 Sensitive Data Protection,請設定應用程式預設憑證。 詳情請參閱「為本機開發環境設定驗證」。
Node.js
如要瞭解如何安裝及使用 Sensitive Data Protection 的用戶端程式庫,請參閱這篇文章。
如要驗證 Sensitive Data Protection,請設定應用程式預設憑證。 詳情請參閱「為本機開發環境設定驗證」。
PHP
如要瞭解如何安裝及使用 Sensitive Data Protection 的用戶端程式庫,請參閱這篇文章。
如要驗證 Sensitive Data Protection,請設定應用程式預設憑證。 詳情請參閱「為本機開發環境設定驗證」。
Python
如要瞭解如何安裝及使用 Sensitive Data Protection 的用戶端程式庫,請參閱這篇文章。
如要驗證 Sensitive Data Protection,請設定應用程式預設憑證。 詳情請參閱「為本機開發環境設定驗證」。
REST
    {
      "byteItem": {
        "data": "[BASE64-ENCODED-IMAGE]",
        "type": "IMAGE_PNG"
      },
      "imageRedactionConfigs": [
        {
          "infoType": {
            "name": "PERSON_NAME"
          },
          "redactionColor": {
            "red": 0.3,
            "green": 0.1,
            "blue": 0.6
          }
        },
        {
          "infoType": {
            "name": "EMAIL_ADDRESS"
          },
          "redactionColor": {
            "red": 0.5,
            "blue": 0.5,
            "green": 1
          }
        },
        {
          "infoType": {
            "name": "PHONE_NUMBER"
          },
          "redactionColor": {
            "red": 1,
            "blue": 0,
            "green": 0.6
          }
        }
      ]
    }
Sensitive Data Protection 會傳回下列項目:
    {
      "redactedImage": "[BASE64-ENCODED-IMAGE]"
    }
解碼 Base64 編碼的圖片。
產生的圖片如下所示:
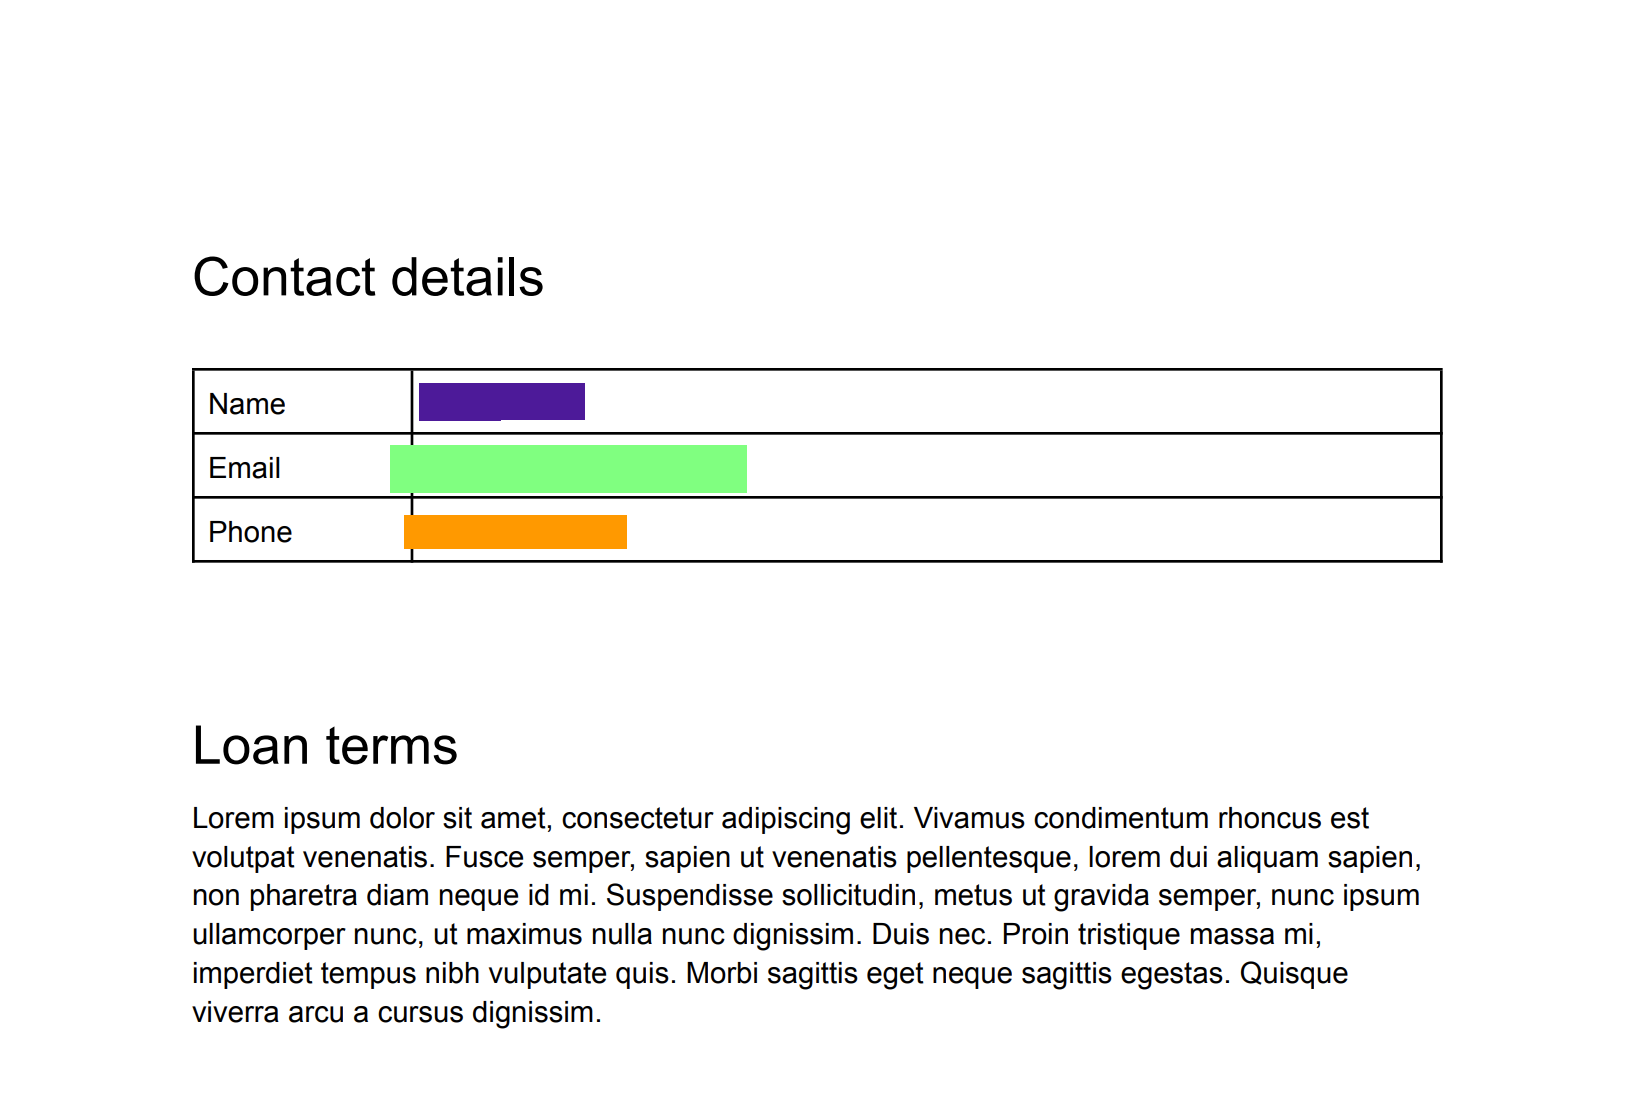
經過編輯的圖片,三種 infoType 以不同顏色標示 (按一下即可放大)。 遮蓋圖片中的所有文字
Sensitive Data Protection 也提供選項,可遮蓋圖片中偵測到的所有文字。
如要從圖片中遮蓋所有文字,請向 DLP API 的
image.redact方法提交要求。要求必須包含下列資訊:- 圖片。
- 「
redactAllText」選項設為true。
請參考第一節中的原始圖片。如要遮蓋所有文字,請將下列 JSON 傳送至 DLP API 的
image.redact方法:C#
如要瞭解如何安裝及使用 Sensitive Data Protection 的用戶端程式庫,請參閱這篇文章。
如要驗證 Sensitive Data Protection,請設定應用程式預設憑證。 詳情請參閱「為本機開發環境設定驗證」。
Go
如要瞭解如何安裝及使用 Sensitive Data Protection 的用戶端程式庫,請參閱這篇文章。
如要驗證 Sensitive Data Protection,請設定應用程式預設憑證。 詳情請參閱「為本機開發環境設定驗證」。
Java
如要瞭解如何安裝及使用 Sensitive Data Protection 的用戶端程式庫,請參閱這篇文章。
如要驗證 Sensitive Data Protection,請設定應用程式預設憑證。 詳情請參閱「為本機開發環境設定驗證」。
Node.js
如要瞭解如何安裝及使用 Sensitive Data Protection 的用戶端程式庫,請參閱這篇文章。
如要驗證 Sensitive Data Protection,請設定應用程式預設憑證。 詳情請參閱「為本機開發環境設定驗證」。
PHP
如要瞭解如何安裝及使用 Sensitive Data Protection 的用戶端程式庫,請參閱這篇文章。
如要驗證 Sensitive Data Protection,請設定應用程式預設憑證。 詳情請參閱「為本機開發環境設定驗證」。
Python
如要瞭解如何安裝及使用 Sensitive Data Protection 的用戶端程式庫,請參閱這篇文章。
如要驗證 Sensitive Data Protection,請設定應用程式預設憑證。 詳情請參閱「為本機開發環境設定驗證」。
REST
    {
      "byteItem": {
        "data": "[BASE64-ENCODED-IMAGE]",
        "type": "IMAGE_PNG"
      },
      "imageRedactionConfigs": [
        {
          "redactAllText": true
        }
      ]
    }
Sensitive Data Protection 會傳回下列項目:
    {
      "redactedImage": "[BASE64-ENCODED-IMAGE]"
    }
解碼 Base64 編碼的圖片。
API 會傳回您提供的同一張圖片,但依據您的條件識別為含有機密資訊的任何文字則會受到遮蓋。
產生的圖片如下所示:

經過編輯的圖片,所有文字 (按一下即可放大)。 設定可能性值的程式碼範例
這個範例與從圖片中遮蓋特定 infoType 類似。此外,這項範例也會示範如何指定最低可能性。
C#
如要瞭解如何安裝及使用 Sensitive Data Protection 的用戶端程式庫,請參閱這篇文章。
如要驗證 Sensitive Data Protection,請設定應用程式預設憑證。 詳情請參閱「為本機開發環境設定驗證」。
Go
如要瞭解如何安裝及使用 Sensitive Data Protection 的用戶端程式庫,請參閱這篇文章。
如要驗證 Sensitive Data Protection,請設定應用程式預設憑證。 詳情請參閱「為本機開發環境設定驗證」。
Java
如要瞭解如何安裝及使用 Sensitive Data Protection 的用戶端程式庫,請參閱這篇文章。
如要驗證 Sensitive Data Protection,請設定應用程式預設憑證。 詳情請參閱「為本機開發環境設定驗證」。
Node.js
如要瞭解如何安裝及使用 Sensitive Data Protection 的用戶端程式庫,請參閱這篇文章。
如要驗證 Sensitive Data Protection,請設定應用程式預設憑證。 詳情請參閱「為本機開發環境設定驗證」。
PHP
如要瞭解如何安裝及使用 Sensitive Data Protection 的用戶端程式庫,請參閱這篇文章。
如要驗證 Sensitive Data Protection,請設定應用程式預設憑證。 詳情請參閱「為本機開發環境設定驗證」。
Python
如要瞭解如何安裝及使用 Sensitive Data Protection 的用戶端程式庫,請參閱這篇文章。
如要驗證 Sensitive Data Protection,請設定應用程式預設憑證。 詳情請參閱「為本機開發環境設定驗證」。
立即體驗
您可以在
image.redact的參考資料頁面中,使用 APIs Explorer 試用這個頁面上的每個範例,或使用自己的圖片進行實驗:後續步驟
- 進一步瞭解圖片檢查和遮蓋。
- 完成使用 Sensitive Data Protection 遮蓋機密資料程式碼研究室。
- 瞭解如何檢查圖片是否含有機密資料。
- 進一步瞭解如何在儲存空間中建立去識別化資料副本。
除非另有註明,否則本頁面中的內容是採用創用 CC 姓名標示 4.0 授權,程式碼範例則為阿帕契 2.0 授權。詳情請參閱《Google Developers 網站政策》。Java 是 Oracle 和/或其關聯企業的註冊商標。
上次更新時間:2025-10-19 (世界標準時間)。