排定 Compute Engine VM 的啟動或停止時間


本教學課程說明如何使用 Cloud Scheduler 和 Cloud Run 函式,透過資源標籤定期自動啟動和停止 Compute Engine 執行個體。
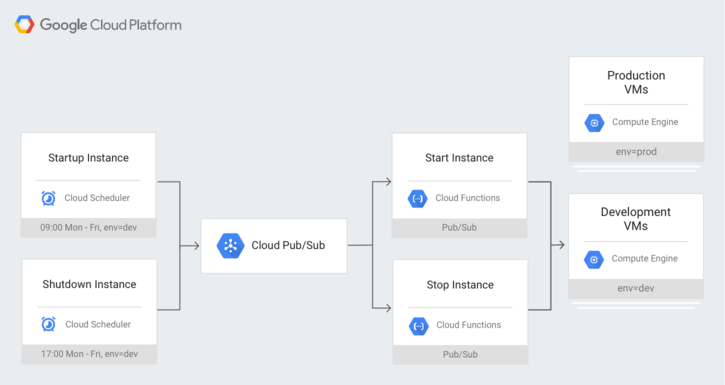
目標

  • 使用 Cloud Run functions 寫入及部署一組函式,啟動及停止 Compute Engine 執行個體。
  • 使用 Cloud Scheduler 建立一組工作,將執行個體的排程設定為在週一到週五的 09:00 到 17:00 執行,以配合一般營業時間。執行個體必須具有 dev 資源標籤。

費用

在本文件中,您會使用 Google Cloud的下列計費元件:

  • Cloud Scheduler
  • Cloud Run functions
  • Pub/Sub
  • Compute Engine

如要根據預測用量估算費用,請使用 Pricing Calculator

初次使用 Google Cloud 的使用者可能符合免費試用資格。

事前準備

  1. 為 Cloud Scheduler 設定環境。

    設定環境

  2. Enable the Cloud Run functions, Pub/Sub, and Compute Engine APIs.

    Enable the APIs

應用程式架構

本解決方案包含下列 Google Cloud 元件:

系統架構圖表,顯示 Cloud Scheduler 透過 Pub/Sub 為 Compute Engine 執行個體進行排程

位置規定

部分元件僅在特定地區受到支援。

  • Compute Engine 執行個體:支援地區和區域中列出的任何地區。
  • Cloud Run 函式:支援位置中列出的區域。
  • Pub/Sub 訊息:當 Pub/Sub 為一種全球服務時,提供全球支援。
  • 使用 Pub/Sub 目標的 Cloud Scheduler 工作:支援任何Google Cloud 位置

為何不使用 HTTP,而要使用 Pub/Sub?

您可能想要使用 Cloud Run 函式的 HTTP 觸發條件來簡化這個架構,而不使用 Pub/Sub 觸發條件

本教學課程使用 Pub/Sub 做為 Cloud Run 函式觸發條件,因為這種方法比使用 HTTP 更安全。不過,HTTP 也是有效的選擇,現在可以透過要求驗證來確保安全。

如要瞭解如何保護 Cloud Run functions,請參閱 Cloud Run functions 安全性總覽。如要比較 HTTP 和 Pub/Sub 觸發條件,請參閱 Cloud Run functions 觸發條件說明文件。

設定 Compute Engine 執行個體

控制台

  1. 前往 Google Cloud 控制台的「VM instances」(VM 執行個體) 頁面。
    前往「VM instances」(VM 執行個體) 頁面
  2. 點選「建立執行個體」
  3. 將「Name」(名稱) 設為 dev-instance
  4. 按一下「標籤」下方的「新增標籤」
  5. 按一下「新增標籤」
  6. 在「Key」(鍵) 中輸入 env,並在「Value」(值) 中輸入 dev
  7. 針對「Region」(地區),選取 us-west1
  8. 針對「Zone」(區域),選取 us-west1-b
  9. 按一下 [儲存]
  10. 按一下頁面底部的 [建立]

gcloud

gcloud compute instances create dev-instance \
    --network default \
    --zone us-west1-b \
    --labels=env=dev

透過 Cloud Run 函式部署由 Pub/Sub 觸發的函式

建立及部署函式

主控台

建立啟動函式:

  1. 前往 Google Cloud 控制台的「Cloud Run functions」頁面。
    前往 Cloud Run functions 頁面
  2. 按一下 [Create Function] (建立函式)
  3. 在「Environment」(環境) 中選取「1st gen」(第 1 代)
  4. 將「Function name」(函式名稱) 設為 startInstancePubSub
  5. 保留「Region」(區域) 的預設值。
  6. 針對「Trigger type」(觸發條件類型),選取「Cloud Pub/Sub」
  7. 在「Select a Cloud Pub/Sub topic」(選取 Cloud Pub/Sub 主題),按一下「Create a topic」(建立主題)
  8. 系統應會顯示「建立主題」對話方塊。
    1. 在「主題 ID」下方輸入 start-instance-event
    2. 按一下「建立」,完成對話方塊。
  9. 按一下「觸發條件」方塊底部的「儲存」
  10. 按一下頁面底部的「下一步」
  11. 針對「Runtime」(執行階段),選取「Node.js 16」或更新版本。
  12. 在「Entry point」(進入點) 中輸入 startInstancePubSub
  13. 在程式碼編輯器左側,選取「index.js」index.js
  14. 以下列程式碼取代範例程式碼:

    const compute = require('@google-cloud/compute');
    const instancesClient = new compute.InstancesClient();
    const operationsClient = new compute.ZoneOperationsClient();
    
    async function waitForOperation(projectId, operation) {
      while (operation.status !== 'DONE') {
        [operation] = await operationsClient.wait({
          operation: operation.name,
          project: projectId,
          zone: operation.zone.split('/').pop(),
        });
      }
    }
    
    /**
     * Starts Compute Engine instances.
     *
     * Expects a PubSub message with JSON-formatted event data containing the
     * following attributes:
     *  zone - the GCP zone the instances are located in.
     *  label - the label of instances to start.
     *
     * @param {!object} event Cloud Function PubSub message event.
     * @param {!object} callback Cloud Function PubSub callback indicating
     *  completion.
     */
    exports.startInstancePubSub = async (event, context, callback) => {
      try {
        const project = await instancesClient.getProjectId();
        const payload = _validatePayload(event);
        const options = {
          filter: `labels.${payload.label}`,
          project,
          zone: payload.zone,
        };
    
        const [instances] = await instancesClient.list(options);
    
        await Promise.all(
          instances.map(async instance => {
            const [response] = await instancesClient.start({
              project,
              zone: payload.zone,
              instance: instance.name,
            });
    
            return waitForOperation(project, response.latestResponse);
          })
        );
    
        // Operation complete. Instance successfully started.
        const message = 'Successfully started instance(s)';
        console.log(message);
        callback(null, message);
      } catch (err) {
        console.log(err);
        callback(err);
      }
    };
    
    /**
     * Validates that a request payload contains the expected fields.
     *
     * @param {!object} payload the request payload to validate.
     * @return {!object} the payload object.
     */
    const _validatePayload = event => {
      let payload;
      try {
        payload = JSON.parse(Buffer.from(event.data, 'base64').toString());
      } catch (err) {
        throw new Error('Invalid Pub/Sub message: ' + err);
      }
      if (!payload.zone) {
        throw new Error("Attribute 'zone' missing from payload");
      } else if (!payload.label) {
        throw new Error("Attribute 'label' missing from payload");
      }
      return payload;
    };
  15. 在程式碼編輯器的左側,選取 package.json

  16. 以下列程式碼取代範例程式碼:

    {
      "name": "cloud-functions-schedule-instance",
      "version": "0.1.0",
      "private": true,
      "license": "Apache-2.0",
      "author": "Google Inc.",
      "repository": {
        "type": "git",
        "url": "https://github.com/GoogleCloudPlatform/nodejs-docs-samples.git"
      },
      "engines": {
        "node": ">=16.0.0"
      },
      "scripts": {
        "test": "c8 mocha -p -j 2 test/*.test.js --timeout=20000"
      },
      "devDependencies": {
        "c8": "^10.0.0",
        "mocha": "^10.0.0",
        "proxyquire": "^2.0.0",
        "sinon": "^18.0.0"
      },
      "dependencies": {
        "@google-cloud/compute": "^4.0.0"
      }
    }
    
  17. 按一下頁面底部的 [Deploy] (部署)。

建立停止函式:

  1. 前往 Google Cloud 控制台的「Cloud Run functions」頁面。
  2. 按一下 [Create Function] (建立函式)
  3. 在「Environment」(環境) 中選取「1st gen」(第 1 代)
  4. 將「Function name」(函式名稱) 設為 stopInstancePubSub
  5. 保留「Region」(區域) 的預設值。
  6. 針對「Trigger type」(觸發條件類型),選取「Cloud Pub/Sub」
  7. 在「Select a Cloud Pub/Sub topic」(選取 Cloud Pub/Sub 主題),按一下「Create a topic」(建立主題)
  8. 系統應會顯示「建立主題」對話方塊。
    1. 在「主題 ID」下方輸入 stop-instance-event
    2. 按一下「建立」,完成對話方塊。
  9. 按一下「觸發條件」方塊底部的「儲存」
  10. 按一下頁面底部的「下一步」
  11. 針對「Runtime」(執行階段),選取「Node.js 16」或更新版本。
  12. 在「Entry point」(進入點) 中輸入 stopInstancePubSub
  13. 在程式碼編輯器左側,選取「index.js」index.js
  14. 以下列程式碼取代範例程式碼:

    const compute = require('@google-cloud/compute');
    const instancesClient = new compute.InstancesClient();
    const operationsClient = new compute.ZoneOperationsClient();
    
    async function waitForOperation(projectId, operation) {
      while (operation.status !== 'DONE') {
        [operation] = await operationsClient.wait({
          operation: operation.name,
          project: projectId,
          zone: operation.zone.split('/').pop(),
        });
      }
    }
    
    /**
     * Stops Compute Engine instances.
     *
     * Expects a PubSub message with JSON-formatted event data containing the
     * following attributes:
     *  zone - the GCP zone the instances are located in.
     *  label - the label of instances to stop.
     *
     * @param {!object} event Cloud Function PubSub message event.
     * @param {!object} callback Cloud Function PubSub callback indicating completion.
     */
    exports.stopInstancePubSub = async (event, context, callback) => {
      try {
        const project = await instancesClient.getProjectId();
        const payload = _validatePayload(event);
        const options = {
          filter: `labels.${payload.label}`,
          project,
          zone: payload.zone,
        };
    
        const [instances] = await instancesClient.list(options);
    
        await Promise.all(
          instances.map(async instance => {
            const [response] = await instancesClient.stop({
              project,
              zone: payload.zone,
              instance: instance.name,
            });
    
            return waitForOperation(project, response.latestResponse);
          })
        );
    
        // Operation complete. Instance successfully stopped.
        const message = 'Successfully stopped instance(s)';
        console.log(message);
        callback(null, message);
      } catch (err) {
        console.log(err);
        callback(err);
      }
    };
    
    /**
     * Validates that a request payload contains the expected fields.
     *
     * @param {!object} payload the request payload to validate.
     * @return {!object} the payload object.
     */
    const _validatePayload = event => {
      let payload;
      try {
        payload = JSON.parse(Buffer.from(event.data, 'base64').toString());
      } catch (err) {
        throw new Error('Invalid Pub/Sub message: ' + err);
      }
      if (!payload.zone) {
        throw new Error("Attribute 'zone' missing from payload");
      } else if (!payload.label) {
        throw new Error("Attribute 'label' missing from payload");
      }
      return payload;
    };
  15. 在程式碼編輯器的左側,選取 package.json

  16. 以下列程式碼取代範例程式碼:

    {
      "name": "cloud-functions-schedule-instance",
      "version": "0.1.0",
      "private": true,
      "license": "Apache-2.0",
      "author": "Google Inc.",
      "repository": {
        "type": "git",
        "url": "https://github.com/GoogleCloudPlatform/nodejs-docs-samples.git"
      },
      "engines": {
        "node": ">=16.0.0"
      },
      "scripts": {
        "test": "c8 mocha -p -j 2 test/*.test.js --timeout=20000"
      },
      "devDependencies": {
        "c8": "^10.0.0",
        "mocha": "^10.0.0",
        "proxyquire": "^2.0.0",
        "sinon": "^18.0.0"
      },
      "dependencies": {
        "@google-cloud/compute": "^4.0.0"
      }
    }
    
  17. 按一下頁面底部的 [Deploy] (部署)。

gcloud

建立 Pub/Sub 主題。

gcloud pubsub topics create start-instance-event
gcloud pubsub topics create stop-instance-event

取得程式碼

  1. 下載程式碼。

    git clone https://github.com/GoogleCloudPlatform/nodejs-docs-samples.git

    您也可以 下載 zip 格式的範例,然後解壓縮該檔案。

  2. 前往正確的目錄。

    cd nodejs-docs-samples/functions/scheduleinstance/

建立啟動與停止函式:

您應該位於 nodejs-docs-samples/functions/scheduleinstance/ 目錄。

gcloud functions deploy startInstancePubSub \
    --trigger-topic start-instance-event \
    --runtime nodejs18 \
    --allow-unauthenticated
gcloud functions deploy stopInstancePubSub \
    --trigger-topic stop-instance-event \
    --runtime nodejs18 \
    --allow-unauthenticated

(選用) 驗證函式是否有效

主控台

停止執行個體

  1. 前往 Google Cloud 控制台的「Cloud Run functions」頁面。
    前往 Cloud Run functions 頁面
  2. 按一下名為 stopInstancePubSub 的函式。
  3. 您應該會看到幾個分頁標籤:[General] (一般)、[Trigger] (觸發條件)、[Source] (來源) 、[Permissions] (權限) 和 [Testing] (測試)。按一下「測試」分頁標籤。
  4. 針對「Triggering event」(觸發事件),輸入以下內容:

    {"data":"eyJ6b25lIjoidXMtd2VzdDEtYiIsICJsYWJlbCI6ImVudj1kZXYifQo="}
    

    • 這只是採用 base64 編碼的 {"zone":"us-west1-b", "label":"env=dev"}

    • 如果您想要自行編碼字串,可以使用任何線上的 base64 編碼工具

  5. 按一下 [Test the function] (測試函式) 按鈕。

  6. 系統執行完成後,您應該會在「Output」(輸出) 下方看到 Successfully stopped instance dev-instance。系統最多可能需要 60 秒才能完成執行作業。

    • 如果看到 error: 'Error: function failed to load.',請等待 10 秒左右,讓函式完成部署並再試一次。

    • 如果看到 error: 'Error: function execution attempt timed out.',請繼續進行下一步,看看這是不是因為執行個體花了很長的時間在進行關閉作業。

    • 如果完成執行,但未顯示任何內容,也可能只是逾時。請繼續進行下一步,看看這是不是因為執行個體花了很長的時間在進行關閉作業。

  7. 前往 Google Cloud 控制台的「VM instances」(VM 執行個體) 頁面。
    前往「VM instances」(VM 執行個體) 頁面

  8. 確認名為 dev-instance 的執行個體在名稱旁邊有一個灰色方塊,這代表該執行個體已停止。系統最多可能需要 30 秒才能完成關閉作業。

    • 如果執行個體看起來並未完成作業,請試著按一下頁面頂端的 [Refresh] (重新整理)

啟動執行個體

  1. 前往 Google Cloud 控制台的「Cloud Run functions」頁面。
    前往 Cloud Run functions 頁面
  2. 按一下名為 startInstancePubSub 的函式。
  3. 您應該會看到幾個分頁標籤:[General] (一般)、[Trigger] (觸發條件)、[Source] (來源) 、[Permissions] (權限) 和 [Testing] (測試)。按一下「測試」分頁標籤。
  4. 針對「Triggering event」(觸發事件),輸入以下內容:

    {"data":"eyJ6b25lIjoidXMtd2VzdDEtYiIsICJsYWJlbCI6ImVudj1kZXYifQo="}
    

    • 同樣的,這只是採用 base64 編碼的 {"zone":"us-west1-b", "label":"env=dev"}
  5. 按一下 [Test the function] (測試函式) 按鈕。

  6. 系統執行完成後,您應該會在「Output」(輸出) 下方看到 Successfully started instance dev-instance

  7. 前往 Google Cloud 控制台的「VM instances」(VM 執行個體) 頁面。
    前往「VM instances」(VM 執行個體) 頁面

  8. 確認名為 dev-instance 的執行個體在名稱旁邊有一個綠色勾號,這代表該執行個體正在執行。系統最多可能需要 30 秒才能完成啟動作業。

gcloud

停止執行個體

  1. 呼叫函式以停止執行個體。

    gcloud functions call stopInstancePubSub \
        --data '{"data":"eyJ6b25lIjoidXMtd2VzdDEtYiIsICJsYWJlbCI6ImVudj1kZXYifQo="}'
    
    • 這只是採用 base64 編碼的 {"zone":"us-west1-b", "label":"env=dev"}

    • 如果您想要自行編碼字串,可以使用任何工具。 以下是使用 base64 指令列工具的範例:

      echo '{"zone":"us-west1-b", "label":"env=dev"}' | base64
      
      eyJ6b25lIjoidXMtd2VzdDEtYiIsICJsYWJlbCI6ImVudj1kZXYifQo=
      

    函式執行完成後,您應該會看見下列資訊:

    result: Successfully stopped instance dev-instance
    

    系統最多可能需要 60 秒才能完成執行作業。

    • 如果您看到下列錯誤訊息:

      error: 'Error: function failed to load.`
      

      請等待 10 秒左右,讓函式完成部署並再試一次。

    • 如果您看到下列錯誤訊息:

      error: `Error: function execution attempt timed out.`
      

      請繼續進行下一步,看看這是不是因為執行個體花了很長的時間在進行關閉作業。

    • 如果未顯示任何內容,可能是函式逾時。請繼續進行下一步,看看這是不是因為執行個體花了很長的時間在進行關閉作業。

  2. 檢查執行個體的狀態是否為 TERMINATED。系統最多可能需要 30 秒才能完成關閉作業。

    gcloud compute instances describe dev-instance \
        --zone us-west1-b \
        | grep status
    
    status: TERMINATED
    

啟動執行個體

  1. 呼叫函式以啟動執行個體。

    gcloud functions call startInstancePubSub \
        --data '{"data":"eyJ6b25lIjoidXMtd2VzdDEtYiIsICJsYWJlbCI6ImVudj1kZXYifQo="}'
    
    • 同樣的,這只是採用 base64 編碼的 {"zone":"us-west1-b", "label":"env=dev"}

    函式執行完成後,您應該會看見下列資訊:

    result: Successfully started instance dev-instance
    
  2. 檢查執行個體的狀態是否為 RUNNING。系統最多可能需要 30 秒才能完成啟動作業。

    gcloud compute instances describe dev-instance \
        --zone us-west1-b \
        | grep status
    
    status: RUNNING
    

設定 Cloud Scheduler 工作以呼叫 Pub/Sub

建立工作

主控台

建立啟動工作:

  1. 前往 Google Cloud 控制台的「Cloud Scheduler」頁面。
    前往 Cloud Scheduler 頁面
  2. 按一下「建立工作」
  3. 保留預設區域。
  4. 將「Name」(名稱) 設為 startup-dev-instances
  5. 在「Frequency」(頻率) 欄位中,輸入 0 9 * * 1-5
    • 這項作業會在週一至週五每天 9:00 執行。
  6. 針對「Timezone」(時區),選取所需的國家/地區和時區。本範例將使用 United StatesLos Angeles
  7. 按一下「繼續」
  8. 在「目標類型」部分,選取 Pub/Sub
  9. 從主題下拉式選單中選取 start-instance-event
  10. 在「Message」(訊息) 中輸入下列內容:
    {"zone":"us-west1-b","label":"env=dev"}
    
  11. 點選「建立」

建立停止工作:

  1. 前往控制台的「Cloud Scheduler」頁面。 Google Cloud
  2. 按一下 [Create Job] (建立工作)
  3. 保留預設區域,然後點選頁面底部的「下一步」
  4. 將「Name」(名稱) 設為 shutdown-dev-instances
  5. 在「Frequency」(頻率) 欄位中,輸入 0 17 * * 1-5
    • 這項作業會在每週一至週五的 17:00 執行。
  6. 針對「Timezone」(時區),選取所需的國家/地區和時區。本範例將使用 United StatesLos Angeles
  7. 按一下「繼續」
  8. 在「目標類型」部分,選取 Pub/Sub
  9. 從主題下拉式選單中選取 stop-instance-event
  10. 在「Message」(訊息) 中輸入下列內容:
    {"zone":"us-west1-b","label":"env=dev"}
    
  11. 點選「建立」

gcloud

建立啟動工作:

gcloud scheduler jobs create pubsub startup-dev-instances \
    --schedule '0 9 * * 1-5' \
    --topic start-instance-event \
    --message-body '{"zone":"us-west1-b", "label":"env=dev"}' \
    --time-zone 'America/Los_Angeles' \
    --location us-central1

建立停止工作:

gcloud scheduler jobs create pubsub shutdown-dev-instances \
    --schedule '0 17 * * 1-5' \
    --topic stop-instance-event \
    --message-body '{"zone":"us-west1-b", "label":"env=dev"}' \
    --time-zone 'America/Los_Angeles' \
    --location us-central1

(選用) 驗證工作是否有效

主控台

停止執行個體

  1. 前往 Google Cloud 控制台的「Cloud Scheduler」頁面。
    前往 Cloud Scheduler 頁面
  2. 針對名為 shutdown-dev-instances 的工作,按一下頁面最右側的「Run now」(立即執行) 按鈕。
  3. 前往 Google Cloud 控制台的「VM instances」(VM 執行個體) 頁面。
    前往「VM instances」(VM 執行個體) 頁面
  4. 確認名為 dev-instance 的執行個體在名稱旁邊有一個灰色方塊,這代表該執行個體已停止。系統最多可能需要 30 秒才能完成關閉作業。

啟動執行個體

  1. 前往 Google Cloud 控制台的「Cloud Scheduler」頁面。
    前往 Cloud Scheduler 頁面
  2. 針對名為 startup-dev-instances 的工作,按一下頁面最右側的「Run now」(立即執行) 按鈕。
  3. 前往 Google Cloud 控制台的「VM instances」(VM 執行個體) 頁面。
    前往「VM instances」(VM 執行個體) 頁面
  4. 確認名為 dev-instance 的執行個體在名稱旁邊有一個綠色勾號,這代表該執行個體正在執行。系統最多可能需要 30 秒才能完成啟動作業。

gcloud

停止執行個體

  1. 執行排程器工作以停止執行個體。

    gcloud beta scheduler jobs run shutdown-dev-instances
    
  2. 檢查執行個體的狀態是否為 TERMINATED。系統最多可能需要 30 秒才能完成關閉作業。

    gcloud compute instances describe dev-instance \
        --zone us-west1-b \
        | grep status
    
    status: TERMINATED
    

啟動執行個體

  1. 執行排程器工作以啟動執行個體。

    gcloud beta scheduler jobs run startup-dev-instances
    
  2. 檢查執行個體的狀態是否為 RUNNING。系統最多可能需要 30 秒才能完成啟動作業。

    gcloud compute instances describe dev-instance \
        --zone us-west1-b \
        | grep status
    
    status: RUNNING
    

清除所用資源

完成教學課程後,您可以清除所建立的資源,這樣資源就不會繼續使用配額,也不會產生費用。下列各節將說明如何刪除或關閉這些資源。

刪除 Cloud Scheduler 工作

  1. 前往 Google Cloud 控制台的「Cloud Scheduler」頁面。

    前往「Cloud Scheduler」頁面

  2. 按一下工作旁邊的核取方塊。

  3. 按一下頁面頂端的 [Delete] (刪除) 按鈕,並確認您要刪除工作。

刪除 Pub/Sub 主題

  1. 前往 Google Cloud 控制台的「Pub/Sub」頁面。

    前往 Pub/Sub 頁面

  2. 按一下主題旁邊的核取方塊。

  3. 按一下頁面頂端的 [Delete] (刪除),並確認您要刪除主題。

刪除透過 Cloud Run functions 部署的函式

  1. 前往 Google Cloud 控制台的「Cloud Run functions」頁面。

    前往 Cloud Run functions 頁面

  2. 按一下函式旁邊的核取方塊。

  3. 按一下頁面頂端的 [Delete] (刪除) 按鈕,並確認您要刪除工作。

刪除 Compute Engine 執行個體:

如要刪除 Compute Engine 執行個體:

  1. In the Google Cloud console, go to the VM instances page.

    Go to VM instances

  2. Select the checkbox for the instance that you want to delete.
  3. To delete the instance, click More actions, click Delete, and then follow the instructions.

刪除專案

如要避免付費,最簡單的方法就是刪除您為了本教學課程所建立的專案。

如要刪除專案:

  1. In the Google Cloud console, go to the Manage resources page.

    Go to Manage resources

  2. In the project list, select the project that you want to delete, and then click Delete.
  3. In the dialog, type the project ID, and then click Shut down to delete the project.

後續步驟

  • 探索 Google Cloud 的參考架構、圖表和最佳做法。 歡迎瀏覽我們的雲端架構中心