This page provides details on how you can optimize Google Cloud NetApp Volumes performance.
Before you begin
Before you make changes to your volumes to optimize performance, review performance considerations.
Adjust volume settings
You can optimize performance by adjusting the following volume settings:
Increase volume capacity: you can increase the capacity of your Premium, Extreme or Standard service level volume to improve maximum achievable volume throughput. For volumes of Flex service level, increase storage pools capacity instead.
Upgrade your service level: you can upgrade your Premium service level volumes to the Extreme service level to improve throughput. We recommend that you assign the volume to a different storage pool with a different service level.
Use manual QoS pools to assign greater throughput: you can decrease the assigned throughput of larger volumes with low throughput requirements, and increase the throughput of smaller volumes that need higher performance up to the available pool throughput.
Increasing volume capacity and upgrading service levels are both non-disruptive to I/O workloads in process on the volume and don't affect access to the volume in any way.
Adjust the client
You can improve performance by adjusting the following settings on the client:
Co-locate clients: latency results are directly impacted by the capabilities and location of the client. For best results, place the client in the same region as the volume or as close as possible. Test the zonal impact by testing latency from a client in each zone and use the zone with the lowest latency.
Configure Compute Engine network bandwidth: the network capabilities of Compute Engine virtual machines depend on the instance type used. Typically, larger instances can drive more network throughput. We recommend that you select a client virtual machine with an appropriate network bandwidth capability, select the Google Virtual NIC (gVNIC) network interface and enable
Tier_1performance. For more information, see Compute Engine documentation on network bandwidth.Open multiple TCP sessions: if your application requires high throughput, you can eventually saturate the single transmission control protocol (TCP) session that underlies a normal NFS and SMB session. For such cases, increase the number of TCP sessions your NFS and SMB connection uses.
Use one of the following tabs to adjust your client based on the type of client:
Linux
Traditionally, an NFS client uses a single TCP session for all NFS-mounted file systems that share a storage endpoint. Using the
nconnectmount option lets you increase the number of supported TCP sessions up to a maximum of 16.We recommend the following best practices for adjusting your Linux client type to fully take advantage of
nconnect:Increase the number of TCP sessions with
nconnect: Each additional TCP session adds a queue for 128 outstanding requests, improving potential concurrency.Set
sunrpc.max_tcp_slot_table_entriesparameter:sunrpc.max_tcp_slot_table_entriesis a connection-level adjustment parameter which you can modify to control performance. We recommend settingsunrpc.max_tpc_slot_table_enteriesto 128 requests or per connection and not surpassing 10,000 slots for all NFS clients within a single project connecting to NetApp Volumes. To set thesunrpc.max_tcp_slot_table_entriesparameter, add the parameter to your/etc/sysctl.conffile and reload the parameter file using thesysctl -pcommand.Tune maximum supported value per session to 180: Unlike NFSv3, NFSv4.1 clients define the relationship between the client and server in sessions. While NetApp Volumes supports up to 128 outstanding requests per connection using NFSv3, NFSv4.1 is limited to 180 outstanding requests per session. Linux NFSv4.1 clients default to
64 max_session_slotsper session but you can tune this value as needed. We recommend changing the maximum supported value per session to 180.To tune
max_session_slots, create a configuration file under/etc/modprobe.d. Make sure that no quotation marks (" ") appear inline. Otherwise, the option doesn't take effect.$ echo "options nfs max_session_slots=>180" /etc/modprobe/d/nfsclient/conf $ reboot Use the systool -v -m nfs command to see the current maximum in use by the client. For the command to work, at least one NFSv4.1 mount must be in place. $ systool -v -v nfs { Module = "nfs" … Parameters: … Max_s<ession_slots = "63" - … }
The following NFS
nconnectcomparison graph demonstrates the impact using the nconnect configuration can have on an NFS workload. This information was captured using Fio with the following settings:100% read workload
8 KiB block size against a single volume
n2-standard-32virtual machine using Red Hat 9 OS6 TiB working set
Using an
nconnectvalue of 16 resulted in five times more performance than when it wasn't enabled.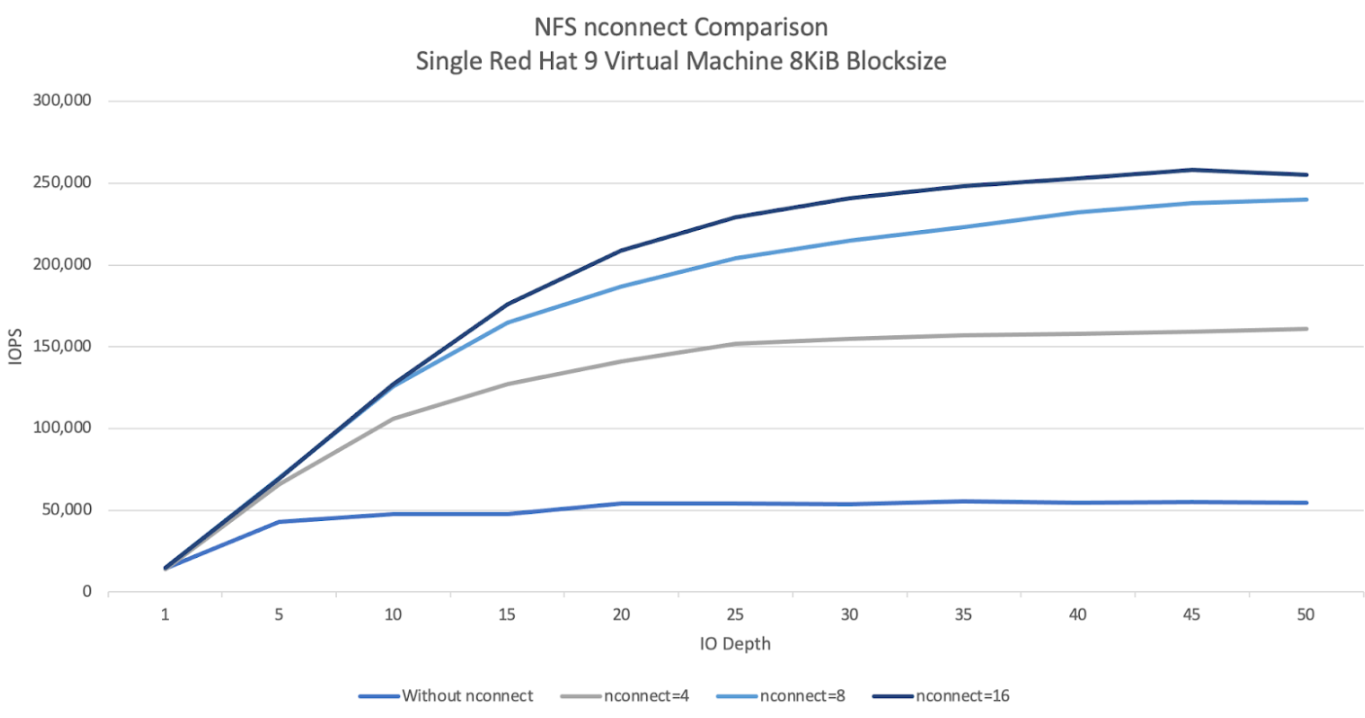
Windows
For Windows-based clients, the client can use SMB Multichannel with Receive Side Scaling (RSS) to open multiple TCP connections. To achieve this configuration, your virtual machine must have an allocated network adapter that supports RSS. We recommend setting RSS to four or eight values, however, any value over one should increase throughput.
The following graph displays the difference using the RSS configuration can have on an SMB workload. This information was captured using Fio with the following settings:
100% read workload
8 KiB block size against a single volume
Single
n2-standard-32virtual machine running a Windows 2022 OS6 TiB working set
Eight jobs were run with only the SMB client RSS option changing between test executions. Using RSS values of 4, 8, and 16 increased performance two-fold when compared to using a value of 1. Each RSS instance was run nine times with a
numjobsparameter of 8. Theiodepthparameter was increased by five each execution until maximum throughput was reached.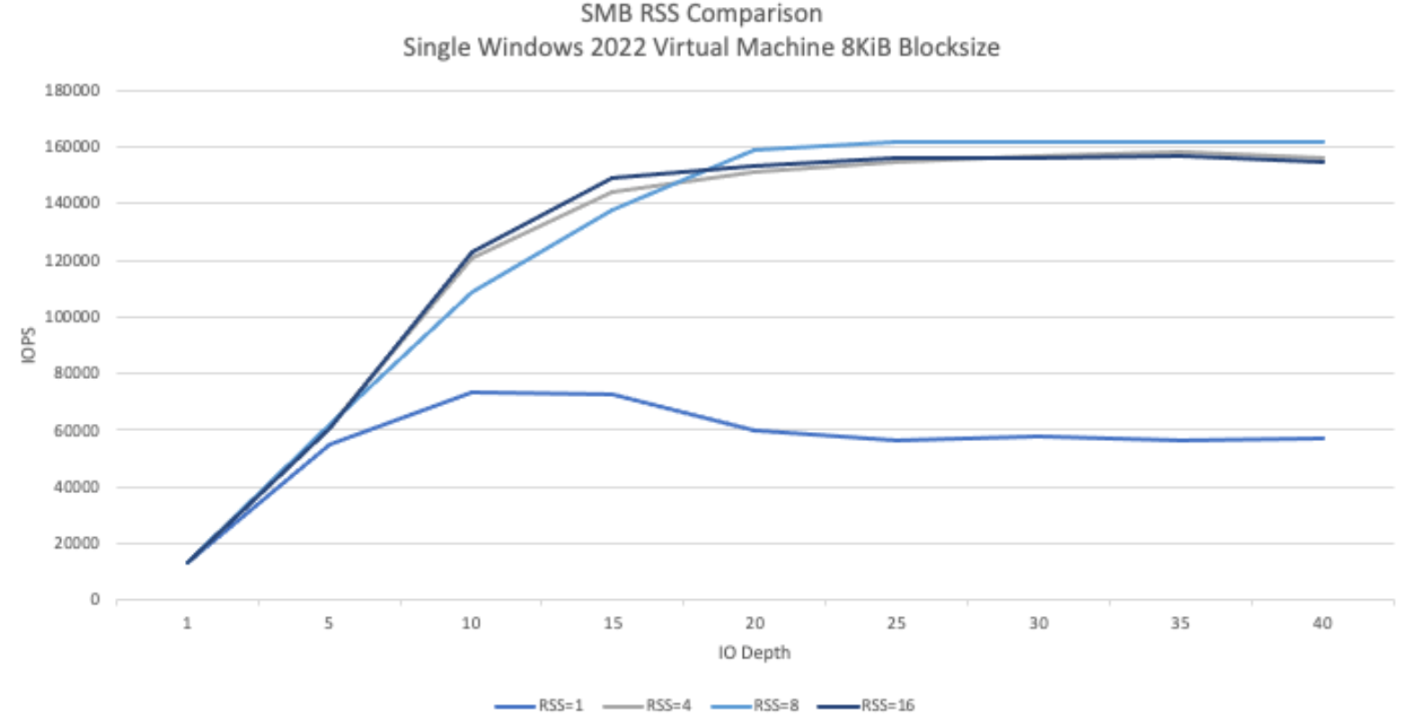
Manual QoS
Manual quality of service (QoS) in NetApp Volumes lets you adjust volume performance to meet workload requirements and control storage costs.
Manual QoS offers the following benefits:
Cost optimization: scale volume performance within your storage pool capacity to optimize cloud costs.
Instant throughput adjustment: adjust volume throughput without downtime.
Disaster recovery cost reduction: lower QoS for replicated volumes to reduce disaster recovery costs for destination pools.
Enhanced performance for clones or caches: increase performance for clone or cache volumes with small allocated sizes.
Flexible workload management: use larger storage pools as containers for multiple workloads, adjusting each volume's throughput as needed.
Considerations
You can manage manual QoS using the Google Cloud CLI, NetApp Volumes API, or Terraform. The Google Cloud console isn't supported.
Manual QoS is supported for Standard, Premium, and Extreme service levels and isn't available for the Flex service level.
Set up manual QoS limits
For volumes within a manual QoS storage pool, you can set throughput and capacity independently. The overall throughput of all volumes in a manual QoS pool is limited by the pool's total throughput. Pool throughput is determined by its allocated capacity and service level. For example, a 40 TiB Premium pool can achieve a maximum throughput of 2,560 MiBps at 64 MiBps per TiB, while a 200 TiB Extreme pool can support volumes with a combined throughput of 25,600 MiBps.
Once the manual QoS pool is set up, you can set the required throughput limit for each volume within it. The maximum throughput limit for a single volume is 4.5 GiBps, or 30 GiBps for large capacity volumes.
The pool and volume commands or APIs display available and assigned throughput values for the pool to help you manage the total throughput. To create a manual QoS pool and define volume throughput, see Create a storage pool and Create a volume.
Create a storage pool
gcloud
Create a storage pool using manual QoS:
    gcloud netapp storage-pools create POOL_NAME \
       --project=PROJECT_ID \
       --location=LOCATION \
       --capacity=CAPACITY \
       --service-level=SERVICE_LEVEL \
       --qos-type=QOS_TYPE \
       --network=name=NETWORK_NAME
Replace the following information:
POOL_NAME: the name of the pool you want to create. Your pool name must be unique per location.PROJECT_ID: the name of the project you want to create the storage pool in.LOCATION: the location of the pool you want to create.CAPACITY: the capacity of the pool in GiB.SERVICE_LEVEL: the service level for your storage pool: Standard, Premium, or Extreme.QOS_TYPE: the QoS type of your storage pool: auto or manual.NETWORK_NAME: the name of the VPC.
Edit a storage pool
gcloud
Edit an existing auto QoS storage pool to use manual QoS:
    gcloud netapp storage-pools update POOL_NAME \
       --project=PROJECT_ID \
       --location=LOCATION \
       --qos-type=QOS_TYPE
Replace the following information:
POOL_NAME: the name of the pool you want to update.PROJECT_ID: the name of the project.LOCATION: the location of the pool.QOS_TYPE: the updated QoS type for your storage pool. Only manual configuration is supported.
Create a volume
gcloud
Create a volume with specified manual QoS throughput limit using the following command:
gcloud netapp volumes create VOLUME_NAME \
  --project=PROJECT_ID \
  --location=LOCATION \
  --storage-pool=STORAGE_POOL \
  --capacity=CAPACITY \
  --protocols=PROTOCOLS \
  --share-name=SHARE_NAME \
  --throughput-mibps=THROUGHPUT_MIBPS
Replace the following information:
VOLUME_NAME: the name of the volume. This name must be unique per location.PROJECT_ID: the name of the project in which to create the volume.LOCATION: the location for the volume.STORAGE_POOL: the storage pool to create the volume in.CAPACITY: the capacity of the volume. It defines the capacity that NAS clients see.PROTOCOLS: choose the NAS protocols the volume is exported with. Valid choices are NFSv3, NFSv4, SMB, and the following combinations:nfsv3,nfsv4nfsv3,smbnfsv4,smb
Depending on the protocol type you choose, we recommend that you add the protocol specific parameters like
export-policyorsmb-settings.SHARE_NAME: the NFS export path or SMB share name of the volume.THROUGHPUT_MIBPS: the throughput limit of the volume in MiBps.
For more information about additional optional flags, see Google Cloud SDK documentation on volume creation.
What's next
Read about storage pools.