Sign in to your Google Cloud account. If you're new to
Google Cloud,
create an account to evaluate how our products perform in
real-world scenarios. New customers also get $300 in free credits to
run, test, and deploy workloads.
In the Google Cloud console, on the project selector page,
select or create a Google Cloud project.
Open the Identity Platform Settings page in the Google Cloud console. Go to the Settings page
Click the Security tab.
Click Allow tenants at the bottom of the page.
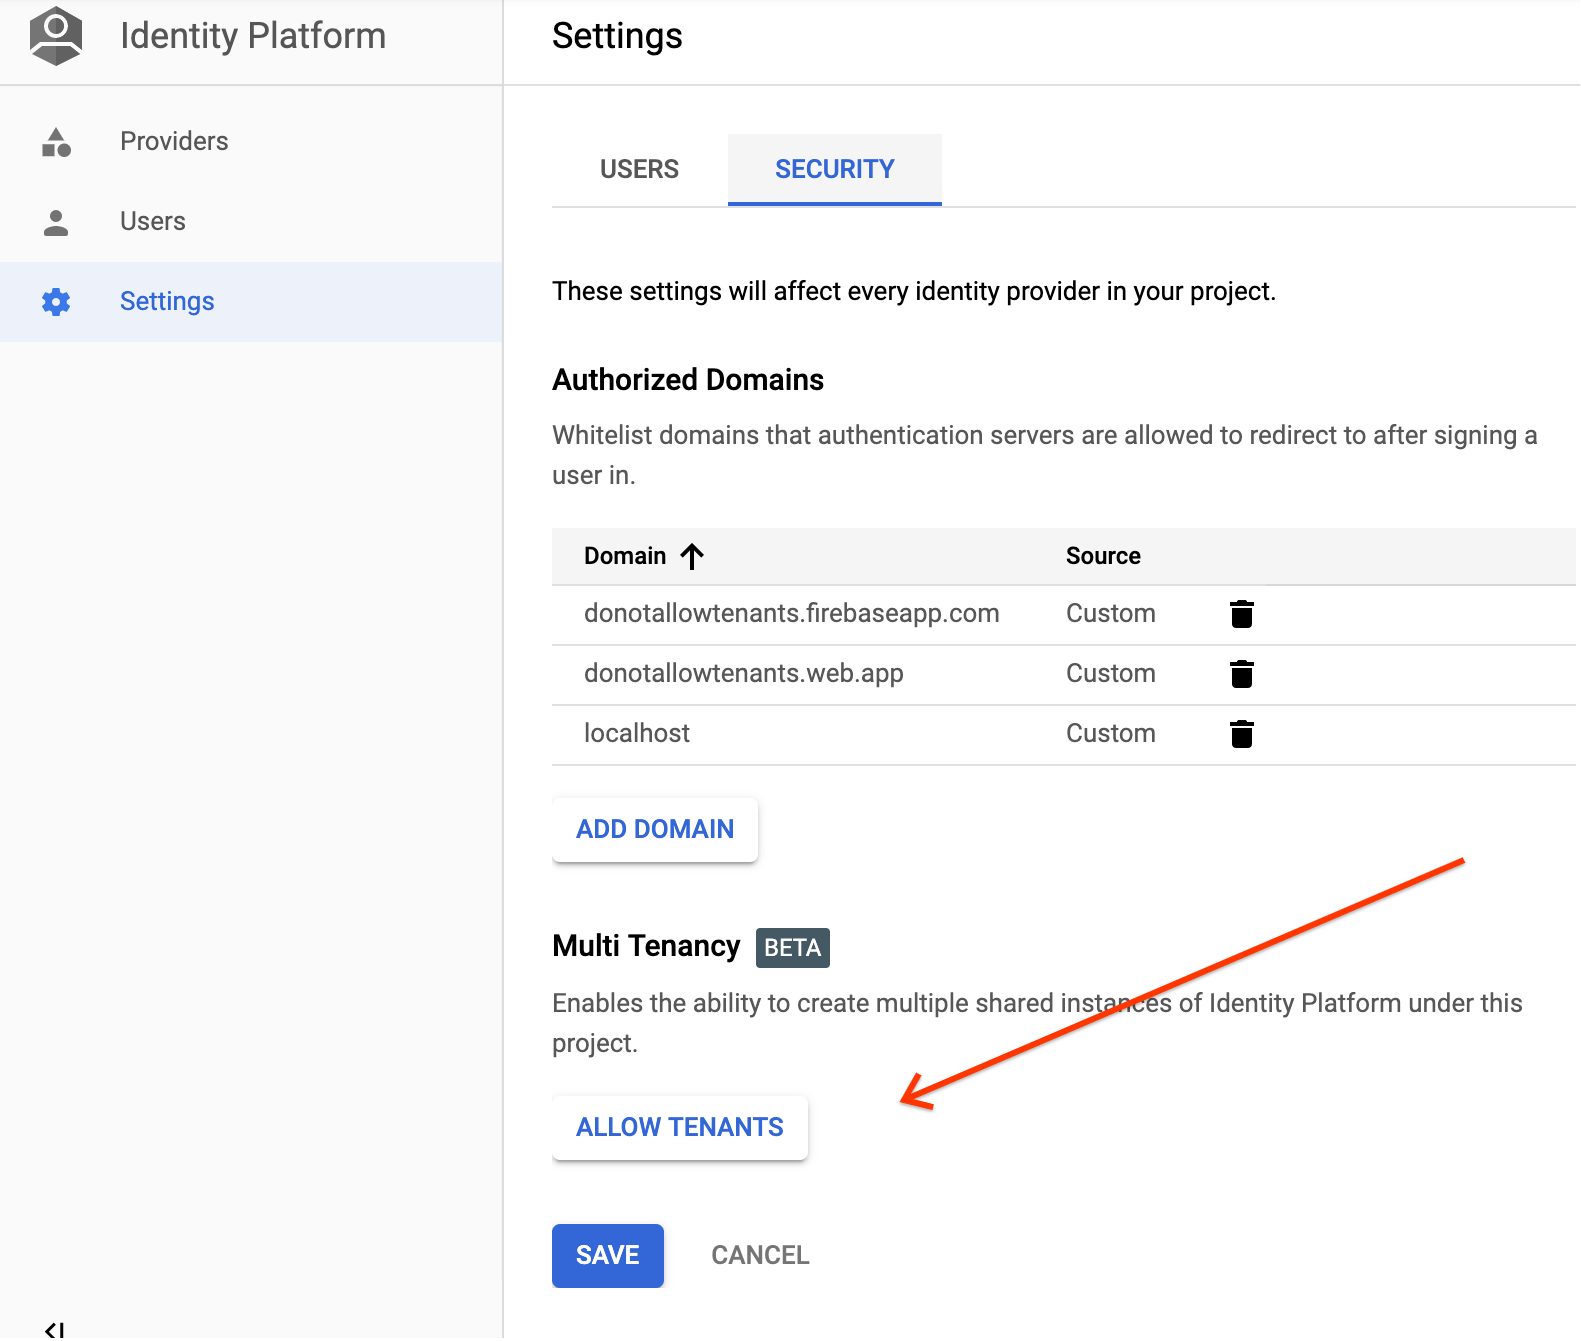
Clicking this button enables multi-tenancy and opens the Tenants page.
You are now ready to create your first tenant.
Creating a tenant
Open the Identity Platform Tenants page in the Google Cloud console. Go to the Tenants page
Click Add tenant.
Enter a Name for the tenant. This does not need to be
unique; Identity Platform will automatically assign a distinct ID.
Click Save.
Congratulations! You've created an Identity Platform tenant.
Selecting a tenant
Use the drop-down menu in the top-left corner to switch between tenants.
Each tenant has its own providers, settings, and users. After you've selected a
tenant, you can manage it the same way you manage a non-tenant
Identity Platform project.
[[["Easy to understand","easyToUnderstand","thumb-up"],["Solved my problem","solvedMyProblem","thumb-up"],["Other","otherUp","thumb-up"]],[["Hard to understand","hardToUnderstand","thumb-down"],["Incorrect information or sample code","incorrectInformationOrSampleCode","thumb-down"],["Missing the information/samples I need","missingTheInformationSamplesINeed","thumb-down"],["Other","otherDown","thumb-down"]],["Last updated 2025-08-25 UTC."],[[["\u003cp\u003eEnable multi-tenancy for Identity Platform by clicking "Allow tenants" in the Security tab of the Identity Platform Settings page.\u003c/p\u003e\n"],["\u003cp\u003eCreate a new tenant by navigating to the Tenants page, clicking "Add tenant", and entering a name, then saving.\u003c/p\u003e\n"],["\u003cp\u003eSwitch between tenants using the drop-down menu located in the top-left corner of the console.\u003c/p\u003e\n"],["\u003cp\u003eEach tenant operates independently with its own providers, settings, and users, enabling you to manage each one separately.\u003c/p\u003e\n"],["\u003cp\u003eDisable multi-tenancy using the Identity Toolkit API.\u003c/p\u003e\n"]]],[],null,["# Set up multi-tenancy\n====================\n\nLearn how to enable [multi-tenancy](/identity-platform/docs/multi-tenancy)\nfor Identity Platform, and create a new tenant using the Google Cloud console.\n\n*** ** * ** ***\n\nTo follow step-by-step guidance for this task directly in the\nGoogle Cloud console, click **Guide me**:\n\n[Guide me](https://console.cloud.google.com/freetrial?redirectPath=/?walkthrough_id=identity-platform--multi-tenancy-quickstart)\n\n*** ** * ** ***\n\nBefore you begin\n----------------\n\n- Sign in to your Google Cloud account. If you're new to Google Cloud, [create an account](https://console.cloud.google.com/freetrial) to evaluate how our products perform in real-world scenarios. New customers also get $300 in free credits to run, test, and deploy workloads.\n- In the Google Cloud console, on the project selector page,\n select or create a Google Cloud project.\n\n | **Note**: If you don't plan to keep the resources that you create in this procedure, create a project instead of selecting an existing project. After you finish these steps, you can delete the project, removing all resources associated with the project.\n\n [Go to project selector](https://console.cloud.google.com/projectselector2/home/dashboard)\n-\n [Verify that billing is enabled for your Google Cloud project](/billing/docs/how-to/verify-billing-enabled#confirm_billing_is_enabled_on_a_project).\n\n- In the Google Cloud console, on the project selector page,\n select or create a Google Cloud project.\n\n | **Note**: If you don't plan to keep the resources that you create in this procedure, create a project instead of selecting an existing project. After you finish these steps, you can delete the project, removing all resources associated with the project.\n\n [Go to project selector](https://console.cloud.google.com/projectselector2/home/dashboard)\n-\n [Verify that billing is enabled for your Google Cloud project](/billing/docs/how-to/verify-billing-enabled#confirm_billing_is_enabled_on_a_project).\n\nEnabling multi-tenancy\n----------------------\n\n1. Open the Identity Platform **Settings** page in the Google Cloud console. \n\n [Go to the Settings page](https://console.cloud.google.com/customer-identity/settings)\n\n2. Click the **Security** tab.\n\n3. Click **Allow tenants** at the bottom of the page.\n\nClicking this button enables multi-tenancy and opens the **Tenants** page.\n\nYou are now ready to create your first tenant.\n\nCreating a tenant\n-----------------\n\n1. Open the Identity Platform **Tenants** page in the Google Cloud console. \n\n [Go to the Tenants page](https://console.cloud.google.com/customer-identity/tenants)\n\n2. Click **Add tenant**.\n\n3. Enter a **Name** for the tenant. This does not need to be\n unique; Identity Platform will automatically assign a distinct ID.\n\n4. Click **Save**.\n\nCongratulations! You've created an Identity Platform tenant.\n\nSelecting a tenant\n------------------\n\nUse the drop-down menu in the top-left corner to switch between tenants.\n\nEach tenant has its own providers, settings, and users. After you've selected a\ntenant, you can manage it the same way you manage a non-tenant\nIdentity Platform project.\n\nDisabling multi-tenancy\n-----------------------\n\nUse the [Identity Toolkit API](/identity-platform/docs/reference/rest/v2/projects/updateConfig) to disable multi-tenancy.\n\nWhat's next\n-----------\n\n- [Sign in users with tenants](/identity-platform/docs/multi-tenancy-authentication)\n- [Create a sign-in page for multiple tenants](/identity-platform/docs/multi-tenancy-ui)\n- [Migrate existing users to a tenant](/identity-platform/docs/migrate-users-between-projects-tenants)\n- [Manage tenants programmatically](/identity-platform/docs/multi-tenancy-managing-tenants)"]]