This page shows how to serve an API from a custom domain that you own, for
example, example.com.
As an alternative to using your own domain name, you can use a domain name managed by Google. See Using a domain managed by Google for more information.
Before you begin
- Obtain a domain name from a domain name registrar if you don't already have a domain name to use for your API.
- Verify domain ownership.
- Name your API host name with your domain name.
- If you are using SSL with your domain, obtain and upload your SSL certificate.
- Deploy your API and Extensible Service Proxy (ESP).
Configure your API project to use your domain name
Follow the instructions in the appropriate tab.
App Engine
To set your API project to use your verified domain, follow the instructions provided in Adding a custom domain for your application
Compute Engine
The recommended way to serve an API from Compute Engine instances is to use a load balancer across an instance group. You need to reserve an external IP address for the domain name and use that external IP address for the load balancer.
To serve the API from a domain name:
- Reserve at least one static external IP address in your project:
- Assign any name you want to the reserved IP address
- For Type, click Global.
- For Attached to, click None. You attach the IP address to a load balancer later.
- Visit your domain provider account and edit your domain settings. You
must create an A record that contains your API name, for example,
myapi.example.comwith the external IP address in its data field - Create an instance group that includes the instances running your API and
Extensible Service Proxy (ESP:
- Assign any name you want for the group and add a description.
- From the Zone list, click the zone used by your API instance.
- In the Instance definition list, click Select existing instances
- In the VM Instances field, add the VM instance running the API.
- Click Create.
- Create and configure an HTTP(S) load balancer:
- Click Define a Backend Service > Create or select a backend service.
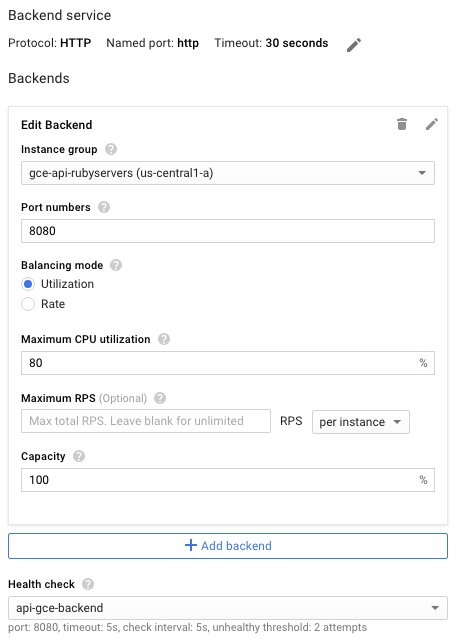
- Assign any name and description you want for this backend service configuration.
- In the Protocol field, select the protocol you want to support through the load balancer, HTTP or HTTPS.
- In the Instance group list, click your instance group.
- In the Port Numbers field, enter
8080. - Click Health check to configure health checks:
- Enter a name for the health check configuration.
- Assign the port
8080. - To accept the remaining default values, click Save.
- For now, accept the defaults for the rest of the configuration. You can make changes later as needed, such as additional ports.
- You don't need to set anything in the Host and path rules; you
can forward everything to your backend API by using the default
Any unmatched filters. This means that all traffic into the
load balancer is directed to the API on the port
8080(the default port) as defined in the preceding steps. - Click Frontend configuration.
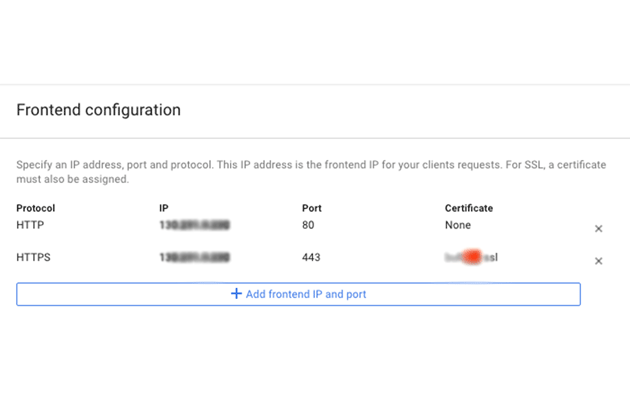
- In the Protocol field, select the protocol you want to support through the load balancer, HTTP or HTTPS.
- In the IP list, click the external IP address you created earlier.
- For the HTTPS protocol, you need to use SSL. In the Certificate list, click the certificate you want.
- Optionally, if you want to support another protocol, click Add frontend IP and port, specify the protocol, the same external IP address, and a different port.
- To create the fully configured load balancer, click Create. If the Create button isn't enabled, check the components you just configured: a checkmark should appear beside each of the configuration components. A missing checkmark means you haven't completed the configuration.
- After your DNS changes propagate, requests are sent to your API by using the load balancer.
GKE
To serve an API over a domain for Google Kubernetes Engine (GKE), you need to expose ESP as a service, by using the returned external IP address for your domain's DNS settings. Note that GKE automatically does load balancing for you.
To expose your API as a service:
- If you don't have one already,
Configure a Kubernetes service
for your API backends. Create a service configuration file,
service.yaml, with content similar to the following:apiVersion: v1 kind: Service metadata: name: echo spec: ports: - port: 80 targetPort: 8081 protocol: TCP selector: app: echo-app type: LoadBalancer - Change the
selectorlabel to match your backend labels (app: echo-appin this example) - Make sure the
targetPortmatches the port used by ESP configured in your API backends. ESP uses port8081by default. - Deploy the Kubernetes service:
kubectl apply -f service.yaml - View the external IP address assigned to your exposed service:
kubectl get servicesEXTERNAL-IPaddress similar to the following:
NAME CLUSTER-IP EXTERNAL-IP PORT(S) AGE hello-node 10.X.XXX.202 10X.XXX.XX.123 8080/TCP 1m - Change the generated external IP from ephemeral to static.
- Select your external IP address from the list.
- In the Type list, click Static.
- Visit your domain provider account and edit your domain settings. You
must create an A record that contains your API name, for example,
myapi.example.com, with the external IP address in its data field.