自動掃描 Java 套件
瞭解如何啟用自動掃描功能、將容器映像檔推送到 Artifact Registry,以及查看映像檔中發現的安全漏洞清單。
每當映像檔推送至 Artifact Registry 時,Artifact Analysis 就會掃描安全漏洞。平台管理員和應用程式開發人員可以使用這項自動掃描功能,協助找出軟體交付管道中的風險。
本快速入門導覽課程會使用簡單的公開套件,示範其中一種套件掃描類型。根據預設,啟用掃描 API 後,Artifact Analysis 會掃描多種套件類型的安全漏洞。支援的套件類型包括:OS、Go、Java (Maven)、Python 和 Node.js (npm)。
事前準備
- Sign in to your Google Cloud account. If you're new to Google Cloud, create an account to evaluate how our products perform in real-world scenarios. New customers also get $300 in free credits to run, test, and deploy workloads.
-
Install the Google Cloud CLI.
-
如果您使用外部識別資訊提供者 (IdP),請先 使用聯合身分登入 gcloud CLI。
-
如要初始化 gcloud CLI,請執行下列指令:
gcloud init -
Create or select a Google Cloud project.
Roles required to select or create a project
- Select a project: Selecting a project doesn't require a specific IAM role—you can select any project that you've been granted a role on.
-
Create a project: To create a project, you need the Project Creator
(
roles/resourcemanager.projectCreator), which contains theresourcemanager.projects.createpermission. Learn how to grant roles.
-
Create a Google Cloud project:
gcloud projects create PROJECT_ID
Replace
PROJECT_IDwith a name for the Google Cloud project you are creating. -
Select the Google Cloud project that you created:
gcloud config set project PROJECT_ID
Replace
PROJECT_IDwith your Google Cloud project name.
-
Verify that billing is enabled for your Google Cloud project.
-
Enable the Artifact Registry and Container Scanning APIs:
Roles required to enable APIs
To enable APIs, you need the Service Usage Admin IAM role (
roles/serviceusage.serviceUsageAdmin), which contains theserviceusage.services.enablepermission. Learn how to grant roles.gcloud services enable containerscanning.googleapis.com
artifactregistry.googleapis.com -
Install the Google Cloud CLI.
-
如果您使用外部識別資訊提供者 (IdP),請先 使用聯合身分登入 gcloud CLI。
-
如要初始化 gcloud CLI,請執行下列指令:
gcloud init -
Create or select a Google Cloud project.
Roles required to select or create a project
- Select a project: Selecting a project doesn't require a specific IAM role—you can select any project that you've been granted a role on.
-
Create a project: To create a project, you need the Project Creator
(
roles/resourcemanager.projectCreator), which contains theresourcemanager.projects.createpermission. Learn how to grant roles.
-
Create a Google Cloud project:
gcloud projects create PROJECT_ID
Replace
PROJECT_IDwith a name for the Google Cloud project you are creating. -
Select the Google Cloud project that you created:
gcloud config set project PROJECT_ID
Replace
PROJECT_IDwith your Google Cloud project name.
-
Verify that billing is enabled for your Google Cloud project.
-
Enable the Artifact Registry and Container Scanning APIs:
Roles required to enable APIs
To enable APIs, you need the Service Usage Admin IAM role (
roles/serviceusage.serviceUsageAdmin), which contains theserviceusage.services.enablepermission. Learn how to grant roles.gcloud services enable containerscanning.googleapis.com
artifactregistry.googleapis.com 在 Google Cloud 控制台中開啟「Repositories」(存放區) 頁面。
點選 [Create Repository] (建立存放區)。
在「Create Repository」(建立存放區) 頁面中,輸入下列設定:
- Name (名稱):
quickstart-docker-repo - 格式:Docker
- 模式:標準
- 位置類型:區域
- Region (區域):
us-central1
- Name (名稱):
點選「建立」。
切換至要儲存容器映像檔的目錄。
將圖片複製到本機目錄。舉例來說,您可以使用 Docker 從 Docker Hub 提取最新版 Jenkins 映像檔。
docker pull jenkins:2.60.3-alpine- PROJECT 是您的 Google Cloud
專案 ID。
如果您的專案 ID 包含冒號 (
:),請參閱網域範圍專案。 us-central1是 Artifact Registry 存放區的區域。docker.pkg.dev是 Docker 存放區的主機名稱。quickstart-image是您要用於存放區的映像檔名稱。 可以使用和本機映像檔不同的名稱。tag1是您要新增至 Docker 映像檔的標記。如果您沒有指定標記,Docker 會套用預設標記latest。取得存放區清單。
在存放區清單中,按一下存放區。
在圖片清單中,按一下圖片名稱。
每個映像檔摘要的安全漏洞總數會顯示在「Vulnerabilities」(安全漏洞) 資料欄中。

如要查看映像檔的安全漏洞清單,請按一下「Vulnerabilities」(安全漏洞) 資料欄中的連結。
「掃描結果」部分會顯示掃描的套件類型摘要、安全漏洞總數、可修正的安全漏洞、無法修正的安全漏洞,以及有效嚴重程度。

安全漏洞表格會列出每個安全漏洞的常見安全漏洞與資料外洩風險 (CVE) 名稱、有效嚴重程度、常見安全漏洞評分系統 (CVSS) 分數、修正 (如有)、內含安全漏洞的套件名稱,以及套件類型。
Google Cloud 控制台會在表格中顯示每個頁面最多 1200 個安全漏洞。您可以篩選及排序這些檔案,依副檔名檢查特定檔案、目錄、圖層或檔案類型。
如要查看特定 CVE 的詳細資料,請按一下 CVE 名稱。
如要查看安全漏洞發生詳細資料,例如版本號碼和受影響的位置,請在安全漏洞名稱的資料列中,按一下「查看」或「查看已修正」。如果安全漏洞沒有修正,連結文字會顯示「查看」;如果安全漏洞已修正,連結文字則會顯示「查看已修正」。
在 Artifact Registry 中開啟存放區清單。
在「Repositories」(存放區) 頁面中,按一下存放區。
在「Repository Details」(存放區詳細資料) 頁面中,按一下圖片。
在映像檔版本清單中,按一下映像檔摘要。
在映像檔摘要詳細資料頁面中,按一下「Vulnerabilities」(安全漏洞) 分頁標籤。
如果提供以圖層為準的中繼資料,構件分析會在「圖層」列中顯示可選取的圖層清單:

如要查看圖層清單,請按一下圖層下拉式選單。
系統會開啟下拉式清單,顯示圖層的編號清單。第 0 層代表最底層,後續各層都會建立在前一層之上。這裡只會顯示偵測到安全漏洞的層。
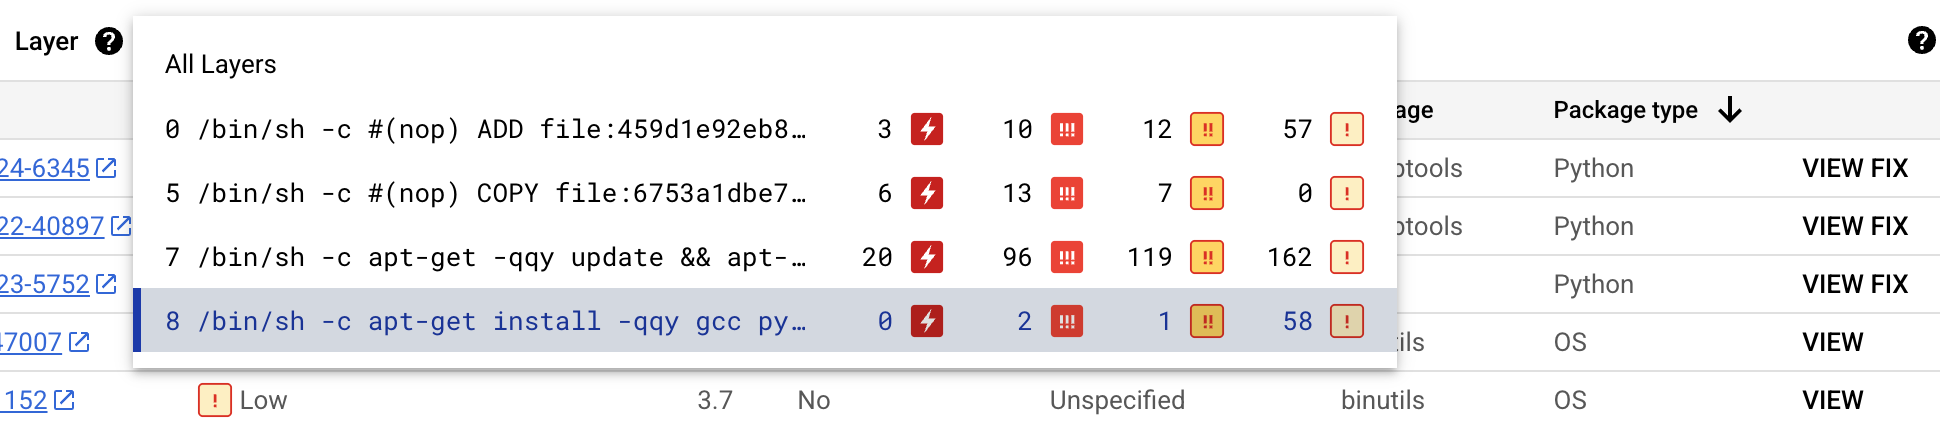
對於每個層級,Artifact Analysis 會顯示用於建構該層級的 Docker 指令,以及該層級中發現的弱點數量。
如要進一步瞭解特定層級的安全漏洞,請從層級清單中選取層級。
安全漏洞表格會更新,只顯示所選圖層中發現的安全漏洞。您可以套用更多篩選器,或調查特定安全漏洞。
按一下安全漏洞旁的「查看」或「查看修正方式」,即可查看更詳細的安全漏洞資訊。
「安全漏洞詳細資料」側邊面板會顯示套件有安全漏洞的檔案位置。
在「檔案位置」表格中,將滑鼠游標懸停在問號上,即可開啟其他圖層中繼資料。
對話方塊會顯示層索引、層建構指令、層摘要和基礎映像檔,方便您修復安全漏洞。
在 Artifact Registry 中建立 Docker 存放區
您必須建立 Docker 存放區,以便儲存本快速入門導覽課程所用的範例映像檔。
畫面會顯示「Repositories」頁面。quickstart-docker-repo 存放區會新增至存放區清單。
設定驗證機制
如要使用 Artifact Registry 推送或提取映像檔,請先設定 Docker,透過 Google Cloud CLI 驗證傳送至 Artifact Registry 的要求。
在 Cloud Shell 或本機殼層中,為 us-central1 區域的 Docker 存放區設定驗證機制:
gcloud auth configure-docker us-central1-docker.pkg.dev
取得套件
使用存放區名稱為套件加上標記
如要將套件推送至 Artifact Registry,您需要設定 docker push 指令,將映像檔推送至特定位置。
執行下列指令,將映像檔標記為 quickstart-image:tag1:
docker tag jenkins:2.60.3-alpine \
us-central1-docker.pkg.dev/PROJECT/quickstart-docker-repo/quickstart-image:tag1
地點
將映像檔推送至 Artifact Registry
將新的映像檔上傳至 Artifact Registry 時,容器分析會自動掃描這些映像檔。
如要將映像檔推送至 Artifact Registry 中的 Docker 存放區,請執行下列指令:
docker push us-central1-docker.pkg.dev/PROJECT/quickstart-docker-repo/quickstart-image:tag1
將 PROJECT 替換為 Google Cloud專案 ID。如果您的專案 ID 包含冒號 (:),請參閱網域範圍專案。
查看安全漏洞掃描結果
如要查看映像檔中的安全漏洞:
查看特定層中的安全漏洞
Artifact Analysis 提供特定層級的中繼資料,協助您找出含有安全漏洞的套件,以及導入該層級的 Docker 建構指令。
如要在 Google Cloud 控制台中查看以層為準的安全漏洞中繼資料,請按照下列步驟操作:
清除所用資源
如要避免系統向您的 Google Cloud 帳戶收取本頁面所用資源的費用,請刪除含有這些資源的 Google Cloud 專案。
如果您是為了本指南建立新專案,現在可以刪除該專案。Delete a Google Cloud project:
gcloud projects delete PROJECT_ID